Welcome to part two of a blog series on Microsoft’s Graph API for Office 365 in FileMaker.
In part one, I share the demise of basic authentication and why relying on strictly passwords is no longer a viable or safe option. Here in part two, I provide insights on using the Microsoft Graph API functionality in your FileMaker solution.
Using the API functionality
After following the steps I provided in part one, we can use the API functionality to which we have given our Azure AD app permissions. We can retrieve a list of email accounts, mail folders per email accounts, emails for each mail folder, attachments for the emails; we can reply in HTML to emails and attach multiple attachments. For OneDrive, we can get a list of all files and folders, download the actual file, upload a new file or create a new folder and we can ask the API to convert documents stored on OneDrive to PDF.
Routes / endpoints
The base URL for each call to the API is always the same, and each API function has its own endpoint (also sometimes called ‘route’).
The API documentation specifies which endpoint you should use; it also tells you what HTTP verb to use. For instance, to get a list of mail folders for a user, we should use a GET call to one of these two endpoints.
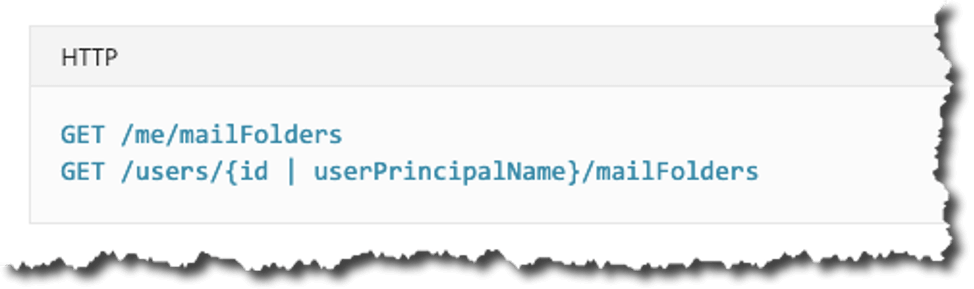
The “/me/” route should be used in the scenarios where we used the interactive user login. We can use the “/users/” route when we do server-to-server integrations and potentially need to repeat this call for a set of different users.
In FileMaker, we store the ‘/users’ route in our preferences table:

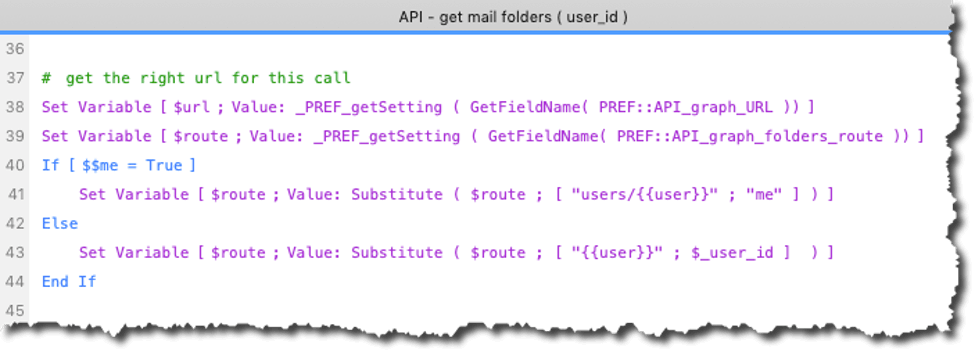
The only difference between the two routes is the same between all endpoints. It is a simple matter of substituting the string “/user/{{user}}/” with “/me/” if we are using the interactive mode. You will see that in many of the scripts. The script that asks the API for the list of mail folders for a particular user, for instance, detects what mode we are in on line 40 and uses the Substitute() function to construct the proper route string.
Checking for Token Validity
To prove that we are permitted to use the API’s functionality, we have to include the token with every API call. Since all the API calls are cURL calls (using the “insert from URL” script step), including the token means adding a header to the cURL options:
Authorization: Bearer the_tokenIf the API responds with code is ‘401 – Unauthorized’, then either the token has expired, or the Azure AD app does not have the right level of permissions set.
One strategy is to just make the call and check the response. When you get error 401, get a new token and try again.
We take a different approach and explicitly check whether the token is still valid. As mentioned earlier, we keep track of the expiry time. Tt the beginning of the scripts that make API calls, we run a subscript to check the current timestamp against the expiry timestamp.
That same script to get a list of the user’s mail folders does that on line 33:
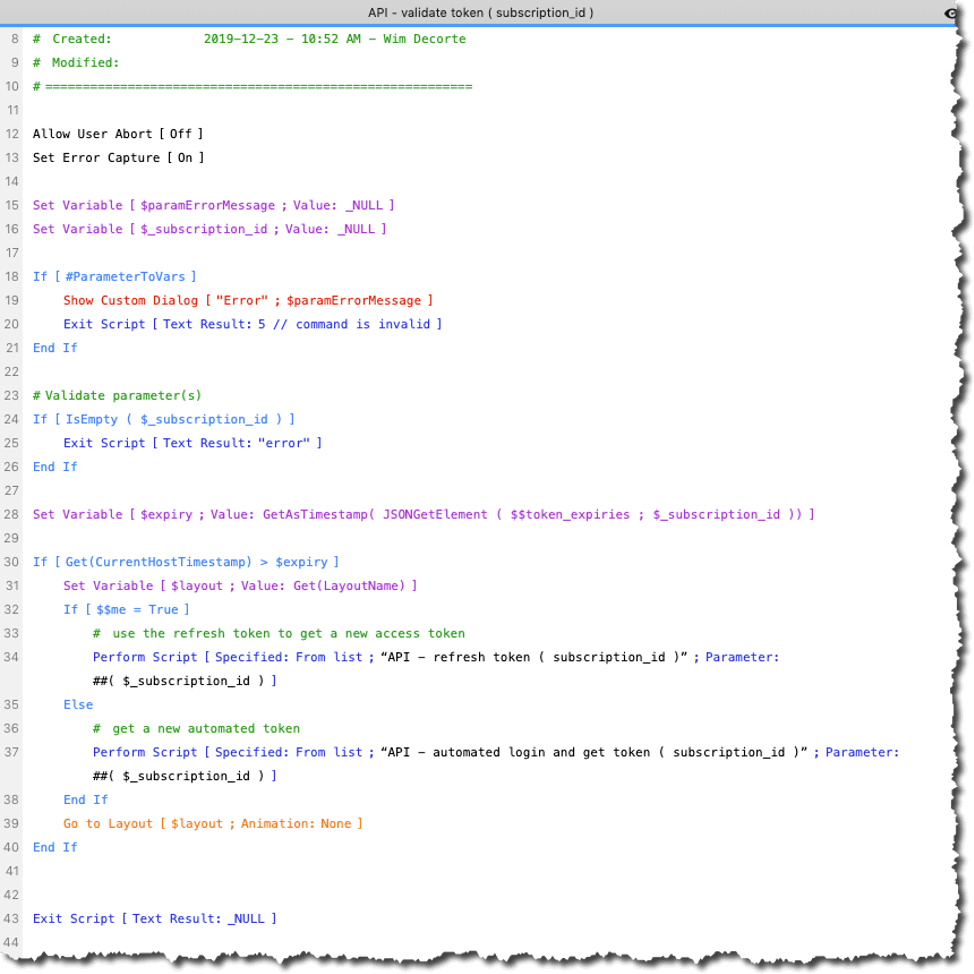
That subscript retrieves the expiry timestamp from the global variable $$token_expiries (each Office 365 subscription that we have a token for is listed in the JSON stored by that variable) and then compares it to what time it is now.
If we find that the expiry time has passed, then it does one of two things to get a new access token:
- If we are running in interactive mode, we use the user’s refresh token to get a new access token (that’s what the refresh token is for: we do not need to ask the user to log in again), see line 34.
- If we are in service mode, we have to log in again with the Azure AD app’s client id and client secret. See line 37.
Anatomy of an API Call
Now that we have all the moving pieces in play, let’s have a look at one complete API interaction and how we use the FileMaker tool-set to execute it.
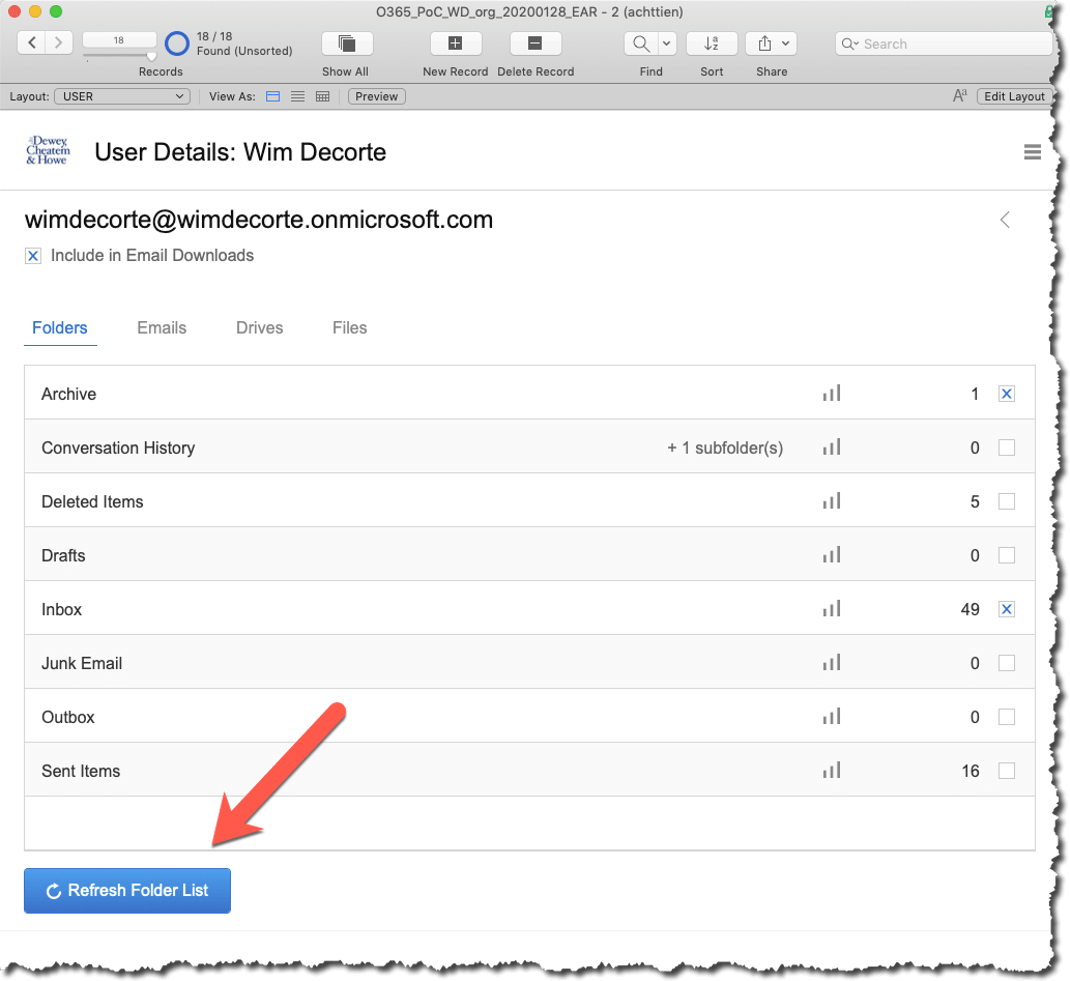
In the demo file, we will initiate the routine to get an update on the mail folders that the user has and the number of emails in each folder:
These are the scripts involved in this process:
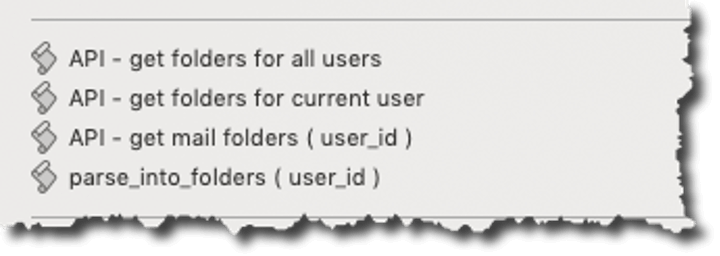
You will find that all the API functionality in the demo file follows the same logic:
- A script that does the work for all users (only useful when you are in service mode)
- A script that does the work for a single user
- The utility script that is called by both
- A script that parses the response sent back from the API
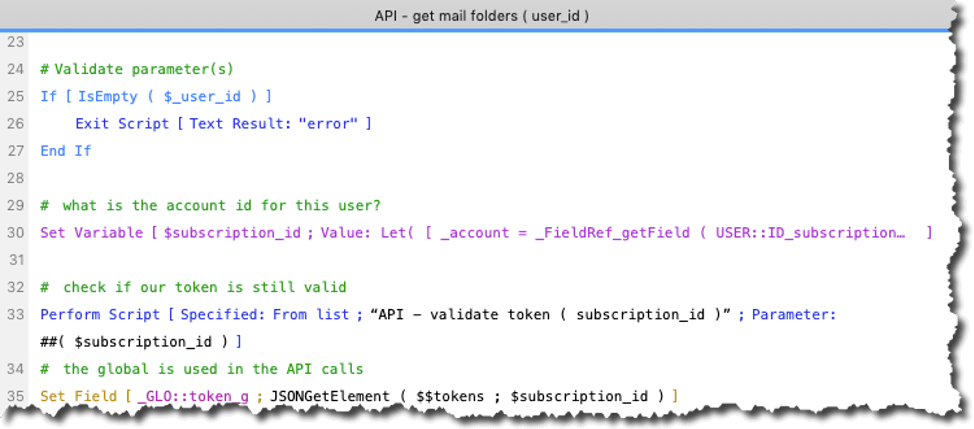
The utility script is where the API call is put together. The script starts by receiving its parameters and validating those to make sure we have what we need. It then determines what the ID is for the Office 365 subscription that the user belongs to (line 30). Once we have that, we check whether we still have a valid token for that subscription (line 33).
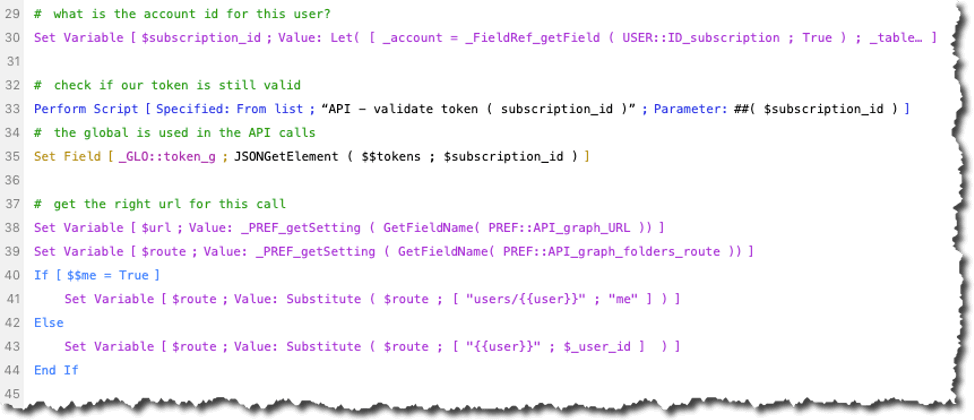
The active token is set to a global field on line 35 so that it can be referenced later. In lines 38 and 39, we retrieve the base URL and the relevant endpoint from the preferences table. In lines 40 through 44, we make sure it appropriately formatted for either the interactive (me) mode or for service-level access.
In the next section of the script, we set the proper HTTP verb for this particular API call (line 48 – it’s a GET call as prescribed by the documentation). Lines 51 and 52 will show and update a card window with our progress so that the user will see some feedback.
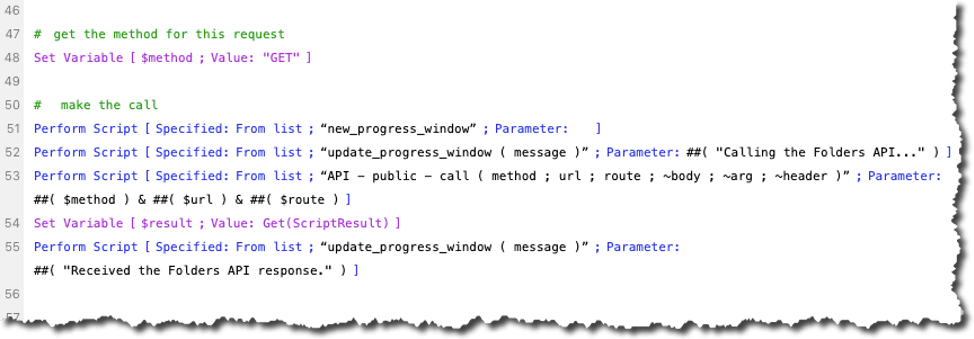
Line 53 is a call to a subscript that prepares the cURL call and the logging that we do around it. Since all RESTful APIs work the same way, we use a generic script that we can easily copy between solutions that use different APIs.
All REST API calls work exactly the same way: you construct a URL from some base URL plus the requested endpoint, you specify an HTTP verb (GET, POST,…) and then send a JSON body or add query parameters to the URL itself. The response is always a response code, some response headers, and a JSON response body.
Because all REST API calls follow the same pattern, we use a generic set of scripts:
API – public – call(method ; url ; route ; ~body ; ~arg ; ~header)
API – private – call(method ; url ; route ; ~body ; ~arg ; ~header)
And pass in the required pieces needed to make the cURL call.
This allows us to channel all the calls through those scripts and log them so that we will have a wealth of troubleshooting information. The private script is only ever called from the public script; the public script sets up the required logging and calls the private script that is responsible for making the actual call.
The parameters break down as follows:
| Parameter | Description | Get Mall Folders Example |
|---|---|---|
| method | the HTTP verb: GET, POST, PUT,… | GET, see line 48 |
| url | The base URL for the API | https://graph.microsoft.com/v1.0/ see line 38 were we read it from the preferences |
| route | The endpoint to the functionality that we are after | users/{{user}}/mailFolders see lines 39-44 where we read it from the preferences and then manipulate it for our service/user scenario |
| ~body | The JSON body that we are sending. The tilde (~) signals that it is an optional parameter, some API calls do not require a JSON body and in that case we pass in a blank. | This call has no body |
| ~arg | Some API calls (mostly GET calls that do not have a JSON body) expect a set of URL query parameters | This call has no query parameters |
| ~header | Most of the time this one is empty, but some API calls require a specific header that is not covered by the generic scripts, we have the option to specify that here. | This call has no special headers |
The bulk of the public script is this, where it logs everything that is fed into the script:
The private script is all about constructing the proper “Insert from URL” syntax to call the API. This ensure all cURL options are correctly specified, then making the actual call, logging how long it took, capturing both the response, the response headers, and setting the full trace of the communication between the API and FileMaker. All of this is logged in the API Call Log.
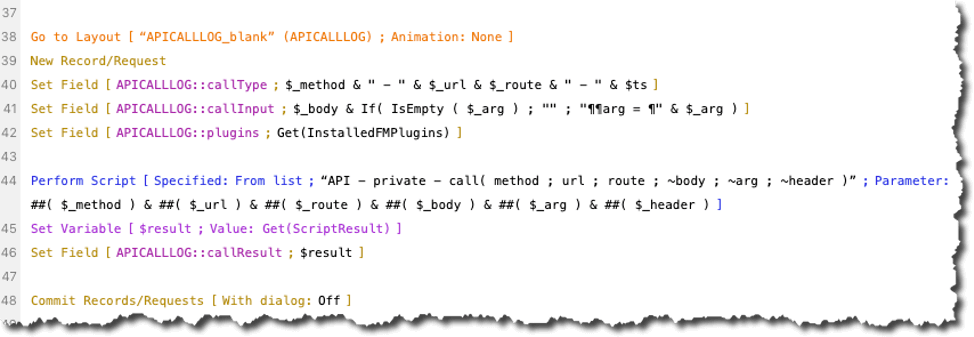
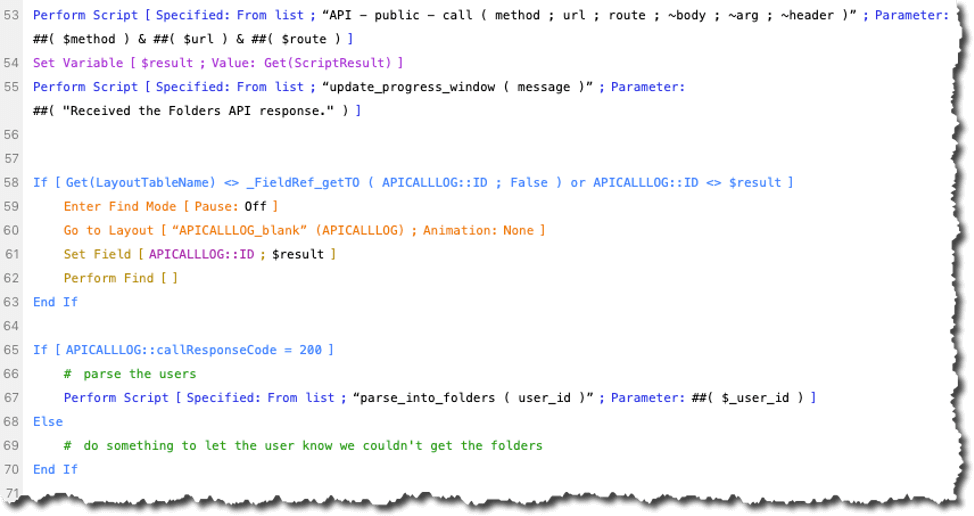
Back in our script that asks for an updated list of mail folders, we then check if the log file shows that our call to the API was successful. If so, we will parse out the JSON that we received in the script “parse_into_folder” on line 67.
The list of mail folders comes back from the API as an array of JSON objects with their internal Microsoft ID, name and how many emails are in the folder:
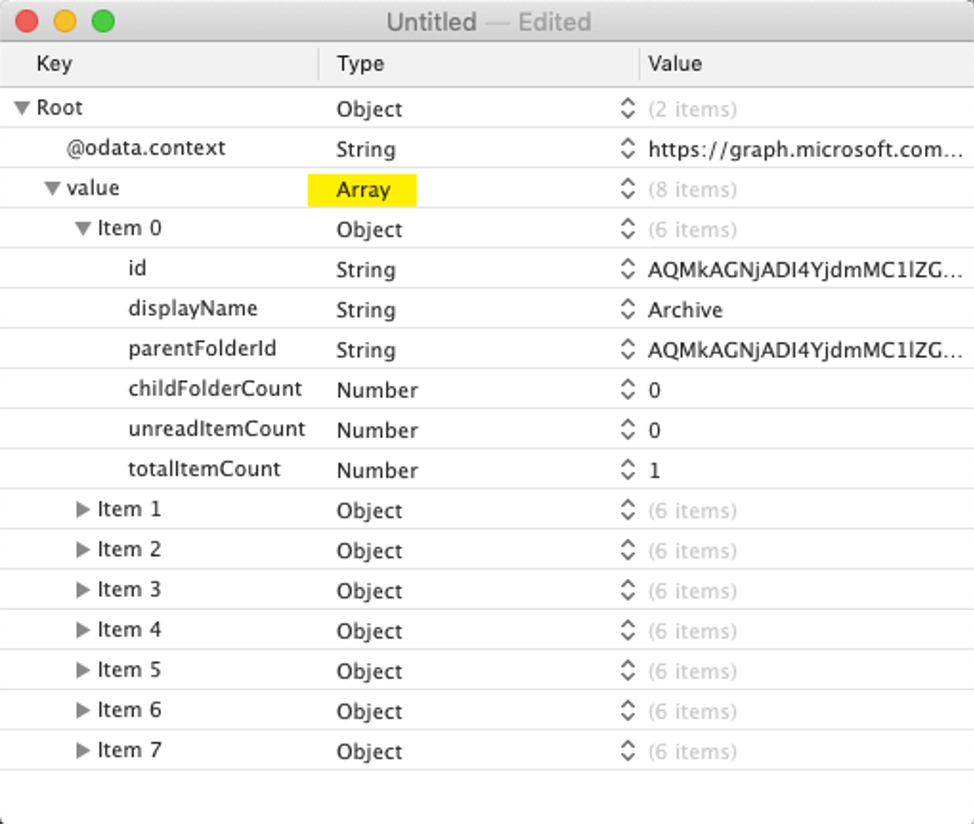
At this point, it becomes a straightforward loop-and-parse exercise with the FileMaker JSONGetElement() functions.
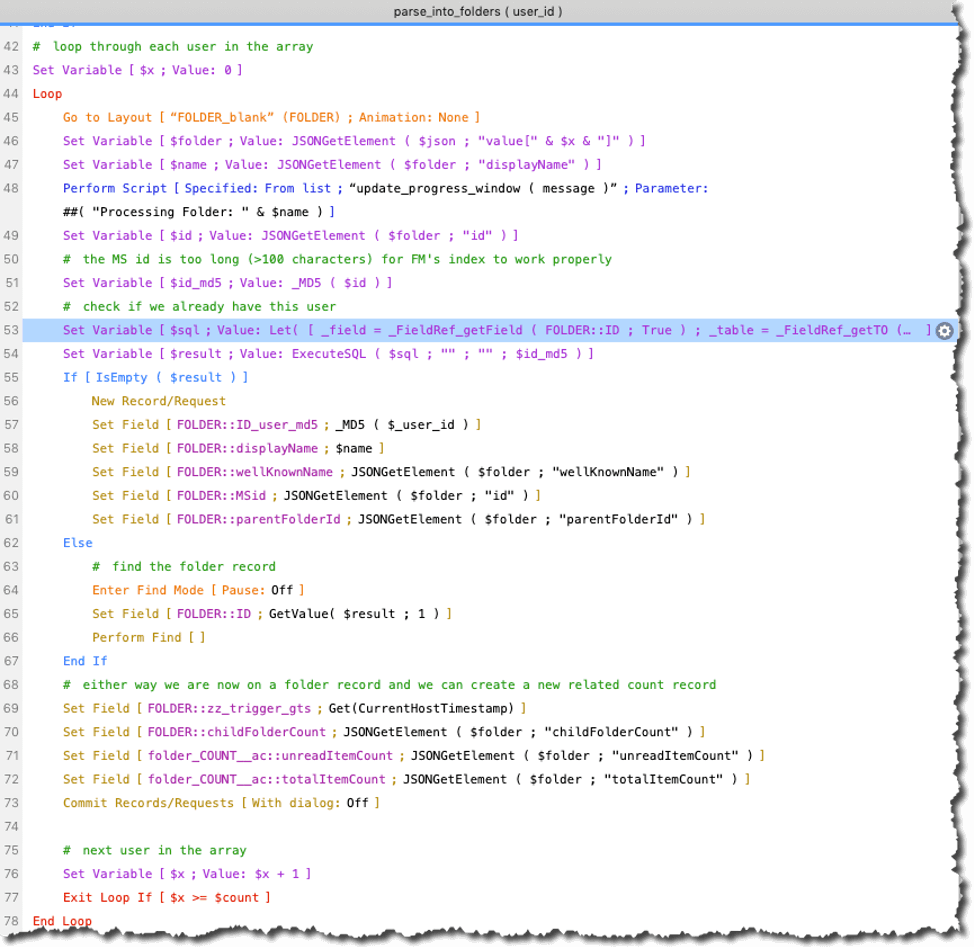
A couple of things to call out: on line 53, we use ExecuteSQL() to check whether we already have a record for this mail folder. If we do not ,then we create a record. If we do ,then we’ll find that record. On lines 71 and 72, we use a relationship set to allow auto-creation of records to set the current email count. That way, we keep track of those counts in their own table, and we can see how the number of emails evolves over time.
This concludes the walkthrough of how FileMaker makes a particular API call and works with the response.
The API Call Log
Especially during the development of an API integration like this, you will want to know what is being sent to the API endpoints and the response. All this is captured in the API Call Log. The log also gives us a count of the actual number of API calls made and how long they take to execute. Some APIs, for instance, have metering and throttling in place when you make more than a certain number of calls in any given time period.
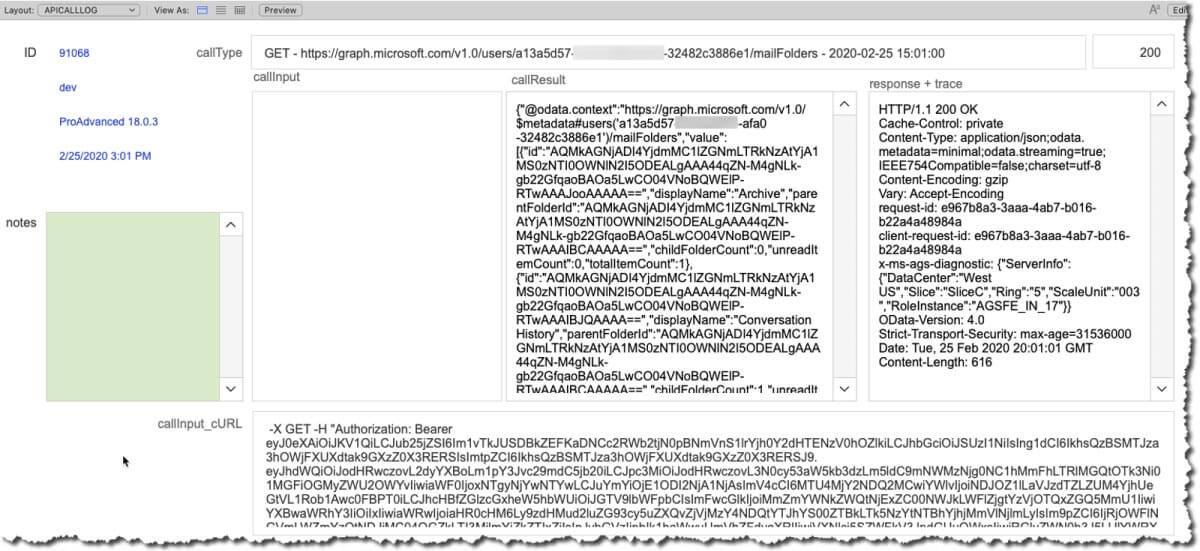
Below is the log entry for the call to get an updated list of mail folders for a particular user.
On the top of the screen, we’ll see the full URL and the HTTP verb used. There was no “callInput,” which would have been the JSON body we send to the API. At the bottom, we see the full cURL options that were used. “callResult” is the API’s response. On the right, we see the response headers and the full trace of the communication.
Logging these details is crucial, and we add it to all API integrations.
Gotchas & Interesting finds
Throttling
We mentioned this earlier; many APIs have some metering or throttling where you cannot exceed a maximum number of calls in any given timeframe.
The Microsoft Graph API has it too ,but in most deployments, you are unlikely to come close to the 10,000 API calls per 10 minutes that you are allowed. If you think you might be close to that limit, trap for error 429 as the API response code and check those headers to see how long you have to wait to resume making calls.
On that note, the list of possible errors is also a good read to see which ones you should or could anticipate in your code.
Long IDs
The internal Microsoft ID for some of its entities is actually very long. Going back to Figure 40: API details for the mail folders, that ID is 120 characters long:
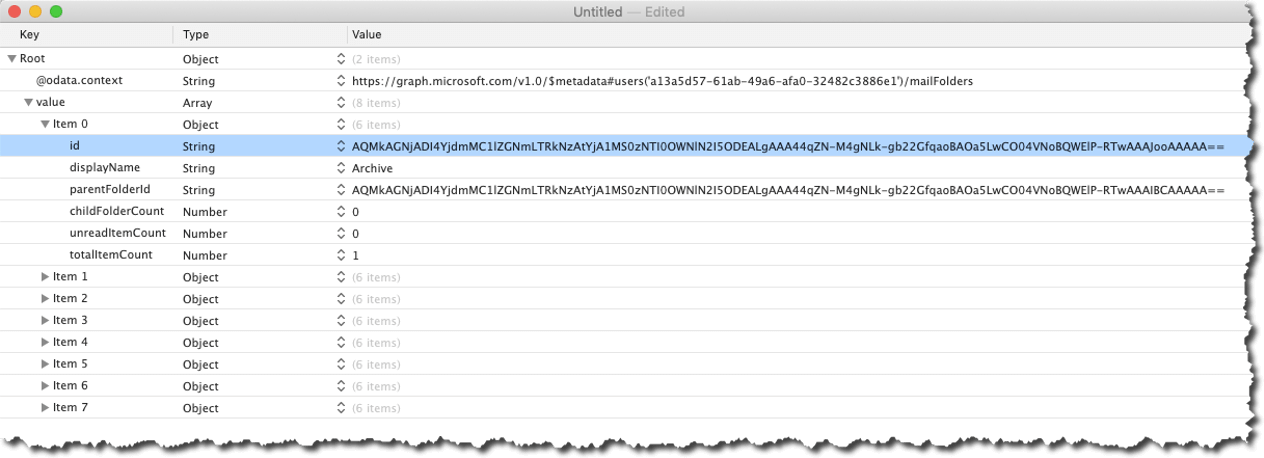
That means that we cannot rely on these Microsoft IDs for any operation within FileMaker that requires the index since FileMaker only indexes the first 100 characters. For instance, we cannot safely use them in relationships or for non-exact (“==”) searches.
Throughout the demo file, you will see that we use an MD5 hash of those long IDs (see the custom function named “_MD5()”) for some relationships and ExecuteSQL() match fields searches.
Immutable IDs
A very interesting (and highly annoying) artifact of those internal IDs for some objects is that they can sometimes change. To counter that, you can ask the API to only return the immutable never-changing version of the id.
That request is in the form of a header that you add to the API calls:
Prefer: IdType=”ImmutableId”Needless to say, we have added that header.
Delta links
One of the challenges when collecting email is: how do you let it know what you already have so that the provider can just send you what is new? As you can tell from the internal IDs: they are not sequential, so you cannot tell it, ‘give me all emails with ID > 12345’. You could keep track of the timestamp of the last request and ask for all emails since the last call. The API has a query syntax that you could use for this.
But fortunately, the Graph API has a simpler built-in solution for this: delta links. When you collect items, the API sends you those in multiple pages.
Take the example of a mailbox with a high number of emails. When we retrieve those emails, the first response will contain a JSON key named “@odata.nextLink” or just “nextLink”:
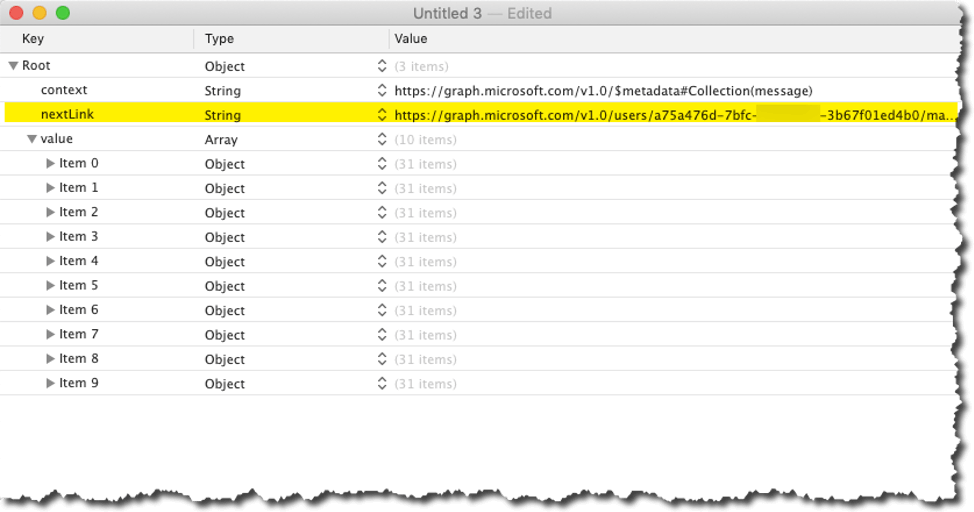
When we parse the response, we need to detect if that entry is there. If we find it, we need to make another call and send that whole URL from the nextLink JSON element to the API. The API will respond with the next page, and we will once again check if there is a nextLink and repeat the process. On the last page, there will be an “@odata.deltaLink” or “deltaLink.”

We need to store that value because the next time we want to retrieve emails for that folder, we can just send this URL to the API. The API will know exactly where we left off and will send all new emails.
Dots in JSON keys
When the JSON response does contain the @odata.nextLink or @odata.deltaLink key, like in this example, we do have a bit of a problem.
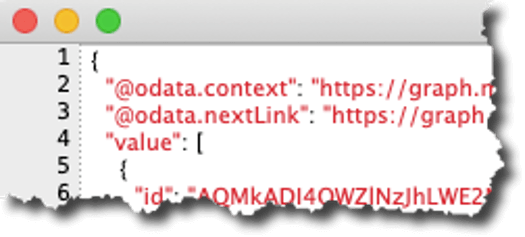
The FileMaker JSONGetElement() function does not handle dots in key names. Our workaround is to substitute them out and turn @odata.nextLink into nextLink.

Beyond the expected functionality
The Office 365 / Graph API handles more than just collecting email and email folders, of course. We also use it to send HTML emails and multiple attachments.
In FileMaker, we can let the user add any styling to the text:
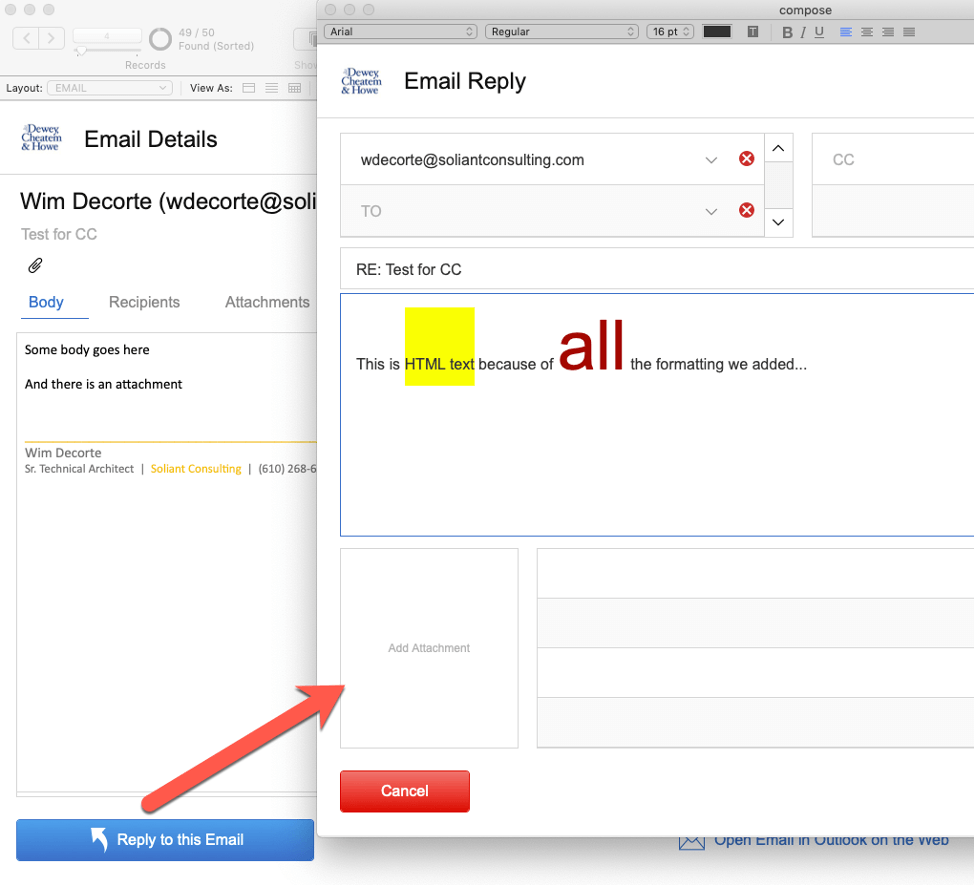
All we need to do for the API is create the body of the message as HTML. This is as simple as using the GetAsCSS() function on the field.

While we certainly can send HTML emails in FileMaker 18 with the updated cURL options, it is a fairly convoluted process. And using the Office 365 API would work in FileMaker 16 through 18.
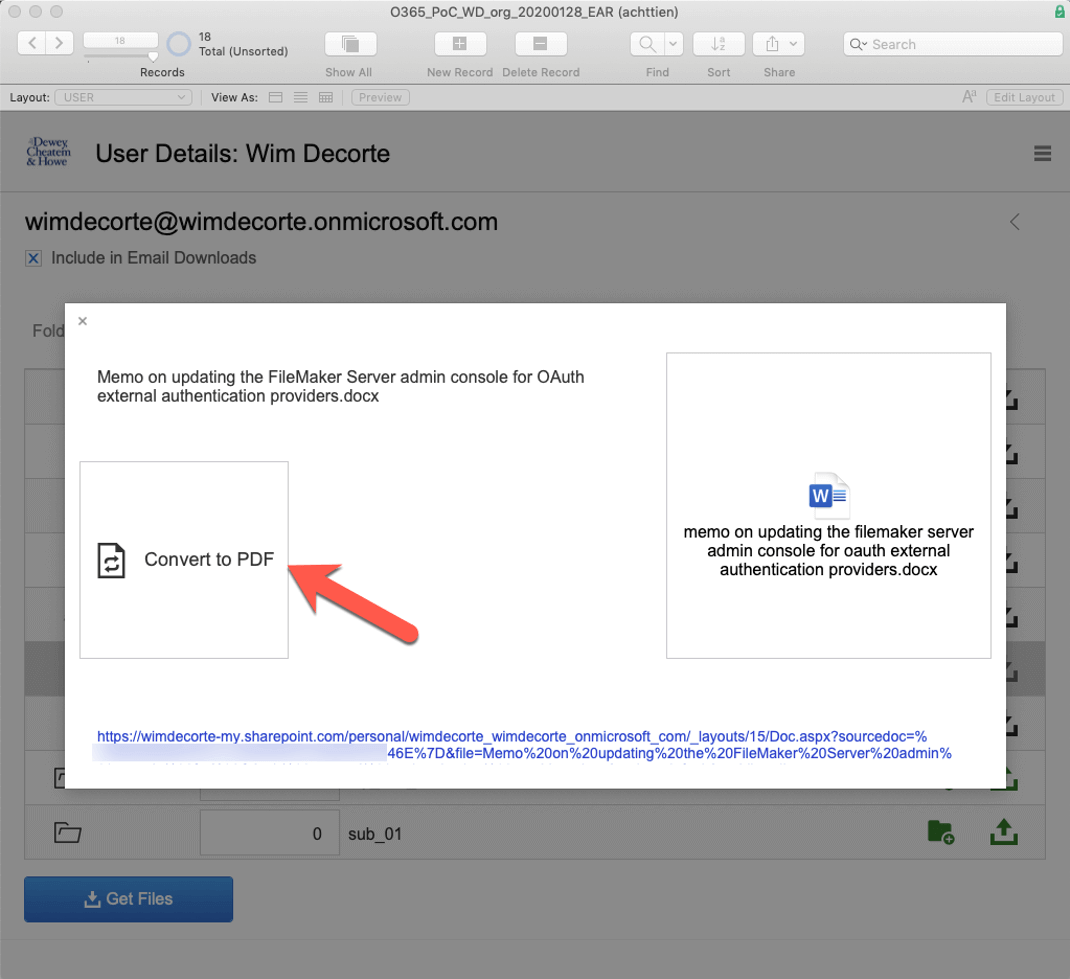
In addition to email, we can also interact with the user’s calendar and work with their OneDrive. We can create folders, upload and download files or just maintain a list of files without actually having to store the file itself.
Another excellent feature is how it allows us to point to any Word or Excel file on our OneDrive and ask it to generate a PDF of it.
Conclusion
We hoped you enjoyed this journey through the Office 365 API and that you now have a sense of how powerful these APIs are and how easy it is on the FileMaker side to work with them. Most of the work includes going through the API documentation, following along with each type of call on how to give the API the proper instructions, and parsing the response it sends back.
Feel free to pick apart the demo file and ask us questions. Working with APIs is a big part of Digital Transformation, and API usage will increase significantly in the near future. If you have any questions or need any help with digital transformation for your FileMaker solution, please contact our team.
Dear Wim,
This is a super interesting article. Many thanks for that!
I have designed a syncronization between FM and Outlook, so that all emails and their attachments related to one project are filed together on our server. But with this tool, I think it could be done easier. I’ll start to experiment with it.
Beste groeten uit Brussel.
Hi Bernard,
Like you, over the years I have devised different ways to sync email data with FM – with plugins and with Outlook add-ins. Using these APIs is a lot easier for sure.
Groeten uit Toronto.
I’m using your method for posting to an Outlook calendar and it works great, but when I try to post an email using Microsoft graph’s sendEmail API I get an error. Below is my Insert from URL line. Any thoughts?
https://graph.microsoft.com/v1.0/me/sendMail/?uploadType=resumable-H “Authorization:Bearer AccessToken” -H “Content-Type: application/json; charset=UTF-8” -H “X-Upload-Content-Type: message/rfc822” -D “$responseHeaders” -X POST -H “Content-Length: 0”
Error AccessDenied Access is denied. Check credentials and try again.
I should say that “AccessToken” is actually the access token generated by the connect script.
‘Access Denied’ usually means that the ‘app’ on the MS365 side has not been granted the proper scopes to be able to do the task. The MS Graph API documentation mentions which privileges to set so check that first.
Great tip, since I’m doing both calendar and email, I hadn’t changed my scope for the email scripts and was trying to use the calendar access token for email. I think that will take care of my issue. Thank you very much.
You solved the access token issue thank you, but now I’m getting the following error when I Insert from URL. I’m not sure what they are referring to by the parameter ‘Message’. Again AccessToken is the actual code. Thanks!
Insert from URL [Target:$result;https://graph.microsoft.com/v1.0/me/sendMail/?uploadType=resumable -H “Authorization:Bearer AccessToken -H “Content-Type: application/json; charset=UTF-8” -H “X-Upload-Content-Type: message/rfc822” -D “$responseHeaders” -X POST -H “Content-Length: 0”]
{“error”:{“code”:”ErrorInvalidParameter”,”message”:”The value of the parameter ‘Message’ is empty.”}}
At first glance it seems you are not sending a payload at all in your request. The Graph API SendMail route expects a JSON body with a well-formed “message” parameter in it.
https://docs.microsoft.com/en-us/graph/api/user-sendmail?view=graph-rest-1.0&tabs=http
You also don’t need to set the X-upload-content-type header as per the spec on the route
Hi Wim,
I feel like I’m so close but I’m stuck. I think I have all the pieces, I just don’t know how to put them together.
I have my Insert from URL:
Insert from URL [Target:$result;https://graph.microsoft.com/v1.0/me/sendMail/?uploadType=resumable -H “Authorization:Bearer AccessToken -H “Content-Type: application/json; charset=UTF-8” -H “X-Upload-Content-Type: message/rfc822” -D “$responseHeaders” -X POST -H “Content-Length: 0”]
and I have my message parameter:
{
“message”: {
“subject”: “Meet for lunch?”,
“body”: {
“contentType”: “Text”,
“content”: “The new cafeteria is open.”
},
“toRecipients”: [
{
“emailAddress”: {
“address”: “markbperkins@gmail.com”
}
}
]
}
}
But how do I incorporate the message into the Insert from URL command? I feel like I need to wrap the message in a JSON function and place it in the Insert from URL step, but I don’t know how to do that. Thanks for your thoughts.
Gus
Hi Gus, this is getting too specific to fit well in blog post comments. Contact us directly or post on community.claris.com.
Dear Wim,
We are using your methods for months now with great luck. But since two months ago we are having a problem with messages which are actually being sent, but stay stuck in the draft box instead of moving to sent items.
This is odd because it’s intermittent and we don’t know whats causing it.
Could you help us analyse this specific problem?
Thank you,
Fabian
Hi Fabian,
Contact us by email; we’ll have to have a look at the api call logs to see if the API returns any meaningful info / errors.
Best regards,
Wim