Welcome to part one of a blog series on Microsoft’s Graph API for Office 365 in FileMaker.
In part one, I share the demise of basic authentication and why relying on strictly passwords is no longer a viable or safe option. In part two, I provide insights on using the Microsoft Graph API functionality in your FileMaker solution.
Your Username and Password Are No Good Anymore: the Demise of Basic Authentication
Traditionally when you needed to log into something, you just typed in your username and password, and that was it. That’s how we have always opened a FileMaker file, for instance.
Basic Authentication is, well…basic: you provide a username and a password, and those get validated. If they pass, you are granted access to whatever it was you were trying to authenticate against.
It is a simple one-step mechanism to prove who you are. It relies entirely on identifying you only by your account name and that password. The account name more often than is not very secret, so that leaves just the password as the one thing that both identifies you and protects that identity.
This is an intriguing read on why relying strictly on passwords and trying to enforce complexity rules for passwords is not a good approach.
This primitive form of authentication is not considered good enough anymore, and basic authentication is going away. Gradually, but we will see less and less of it in the future. “Modern Auth” is taking its place, and that typically means OAuth 2.0 supplemented with multiple ‘factors’ to prove that you are who you say you are. We see more interest in using OAuth to log into FileMaker solutions, but the demise of basic authentication extends into other functionality as well.
Back in September 2019, Microsoft announced that as of later this year (2020), Basic Authentication will no longer be supported for a good number of their services, and that includes POP and IMAP to collect emails or for integrations with their Exchange Online and Exchange Web Services. Google announced very much the same thing in December 2019 for what they refer to as “Less Secure Applications,” i.e., those using Basic Authentication. Google takes it a step further than Microsoft by also disallowing basic authentication for sending email through SMTP.
The alternative for both of these providers is to use OAuth 2.0 as the authentication mechanism (we’ll call it OAuth from here on).
This blog post series is inspired by working on a client’s system where their workflows require keeping track of incoming emails and replying to them. Email service is provided by Microsoft Office 365. These blog posts will document the process of discovery on how to do deep integration with the Office 365 APIs (weirdly named “Graph API”) and the challenges that you are likely going to encounter with similar APIs.
For the longest time we have been able to send email from FileMaker in one of two ways:
- by handing it off to the email client on the workstation or
- through an SMTP connection to the mail server.
FileMaker never had native capabilities to read email. If you wanted to retrieve emails, you had to resort to a plugin that supported POP or IMAP.
In all of the above cases (SMTP natively, POP/IMAP through a plugin), the authentication is simple basic authentication.
OAuth is not simple. It involves multiple steps, which is one of the reasons why it is inherently more secure than the simple one-step Basic Authentication; there are more checks and balances in the process.
Before we get into the details on how to make this authentication mechanism work from inside FileMaker, let’s take a glance at how OAuth is designed to work so that the challenge becomes clear.
First off, purists will point out that OAuth is not an authentication mechanism; it’s an authorization mechanism. With ‘authentication’ meaning strictly: who are you. And ‘authorization’ meaning: what are you allowed to do. For our purpose, consider it to be both: in order to know what you are allowed to do, you first need to establish that you are who you claim to be.
The “Resource Owner” is typically you (or your user). You own the data to which you want to access. “The Authorization Server” is where the user’s identity is kept. That could be the API provider itself, or it could be an Identity Provider (IdP) to which they delegate the authentication. For Office365, for instance, that’s Azure Active Directory. Some APIs let you log in with your Google account, or your LinkedIn account or even your Facebook account. In that case, those providers are the “Authorization Server.” The “Resource Server” is the one that provides the API functionality: in our case, Office 365 with its mail, files, calendaring, and so on.
While the distinctions between those roles on the right-hand side are important, we can simplify them for our purpose by just calling them “the API.”
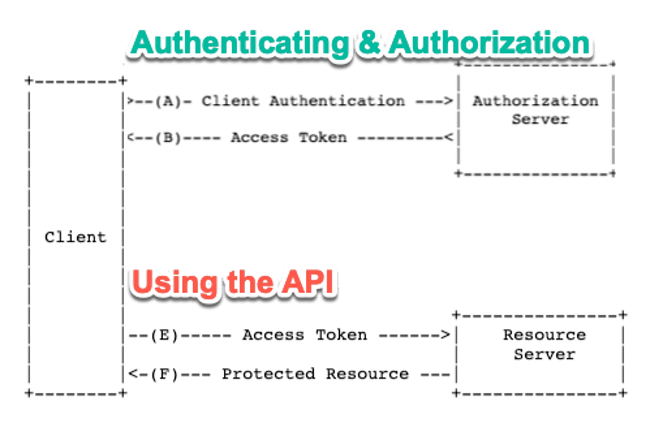
The complete flow or ‘dance’ is described in the OAuth 2.0 RFC and looks like this:
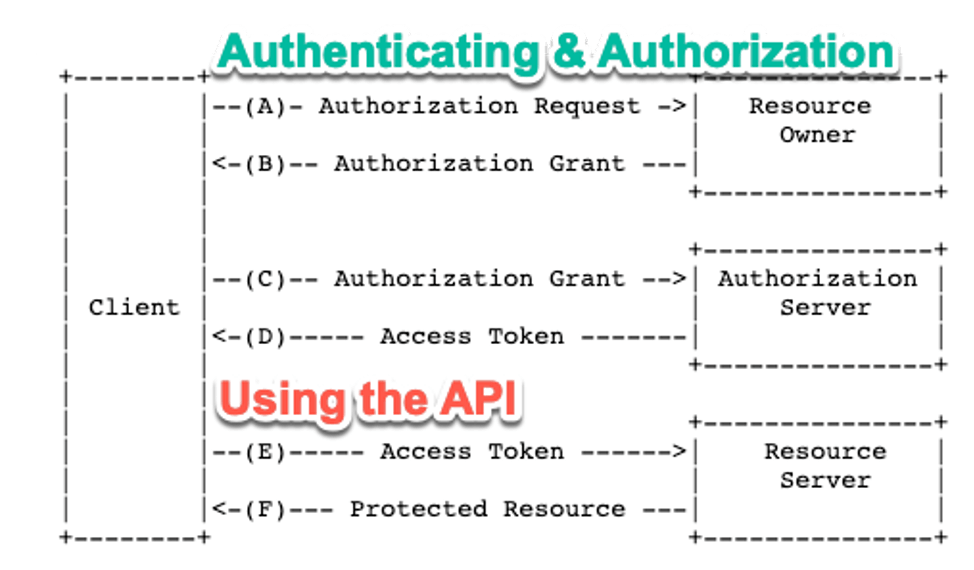
In practical terms, when we need access to the API, this flow will go like this:
- We take the user to a login screen that belongs to the API (or whomever they delegated the Identity Management to) and we are also providing info as to what exactly we are requesting access to (typically in the form of a ‘Client ID’)
- The user authenticates thereby either providing a username/password or any other form of authentication (a YubiKey, smart card, text message, phone app, etc.)
- Assuming that the authentication works, the API responds to a pre-set URL (the ‘redirect URL’) with a code
- We take that code and make another call to the API giving it back the code plus a secret that belongs to the resource we want to work with (typically an ‘app’ we set up on the API provider)
- The API responds with JSON that contains a token (more typically a set of tokens but more about that later)
- We use that token for all subsequent calls to the API’s functionality since it is our ‘passport’ that shows that we are authorized for the data and functionality we are asking it to perform. The token has a limited lifespan, typically one hour.
What we’ve described above is the “Authorization Code” flow which involves actual user input, the user has to physically do the authentication on step 2 as part of this process.
This will not work, of course, if we want to do server-to-server processes (such as collecting email as part of a FileMaker Server-side schedule). For that, there is a variant called the “Client Credential” flow. We’ll discuss both and show how to implement them in your FileMaker solution.
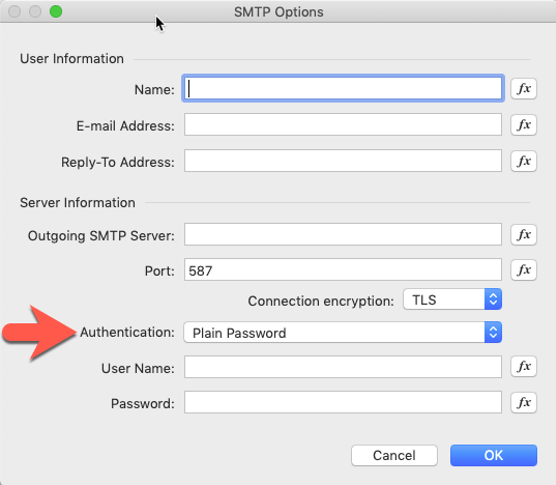
We know that FileMaker’s “Send Mail” script doesn’t support this kind of authentication since there is only room for a username and password (see Figure 1: authenticating for SMTP access). Perhaps we can expect an update to this FileMaker feature to support modern authentication. However, in the meantime, we can explore the alternatives that Microsoft, Google, and many others provide to deliver services through APIs. This series of blog posts will document our discovery of the Microsoft Office 365 APIs. We conclude they are easy to use and immensely powerful. For instance: those APIs are by far the easiest way to send out HTML emails. Multiple attachments? No problem.
Our experience is that these APIs provide much more powerful features more easily than trying to work through the SMTP and POP/IMAP protocols.
There are other resources in our community available too that provide their own spin and are good for further exploration: from ClickWorks, SeedCode, and dbservices.
Here is our first challenge: how do we authenticate? Step 3 in the flow we described above is usually the trickiest because that is where the API has to respond to us, and we need to be able to capture that response.
Demo File
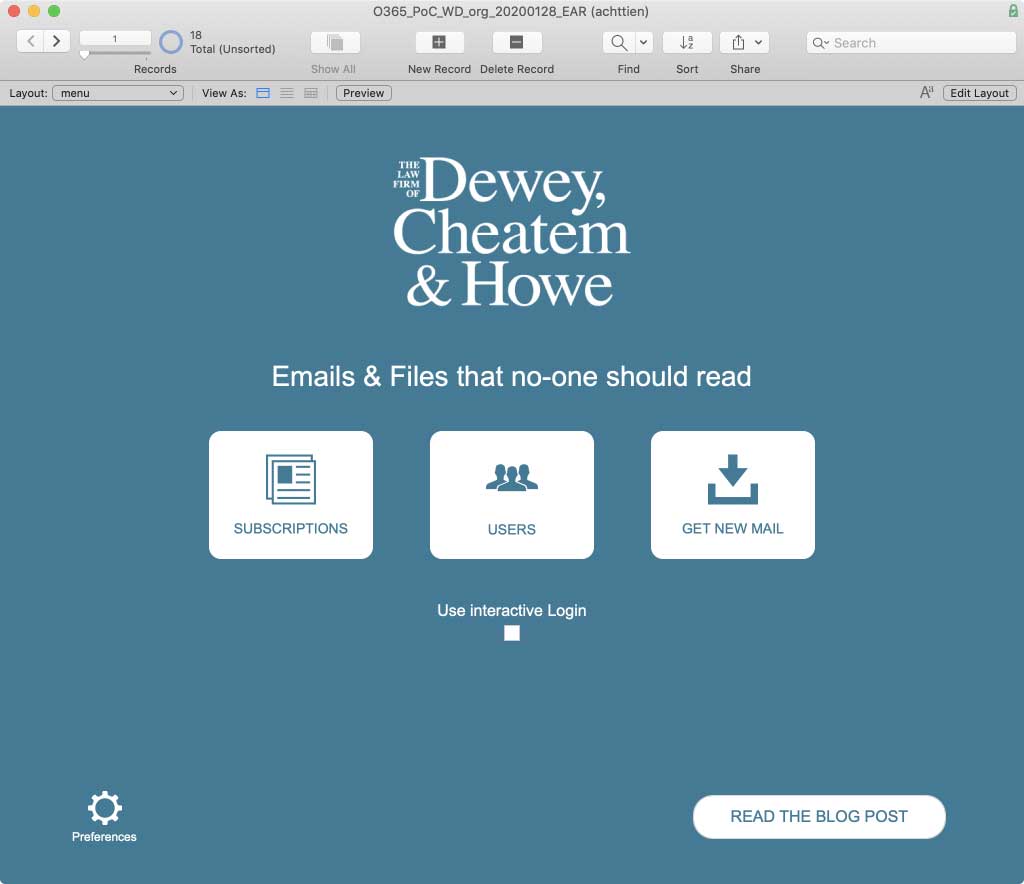
You can follow along in our demo file.
Authentication
As mentioned earlier, we have two different authentication flows that we need to build:
- One where the user is involved and has to provide their identity proof
- One where the user is not involved for use in server-to-server automated flows
In Microsoft Office 365 terms, those are described as “on behalf of the user” and “service access (without a user).” In OAuth terms, they are named “Authorization Code flow” and “Client Credentials flow.”
We will show how to construct both of these in FileMaker. But it all starts with an app in Azure AD. This is common to many APIs where the user’s rights are set in an application that you register with the API. You grant that application certain permissions, as well as access to certain data and functional areas.
The app
The app that you register on the Microsoft side will give you the ‘Client ID’ that we mention in step 1 of the ‘Authorization Code’ flow we outlined above. In addition, the app gives you a place where you can specify what permissions any API interaction through the app should have.
If you have used OAuth authentication for your FileMaker solutions, then this part of the process will be familiar since that too requires setting up an app in Azure AD. (See my 2017 DevCon presentation.)
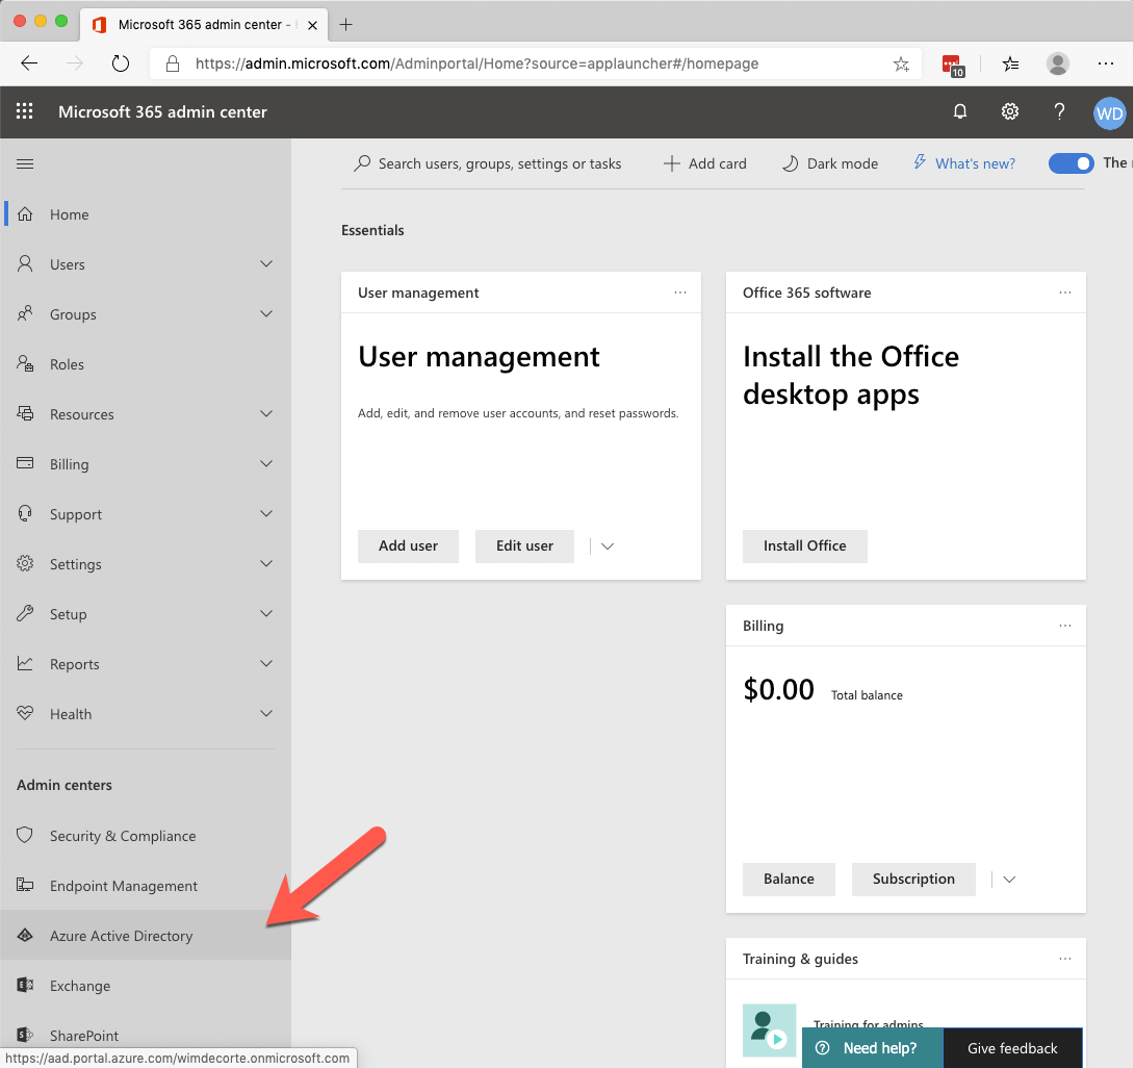
Start by logging into admin.microsoft.com and expand the left navigation panel until you see the Azure Active Directory.
For the Office 365 (Graph) API, it is Azure AD that holds the user’s identities, and that is responsible for providing the authentication for the API.
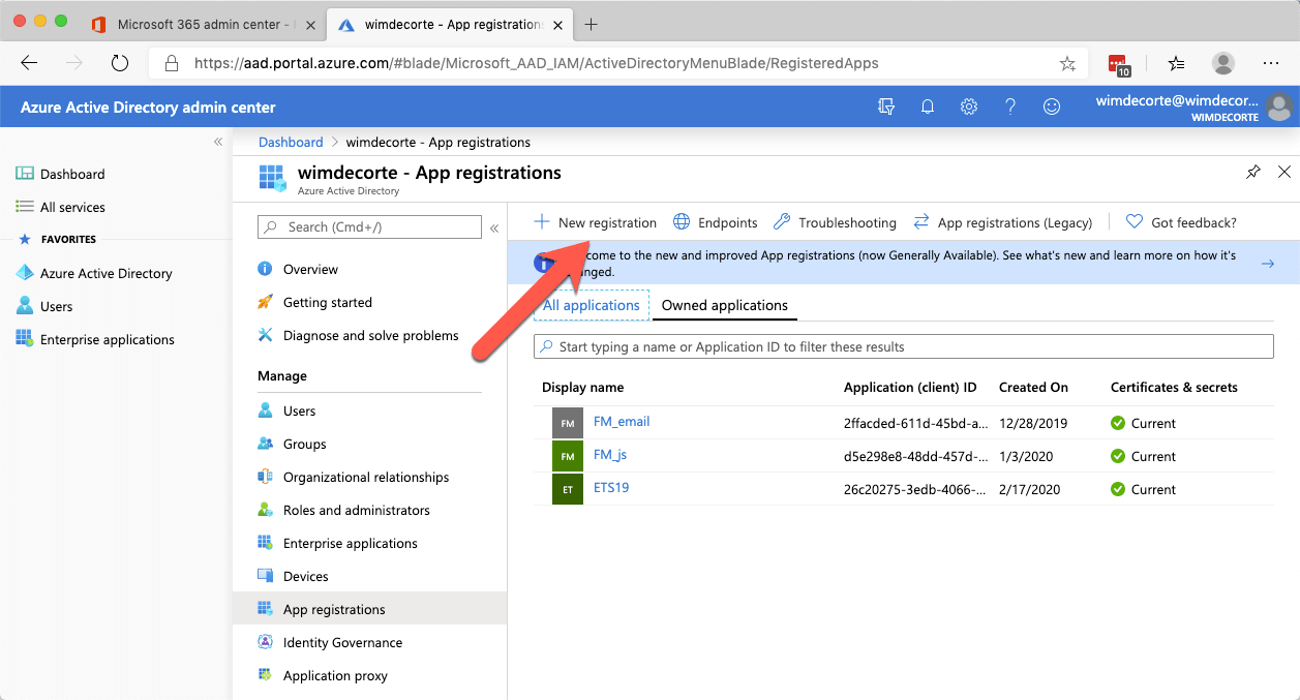
Click on ‘Azure Active Directory,’ and in the new Azure portal browser tab that opens up, select ‘Azure Active Directory’ again and click on “App registrations.”

In the ‘App registrations’ panel select ‘New registration.’
There are only two settings required: a name and a redirect URL.
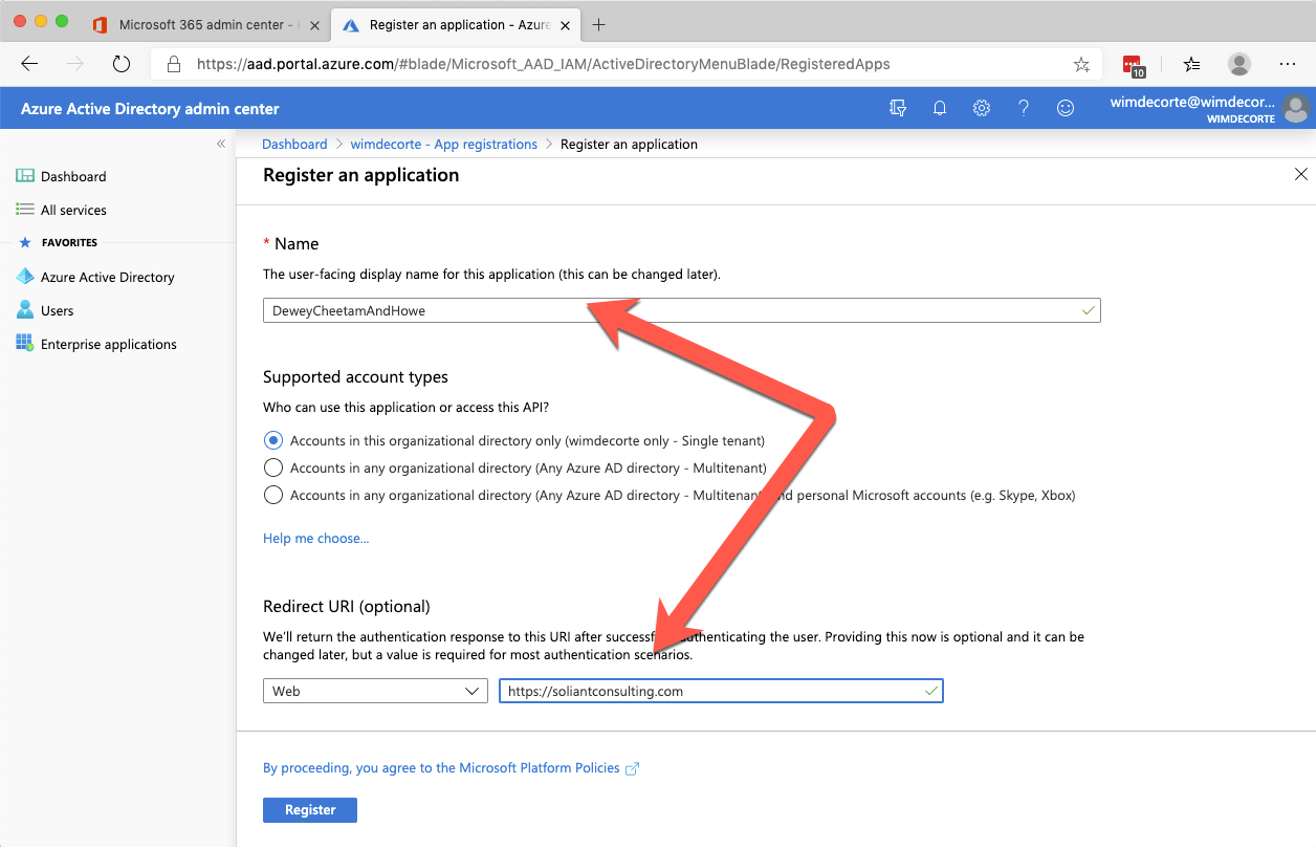
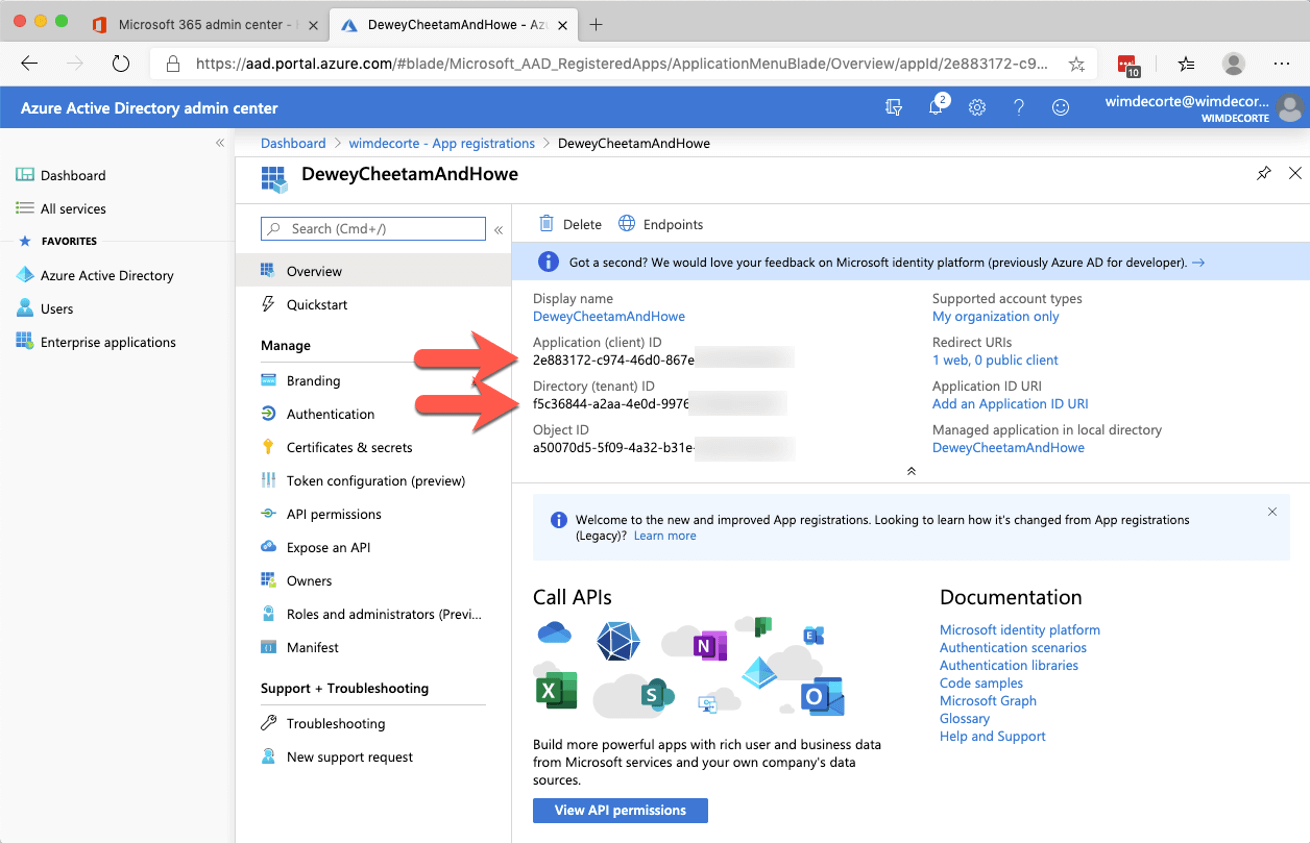
The redirect URL is used in step 3 of the OAuth flow and has to be a valid URL. We’ll use our Soliant home page. When you finish by clicking the ‘Register’ button, you will see some information about your new app. Make a note of the ‘Client ID’ and the ‘Tenant ID,’ you will need those later.
The next step is to add permissions to the app. In the middle pane, select ‘API permissions.’
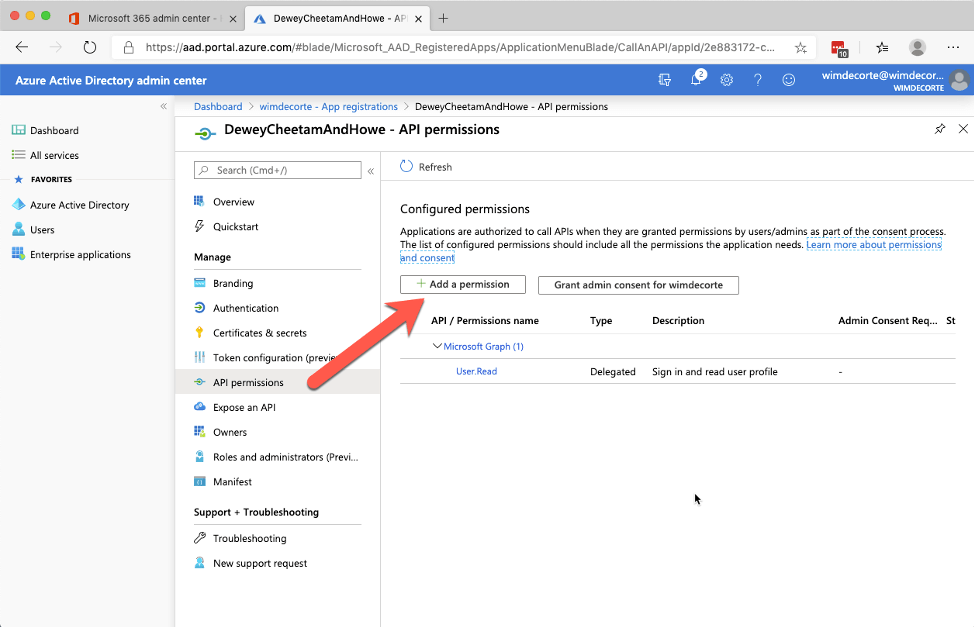
The API that we are after is the Graph API, which is the unified API that spans the whole of Office 365: users, email, calendar, OneDrive, and more.
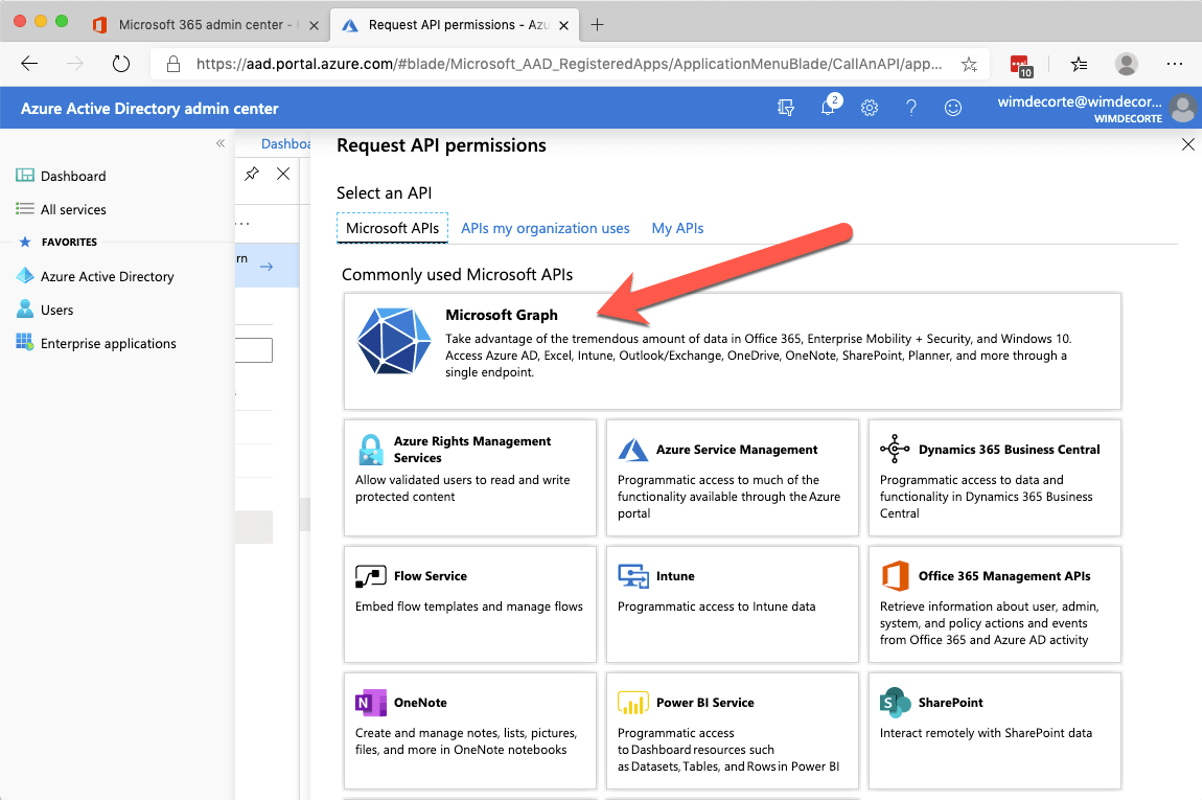
Select ‘Microsoft Graph,’ and the next choice will be between ‘delegated permissions’ and ‘application permissions.’
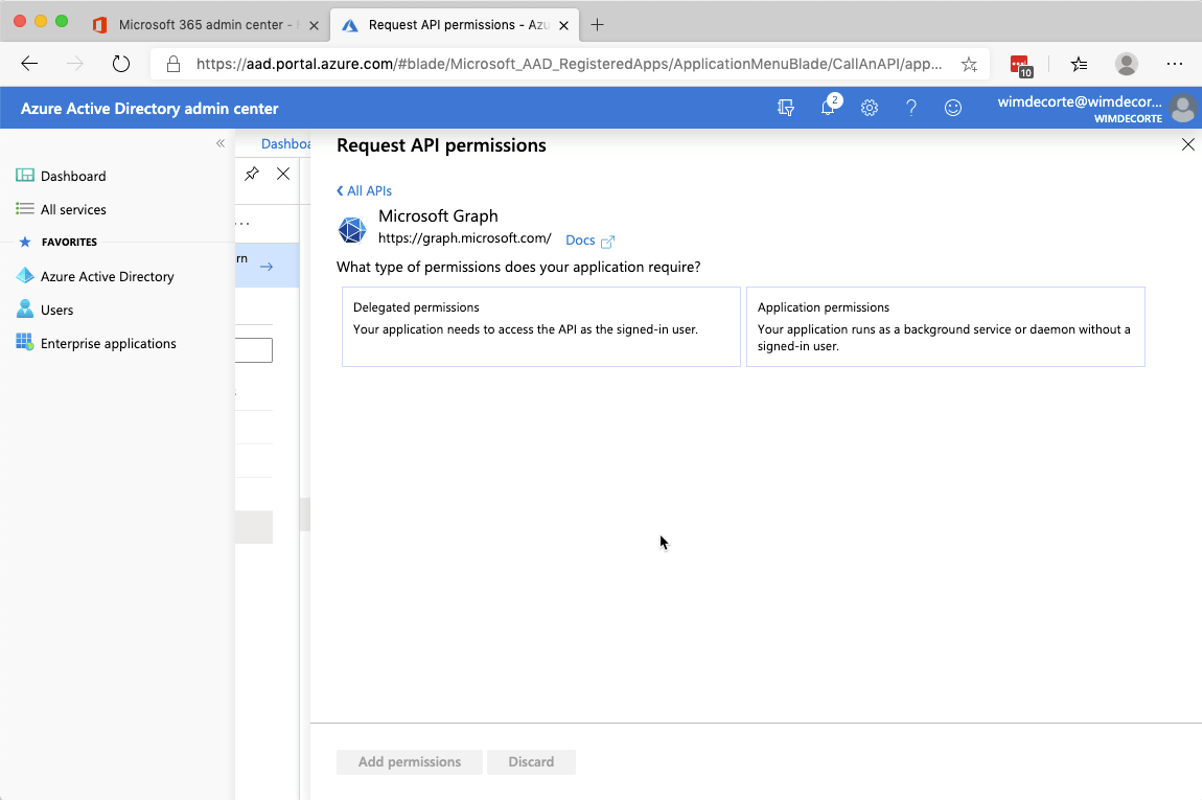
Choose ‘delegated’ if you are planning on making the users authenticate manually and choose ‘application’ if you plan on using the API in the background without the user’s logging in. If you want both, then you will have to set up the required permissions twice.
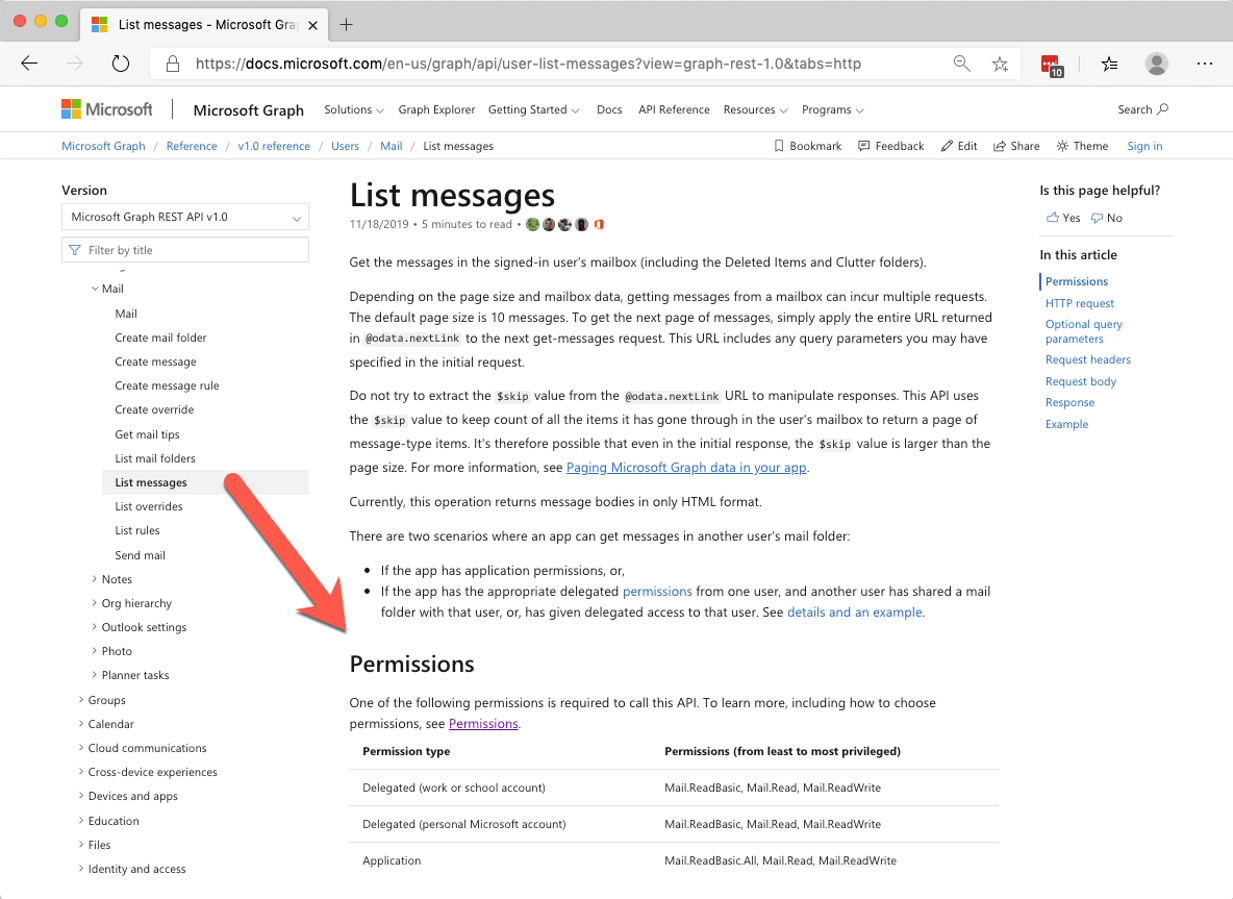
The Graph API documentation lists what permissions you need to perform each API function, for instance, to get a list of emails in a user’s mail folder you would need the permissions below:
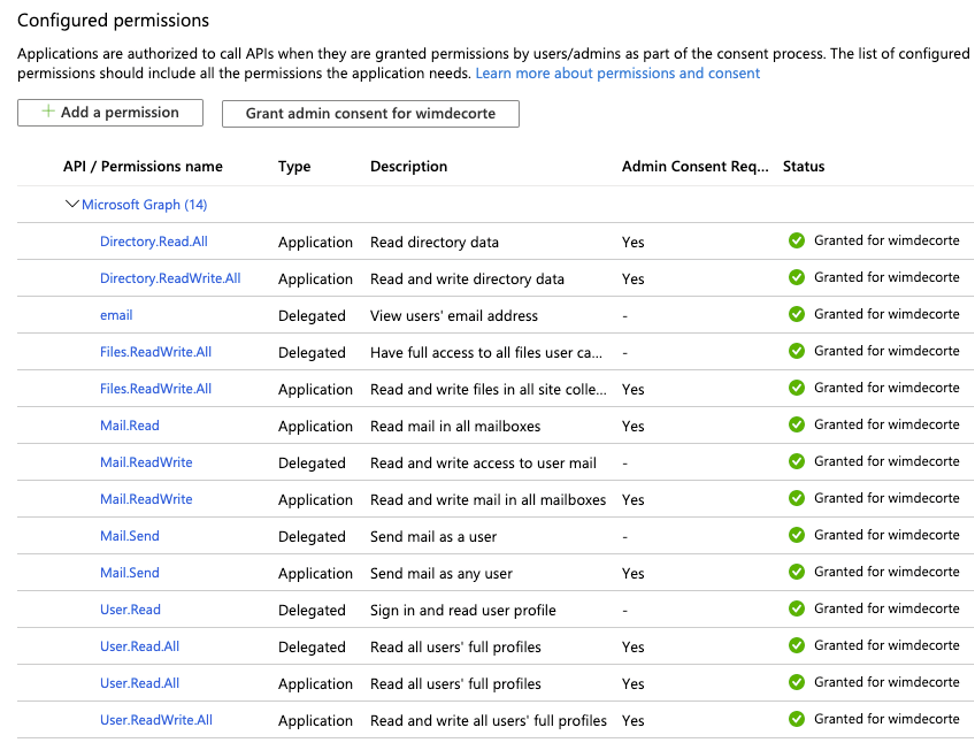
The demo file requires the following permissions to cover both ‘delegated’ and ‘application’ scenarios.
There is one more app configuration that we need to make: we need to generate a ‘Client Secret’ that we use in step 4 of the flow to exchange the code for a token. In the menu options for your app, choose ‘Certificates & secrets’ and click on ‘New client secret.’
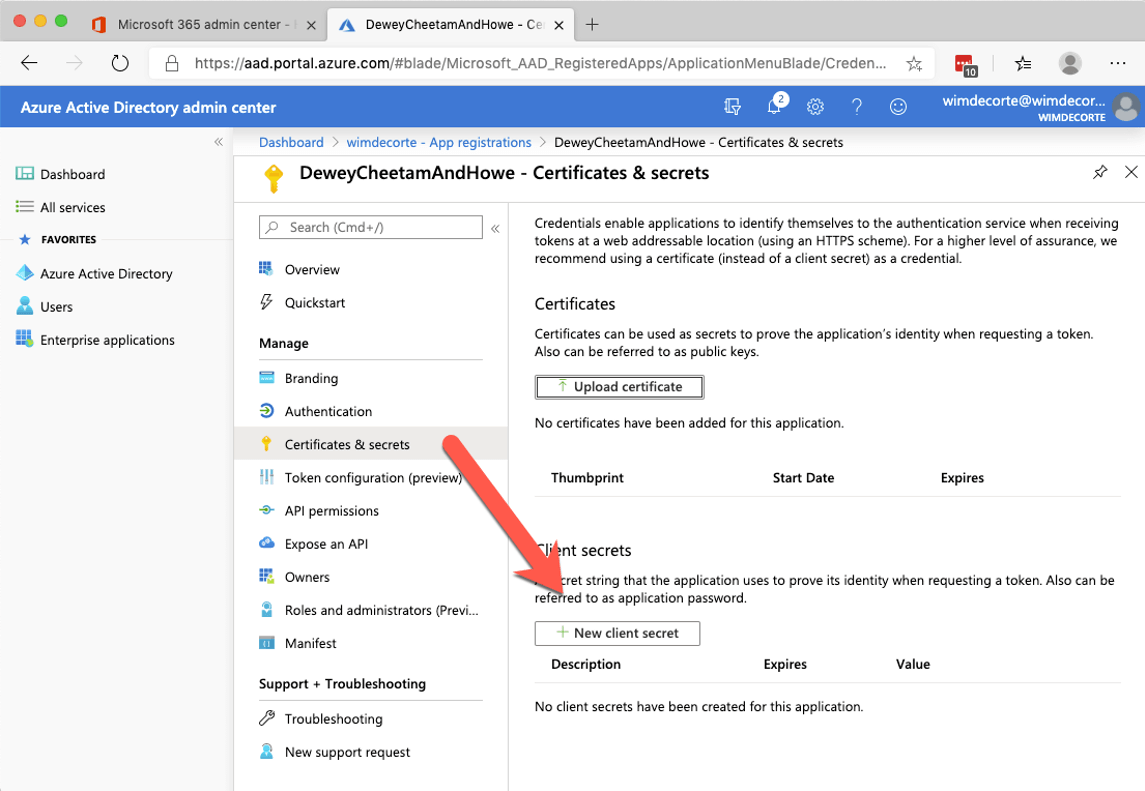
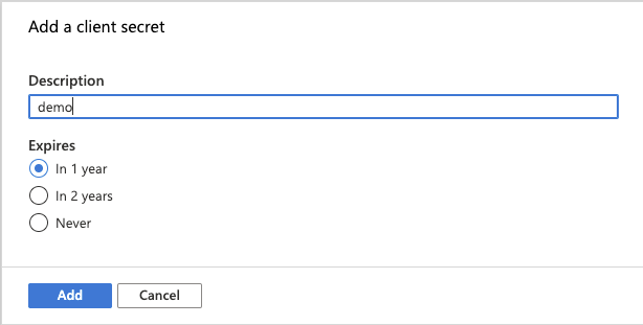
Give the secret a name and choose how long it should be valid for. It is not recommended to choose a secret that does not expire.
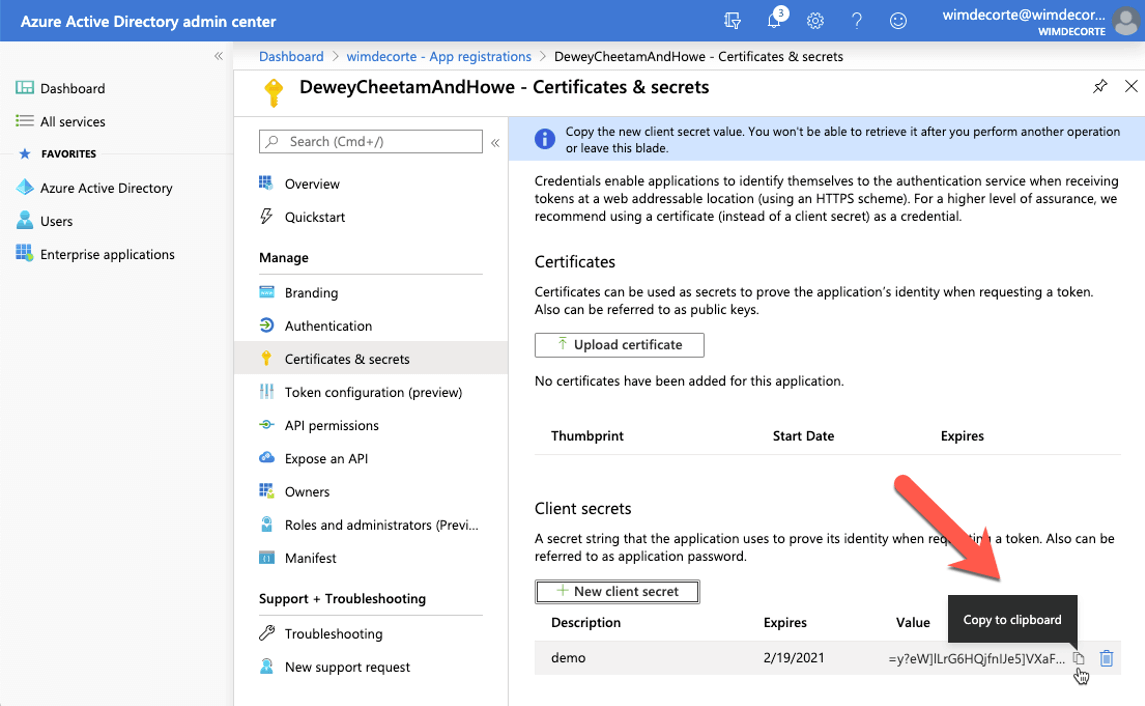
Make sure to copy the secret and store it somewhere safe for now. When you navigate away from this section, you will no longer be able to see the secret.
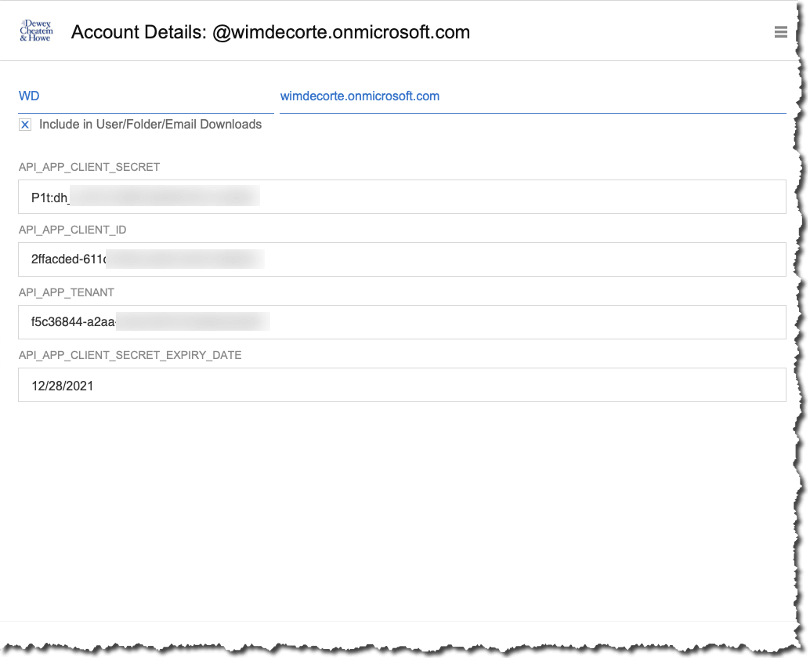
Now that we have the app set up, we can store its settings in our demo app. From the menu, click on ‘Subscriptions,’ create a new record, and populate the fields. Note that we also keep track of the expiry date of that secret so that we can prompt the admins ahead of that date.
At this point, we are done with the configuration on the Office 365 side. From here on, we will be in FileMaker, making the API calls work.
Earlier, we noted that there are two different types of authentication flows we can take:
- One where the user physically needs to be involved (‘on behalf of the user,’ ‘delegated’)
- And one where the integration can run as service without the user’s involvement (‘service,’ ‘application’)
The next two sections will describe how to make both of those flows work in FileMaker.
On Behalf of the User
When we want the user to authenticate themselves to get access to their email, calendar, and files, then this is the route to take.
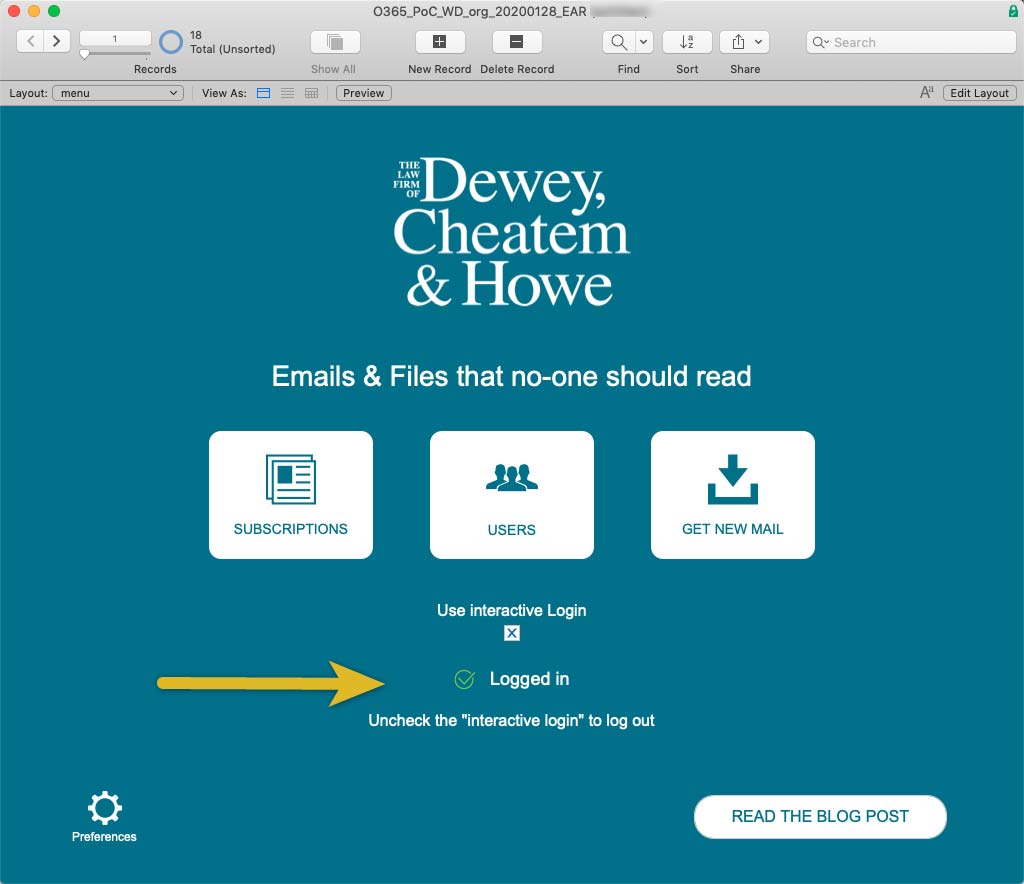
In the demo file, toggle on “interactive login” and then click on the “log in” button:
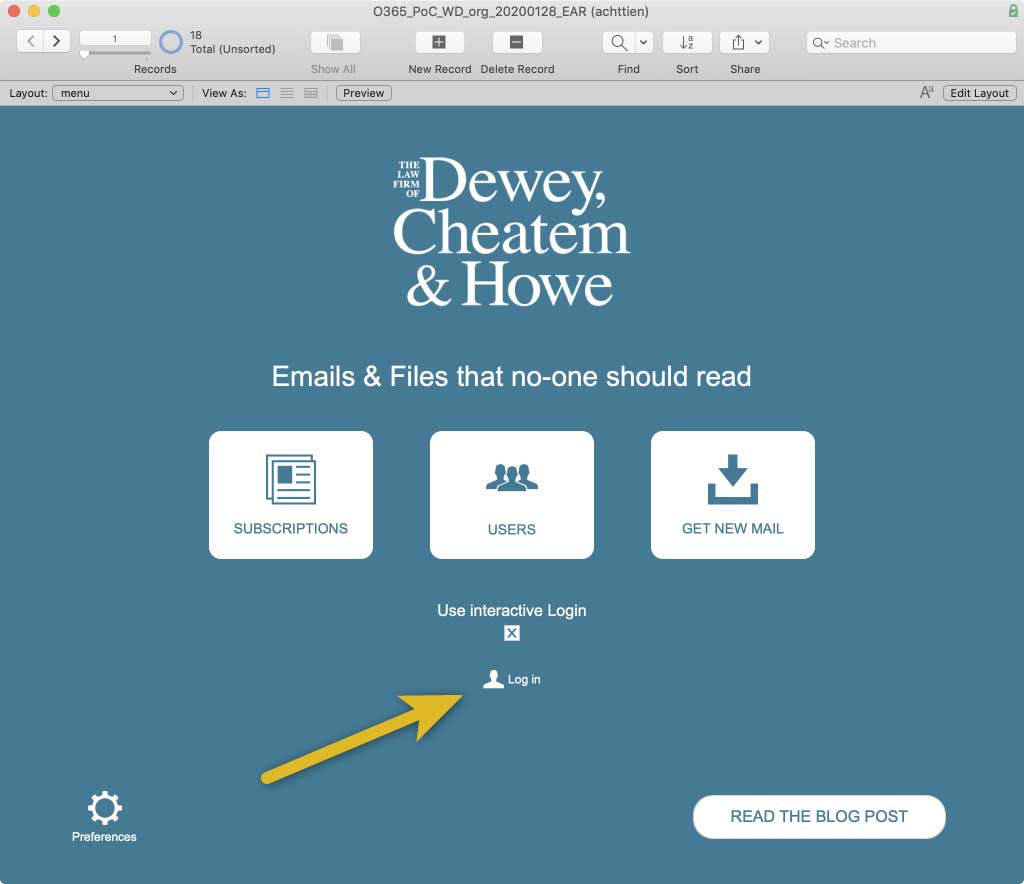
The FileMaker Script will take the user to a layout with a web viewer on it, and it will construct the proper URL to go to the Microsoft login page.
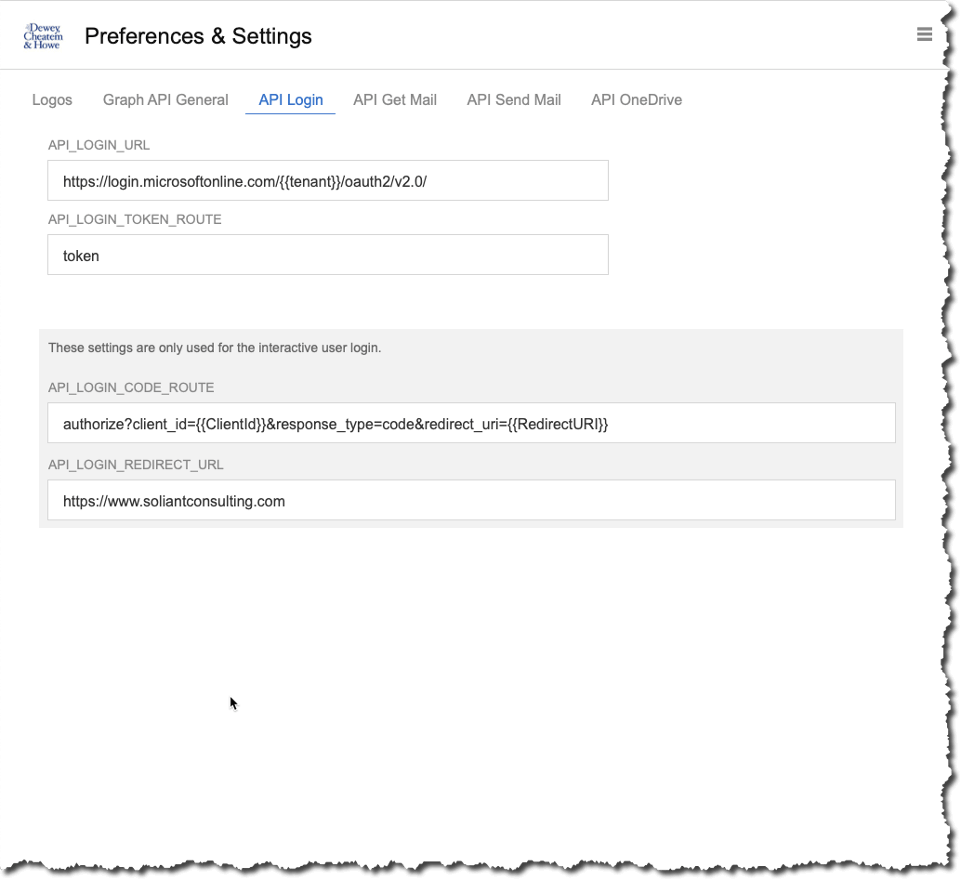
The URL and its parts are kept in the preferences section of the demo app, and you can adjust them there in case Microsoft changes their API.
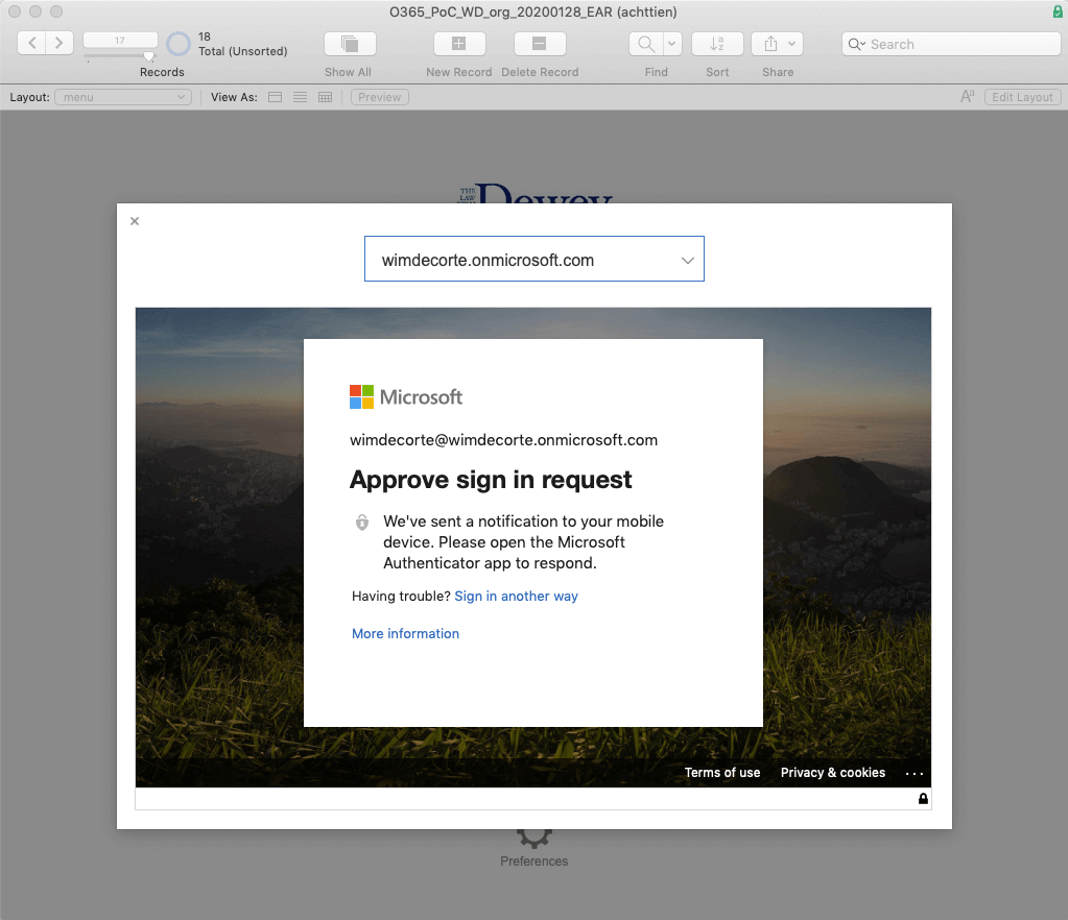
For my Office 365 account, I have password-less authentication set up through the Microsoft Authenticator app on my phone, and the web viewer will display this login page.
That is step 1 and step 2 of our flow. Since we have to wait for the result of the authentication, there is an OnTimer trigger that starts as soon as we select what Office 365 subscription we are logging into (the demo file is set up to handle multiple subscriptions). The timer will check every second for a minute, and if we did not receive the expected response, it will stop and show an error to the user.
As soon as I approve the login request on my phone, the Microsoft login page will redirect the web viewer to the URL we have provided in the Azure AD app (www.soliantconsulting.com), and it will append query parameters to the URL. One of those query parameters will be the code that we require for step 4.
The OnTimer checks the ‘source’ of the web viewer (which is the URL – line 27 in the screenshot) to see if it contains the string “code=” which would indicate that the web viewer was indeed properly redirected and that the authentication worked:

This is step 3, and the key here is that the web viewer is redirected. That means that for all intents and purposes, the redirect URL that we configure in the Azure AD app is meaningless; there does not need to be anything there except a working URL. We could have used www.microsoft.com, for instance. Only the query parameters that Microsoft appends to that URL when it instructs the browser (the web viewer in our case) to redirect matters.
As soon as the OnTimer script detects that there is a code in the URL that the web viewer displays, it parses out that code and makes a call to the login URL with the code, the client id, and the client secret. This call is an HTTP POST, so we use the “insert from URL” script step; we no longer need the web viewer.
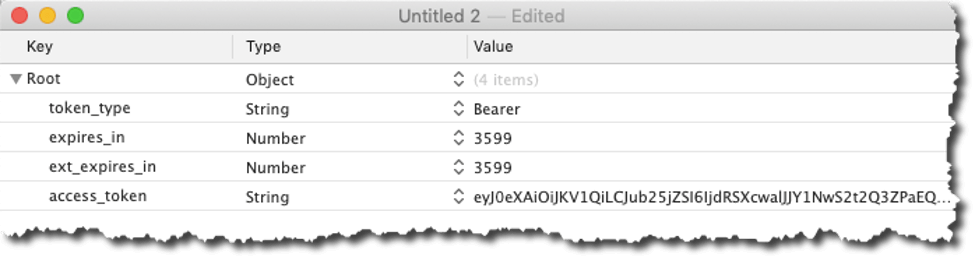
The result of that call is a JSON response from Microsoft that contains the access token that we will need for all subsequent calls to the API. The JSON also includes information about when the token expires (in 3599 seconds, one hour), and we also get a refresh token.
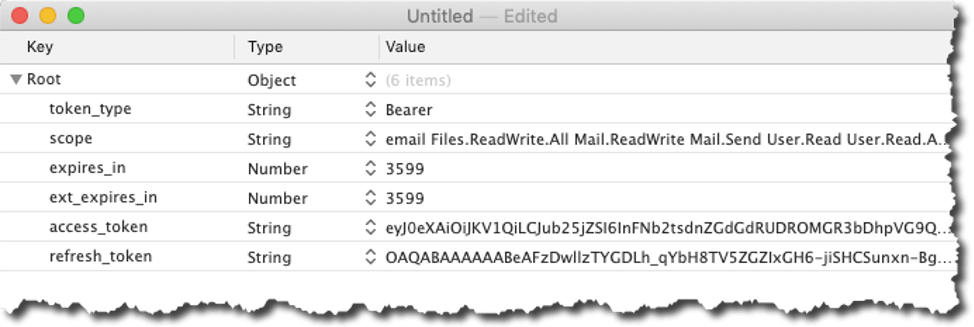
We can use the refresh token to obtain a new access token when it expires, without having to make the user re-authenticate completely from step 1. The refresh token is valid for 90 days by default. We will cover that later.
In our FileMaker file the user simply sees the confirmation that they are logged in:
Since we will use the token often and we do have to keep track of whether it is still valid we store that info in a set of global variables:

We store it as JSON because the demo file can be used with multiple Office 365 subscriptions, so we store the id of the FileMaker record for the subscription and the token that goes with that. In the expiry variable, we store the numerical representation of the timestamp of when the token expires.
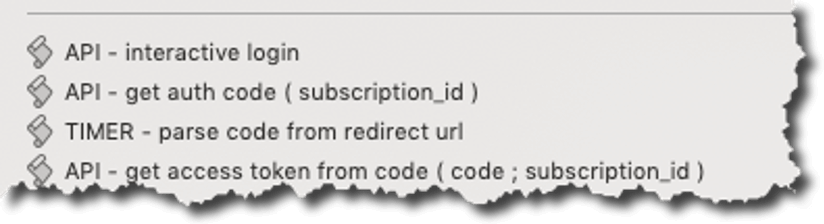
The scripts involved in this flow are these:
Server-to-server authentication
For the scenarios where we do not want or cannot have the user do the authentication, we have to use a different flow called the “Client Credentials” flow. The main difference is that instead of asking the user to authenticate, we give the Identity Provider the app’s client id and client secret to act like the app’s username and password. The authorization server responds with the access token directly without going through the steps to first get a code and then exchange that code for a token.
Unlike the client-interactive flow, we only get an access token; we do not get a refresh token:
This is for security reasons: when the token expires, you have to re-authenticate and prove that you still have the client id and client secret. If we think the client secret is compromised, we can revoke it in Azure AD, and the exposure would be minimized. There is no long-lived refresh token that can be used to get a new access token.
Since there is no UI in this process, there is just one script that does the required HTTPS POST call and parses the returned JSON:

Stay tune for part two, in which I’ll share how to use the API functionality to which we have given our Azure AD app permissions. If you have any questions about the content above or would like to discuss enhancing authentication for your FileMaker solution, contact our team.
Really great introduction, Wim. Thank you!
Is there a recommended permission configuration for using an app-specific email account (like myapp@mycompany.com)?
If you use Delegated Permissions, a person will have to manually input the credentials every 90 days for it to continue to work. And if you use Application Permissions, you have access to all accounts, which your administrator may not like. Seems like my requirement falls in a gap that doesn’t fit well with either…
Thanks, Jason.
Two options:
– perhaps there is something that can be done on the Azure AD side so that the app’s permissions only extend to an ‘organizational unit’ equivalent. I haven’t explored that but it may be worth a conversation with the Azure AD administrators.
– or: carefully manage the refresh token, if you use it to get a new access token you also get a new refresh token. It’s only if you don’t use the refresh token for > 90 days (or whatever expiry you configure it for) that the user will need to authenticate manually again. Obviously the storage of and access to that refresh token needs to be very secure.
Ah – got it. I didn’t realize the refresh token could be replaced without starting over.
I’m working in the sample file now and I’m having trouble finding where the USER record is supposed to get created. I would have expected it would happen in or after “parse_me”. I authenticated successfully and I see in APICALLLOG that my user profile was pulled from the /me/ endpoint, but no user record is created so any subsequent attempts to get folders or mail are failing… I tried manually creating the USER record manually from the data returned from /me/ but then I get ErrorAccessDenied when I try to get the folders, so I must be doing something wrong when creating the USER record.
On the Users list there is a button at the bottom that will grab the available users from the subscription. If you are using the interactive login it should bring back only your user details.
Hi Win, many thanks for sharing this. I’m looking at the demo file at this moment and if I call the users in the users list clicking the “Sync with Office365” button, I received the message “This is not allowed while you’re logged in interactively, this only work in the application-to-application integration scenario.”
Correct: when you log in interactively you only have access to your own account and mailbox. So you cannot retrieve a list of other users in the MS365 subscription. You are ‘sandboxed’ to your own account.
A server-to-server setup would have an API key with the right privileges to access all user accounts on the subscription.
Very nice explanation on how to interact with O365!
I was wondering if it is possible to also get profile information from the user? Such as picture, email, telephone, …the usual stuff I guess, but also things like licensing info, group membership, …
Hi Mario,
Certainly. The Graph API documentation outlines how to get the profile, including picture (https://docs.microsoft.com/en-us/graph/api/resources/profilephoto?view=graph-rest-1.0 and https://docs.microsoft.com/en-us/graph/api/user-get?view=graph-rest-1.0&tabs=http). Group memberships: https://docs.microsoft.com/en-us/graph/api/user-checkmembergroups?view=graph-rest-1.0&tabs=http.
There are also endpoints for licensing details.
Best regards,
Wim
Thanks Wim, much appreciated and know it took a bit of work to put this together. This certainly seems to be the future of access to many APIs.
Very nice solution Wim!
Is it possible for you to extend this and describe how to make calendar booking from Filemaker into Outlook using this API?
Hi Hakan,
Interacting with a Calendar follows largely the same logic as interacting with messages and files, the reference to that part of the API is here: https://docs.microsoft.com/en-us/graph/api/resources/calendar?view=graph-rest-1.0.
At some point we will circle back to this demo and extend it but that is not planned for a few months yet. If you need something urgently then contact me by email.
Best regards,
Wim
We appreciatie your work Wim. We have fully integrate the solution in our application. And things working great. The only thing that’s not working is the inline graphic. I know the JSON-code for it but I don’t know how to integrate it with your solution.
{
“attachments”:[
{
“@odatatype”:”#microsoft.graph.fileAttachment”,
“contentBytes”:””,
“contentId”:””,
“contentType”:”image/jpg”,
“isInline”:true,
“name”:””
}
]
}
Do you already have a solution for this?
Hi Fabian,
I’ll email you directly to get a little more detail about what is not working.
Best regards,
Wim
Hi Wim,
First of all thanks for putting this tool together. I helped Fabian ( see message above ) with implementing it into his application and as he said, things are working great.
One thing struck me, though. When I tried to send an email with a pdf file of 770Kb ( not big in my opinion ) as attachment it didn’t pass the attachment limit validation in the ‘API – send email’ script ( if [ Lenght ( $json) > 1000000 ] ).
Can you explain to me why this particular limit ( 1000000 ) is set and how I can calculate the maximum allowed size of an attachment file from it? I already did the multiplication 770 * 1024 which is still way lower than the given limit. I know there’s more in the checked json variable than just the coding for the pdf file, so I’m curious to know if a certain percentage is to be predicted upon which the maximum file size can be calculated.
In the meantime I have managed to raise the limit value to 2000000. That seems to be the maximum. Trying to send an attachted pdf file of 1753Kb with the limit in the validation set to 3000000 resulted in passing the validation, but not sending the pdf file as attachtment, just the mail.
Can you explain things about this subject further to me? In a found article I read about a 3Mb cumulative limit for attachments within the Microsoft Graph API, but this seems to be nowhere near that limit. In the original code there’s only one attachment container that already had that 1000000 limit validation. BTW we only use the containers, not the portal one.
Looking forward to your reply.
Best regards.
Gerard
The 1 million-limit has to do with the max length of a script parameter in FM, it’s not a limitation of the Graph API. In a real solution I would probably consider passing files along from global containers instead of as part of a script parameter.
Do you know when you will publish part two of the demo and show the API at work in FileMaker? I am curious that once it is all set up how to configure the send mail script step.
Hi Nancy,
Part two is here: https://www.soliantconsulting.com/blog/microsoft-graph-api-filemaker-two/
And the demo file shows how we put all the API calls together in FM.
Sending mail is not covered but straightforward once you have the structure of the API calls down.
Best regards,
Wim
Hi wim,
thank you so much for the job, detailled and the demo file.
can you explain me why in the scripts the $_user_id and $_subscription_id are empty and then I have an API call error of course.
I’ve tried to manually enter the $_user_id with the value but what is the subscription id ?
thank you for the help.
Antoine
Hi Antoine,
the naming convention for variables in that demo file is that any variable that starts with “$_” are variables that are being set by the script parameter that is passed into the script.
If those variables are empty it is because the calling script is not passing in the right parameter.
What script are you seeing this in?
Best regards,
wim
Hi Wim,
Thank you both parts of this blog, very useful. I have set up as described but it is not pulling the emails through on the demo file you provided. The log in works but it does not download emails. Does the account need to have elevated privileges?
Thanks
Joe
Hi Joe,
Which of the two options are you using? The user-initiated method where the user logs in through the web viewer or the server-to-server method that doesn’t require a user login?
The privileges to read email are set on the Azure side, there are no privileges on the FM side that are at play here. All calls made to the MS API are logged in the API Call Log table so check there to see what response you get from the API.
Best regards,
Wim
I’ve setup this following your guide but when trying to use the log in. After succesfully logging in and getting to the redirect. I’m getting “No authorisation code was found in the redirect URL”. What is causing this?
For anyone with this issue is was because I used the Client Secret ID rather than the value.
This works very well, I’m impressed how much it actually does…a credit to soliant for hard work on this.
I have one question – What is the use for the interactive login? It doesn’t allow you to get mail etc?
Not being logged in I can grab all users and folders etc.
The interactive login is for when you explicitly want the user to log in themselves. The token you then capture is only valid for their own information and you cannot use it to read email from another account.
Ah I see thanks. With sending mail is it restricted to only allowing one attachment? Some emails I generate from my system could have anywhere from 1 to 30+ attachments depending on type of email.
Looks like it does mostly what I want it to do, I guess more functionality can be added from looking at the 365 Graph API?
You can have multiple attachments.
And yes, the demo file is only a small subset of full Graph API. Adding new features to the file based on what the Graph API offers is straightforward as it will all follow the same structure.
I’ve just implemented parts of this into my solution, everything works fine but the “Refresh folder list” seems to make new copies of the folder every time, does it with “Get Email”s too. What might cause this?
That would likely be the “parse” script that is called after receiving the response from MS. Part of its routine is to do a SQL query to see if you already have a record for the folder and if not, create one. Step through that with the script debugger and see what it comes back with for a folder you know it already has.
$result is empty looking at the dataviewer, $sql looks setup properly ‘SELECT “ID” FROM “FOLDER” WHERE “MSid_md5” = ?’.
$id and $id_md5 are populated with values too?
If you go to a folder record that exists, does the MSid_md5 (and by extension the actual MSid) match with what you are getting from the API call?
If not then perhaps the call to MS does not ask for the immutable ids.
MSid_md5 is blank on every folder record. In the user table it has a value stored against the MSid_md5 record. Does it matter that I haven’t used blank layouts like in your example?
The layouts wouldn’t cause this, but using non-blank layouts will make the routine slower.
Check the custom function / calculation that sets the md5 field, something is wrong in your solution with that. Without a value in that field, FM has no way to check if the folder record exists.
Thanks Wim, looks like a few of the calcs had been commented out because the correct TO’s didn’t exist when initially importing.
With viewing emails, some of the content does not show which I’m assuming is the local attachments, will these ever display?
It’s not clear exactly what you are referring to. Perhaps ask the question on community.claris.com and tag me (@wimdecorte) so that you can upload some screenshots to review?
Hii Wim.. why my Oauth not working on webdirect?
No idea 🙂
You’d have to give us a lot more information in order to begin troubleshooting.
What part is not working? Are you using the user interactive login option to log into the MS Graph API account?
yes I use “user interactive login” and my webviewer show no response. It is webviewer not working on webdirect?
The webviewer itself is working but the MS login page may refuse to load in an iFrame. iFrames are what webviewers in WebDirect are rendered like and their behavior is always going to be troublesome and out of your control in how you can influence that behavior.
Yes, that what I mean.. the MS login.. do have any idea to solve it?
The easiest solution is to not rely on users having to authenticate and use the server-to-server type of integration. If that is not possible then first order of business is to confirm that the iFrame is the issue by doing some research on the MS forums and/or setting up a quick iFrame test in a custom HTML page so that you have more control over the total environment for debugging.
I got stymied at the beginning, where you say to log into admin.microsoft.com. The response: “You can’t sign in here with a personal account. Use your work or school account instead.” So I have learned about the difference between Microsoft “Work” and “Personal” accounts. My subscription is a family plan, not a work plan, so it’s a personal account, and it looks like Azure AD won’t work with personal accounts. So I guess I need an upgraded/business account to even try this solution.
Yes, the assumption here is that we’re dealing with businesses. If you just want to test, I do believe you can sign up for an MS developer account to MS365. It’ll have some limitations but it will work for testing.
Hi Wim,
Many thanks for your demo file, I have found it super useful over time.
I appreciate this thread hasn’t been commented on for a while, so hopefully you’ll see my message. I can only get “txt” files to upload form the “Files” screen and these only seem to get the file name inside as the content. I have seen some posts around about the “read from Data File” only returning this data. I wonder if you have moved this functionality forward since releasing the APP? Can Base64 be used or another method? I am ultimately looking to be able to upload .pdf files created by Filemaker.
Your help would be very much appreciated
Hi Paul,
It’s been a while since I looked at the file but I believe it should be able to handle attachments of any kind. Feel free to post on the community forum with some details about what you are seeing.
Best regards,
Wim
Hi Wim, we have been using this in interactive mode for a few months and i wanted to try and change it over to server to server, we have all of the correct permissions set up in azure. When i try and run the auto Login & get token script i get an error advising too few parameters passed in, am I missing something? Your guidance would be appreciated. Thanks
Hi Kelly,
The file uses a somewhat older technique to parse and validate parameters. When you use script debugger to step through the scripts it should become clear which script is not receiving its expected number of parameters and you that should point to the fix.
Best regards,
Wim
Thank you 🙂