
What is a FileMaker-Salesforce Integration?
A direct integration between FileMaker and Salesforce allows you to use the best capabilities of both platforms. It keeps your data clean, workflows streamlined, and information secure. This integration is made possible with FileMaker’s new OAuth functionality.
Why Do You Need the Integration?
With the explosive growth of Salesforce, some businesses using FileMaker are looking to integrate with and/or move some of their existing business processes to Salesforce.
While this has been possible for a long time, it has never been an easy process, involving third-party servers and plugins.
Having a FileMaker only solution would mean a clean, debuggable, much less fragile connection to Salesforce.
How Should You Build Your Salesforce-FileMaker Integration?
The team here at Soliant hoped the improved “insert from URL” script step could communicate with Salesforce. Alas, the lack of ability to set headers (despite being able to post) means you cannot use this script step for communication with Salesforce.
We explored another option using FileMaker –> AppleScript –> Curl –> FileMaker. While this worked, you can imagine its stability. Not great.
However, FileMaker recently announced an improvement to their WebViewer component that now finally allows pure FileMaker communication via Oauth. (Well, all the code lives in FileMaker, anyway). Now we’re talking!
JavaScript loaded as part of a web page can now communicate with FileMaker via the FMP URL syntax. This has been extensively written up in the popular blog post by one of my fellow developers at Soliant. This blog relies extensively on Mike Duncan’s work. Thanks, Mike!
Essentially, we can now open an OAuth Useragent Login webviewer and retrieve the token and refresh_url provided by Salesforce. From here, we can make requests to Salesforce of virtually any kind with correct permissions settings. We can query a custom Rest-Based Class or hit Salesforce’s built-in Rest API that exists for every object.
I will now explore implementation details in:
The Nitty Gritty of Salesforce-FileMaker Integrations
Salesforce:
Start with reading up on OAuth, specifically the User-Agent flow described about half-way down this page: https://developer.salesforce.com/page/Digging_Deeper_into_OAuth_2.0_on_Force.com
Second, you need to ensure you have created a free Developer Salesforce Org. If you haven’t, head over to http://salesforce.com to get one.
Once in and set up, go to “Setup->Create->Apps.” At the bottom of the page, hit “New Connected App.” Enter the name, API name and email address. These are not super important.
In OAuth Settings, set up the app as shown in the picture below (here is the URL for reference – https://login.salesforce.com/services/oauth2/success):
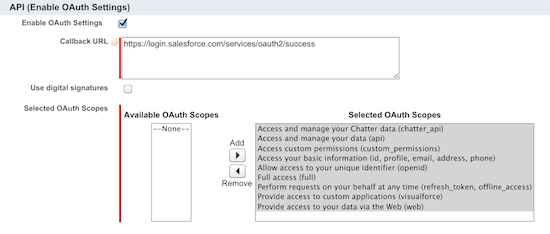
Once you have saved this, you’ll be taken to the detail page of the connected app. Copy the consumer key, the consumer secret, and the callback URL, and keep them for later reference.
FileMaker: (please refer to the supplied FileMaker file)
To implement User-Agent OAuth flow, first we open a webpage in FileMaker. The URL should look something like this:
url_org & "/services/oauth2/authorize?response_type=code&client_id="& client_id &"&redirect_uri=" & uri_redirect&"&display=touch&scope=full refresh_token"Where client_id, uri_redirect are fields on the current record.
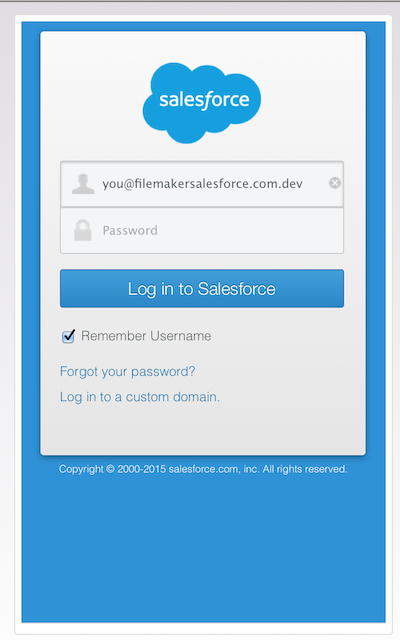
This will open up a screen where the user is able to authenticate to Salesforce – use your previously generated developer credentials to gain access:
This page redirects to the redirect_uri previously specified, and we can scrape the token from there using something like this:
Let (  [result = GetLayoutObjectAttribute ( "login_webviewer" ; "source" );
         start = Position ( result ; "access_token" ; 1 ; 1 ) + 13;
         end = Position ( result ; "&" ; start ; 1 )];
         Middle(result;start;end-start)   )
Don’t forget to URLdecode this data – Salesforce sends a ‘!’ as part of the token that appears as ‘%25’ – leaving the token like this will cause strange errors! Look at the FileMaker file for examples on how to scrape the refresh token also.
Talking to Salesforce
Now we can make requests to Salesforce at will, assuming we include the correct header information. This is where JavaScript comes in handy. Using a “Set Webviewer” step, we can set a data URL with the entire web page we want to load and the JavaScript we want to run (in this case, on the onload event). Despite using Safari as rendering technology, FileMaker does not worry about CORS, which is a big relief. If it had, we would have been back to square one. This makes sense, as the FileMaker environment is much more locked down than a standard webpage is.
JavaScript Webpage
Here is our webpage (with embedded JavaScript):
"data:text/html," & "<html><body>
<p>
Running REST based SOQL query...<br />
</p>
<script>
var documentLoaded = setInterval(function () {
if(document.readyState === "complete") {
performQuery();
clearInterval(documentLoaded);
}
}, 100);
function performQuery() {
var query = "" & Requests::url_org & "/services/data/v32.0/query/?q=" & UrlEncode(Requests::soql_query) & "";
var request = new XMLHttpRequest();
request.open("GET", query, true);
request.setRequestHeader("Authorization", "Bearer " & token & "");
request.setRequestHeader("Content-Type", "text/plain");
request.onload = function() {
if (request.status >= 200 && request.status < 400) {
var resp = request.responseText;
sendResults(request);
} else {
sendResults(request);
}
};
request.onerror = function() {
sendResults(request);
};
try {
request.send();
}
catch (e){
sendResults(e);
}
}
function sendResults(results){
var stringResults = JSON.stringify(results);
var testUrl = "fmp://$/SF_Oauth2?script=handle_raw_results¶m=" + stringResults;
window.location = testUrl ;
return false;
}
</script>
</body></html>"I’ll explain what it does.
First, it defines an onload function, which runs as soon as the page has rendered. This runs the SOQL query on Salesforce we want. This can be any valid SOQL query. (Actually, I need to check if there are any limits to SOQL queries run via the REST API, but for now, any basic query will run here.)
Next, it parses the result and hands it off to FileMaker via the FMP URL syntax using the new ‘$’ (currently open file) syntax. Note the data runs through JSON.stringify.
Salesforce-FileMaker Implementation Details and Gotchas:
UrlEncode: In performQuery() it uses a custom UrlEncode function written by Jeremiah Small (another Soliant developer). Get it here http://www.briandunning.com/cf/165. This is because the built in UrlEncode function that FileMaker provides does not handle single quotes properly.
Data URL Construction: When constructing the webpage to load in the Webviewer, you are doing the entire load using a “data” url. FileMaker will treat your entire webpage as a single string, so you need to build up the webpage as such. For exampe, to add a filemaker function while creating the string, you would do something like this:
"data:text/html," & "<html><body><p>
Running State Query...<br /></p>" &
NativeFilemakerFunctionHere() & "<script>.... "
Comments: Do not use line comments here unless you are going to explicitly break each line. This will cause your script to not work (and like all errors in this script you will get no notification of the error)
Debugging: For testing, you should recreate the page as a normal HTML page and run it on your local webserver. Then you can inspect the file for Javascript Errors.
That’s it!! You now have your data in FileMaker.
Extra for Experts
To use a custom Rest Class in Apex, create a class in Salesforce “Setup->Develop->Apex Classes->New.” Name it something like “AccountController” eg:
@RestResource(urlMapping='/Accounts/*')
global with sharing class RESTAccountController {

@HttpGet
  global static List getAccountsbyState(){
    //Get Company Name from URI
    String CompanyBillingState = RestContext.request.params.get('companyState');
    List company = [ Select ID, Name, Website from Account where BillingState =: CompanyBillingState];
    return company;
  }
}
In the security settings for the class, make sure that every Salesforce profile can access the class. Then save and go back to FileMaker. Here, you will follow much the same process as before, but you’ll call a different url in FileMaker – something like this:
var query = "" & Requests::url_org & "/services/apexrest
/Accounts?companyState=" & webservice_state_param &"";
Assuming that you have defined these parameters correctly, you’ll get the data in the same form as before – a JSON string.
To parse this, use a FileMaker file provided by ModularFilemaker. Again, you can do so using native FileMaker. http://www.modularfilemaker.org/module/json/
Here is the FileMaker example file:
Happy coding!
PS: Here is a file to help Daniel. You will need to parse the data like this, and it will work for them. The parsed JSON is in the “Unit Test” part of the file. JSON_Parse_Example.fmp12
I tested this and it works on the Mac side, but it doesn’t work in Filemaker on the Windows side.
Is there anything preventing this from working on the PC side?
Hi Alan, I’m posting this on behalf of Caspar:
“IΓÇÖm not sure about windows – it uses a different browser engine, so itΓÇÖs likely a CORS issue.
Luckly on the Mac, FileMaker does not enforce CORS from the webviewer. If it did, we would be in the same position.
Unfortunately, I donΓÇÖt have windows and canΓÇÖt test this.
I think we will have to just say that at the moment, this solution is Mac only.
Caspar”
Hi Caspar –
Thanks so much for doing this; we are having trouble using the JSON parser to parse out salesforce’s data:
$responseText = “{\”totalSize\”:1,\”done\”:true,\”records\”:[{\”attributes\”:{\”type\”:\”Account\”,\”url\”:\”/services/data/v32.0/sobjects/Account/001L000000hdu4gIAA\”},\”Name\”:\”Adatasol Test\”,\”Baan_Customer_Number__c\”:\”987654321\”,\”Line_Of_Business__c\”:\”111-User – Cranes Dockside\”}]}” ;
Is there something we are missing on this syntax ?
I need to be able to update a few Salesforce Account fields from FileMaker server on Windows. If my reading of the above is correct, the approach described above won’t work due to lack of Windows support.
Is my solution to use a plugin like the MBS plugin that provides curl support, including headers?
http://www.mbsplugins.eu/component_CURL.shtml
Note: I barely understand anything I just typed, so maybe there’s another approach you can direct me towards.
PS: We are a former Soliant client.
Good to know. Thanks, Caspar!
I don’t mean to resurrect an older post, but I feel inclined after many soul crushing hours determined to get this working on Windows, which turned out successful.
Before I go further, I want to say thanks to Caspar. Without this post, I don’t think I could have implemented a solution nearly so quick.
Without further ado, this does work, but Carriage Return and Newline characters,Char(10) and Char(13), need to be removed from the JSON. It’s funny, I use those to make it easier to read the JSON. Didn’t expect them to break the script. After removing those characters, I’m able to submit data to SalesForce in a Windows enviroment.
I forgot to add a tag to the calculations sending the request to Salesforce, before the tags, you also need to insert “” for it function.
Hey, great stuff. I’ll have to give it a go and add an addendum to the blog.
Hi David! I need to use this file in windows and I have no idea of the modification to which you mean, can you help me?
Hi! I need to use this file in Windows but do not understand the changes that would have to do. Can you help me?
Hi Sara, I’m sorry, David has done all the work to implement this, so I’m not exactly sure what he did. From what he said however, it looks like the JSON string should all be on one line. No carriage returns at all. Try this and see how it goes.
Moving ahead a few years and now we are at FileMaker 19. Is this integration easier now on Windows with the latest version of the FMS Data API?
Hi Tom,
The Data API doesn’t really come into play here since the example drives the integration from inside FM, talking to SF. If you wanted to integrate from inside SF and talk to FM Then yes: that is where the Data API would shine.
One thing that has become easier in 19 is the way that any JavaScript code in the FM webviewer can talk back to FM by running a script, without having to use the fmp url scheme.
Best regards,
Wim
My problem is that the web viewer shows nothing.
I haven’t changed anything. Just entered my own data. The login works so far. I get the token.
But unfortunately the SOQL query doesn’t work and I can’t create a data record either. What could be the problem?
The connected application works so far.
I am using macOS Catalina.
Hi Tanja,
Unfortunately we can’t really tell from your description. Feel free to contact us for a quick consult or post your question to the Community forum: https://community.claris.com.
Best regards,
Wim
Hi Wim,
Thanks for your response,
I have read the amazing tutorial here on this page, which gave me a first help in connecting to Salesforce via OAuth.
And I have also study your sample File. After some work arounds, I could connect and see the results of the sql-Query.
The wors arounds are necessary for me, because I did not see anything in the Webviewer.
But this is not my problem.
My solution is not released yet. But it seem, that my customers need to login several times because the token is not valid after a few time is passed.
Can you tell me, how to log into Salesforce without having to type in every time my username and password in the window, that appears when I click “Login” in the FileMaker sample file.
Is the OAuth only possible with the Enterprise Edition of Salesforce? If yes, thecustomers need to login to salesforce to get the toke with my account.
it would be great, if you can help me. I am absolutly new to Salesforce.
Thank you su much.
Tanja
Hi Tanja,
The SF API works the same as most other services: after you log in through the web viewer you can capture the token that is part of the URL that the web viewer will redirect to. You’ll need to store that token and use it for all subsequent API calls. The demo file on this blog post is a bit dated, but to see the same mechanism in action in a more modern demo see this blog post: https://www.soliantconsulting.com/blog/microsoft-graph-api-filemaker-one/
Different API but same basic principle. See the scripts and layouts involved when you select the “user interactive login” in that demo and you’ll see how we use the web viewer to let the user log in, and then inspect the URL after that to obtain the token to use in the rest of the API calls. SF works the same way.