Connecting Your WordPress Website and FileMaker Solution
In this post, we demonstrate how you can submit a form built with a freely available WordPress plugin, Ninja Forms. This makes building web forms easy while staying compliant with a WordPress theme. This process also supports responsiveness of your WordPress deployment.
You do not need access to the backend MySQL database, which is not always easy or available. This makes it very portable and convenient to add as a WordPress administrator. You only need to add a custom action to the Theme Functions (“functions.php”) file in WordPress and specify that custom action in your Ninja Forms configuration.
Previous Strategy: Custom Web Publishing
Previously in FileMaker 16 and prior, you could send data to a CWP (custom web publishing) script that could include the FM API for PHP and use that to insert to your database. This required a web server running PHP, possibly on the same machine where FileMaker Server was running.
Simplified Process with the FileMaker Data API
That changes in FileMaker 17. Now, you can communicate directly with the newly available Data API to insert a new record in your database with no other pieces needed or external APIs to load.
Both methods use a WordPress function, WP_Http(), to make the external requests and submit all form data entered by end users. In WordPress, go to Appearance->Editor, then select the Theme Functions file and insert the following code, with adjustments made to the variables at the top of the function.
add_action( 'fm_WordPress_action', 'fm_data_api_form' );
function fm_data_api_form( $form_data ){
// set variables
$myServer = 'https://your_server_name/'; // the url of your server
$myUser = 'Username'; // your username
$myPass = 'password'; // your password
$myFile = 'Your_File'; // your file name
$myLayout = 'Your_Layout'; // your layout name
// authenticate and get token
$myEndpoint = 'fmi/data/v1/databases/' . $myFile . '/sessions';
$post_url = $myServer . $myEndpoint;
$headers = array('Authorization' => 'Basic '.base64_encode("$myUser:$myPass") , 'Content-Type' => 'application/json');
$request = new WP_Http();
$response = $request->request($post_url, array( 'method' => 'POST', 'body' => $myJSON, 'headers' => $headers ));
if($response){
//inspect response
$responseObj = json_decode($response['body'], false);
$responseCode = $responseObj->messages[0]->code;
if($responseCode == '0'){
$responseToken = $responseObj->response->token;
// format json from form data
$form_array = array('fieldData'=>array());
foreach( $form_data['fields'] as $field ) {
// get key/value pairs into an array by themselves
if($field['key'] != 'submit_button'){
$form_array['fieldData'][$field['key']] = $field['value'];
}
}
$myJSON_Data = json_encode($form_array);
// insert record
$myEndpoint = 'fmi/data/v1/databases/' . $myFile . '/layouts/' . $myLayout . '/records';
$post_url = $myServer . $myEndpoint;
$headers = array('Authorization' => 'Bearer ' . $responseToken , 'Content-Type' => 'application/json');
$request = new WP_Http();
$response = $request->post( $post_url, array( 'method' => 'POST', 'body' => $myJSON_Data, 'headers' => $headers ) );
if($response){
// ok
} else {
// insert err
}
// log out
$myEndpoint = 'fmi/data/v1/databases/' . $myFile . '/sessions/' . $responseToken;
$post_url = $myServer . $myEndpoint;
$headers = array('Content-Length' => '0');
$request = new WP_Http();
$response = $request->post( $post_url, array( 'method' => 'DELETE', 'headers' => $headers ) );
} else {
// authentication err
}
}
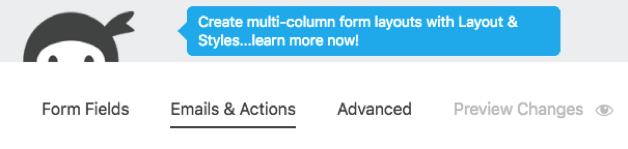
}Enabling Ninja Forms
To use with Ninja Forms, we configure the “Emails & Actions” configuration (see Figure 1) for the form we are working on, enable the “Web Hook,” (see Figure 2) and give it a Name and Hook Tag. The Hook Tag here is important, and it needs to match the action name given in the custom action. In the code above, it is the first parameter of the add_action function, where we name it “fm_WordPress_action”.

If we break down the above code, we see the performance of two steps. The first is to authenticate to the database and get a token back. Once we have successfully authenticated and have a token, we use that in the header of our HTTP request to submit JSON to the Data API that completes our record creation.
There are RESTful endpoints used to perform both authenticating and record creation. You can find these in the Data API documentation. First, we send credentials using a HTTP header and receive a token upon successfully authenticating to the database.
Once we have a token, we do a bit of cleanup work to get our data out of the form, where we reference the “Field Key” from the form builder, and correctly format the JSON we will submit as the body of our request to create a new record. We define the Field Key for each field in the form (see Figure 3).

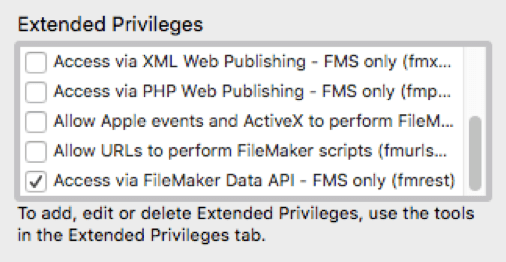
Of course, all field keys need to match with the field names in your database. Also, this assumes that you have correctly set up security in your FileMaker file, and have enabled the “fmrest” privilege set for the account used to perform this action (see Figure 4).
You will see the File and Layout specified in the endpoint we reference, so we only then need to include the JSON containing our record data, in addition to passing our authentication token as a header. All this is simple enough, once you have achieved a cursory understanding of REST architecture and how to work with it.
Licensing and Costs
FileMaker Server includes an amount of data transfer at no additional cost. The good news is that the amount already provided — 2GB of data, per user each month — should be more than enough for most every use case. That does not include container data and only counts toward outbound data transfer. Data is also shared for all users.
For example, if you have a FileMaker Server with five licensed users, that would be 10 GB/month, or 120 GB for the year. That far exceeds the amount that most solutions see in data transfer even with FileMaker Pro pushing user interface and containers. If you go beyond this very high threshold, you would likely want to pay additionally for the support to handle that kind of traffic.
Considering the cost of FileMaker Server effectively includes this licensing, I would not hesitate to recommend using the Data API in any new development.
Building on Your FileMaker-WordPress Integration
This is just an example showing a basic integration of a WordPress form used to create a record in your database. You could build on this example to add more robust error handling or additional functionality.
Integrating with FileMaker is easier than ever! Hopefully this article gives you some insight into how you can extend your FileMaker applications in ways previously not conceived.
If you have any questions or need additional help integrating your FileMaker solution with your website, please contact my team. We’d love to see if we’re a good fit for your next project.
References
- FileMaker Data API Guide
http://fmhelp.filemaker.com/docs/17/en/dataapi/ - FileMaker Licensing FAQ
http://www.filemaker.com/purchase/store/faq-teams.html - Ninja Forms
https://ninjaforms.com - Your Guide to Using the FileMaker Data API to Enhance Your Application
https://www.soliantconsulting.com/blog/filemaker-data-api
nice work. Would love to see an example using ContactForm 7 … it is by far the most popular contact form plugin.
You might be able to by adding an event listener, then the code presented here may be a guide to what the javascript function would look like.
Great article, I got it working nicely in FMS17, great share! I did notice it does not work with FMS16, any idea why? Thanks again
Hi Damien,
The Data API in FMS 16 is different than the final release in 17. Considering the version in 16 is a beta, I would focus on the current version. Of course you can use CWP instead of the Data API in previous versions of FMS as well.
Pingback: FileMaker 17 Data API - FileMakerProGurus
Thanks for the reply Mike, made sense when I saw the previous Data API structure.
Is it possible using this method to feed data into a NinjaForm? I know you can via query string – what about sending in a primary key, and having the NinjaForm extract the data from FileMaker via API and then populate the form?
I have not done that, but may be possible.
This is one way, sending data from Ninja forms to a FM Database. What about the other way around, a user logs in a WordPress site and will presented by some FM Data (for instance all their open tickets, orders, invoices, etc.) based on their email or id. How would you suggest this setup?
There are several ways to tackle this scenario. One would be to create a custom template and point to some custom PHP to include, then display that in your WP site. This is basically custom web publishing so would require more development, especially if you want to also support the CSS and theming inherited from WordPress, but can be done.
Hello, We’ve tried this for a client site but are unfortunately getting 102 errors. We created a completely blank new form with only one field “First Name” which has the field key “name”, nothing complex. The Filemaker side is set up to receive “name”, “email” and “message” (from previous tests) but for some reason we’re getting 102 errors suggesting that a field is being submitted which has nowhere to go. How do we view the JSON output to determine what fields need to be accepted from the Filemaker side?
CSV outputs of the NinjaForm submissions show ID “#” and “Date Submitted” fields but I can’t see the above code collecting that information for submission anywhere so I can’t understand what the fields are which we are overlooking? We did everything exactly as described in the above post.
Error 102 is “Field is missing” so either the field being submitted is named wrong or the field does not appear on the layout. Can you confirm that the fields are being correctly labeled by ninja forms? In the past, I have been able to write out the request to a temporary file to see what is being sent, and examine what comes over.
Hello Mike,
thank you for the article. I have tried to follow your steps and it seems to create record but it doesn’t pass any data through. Could you share how to write out the request to temporaty file so I can see what is being sent?
Thank you
Hi Filip,
If you create a txt file on your web server and set the permissions to allow you to write from php, you can use this function to write to that file…
file_put_contents($txtfile, $output)
Where $txtfile is the name of the txt file, and $output is something that you set to see what is being sent, which could include any errors.
Hi Mike – just wondering if this will survive a theme update? If I add the function to the Theme Functions file and subsequently update the Theme will this new function still be there?
You will want to copy the code from the functions file into the new theme, and as always, test after updating.
Pardon me for interfering: If we are talking about functions.php in the WordPress theme best practice is to use a child theme for your alterations and additions to e.g. functions.php or style.css. This is a very simple process. More info here: https://developer.wordpress.org/themes/advanced-topics/child-themes/
Nice blog, Mike Duncan. The FileMaker has made the process of connecting to data API easier. The subtopic of enabling Ninja forms using WordPress plug-in is helpful. It explains the method of FileMaker integration and the blog gives knowledge about how to develop FileMaker solutions for your websites in future.
Do you know if this works with Gravity Forms?
This same concept will work with Gravity forms. The example shown is different, but works the same way.
Hello Mike,
Thanks for the article. Because of errors 102 I tried to figure out what went wrong. I wrote out the data from the form ($myJSON_Data) and the only thing I get back is {“fieldData”:[]}. Als $form_data seems to be empty.
Sounds like the data is not getting sent from your function, could that be?
Hello Mike, it seems to be but I can’t figure out why an don’t know where to look now. Using the wright tags in the WP Hook.
Thanks for this information. Are there any changes to the methodology or WordPress code for FileMaker 19 or the latest version of WordPress?
I have not test specifically, but it should remain the same, yes.
I’ve been told by another FBA member that Filemaker’s Data API in FMS is not reliable 100% of the time?
He suggested it would not catch all the JSON calls to the API and suggested I look at one of their custom “plug-ins” which of course has a yearly fee.
I smell something fishy?
What say you people – could this be used in a production environment reliably?
appreciate any feedback..
That does not sound right to me. We have many successful deployments using the data api without added any plugins.
Hi Mike,
Nice article. Does this require the paid version of ninja forms as I do not see the wp hooks option under emails & actions. Is it necessary to purchase this? https://ninjaforms.com/extensions/webhooks/?utm_source=Ninja+Forms+Plugin&utm_medium=Emails+and+Actions&utm_campaign=Builder+Actions+Drawer&utm_content=WebHooks
Hi Martin, that plugin is not necessary. It may be worth it to help in troubleshooting, but to handle getting an authorization token and then deleting it when done would not be handled by that plugin alone. You might use that plugin to send the form contents to a PHP script, for example, that would handle inserting the data into FileMaker using some available libraries for working with the Data API.
I had the same confusion: “WP hook” is NOT “Web hook”. To use Ninja webhook, you need the webhook plugin. To use the WP hook (as in this example) you do not need the Webhook plugin, but you have to enable developper mode in the Ninja Preferences. Then the WP hook will be available!
Hi Mike,
Thank you for the article, I have tried this but got “102” error, and it seems the data not been pass through and it shows DELETE in the FileMaker log. But I didn’t make any command of DELETE for sure. And the the form in Filemaker is a new form with very simple fields. So do you have any advice on this? Many thanks in advance.
The delete is likely from the last action to delete the token. These calls can be difficult to troubleshoot. I have, in the past, created a form with a single field to make it easier to submit and test.
Dear Mike,
Many thanks for this great tutorial!!
But unfortunately I have a problem understanding the code (as has my php-interpreter) – maybe I just miss something obvious?
How should the authentification request work, if the variable $myJSON is not defined??
$response = $request->request($post_url, array( ‘method’ => ‘POST’, ‘body’ => $myJSON, ‘headers’ => $headers ));
Thanks Gilbert
Authentication has changed since 17. Check the documentation for how to build the json to send for the body of a request to the sessions endpoint. Since it gets sent in the header, you might be able to omit sending the body at all.
Hi Mike,
“Curiosity killed the cat” …
March 10, 2021 at 1:13 pm you mentioned: “You might use that plugin to send the form contents to a PHP script, for example, that would handle inserting the data into FileMaker using some available libraries for working with the Data API.”
Could you expand some on the setup you mentioned above? We would like to pass data both ways between our website and our FileMaker Server to automate some office functions.
Your article mentions WP_Http and I’ll agree that WordPress has functions that can save a lot of programming. Depending on what makes the connection(s) and data transfer more straightforward would seem the better way to setup the interfaces, whether it is PHP and MySQL or a combination of those with WordPress functions on the WordPress side going to FileMaker; and what would work best going from FileMaker to WordPress.
If the answer would be too involved perhaps you could let us know that and estimate a level of effort you think it would take to provide an answer.
Thank you
Have you tried to update the endpoint to fmi/data/vLatest to see if that addresses the newer data api version?
Great share! Thanks for the information. Keep posting!