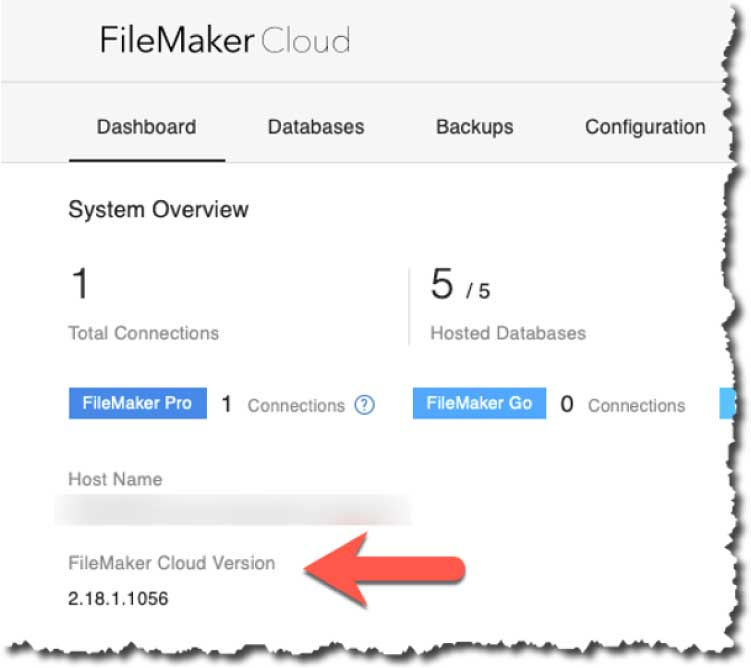
In the admin console, you can verify you have the new version by checking if the FileMaker Server version is reported as “2.18.1.xxxx”:
The two major new features are:
- Support for OAuth Identity Providers: you can now give access to your hosted solutions to any account that can be authenticated by a supported provider (Okta and AD ADFS). This is somewhat similar to what you can enable for your on-premise FileMaker Server, as we discussed back in October 2019.
- Admin API calls to upload files to your FileMaker Cloud server and the ability to run the Data Migration Tool. This has all the potential of making deployments easier. For now, this is a FileMaker Cloud-only feature that we hope will be made available in the on-premise version too.
External IdP
Before this change, you could only access files hosted on FileMaker Cloud 2.0 with FileMaker ID accounts. This new feature opens that up significantly and lets you specify either Okta or your Active Directory ADFS as the account authentication provider.
Keep in mind that you can specify only one OAuth IdP provider. This is different than for on-premise FileMaker Server where you can have multiple OAuth providers active at the same time.
For some background on OAuth and Open ID Connect, see the white papers that Steven Blackwell and I released in the fall of last year, where we outline how it works, what FileMaker Server expects and how to set up and configure IdPs to use with your on-premise FileMaker Servers 17 and 18.
Setting Up Okta
That white paper uses Okta as an example IdP and describes how to set up Okta to authenticate your FileMaker users. We will use the same configuration here, so use that white paper to guide you through the Okta set up if you are not yet familiar with it.
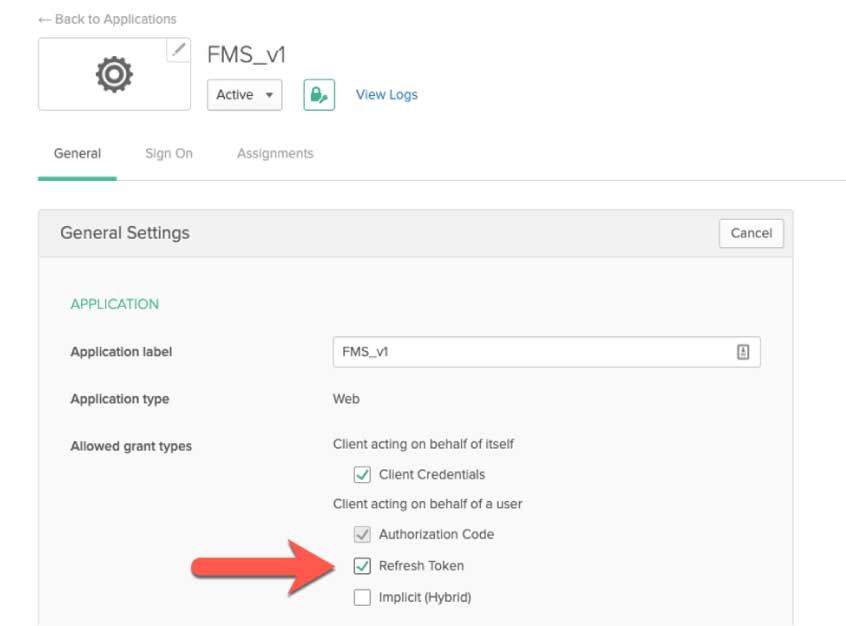
On the Okta side, the only additional setting that is required is to toggle on the “refresh token” option on the Okta app.
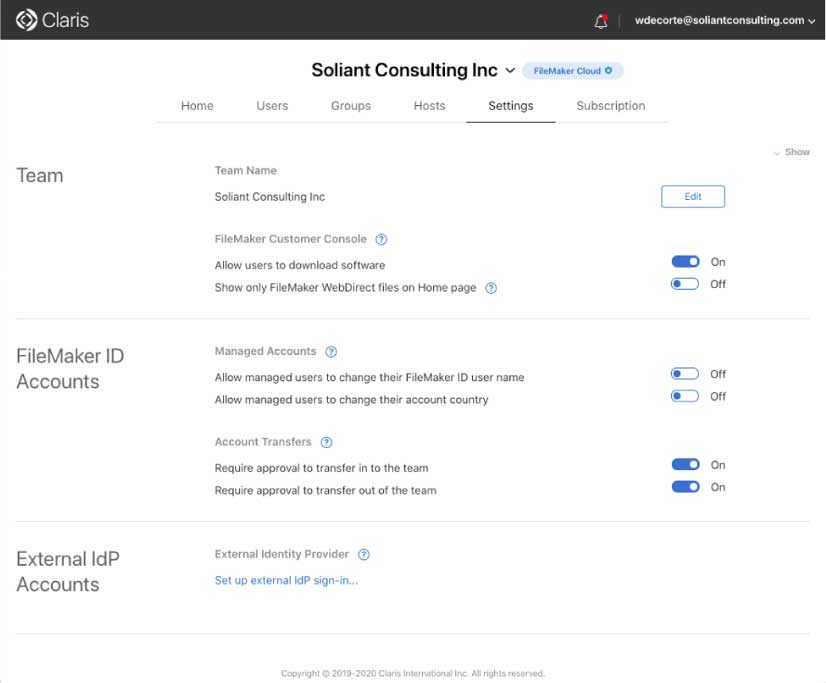
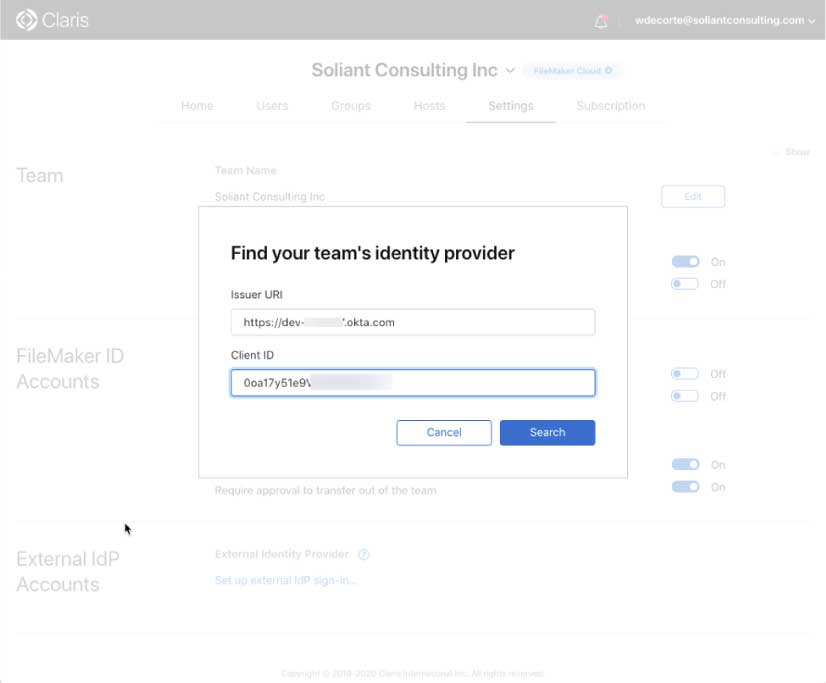
To configure FileMaker Cloud, log into your Customer Console (my.filemaker.com) and select “Settings.” At the bottom of that page, you will find a new section labeled “External IdP accounts.”
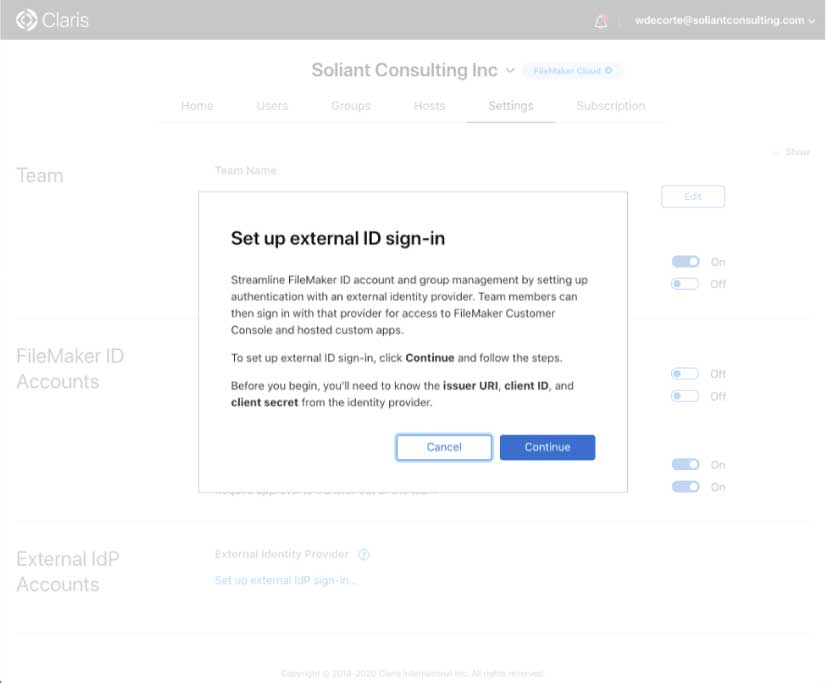
Click on “Set up external IdP sign-in” and review the information there, it basically just prompts you to make sure you have everything set up on the IdP side. Specifically, you need to have the client id and secret ready of the app you have set up at the IdP.
At the next screen input the login URL for your Okta instance and the client id of the app you have set up in Okta:
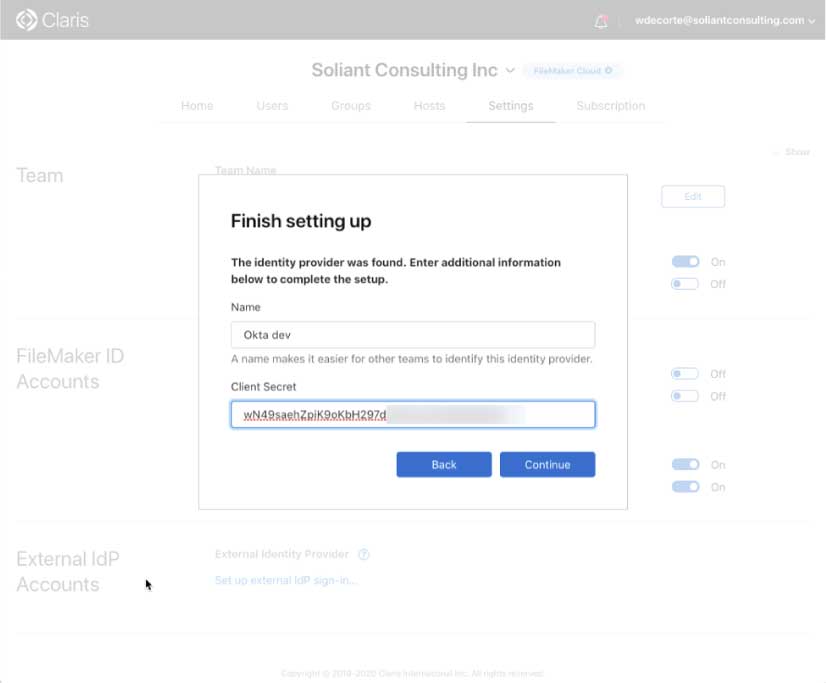
Give our IdP setup a meaningful name and provide your client secret:
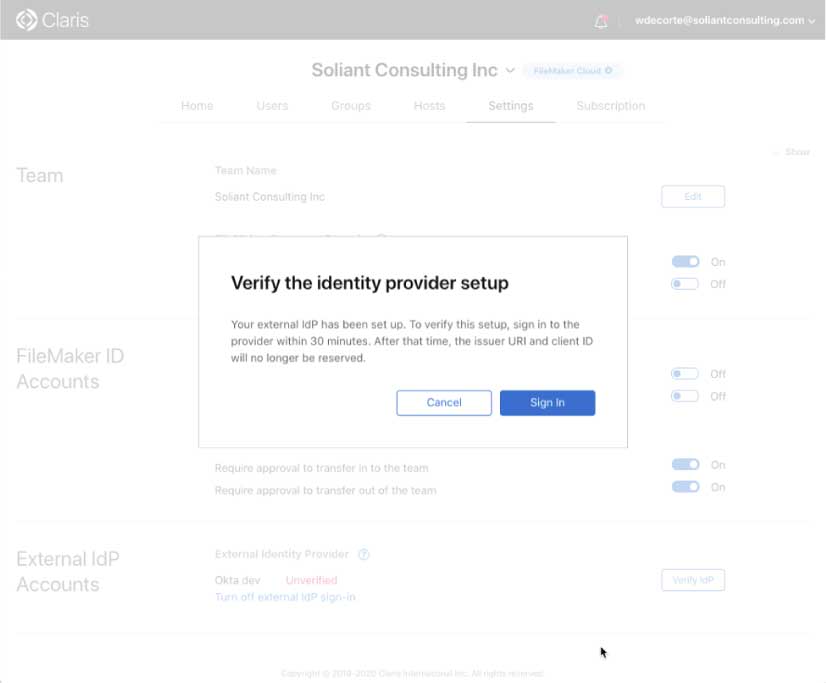
The final setup in this part of the setup will prompt you to log into Okta to verify all the settings.
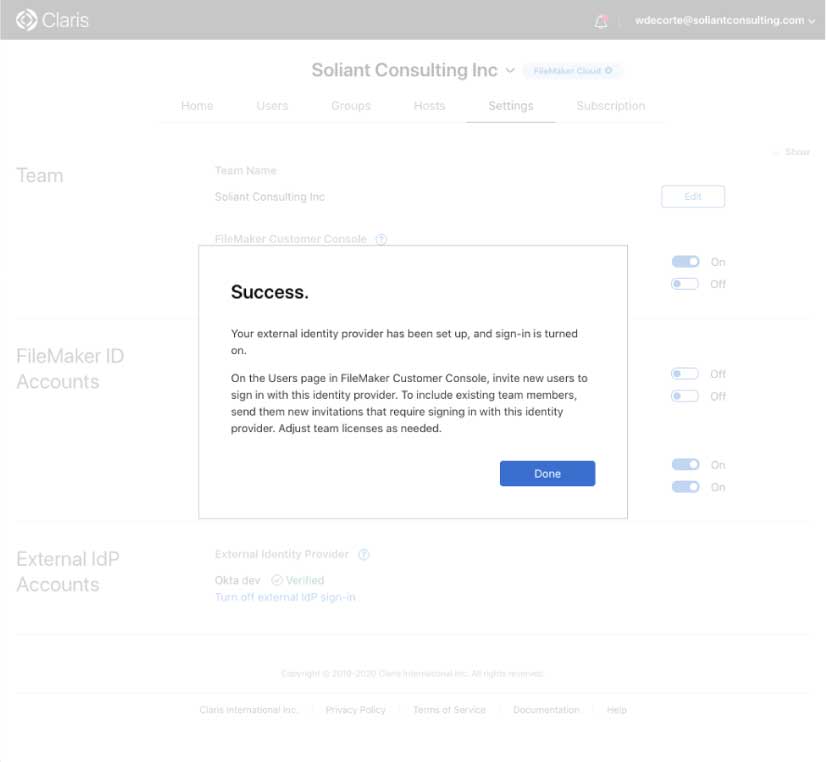
Your Integration is Live
After that, login into Okta; you are all set, and the integration is active:
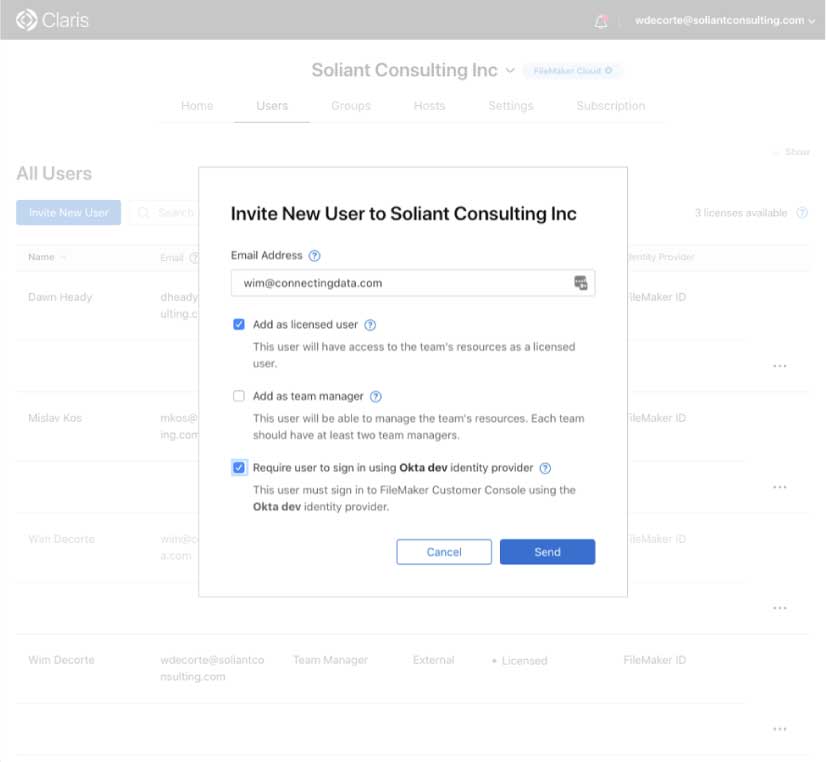
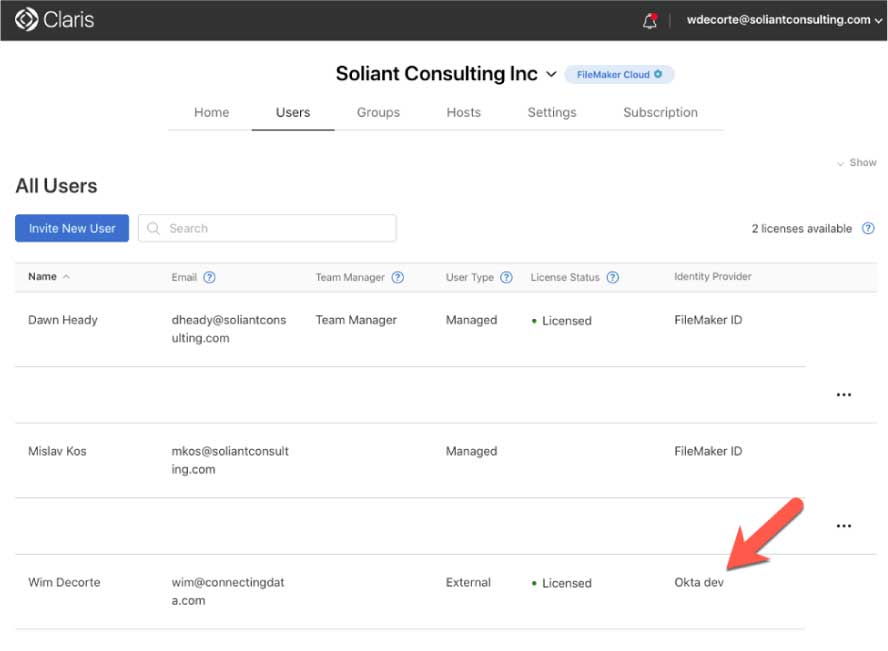
The next step is to go the “Users” section of your Customer Console and invite one or more of your Okta users by toggling on the option at the bottom to indicate that this user will be authenticated through your chosen IdP.
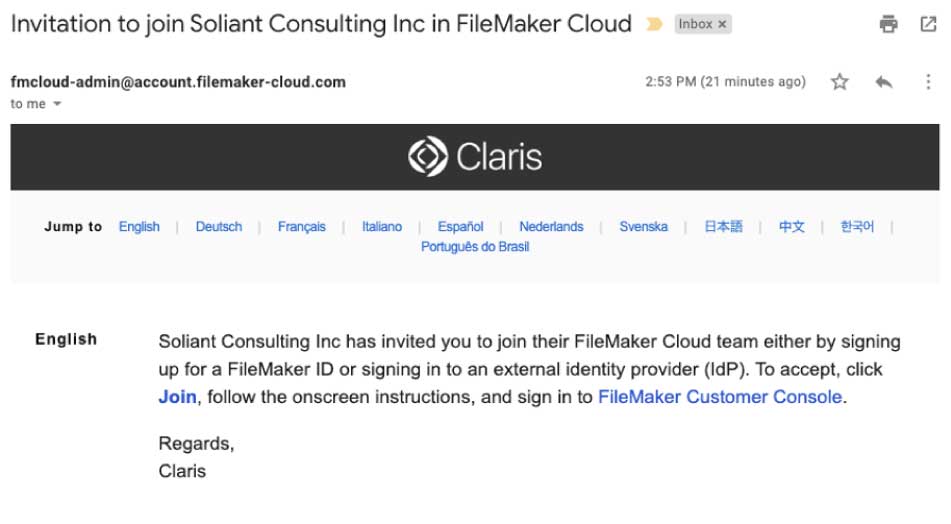
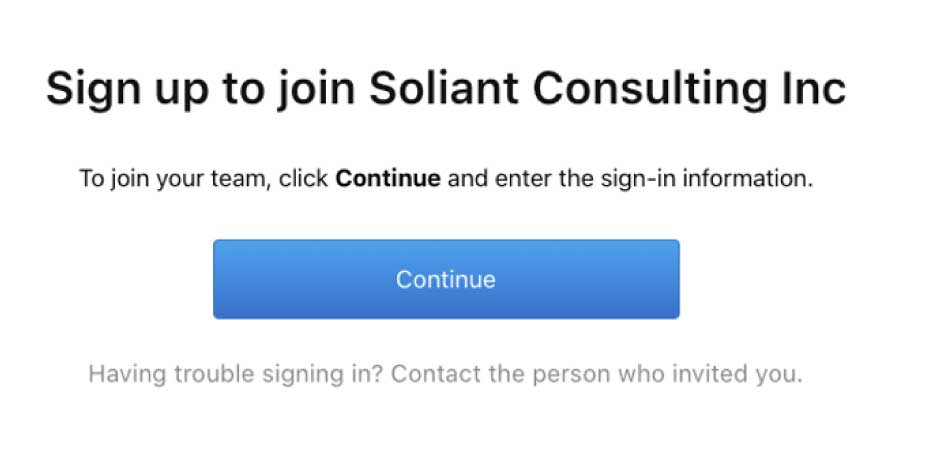
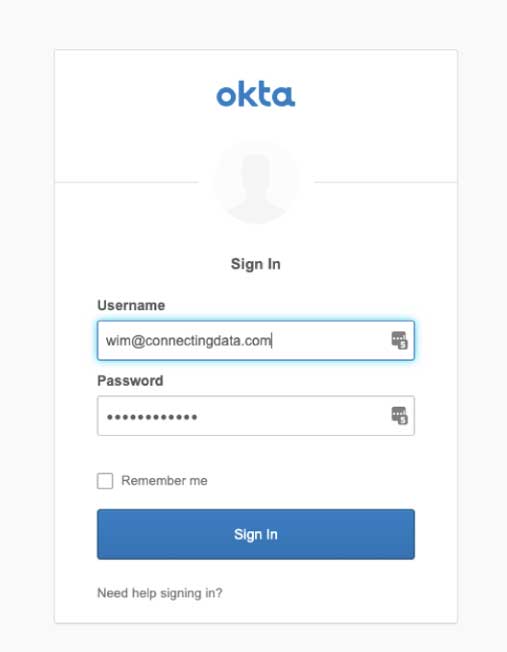
That user will receive an email invitation (figure 10a), and when they click to join your team (figure 10b), they will be taken to the Okta login page (figure 10c) to verify their identity:
When the user completes this process, they will show up in your Customer Console as a registered user with an indication that their identity is not governed by FileMaker ID but through your chosen IdP.
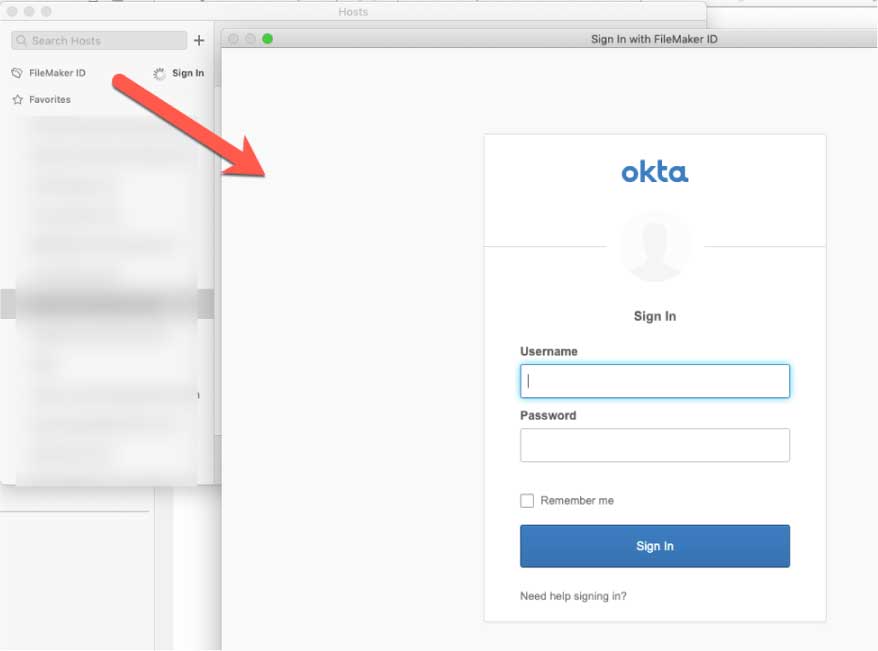
The user can then log into FileMaker Pro 18v3 to see the files hosted on your FileMaker Cloud. When they type in their email address, FileMaker Cloud will detect that their account is governed by Okta and will present the Okta login page instead of the FileMaker ID login page:
Admin API Enhancements
The second major new feature in FileMaker Cloud 2.1 is the added Admin API functionality. The Admin API now allows for uploading files to FileMaker Cloud and running the Data Migration Tool. Both of these have the potential to facilitate and automate pushing updates to your solutions.
The documentation describes the new calls and how to use them; below, we will walk you through an example. This blog post comes with a Postman collection that you can use to test against your own FileMaker Cloud instance.
This part of the Admin API requires you to authenticate with an FM ID token. That is different than using the Admin API with your on-premise FileMaker Server, where basic authentication is used (just your username and password). Both the Data API and the Admin API on FileMaker Cloud uses a more complex routine. See our blog post on how to authenticate to the FileMaker Cloud Data API and download the mini web services that make that part easy.
The API requires a set number of steps in the right sequence. To upload a file that means:
- Authenticate and get an FMID token
- Exchange the FMID token for a session key
- Optionally – but a good idea: check the available hard disk space
- Create an upload session
- Start the upload session
- Upload the database (if the file is bigger than 500MB, repeat this for the required number of chunks)
- End the upload session
Running the Data Migration tool is a single API call that uploads the clone
- Execute the data migration
Uploading a File
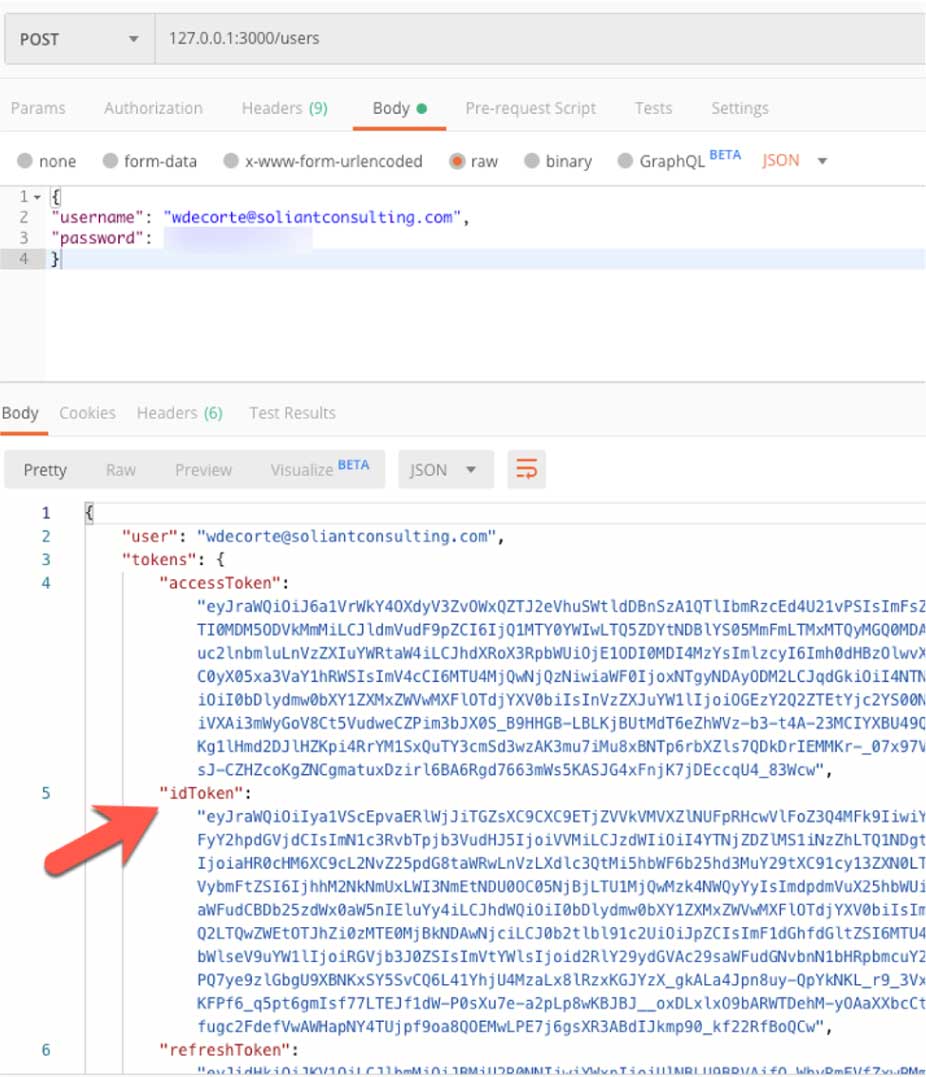
The very first step then is to get a FileMaker ID token. That’s what the blog post describes, using VS Code we run that web service locally and pass it the username and password of my FileMaker ID account. From the response, we grab the ‘idToken.’
With the token, we can now make our first call to the Admin API itself and get a session key. The endpoint and headers are described in the documentation. This is where we use that FMID token in the Authorization header.
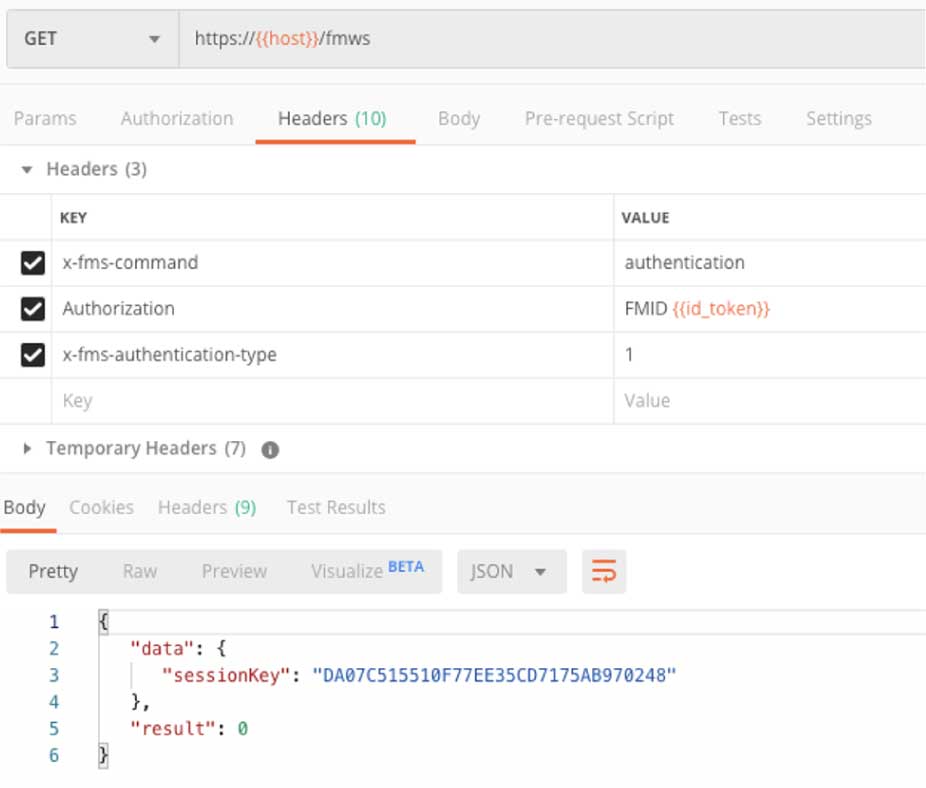
The result is a session key that we need to use for all subsequent calls.
The next call we want to make is to check how much disk space is left on our server:
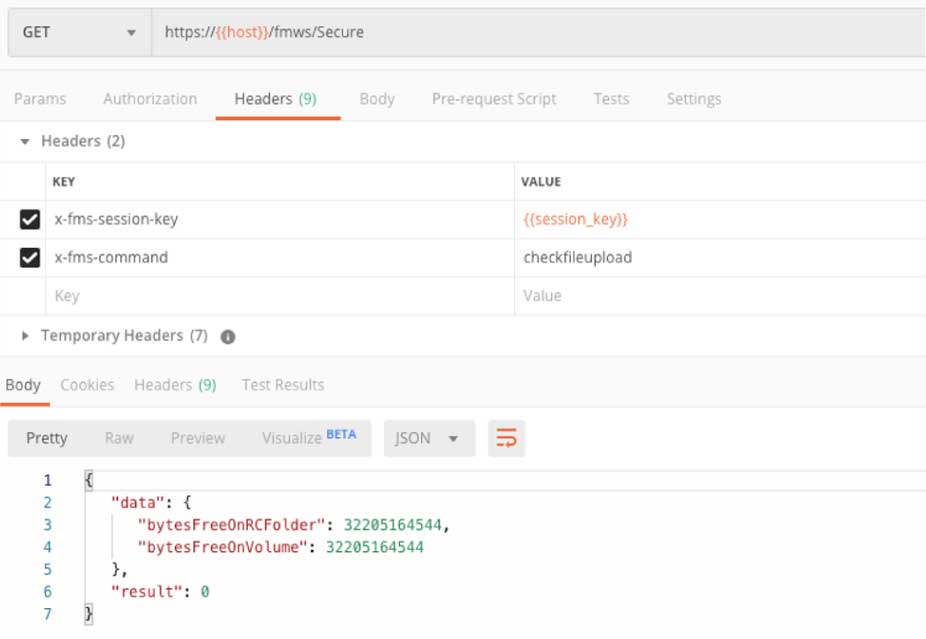
Even though the API may respond with a response code of ‘200,’ which typically means ‘success;’ it is important to check the response headers, specifically for what is returned in ‘X-FMS-Result.’ That will contain the FileMaker Server error code.

When we know we have enough disk space left on the server, we can create an upload session that gives us temporary upload URLs for our file and (if needed) its Remote Container data.
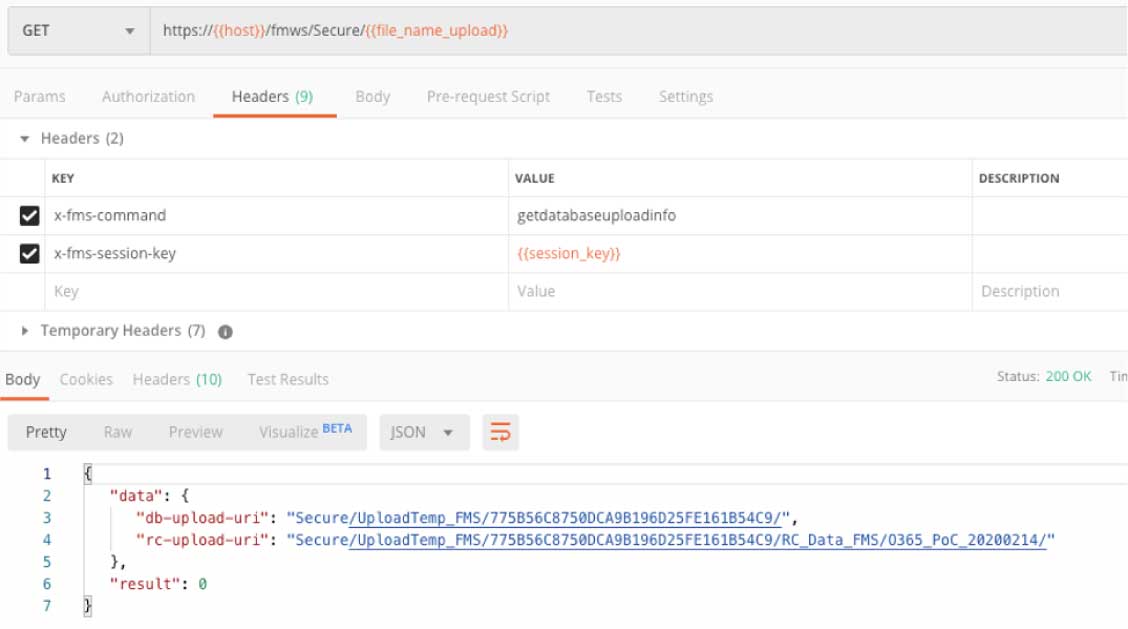
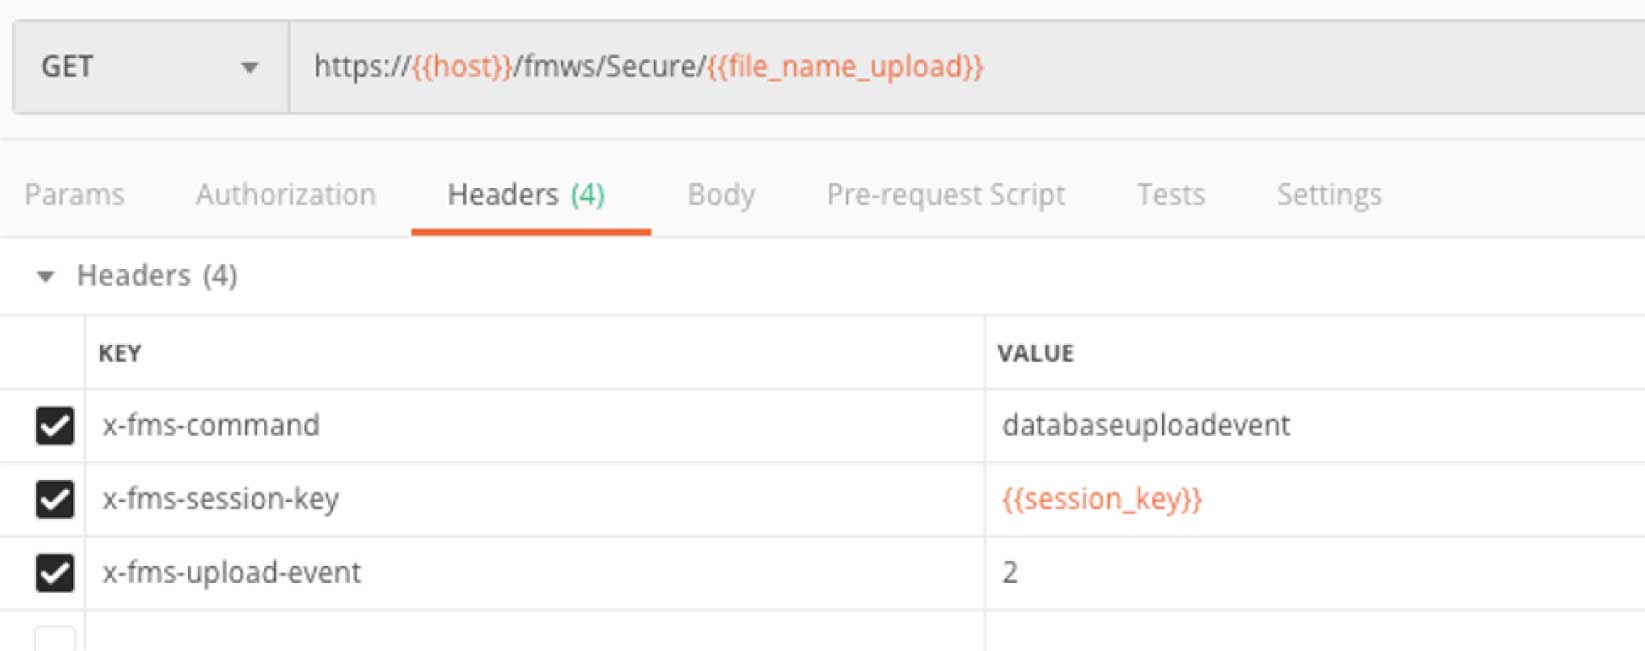
One thing that you will note is that from here on, all the API calls use the same url. The only difference is in what command is specified in the ‘X-FMS-command’ header.
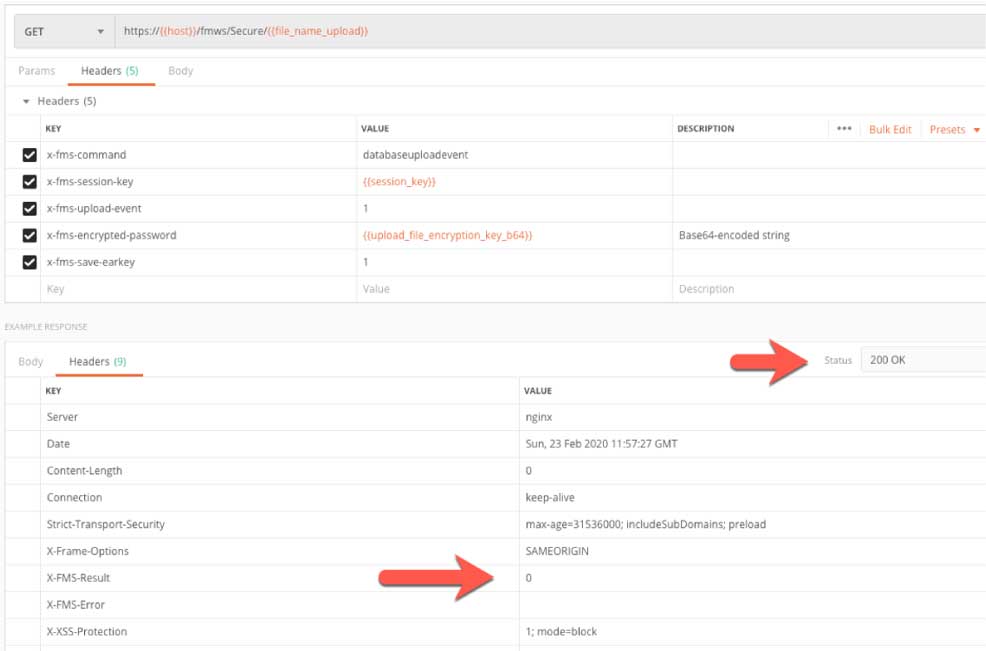
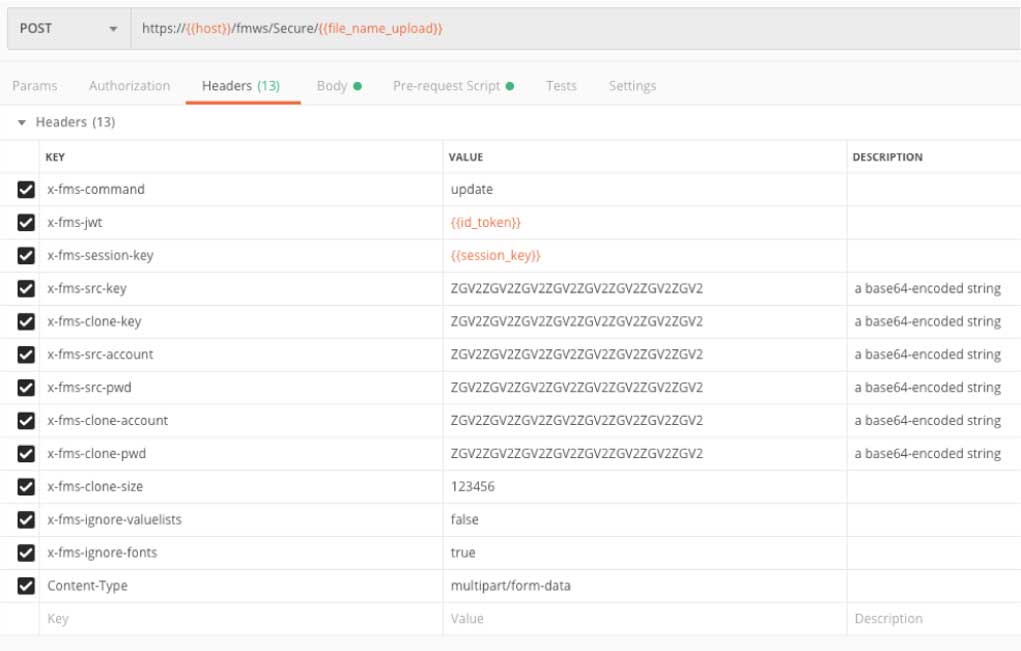
Before we actually start uploading the file to this temporary URL, we have to signal to the API that we will begin that upload. Note the X-FMS-command and the X-FMS-upload-event values in the headers to do that.
Since our FileMaker file is EAR-protected, we also pass along the encryption passkey (in a Base64-encoded string). This call does not return a body like the API calls up to this point, so we need to make sure to check the HTTP response code and the X-FMS-Error response header.
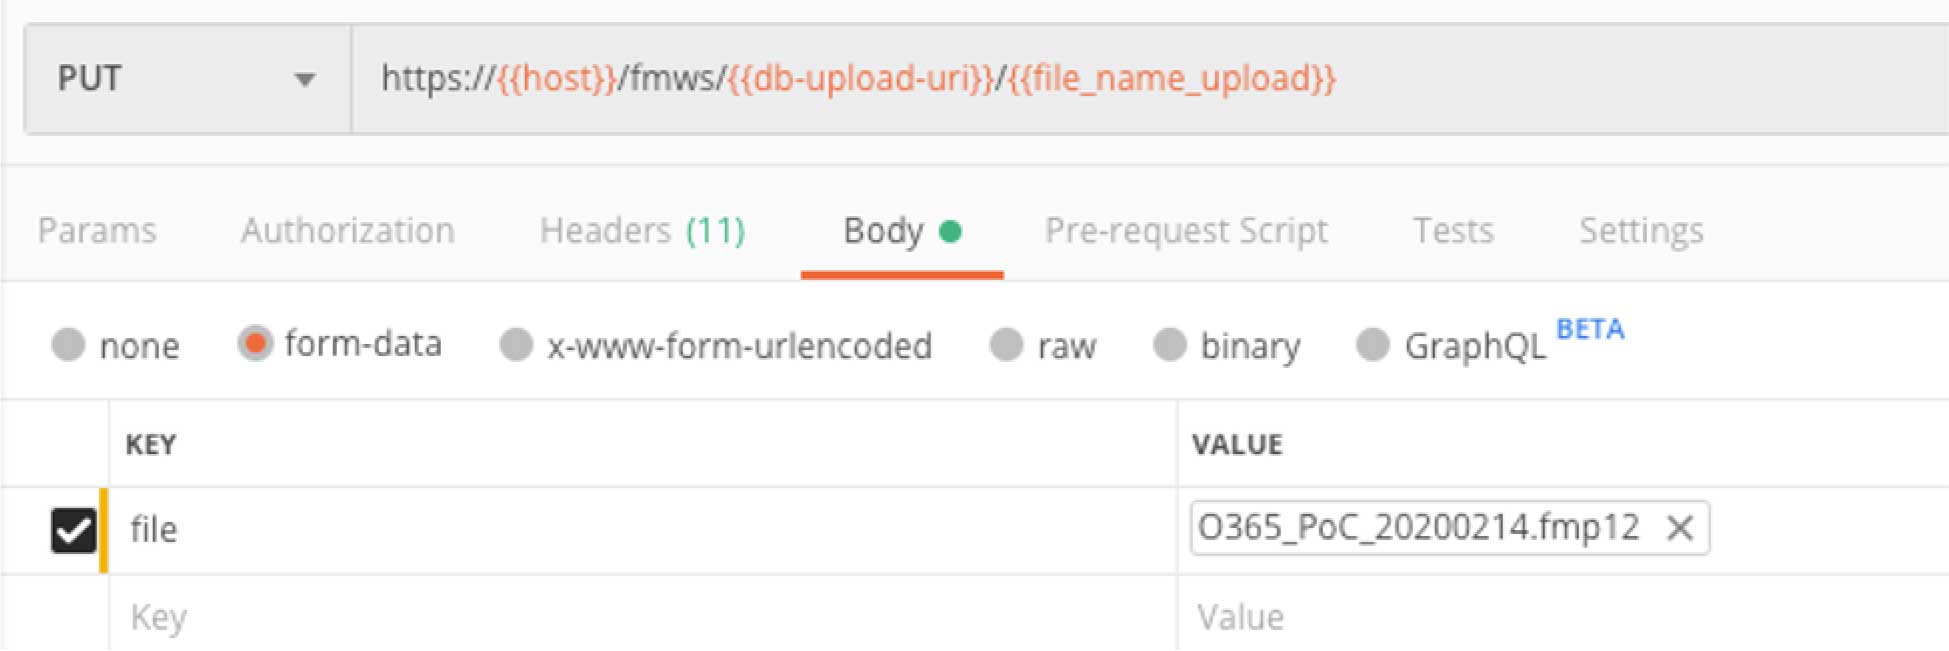
FileMaker Server did not throw an error so we can send the file. The headers are straightforward, but note that this time the HTTP verb is “PUT.”
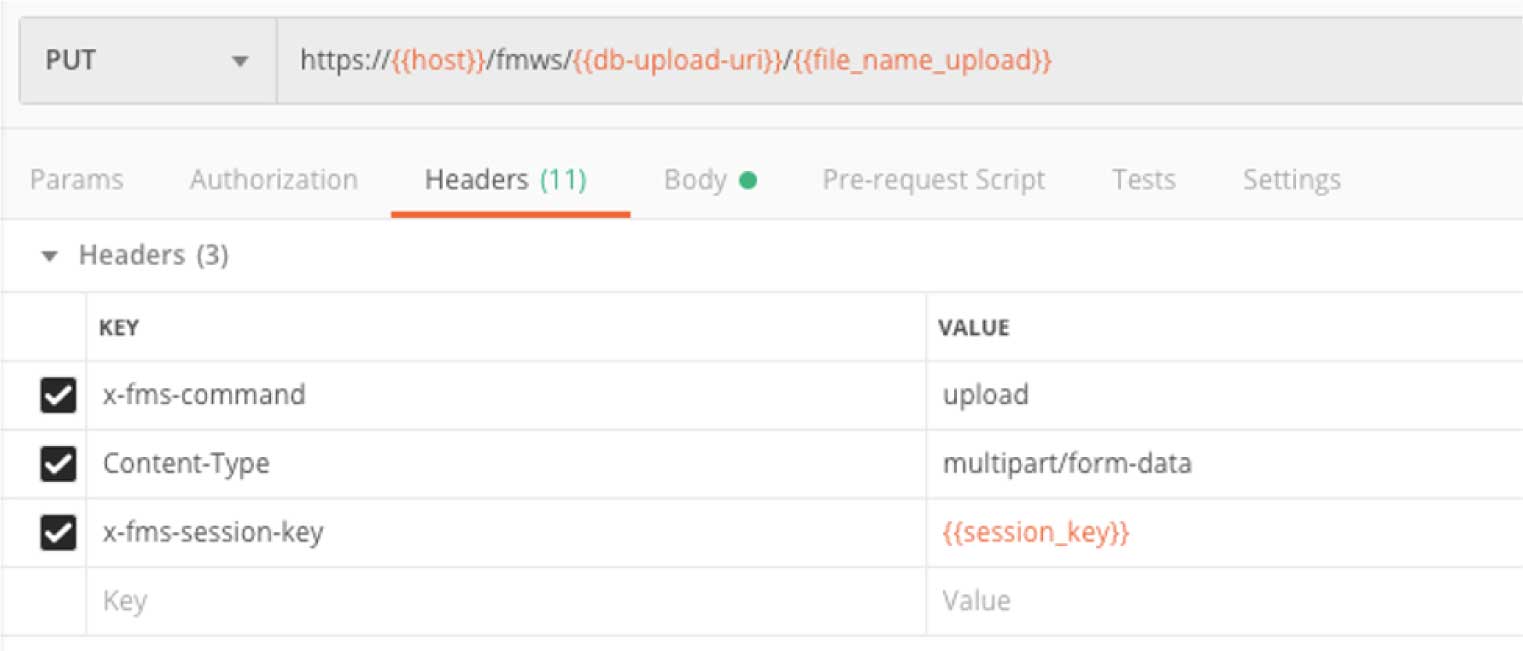
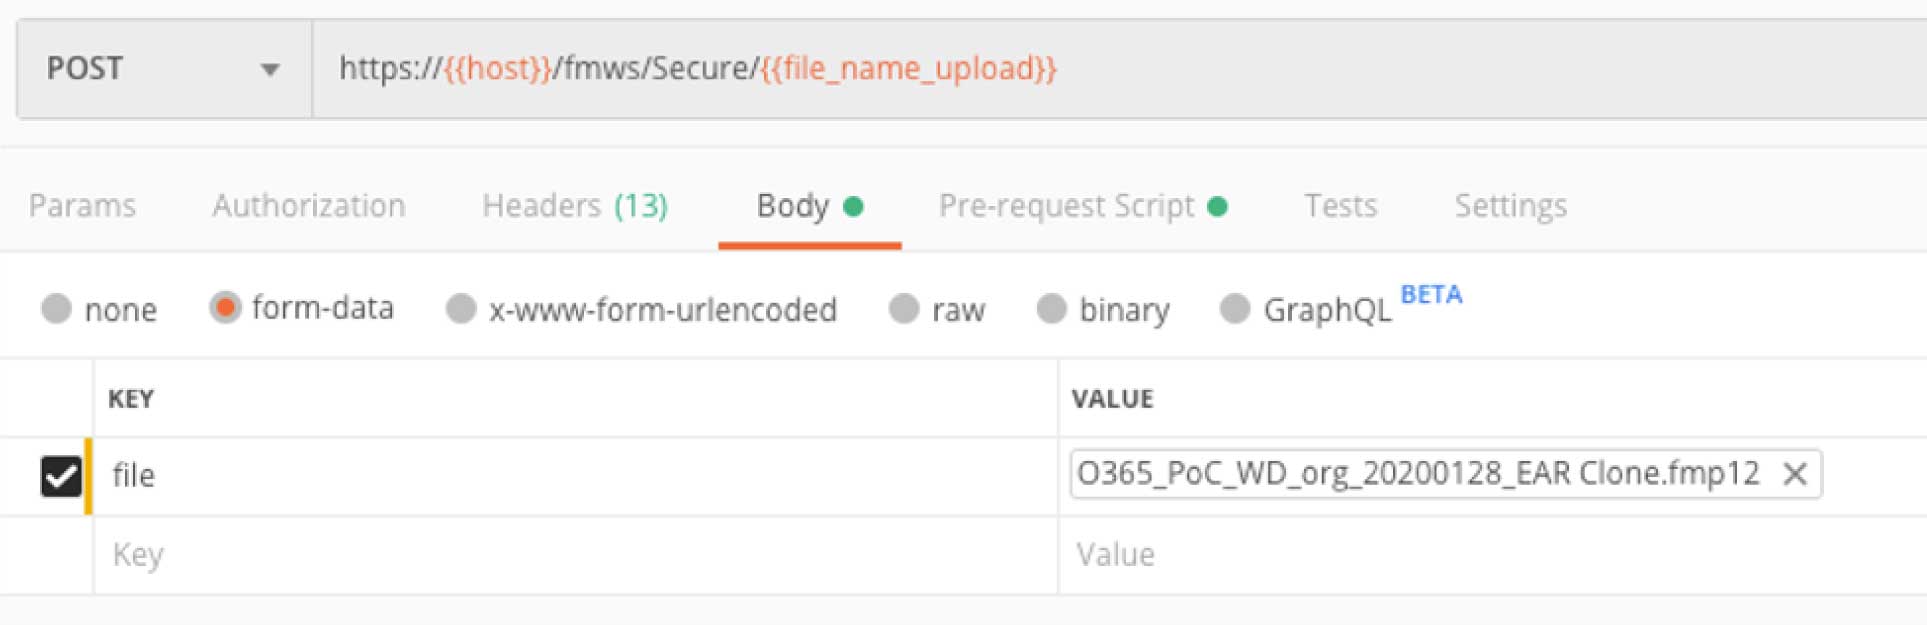
The body of this request is the file that we are uploading in form data.
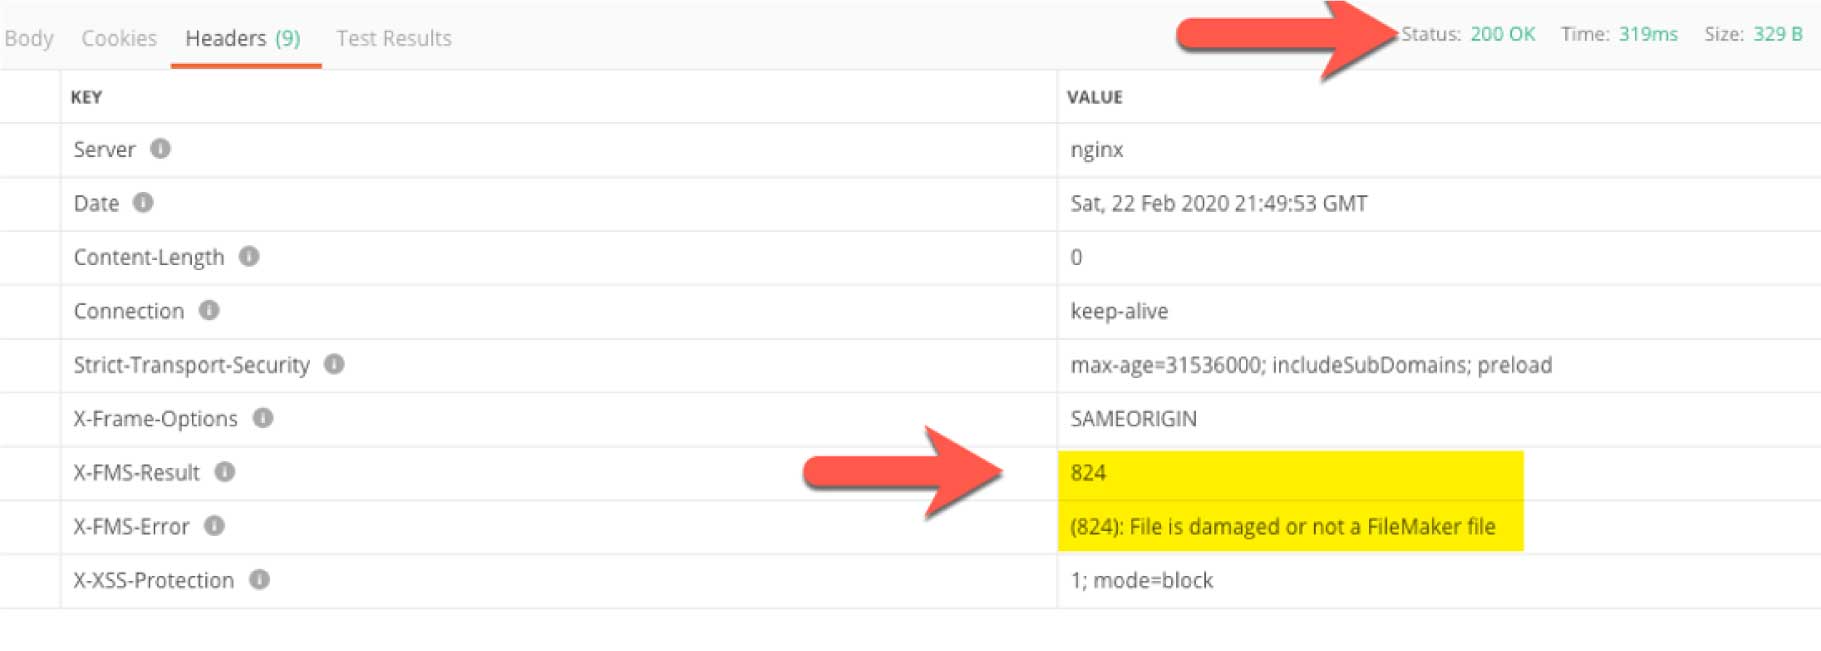
Also note that while the HTTP response code is 200 and the X-FMS-Error is 0, it does not mean that the file was actually uploaded ok. To know whether we were successful, we have to signal to the Admin API that we are done with the upload. This call is identical to the one we made to start the upload except that here the x-fms-upload-event value is 2 instead of 1.
At this point, we need to check whether FileMaker Server ran into an error. Figure 22 shows a good example of the API telling us that our API call was good (we get HTTP response code 200), but the X-FMS-Error tells us that FileMaker Server did not like our file, we got error 824.
Running the Data Migration Tool
The API call to perform a data migration is similar to the ones we used for uploading a file; we will, in fact, include the clone file in this call. The URL is the same as before and includes the name of the source file (the ‘old’ file).
There are many headers to include in this call, including the account and passwords of a Full Access account in both source and clone files, their encryption passkeys, the size of the clone, and some DMT parameters. The accounts, passwords, and encryption keys all need to be Base64 encoded.
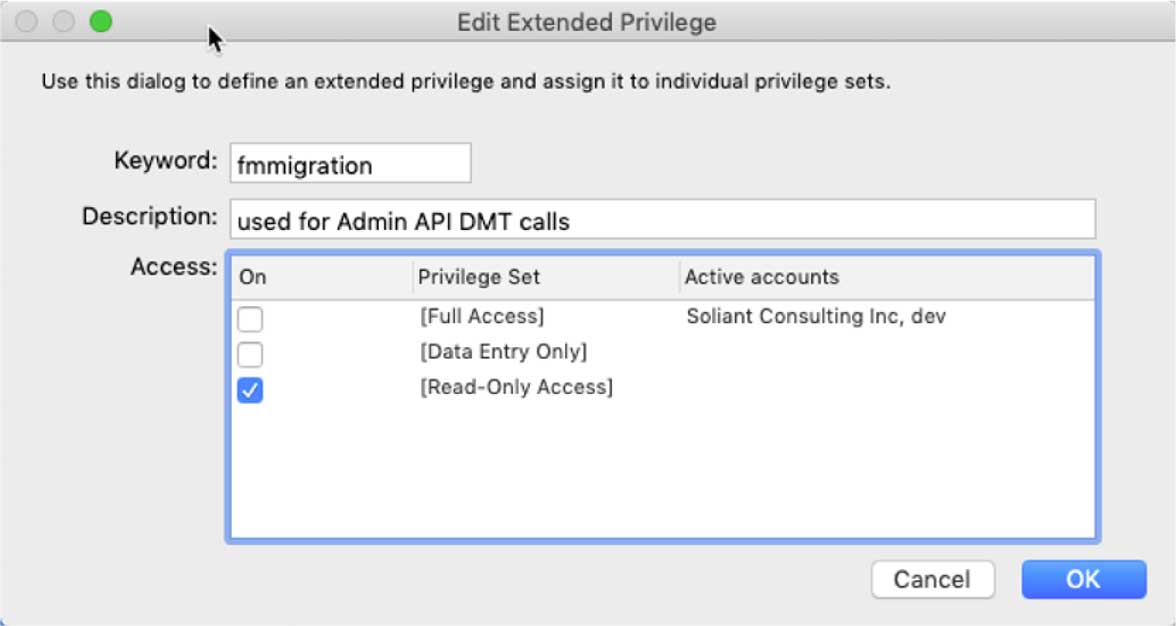
This functionality works, of course, when you use an account with [Full Access] privileges. But you can now also create a new extended privilege in your FileMaker file and name it “fmmigration.” Any account that has this extended privilege enabled in their privilege set can be used for this Admin API call, even if the account has no other rights and no rights to modify schema.
The Admin API call looks like this:
And the body is the clone file as form data:
As with other new Admin API calls, check both the response code and the X-FMS-Error response header to verify all actions worked. The response body, in this case, will be similar to the log file generated when you run the DMT yourself. That too will contain useful information.
We look forward to exploring these new API functions and how they reduce effort in deploying updated solutions.
We certainly hope this functionality gets included in the on-premise version of FileMaker Server soon.
Hey Wim,
Michael here from the other thread of trying to get my tokens. Still working!
I was able to go through all of the processes through Postman to create a new record in my FM solution which I was very happy about.
I started this journey because my company has a Microsoft Form they send out to customers to fill out and submit. Once submitted, it’s automatically sent to the Excel Online spreadsheet and is added as a new line. Office 365 has something called Power Automate (kind of like Claris Connect). They do not have any Filemaker connectors but I am able to create a custom connector. The security section is the biggest hurdle for me at the moment. Trying to figure out what I learned about the tokens and apply it here. For “Authentication Type” they do have a OAuth 2.0 option. What I would like to do is create a flow in Power Automate that is triggered when a customer hits the submit button to send it to my FM Solution and create a new record with the answers they supplied. Would OAuth 2.0 be the solution so it’s fully automated and no user interaction needs to happen for authorization and tokens and stuff? As you can tell I am still very new to this and am trying to read up and research as much as possible, but still a little stumped. I tested a sample flow to populate answers in Google Sheets upon Form submission and it did work. But they already had a google sheets connector and I logged into it and it keeps the login. But I know FM is different because of the token 15 minute timeout. Just want to be able to automate it all without any user actions. Customer submits and it get’s sent to FM and creates a new record, viola!
Any help or suggestions of where to look to help me is greatly appreciated.
Michael
Hi Michael,
That’s a longer conversation than this medium is good for. My Claris Engage On-Demand session on Webhooks is all about the kind of setup you have in mind. Contact me by email so that we go over your options in a little more detail.
Best regards,
Wim