Welcome to my last post in a four-post series on leveraging the Marketing Cloud. I’m sharing insights on effectively engaging more audiences with less effort through email automation in Salesforce.
Haven’t read my first three posts? Catch up here:
- Part One: More Connections, Less Effort: An Introduction to Marketing Cloud Automation
- Part Two: More Connections, Less Effort: Audience Segmentation Automation in Salesforce Marketing Cloud
- Part Three: Setting and Forgetting Email Personalization with Marketing Cloud Automation
This series of posts has highlighted an important truth about small marketing and sales teams. They may face an uphill battle to send out personalized mass emails and engage targeted audiences with tailored content. However, all they need is automation tools.
That’s where the Salesforce Marketing Cloud comes in. In previous posts, I’ve shown how to create segmented lists and build highly-targeted marketing emails once and then run forever. Even better, you add new contacts to Salesforce that fit the specific criteria, the dynamic list in Salesforce automatically pulls them in. Your list is always up to date.
In this blog post, I’m going to focus on wrapping up this multi-step process. I’ll start with setting up email automation in Salesforce and Marketing Cloud.
Putting Everything Together with Automation
We’ve pulled together the list segmentation and content personalization pieces of the puzzle. Now it’s time to put them together and start finalizing the process.
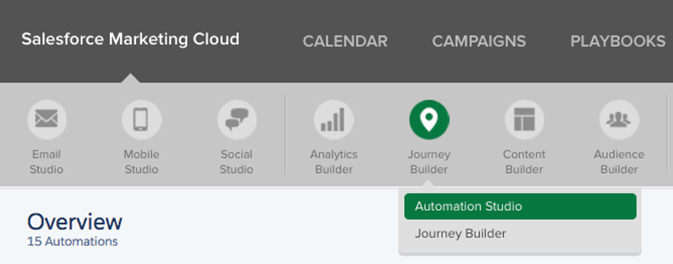
To do that, we will use Automation Studio (Figure 28).
Automation Studio is a drag and drop interface to assemble and sequence a set of activities – such as those we have created in the foregoing steps – to accomplish a specific goal.
Creating an automation is a straightforward process. However, if you haven’t done one before, check out this excellent documentation from Marketing Cloud.
During this process, you’ll need to add a workflow – the set of activities to perform in sequence – associated with this automation. Then just schedule the automation to run – The configuration procedure is essentially the same for every activity.
Our completed automation should look like what is shown in Figure 29.
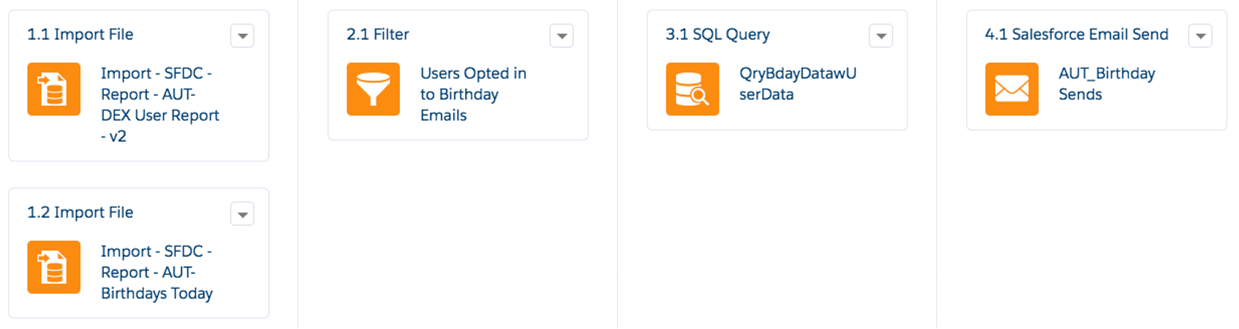
Here is a brief description of what it does.
- Step 1.1 – Import contact owner data using the import activity
- Step 1.2 – Import audience data using the import activity
- Step 2.1 – Once both imports are complete, merge the data into another data extension using the query activity
- Step 3.1 – Then filter out the opt-outs and move the opt-ins into the final target data extension using the filter activity
- Step 4.1 – Trigger the email send
Once done, save the automation, and set a schedule.
Scheduling the Email Automation in Salesforce
You’re almost finished! Simply click the Schedule tab, and enter a schedule (Figure 30).
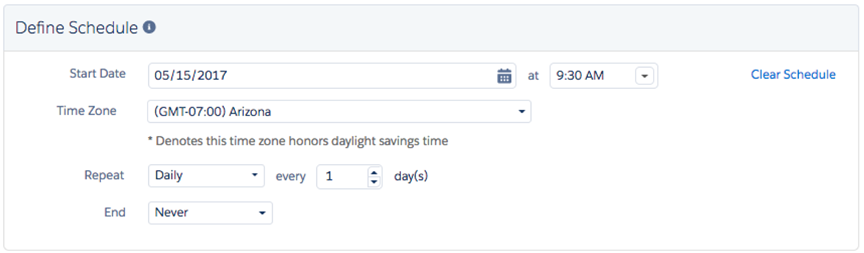
In my example, I have scheduled it to run daily at 9:30 am. Every morning at 9:30 am, every contact with a birthday on that day will receive a personalized message from his/her point of contact automatically. This email automation in Salesforce just keeps working in the background. It helps you take advantage of increased engagement with your contacts in an inexpensive, scalable and resource-light way.
Next Steps – Tracking Your Success
Of course, a marketer’s job is never finished. Now that you have personalized content in place, you’ve got to analyze its success rates and optimize as needed. Content only gets better with time and optimization. I recommend you check back in every once in a while to check how well your target audiences are engaging with your personalized content.
To send tracking data to the Sales Cloud, you need to integrate the Marketing Cloud and Sales Cloud and ensure the target data extension is located within the tree of folders underneath the “Salesforce Data Extensions” root folder. I covered this in my second post.
To view the results, you can create a report using the Individual Email Results. It may take several hours for tracking data to reach the Sales Cloud after the email is sent, so don’t worry if you don’t see them right away.
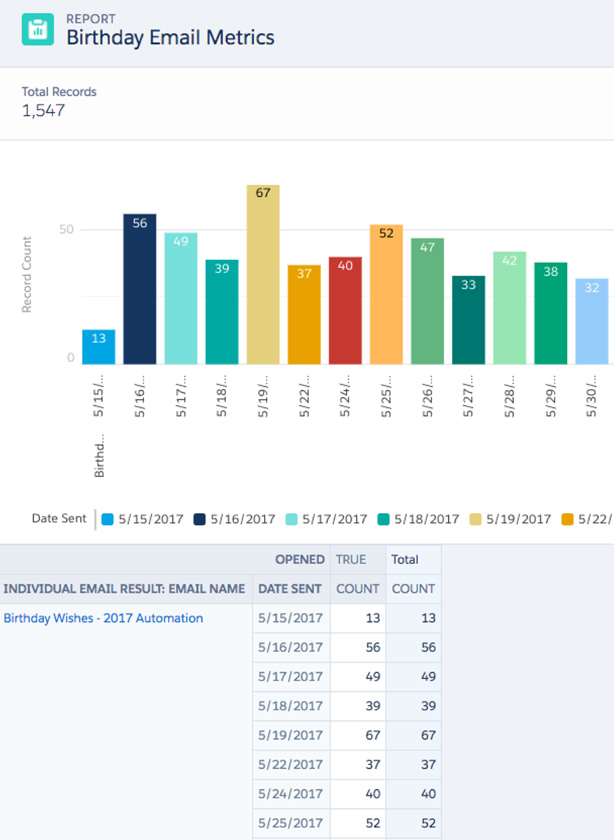
To give you an idea of the data you’ll be able to analyze, here is a sample report showing the number of email opens by email sent date (Figure 31).
To see the tracking data on an individual contact, just add the Individual Email Results related list to the page layout.
Here’s some sample tracking data (Figure 32).
Congratulations, and Good Luck!
And that’s it! Good luck with your email automation in Salesforce! Using this step-by-step process, small marketing teams can launch mass email automation in Salesforce and increase engagement among prospects and customers without manually doing all of the work. By connecting Marketing Cloud and with Sales Cloud, you can automate most of the process and reach more target audience members faster.
I’m glad I could share this blog series with all of you. If you’d like to have all of the information in one place, you can download the comprehensive white paper here:
If you have any questions, please feel free to ask in a comment below.