Sending and receiving texts from your FileMaker app has long been possible, but the speed and ease of setting it up have improved significantly with the release of Claris Connect.
The other options are still viable, though, so which one you choose will depend on the implementation and license costs, the skillsets available to you, and your deployment preference. If your workflow involves integrating with other external services, like Office 365 or Formstack, that will further tip the scale in favor of Claris Connect.
No matter which option you choose for your FileMaker solution, you will need to work with an SMS gateway or aggregator to send and receive text messages. (We will use Twilio in this blog post.) Sending texts is straightforward and is done by making a call to the provider’s API. Receiving texts is a little more complicated since it requires you to set up a webhook which the provider can call once they receive the inbound message.
The webhook is the key piece here. We can imagine giving Twilio a webhook URL that calls the script Data API endpoint:
https://{host}/fmi/data/{version}/databases/{database-name}/layouts/{layout-name}/script/{script-name}When Twilio receives an inbound text message, it could simply hand it off to our FileMaker script. But the Data API requires us to make a login call first. And, if we don’t want to risk tying up our finite supply of Data API sessions, we will need to log out at the end as well. But API providers like Twilio don’t allow for this type of chained API calls: 1. Login, 2. Call script, 3. Logout. Instead, they ask us to provide a single webhook URL that would need to do those three things for us.
Claris Connect solves this problem by acting as the webhook for the API provider. It simplifies our deployment profile since we don’t need to worry about setting up and maintaining a webhook elsewhere. It also makes the implementation easier, since authoring a Claris Connect flow is considerably simpler than setting up a webhook. But the price point is higher as well.
Confirming Appointments Via Text
Let’s take a look at how we can implement this functionality using Claris Connect.
To work with a more concrete example, let’s suppose we want to send a text to our customer to confirm an appointment. To do this, we could set up a FileMaker Server schedule to look for customer appointments that are due tomorrow and then text each of those customers to confirm the appointment. The customer can then reply to confirm or request a call back to reschedule.
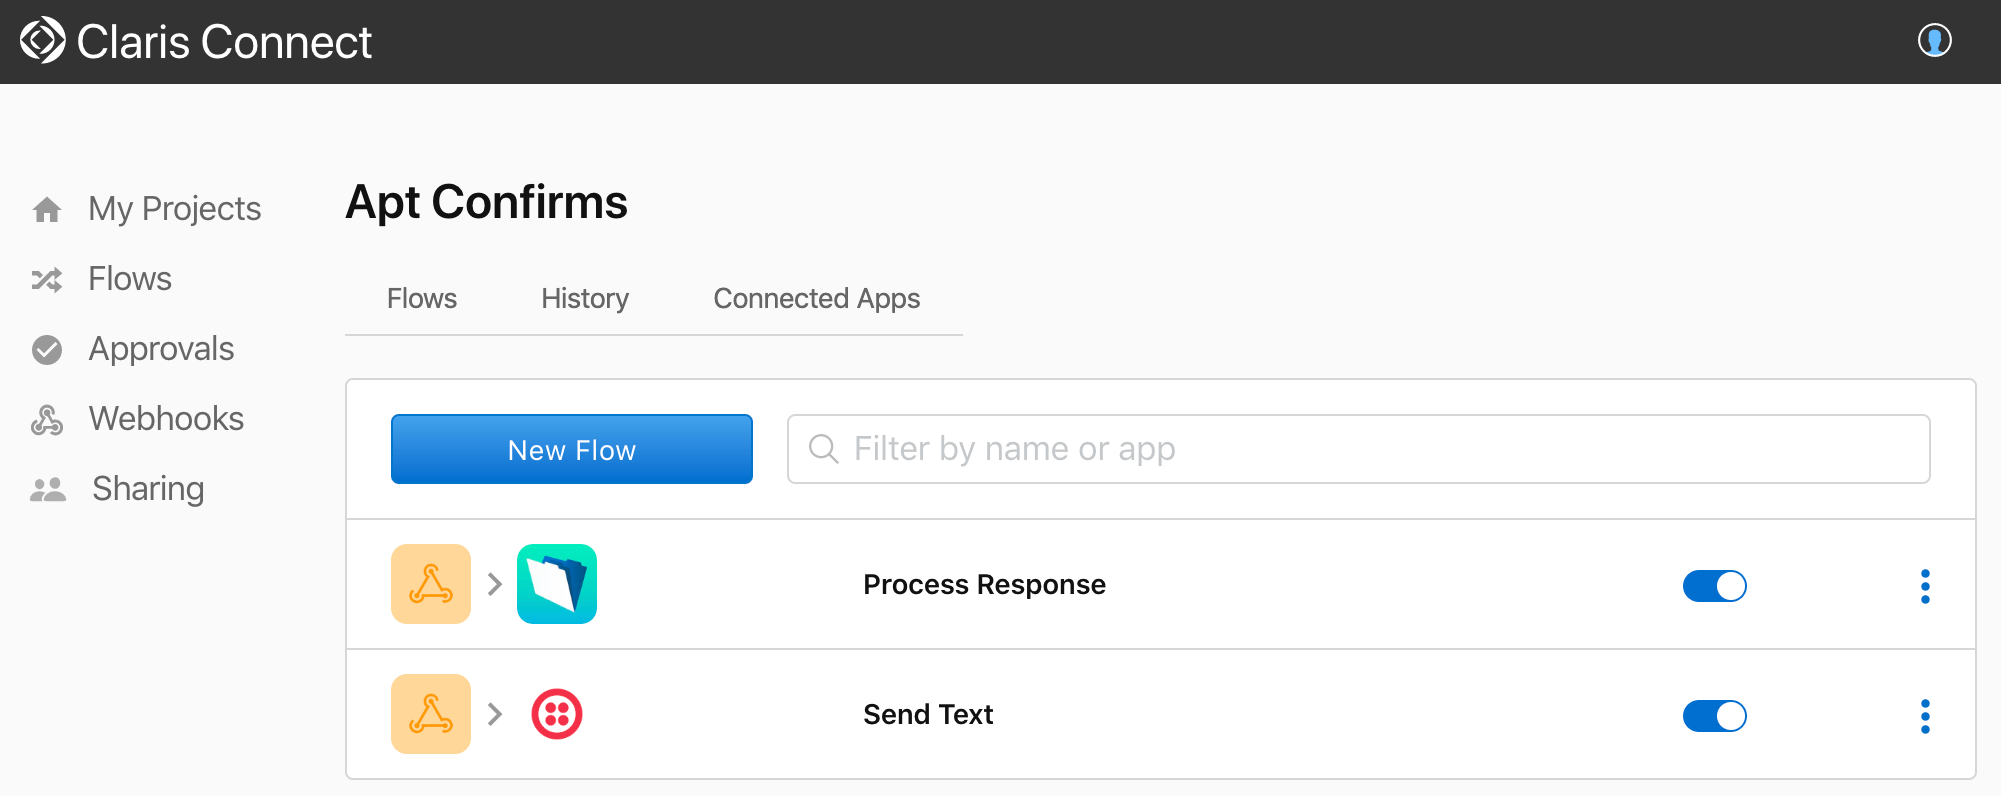
When setting up Claris Connect flows, it can be useful to describe what we want each flow to do using simple, succinct statements. In our case, we will have two flows instead of just one because our workflow is interrupted by the fact that we have to wait for our customer to respond to our text message. This “interruption” splits our flow into two distinct flows.
- Send text: A FileMaker script schedule tells Twilio to send an SMS message to a customer to confirm tomorrow’s appointment.
- Process response: When the customer sends an SMS reply, Twilio tells FileMaker whether or not the appointment has been confirmed.
The first flow – sending a text message – could be accomplished directly from within FileMaker without involving Claris Connect, but we’ll use Claris Connect here anyways to illustrate how easy it is to use.
Set Up Twilio Account and Project
As the first step, you will need to create a Twilio account if you don’t already have one. As part of creating your account, Twilio will automatically create a “project” for you. Even if right now you are only interested in testing out the sending and receiving of text messages, you may eventually want to try out other Twilio products. Or perhaps you may decide you want to implement additional workflows in slightly different ways. Projects are a way of compartmentalizing these different efforts into separate areas.
When a new project is created, Twilio asks you to provide a mobile phone number (for example, your cell phone) to associate with that project. By default, the new project will be created as a free trial.
The automatically created project will be named “My first Twilio project.” You can rename your project to something more meaningful by going to the console and then navigating to Settings.
Next, go to the project dashboard and take note of the account SID and auth token.
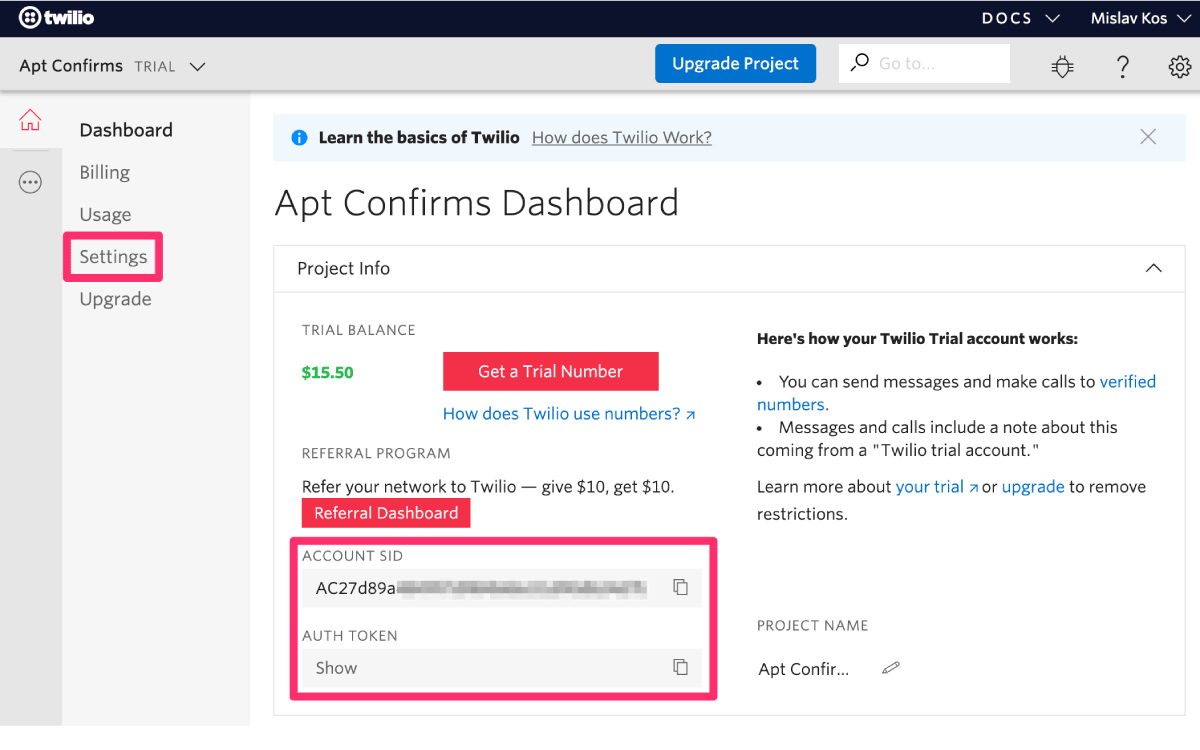
Then click on “Get a Trial Number” and take note of what that phone number is. This is where the confirmation texts will be sent from.
As the next step, we’ll need to add a verified phone number to receive our confirmation texts. Eventually, these phone numbers will be our customer phone numbers, and we won’t need to tell Twilio what they are ahead of time. But when using a free trial project, Twilio will only send texts to verified phone numbers. Go to the Verified Caller IDs page and add a mobile phone number that you would like to use. This will need to be a phone that you have access to, so it will be simplest to use your cell phone.
Create “Send-Text” Webhook
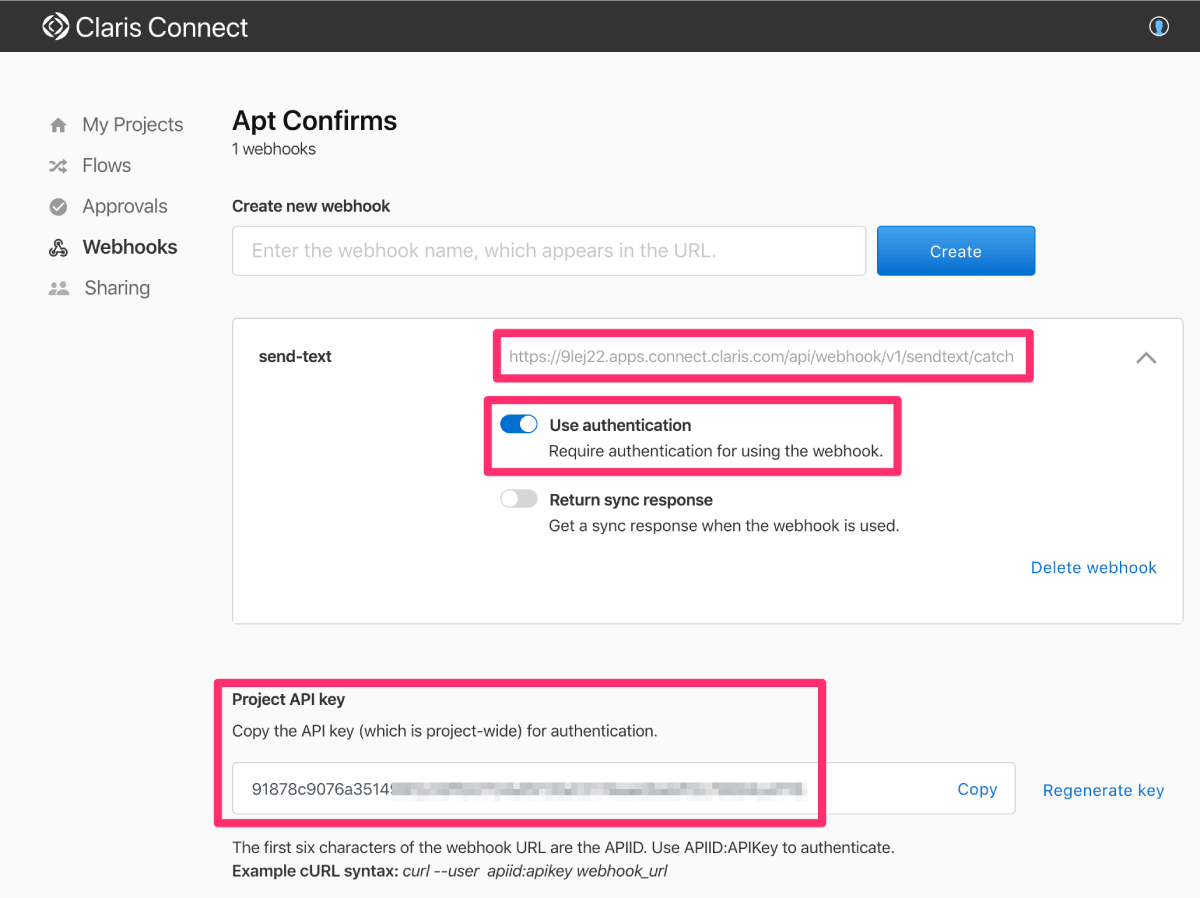
In Claris Connect, create a new project, navigate to “Webhooks,” and create a webhook named “send-text.” Our FileMaker app will call this webhook to send the confirmation text message. Take note of the webhook URL.
Enable “use authentication” and take note of the project API key, which we’ll need to use later for authentication.
Create “Send Text” Flow
In Claris Connect, create a new flow named “Send Text”. Select the “Webhooks” connector. Choose the “Incoming HTTP Request” trigger and click “Continue.” Then select the “send-text” webhook.
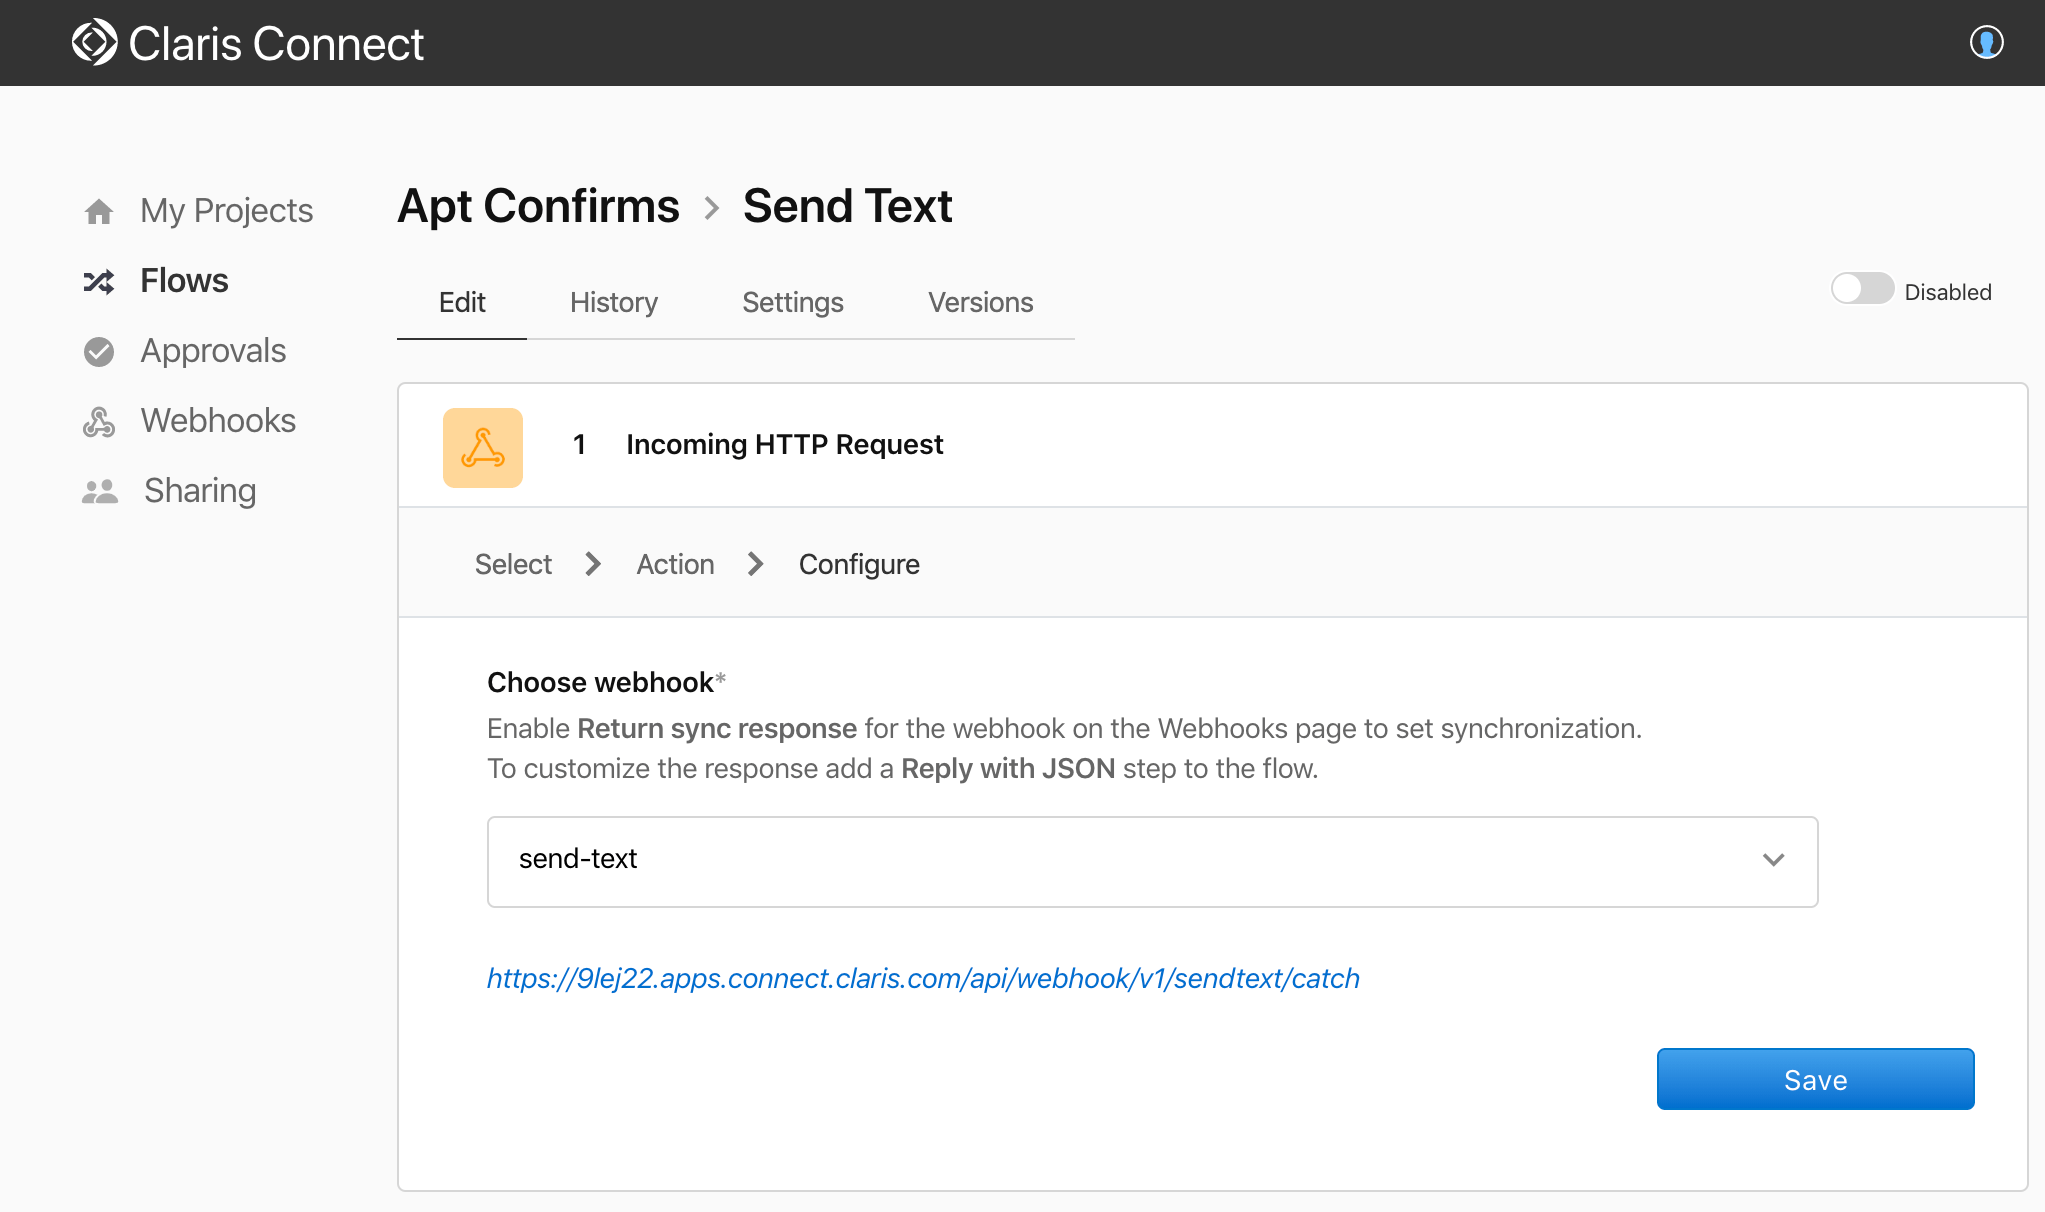
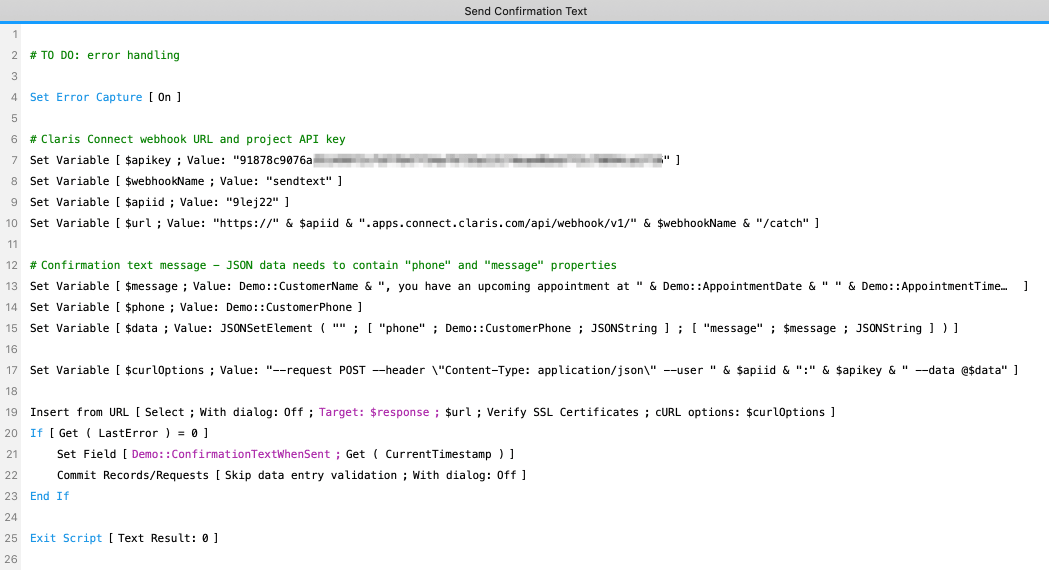
At this point, you will need to create and run a script in your FileMaker app to call the webhook. This will prime the flow step with sample data, allowing you to save and continue on. Here’s what our script looks like:
Add a second step and select the “Twilio” connector. Choose the “Send message” action and click “Continue.”
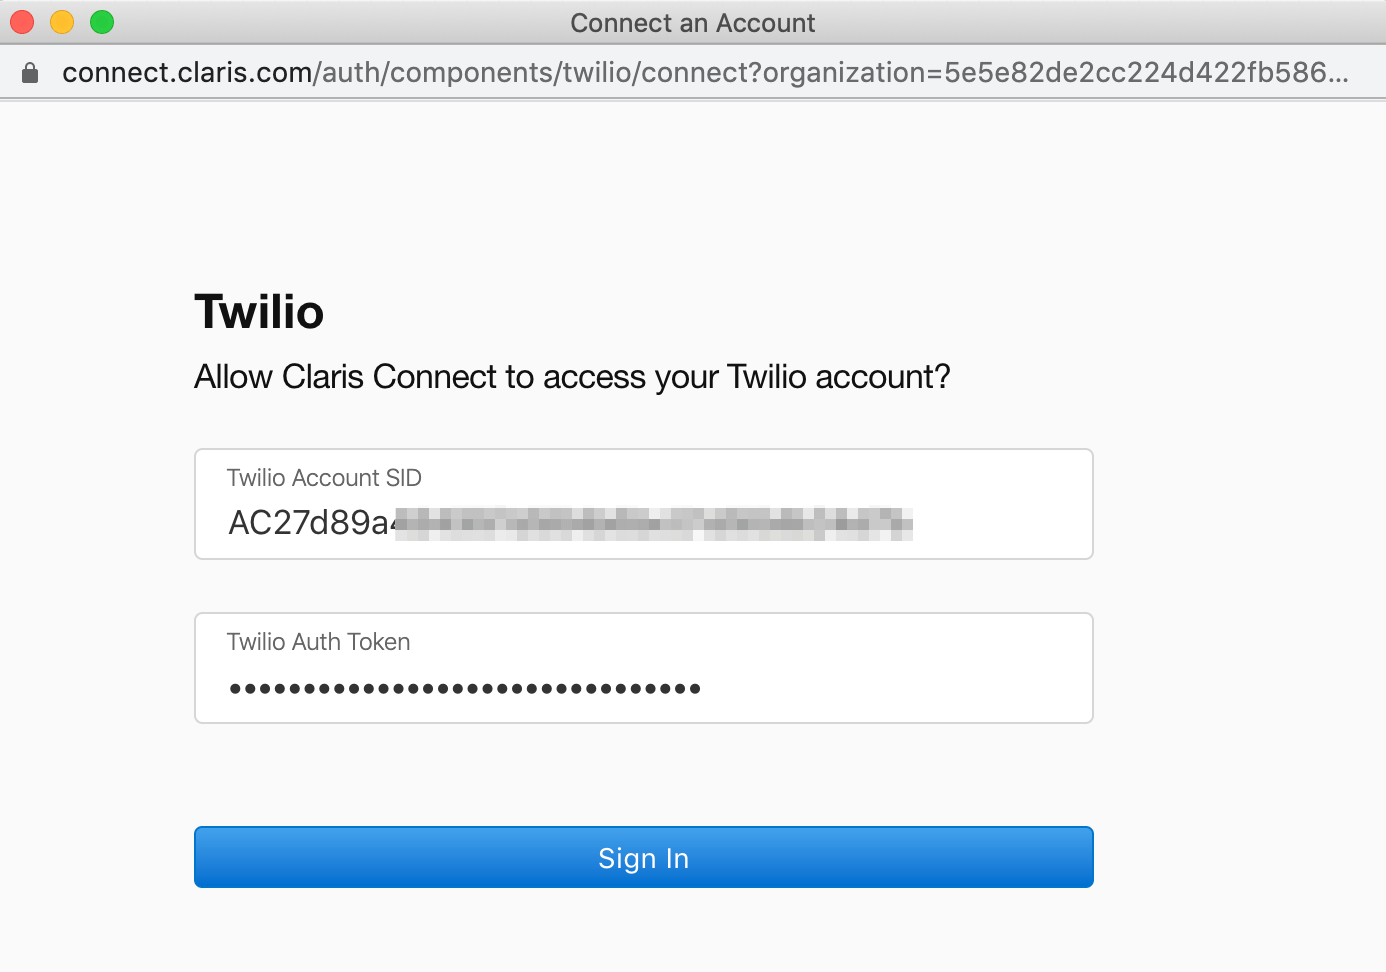
At this point, you will need to connect your Claris Connect account to your Twilio project. Click “Connect New Account” and enter the Twilio project account SID and auth token.
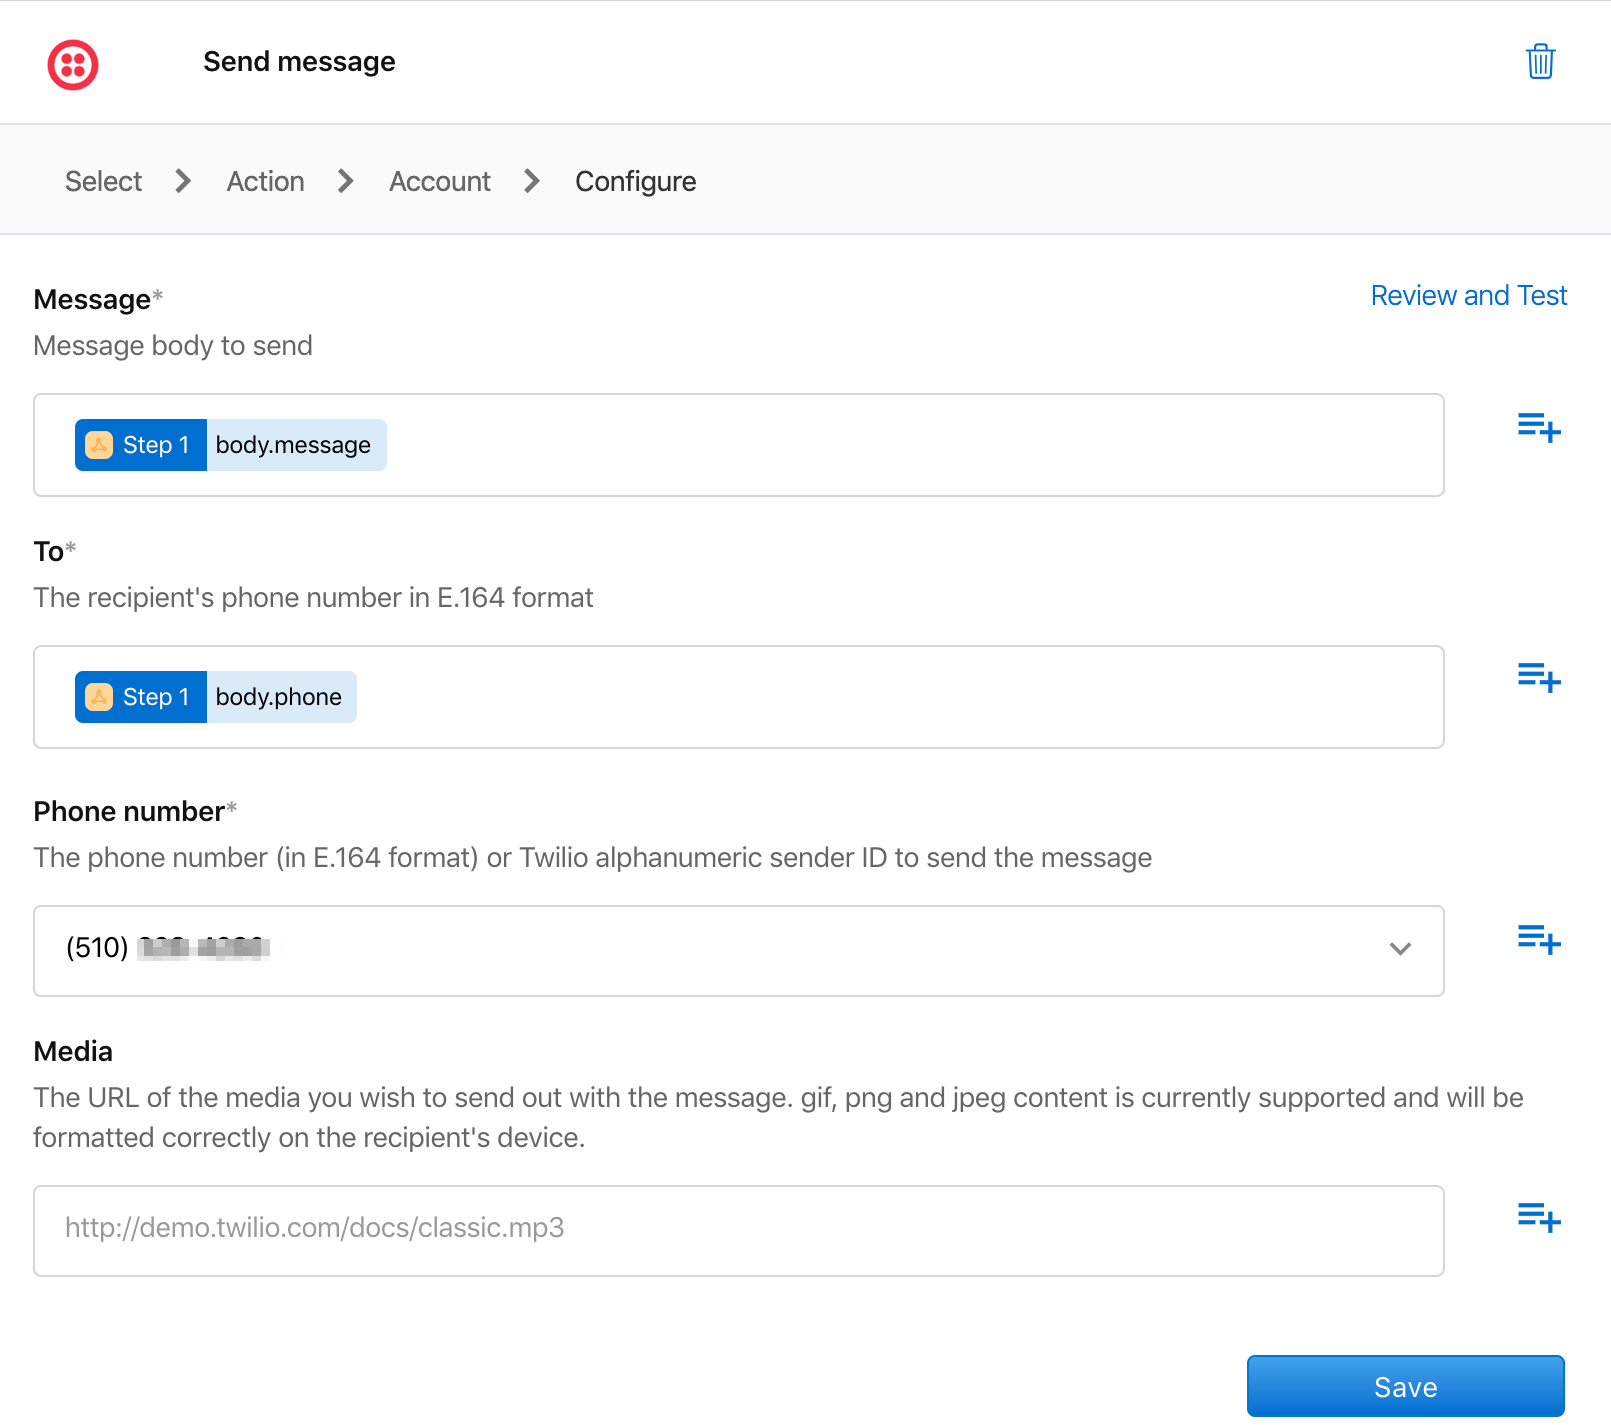
After clicking “Continue,” specify the message and the recipient phone number by selecting from the step 1 data. Use the blue plus button to do this. Enter your Twilio phone number to use as the ‘from’ phone number. Click Save.
Our first flow is now finished, and we’re ready to move on to the next flow.
Create “Process-Response” Webhook
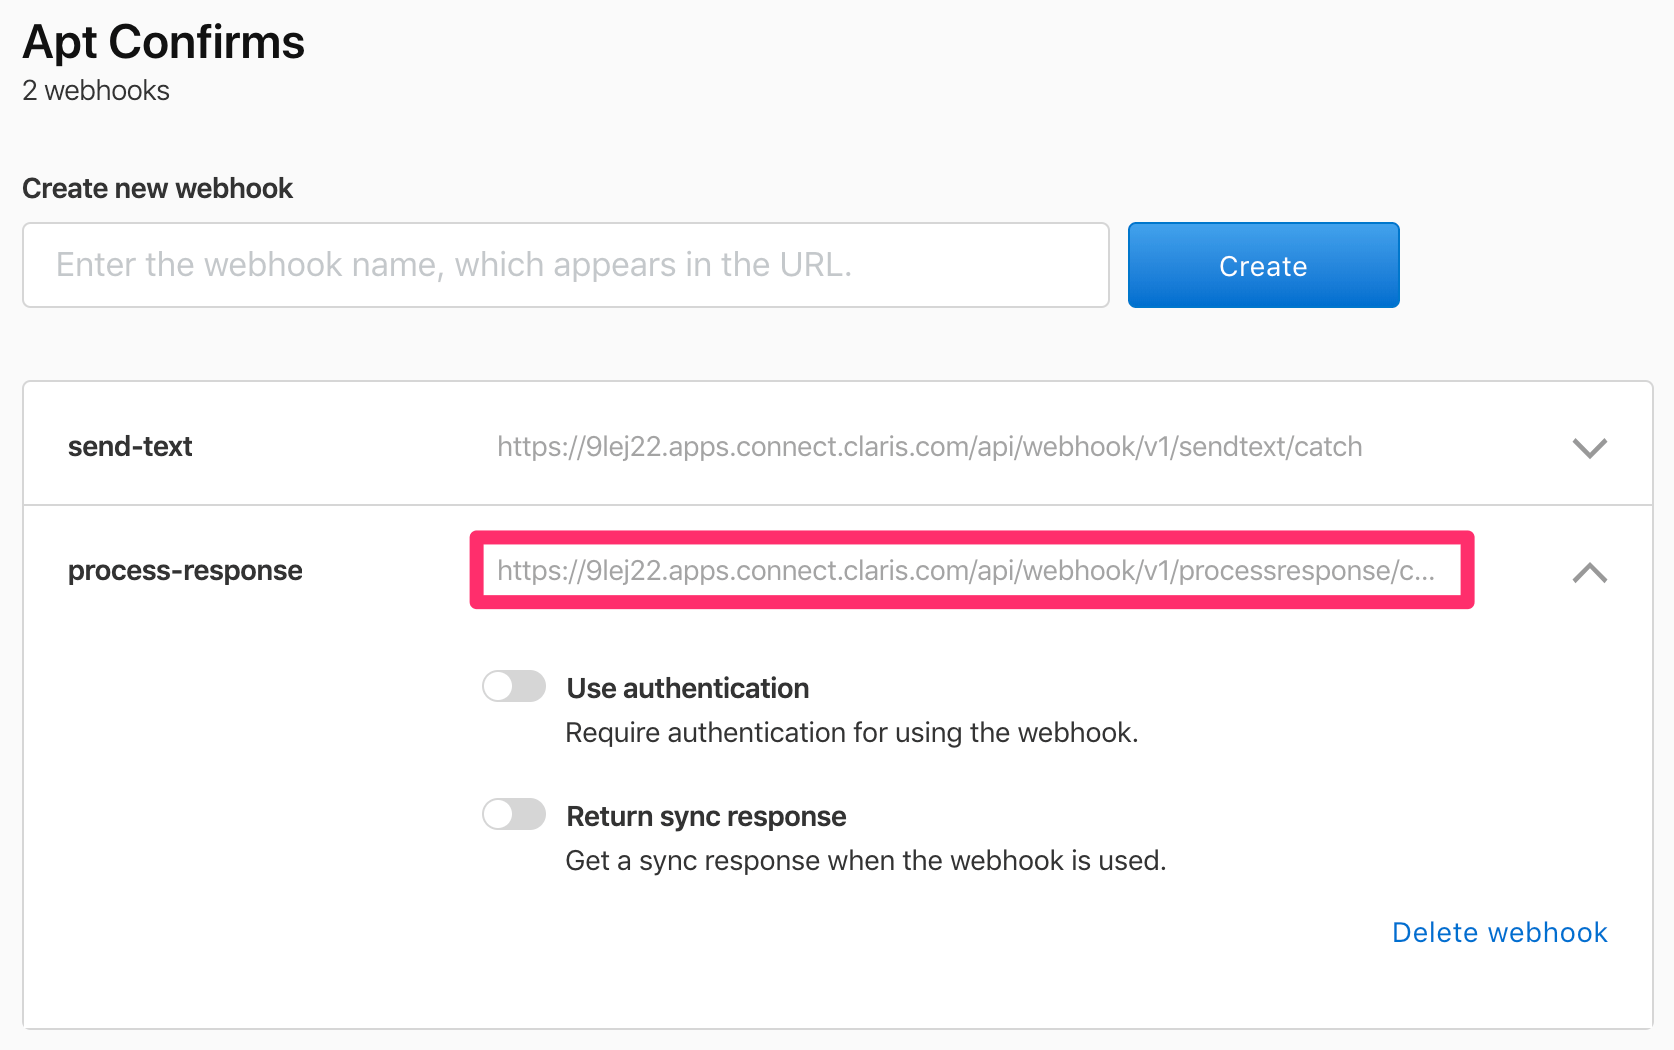
In Claris Connect, create a second webhook named “process-response.” Take note of the webhook URL.
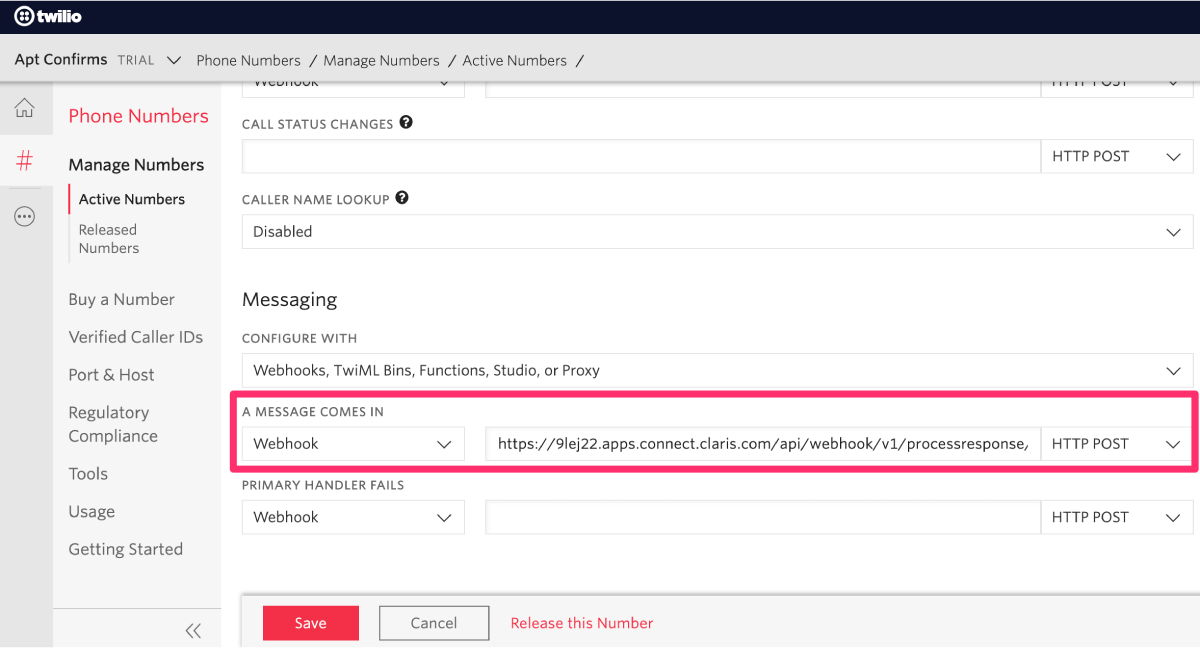
Next, we’ll need to configure our Twilio phone number to call this webhook whenever it receives an inbound message. Browse to the Twilio phone numbers page, select the number that will receive the messages, and scroll down to Messaging > A Message Comes In.
Set the dropdowns to “Webhook” and “HTTP POST” and enter the Claris Connect webhook URL. Click Save.
Create “Process Response” Flow
In Claris Connect, create a new flow named “Process Response.” Select the “Webhooks” connector. Choose the “Incoming HTTP Request” trigger and click “Continue.” Then select the “process-response” webhook.
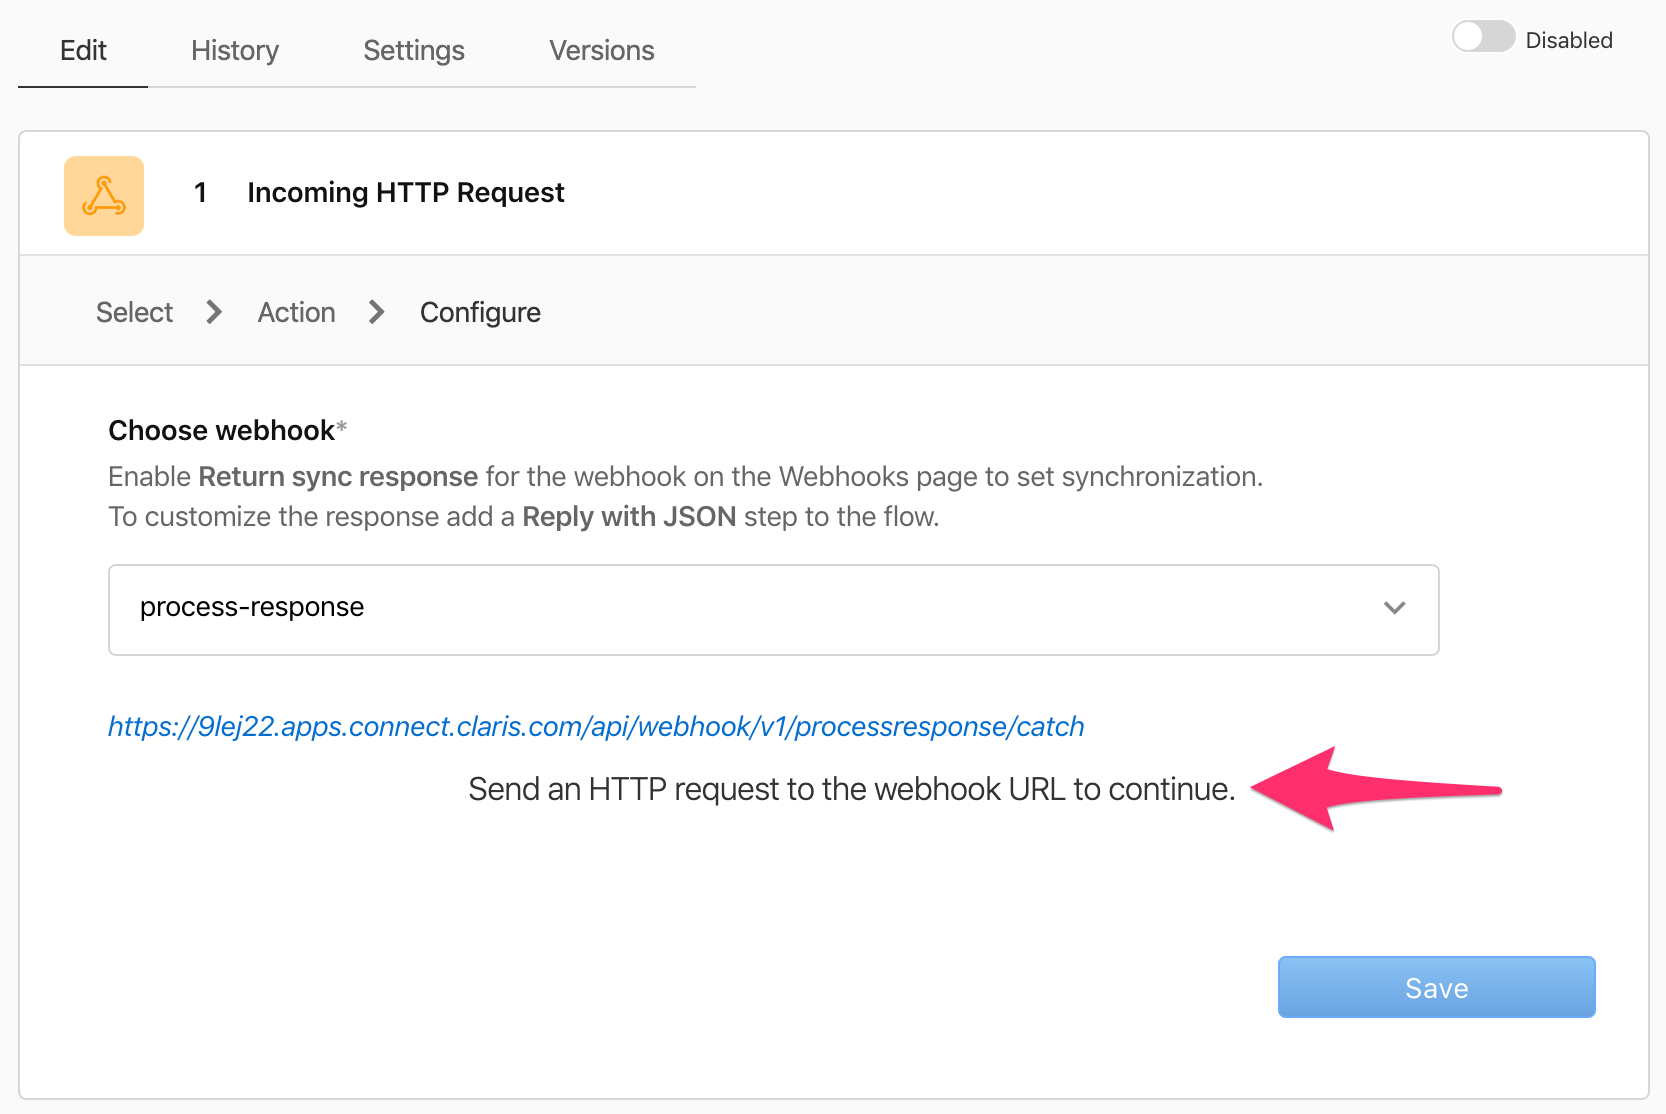
At this point, we will need to send a text message to our Twilio phone number. This will cause Twilio to call our webhook so that our flow has some data to work with. Because we’re using a free trial Twilio project, the text message will need to be sent from a verified phone number. The body of the message can be anything.
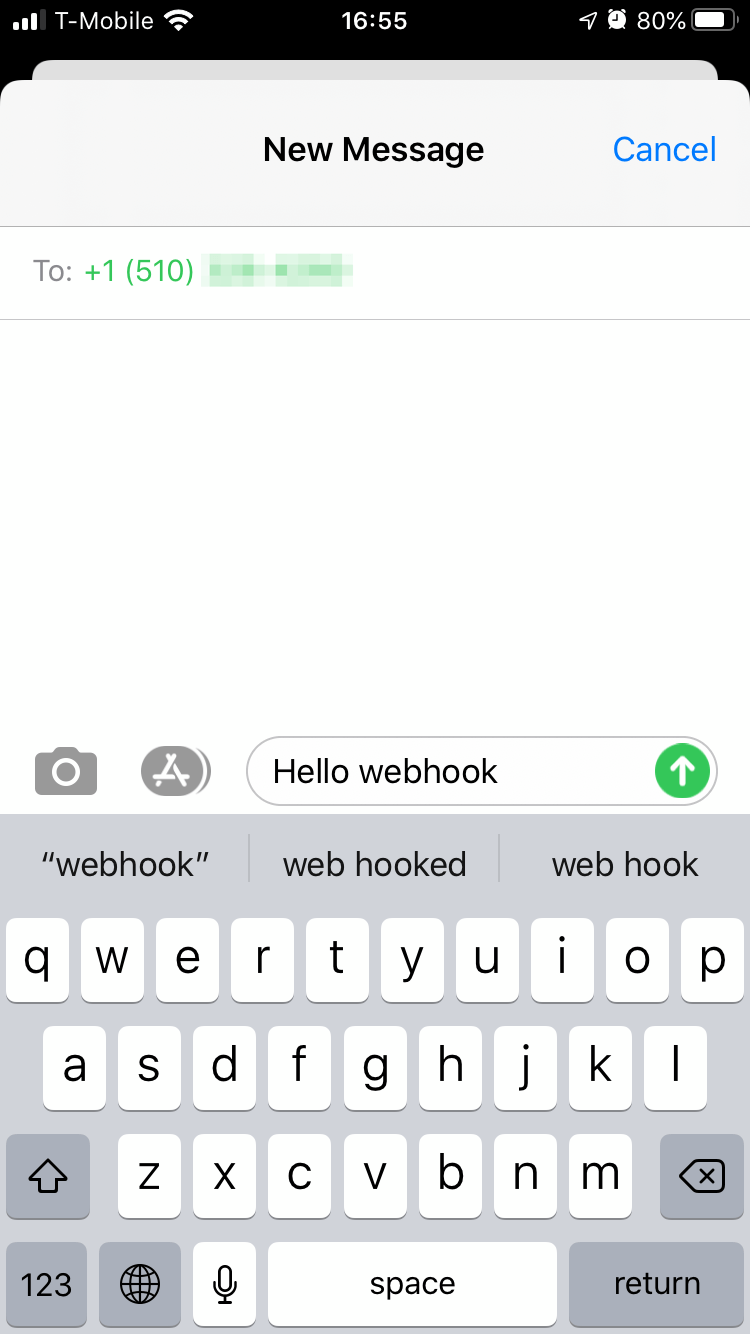
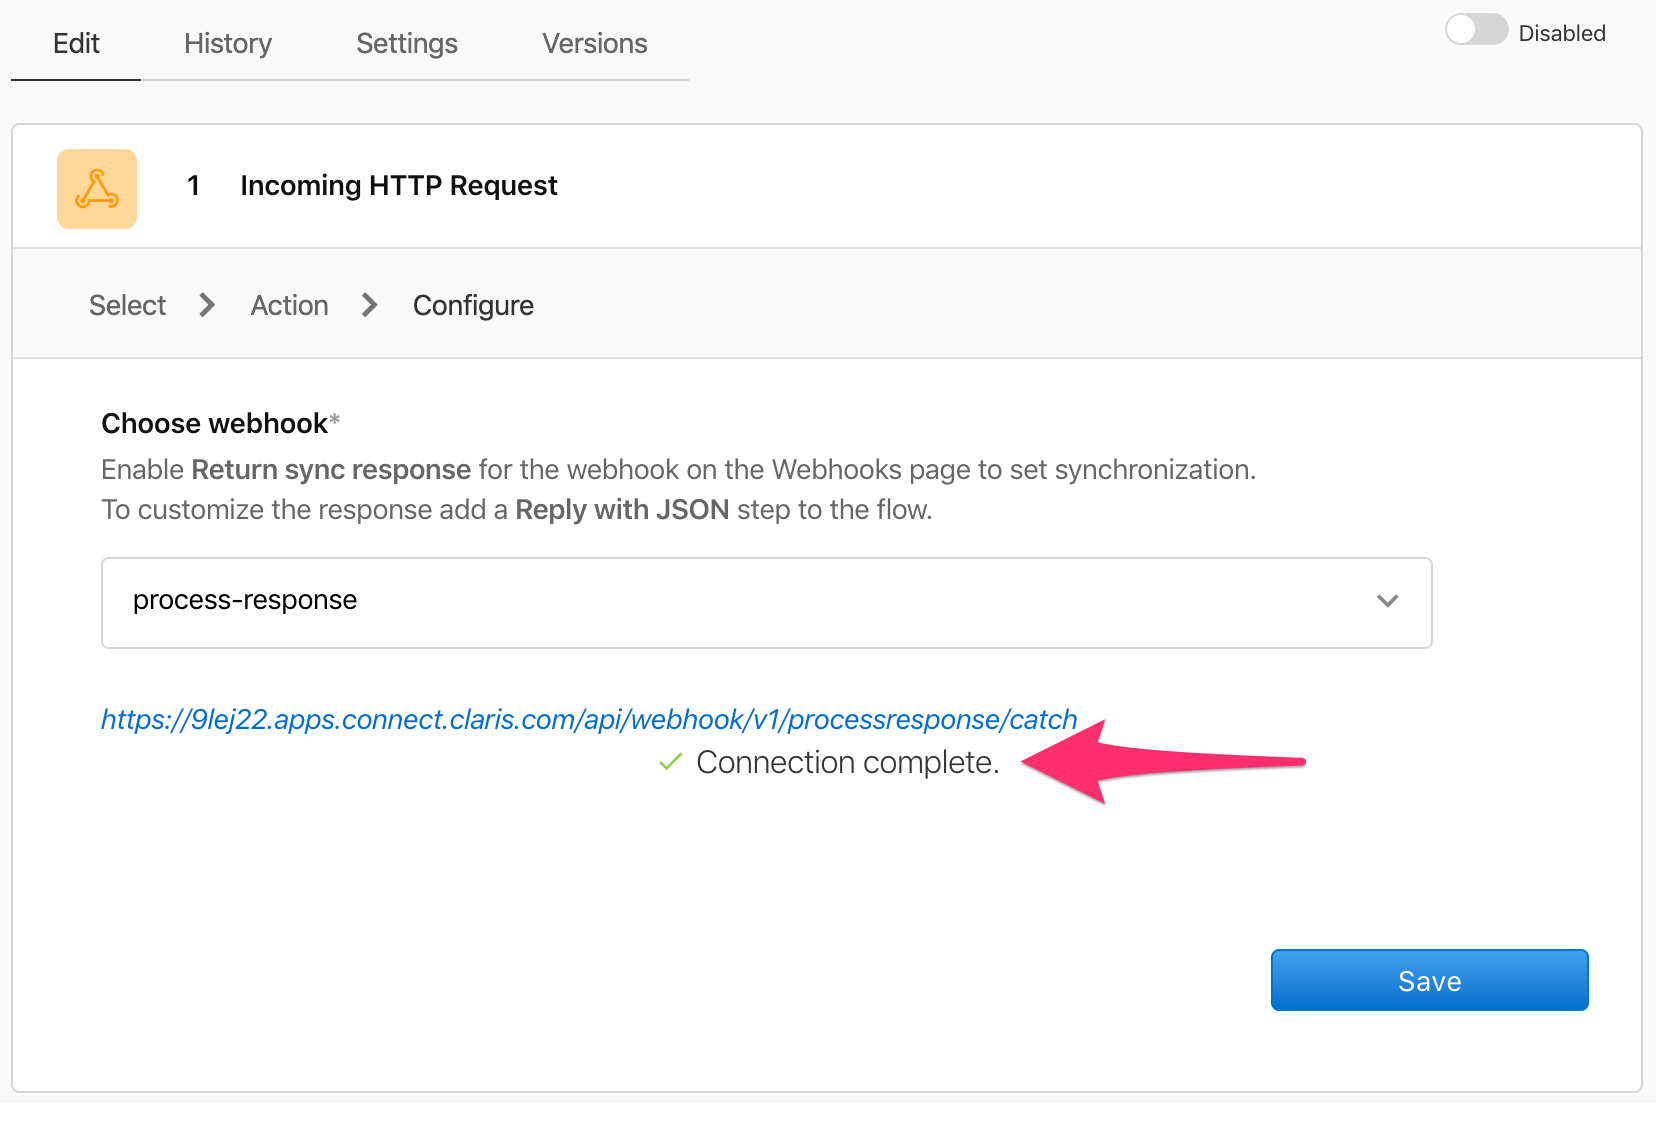
Once the webhook is called successfully, we can save our configuration and continue on.
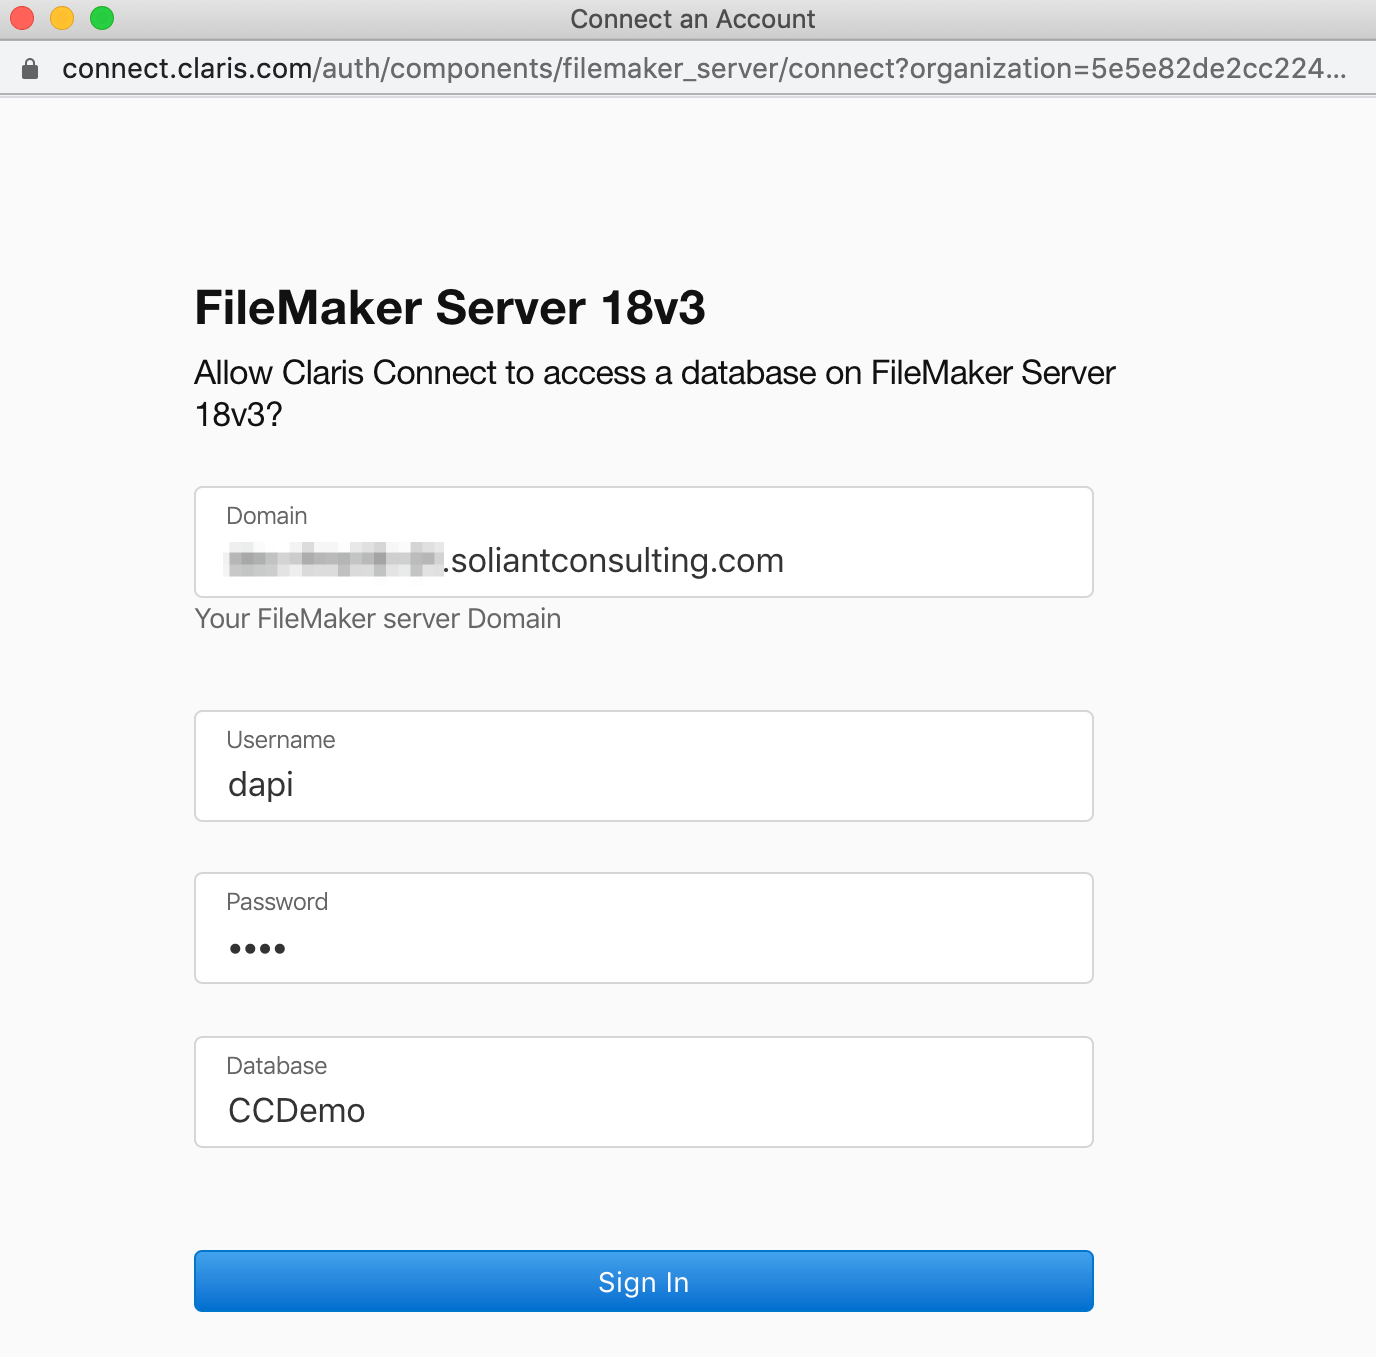
Add a second step and select the “FileMaker Server” connector (or “FileMaker Cloud” if you are hosting your app there). Choose the “Execute Script” action and click “Continue.”
At this point, you will need to connect your Claris Connect account to a FileMaker app account. That account will need to belong to a privilege set that has the “fmrest” extended privilege set enabled. Click “Connect New Account” and provide the requested information. Click “Sign In” and then “Continue.”
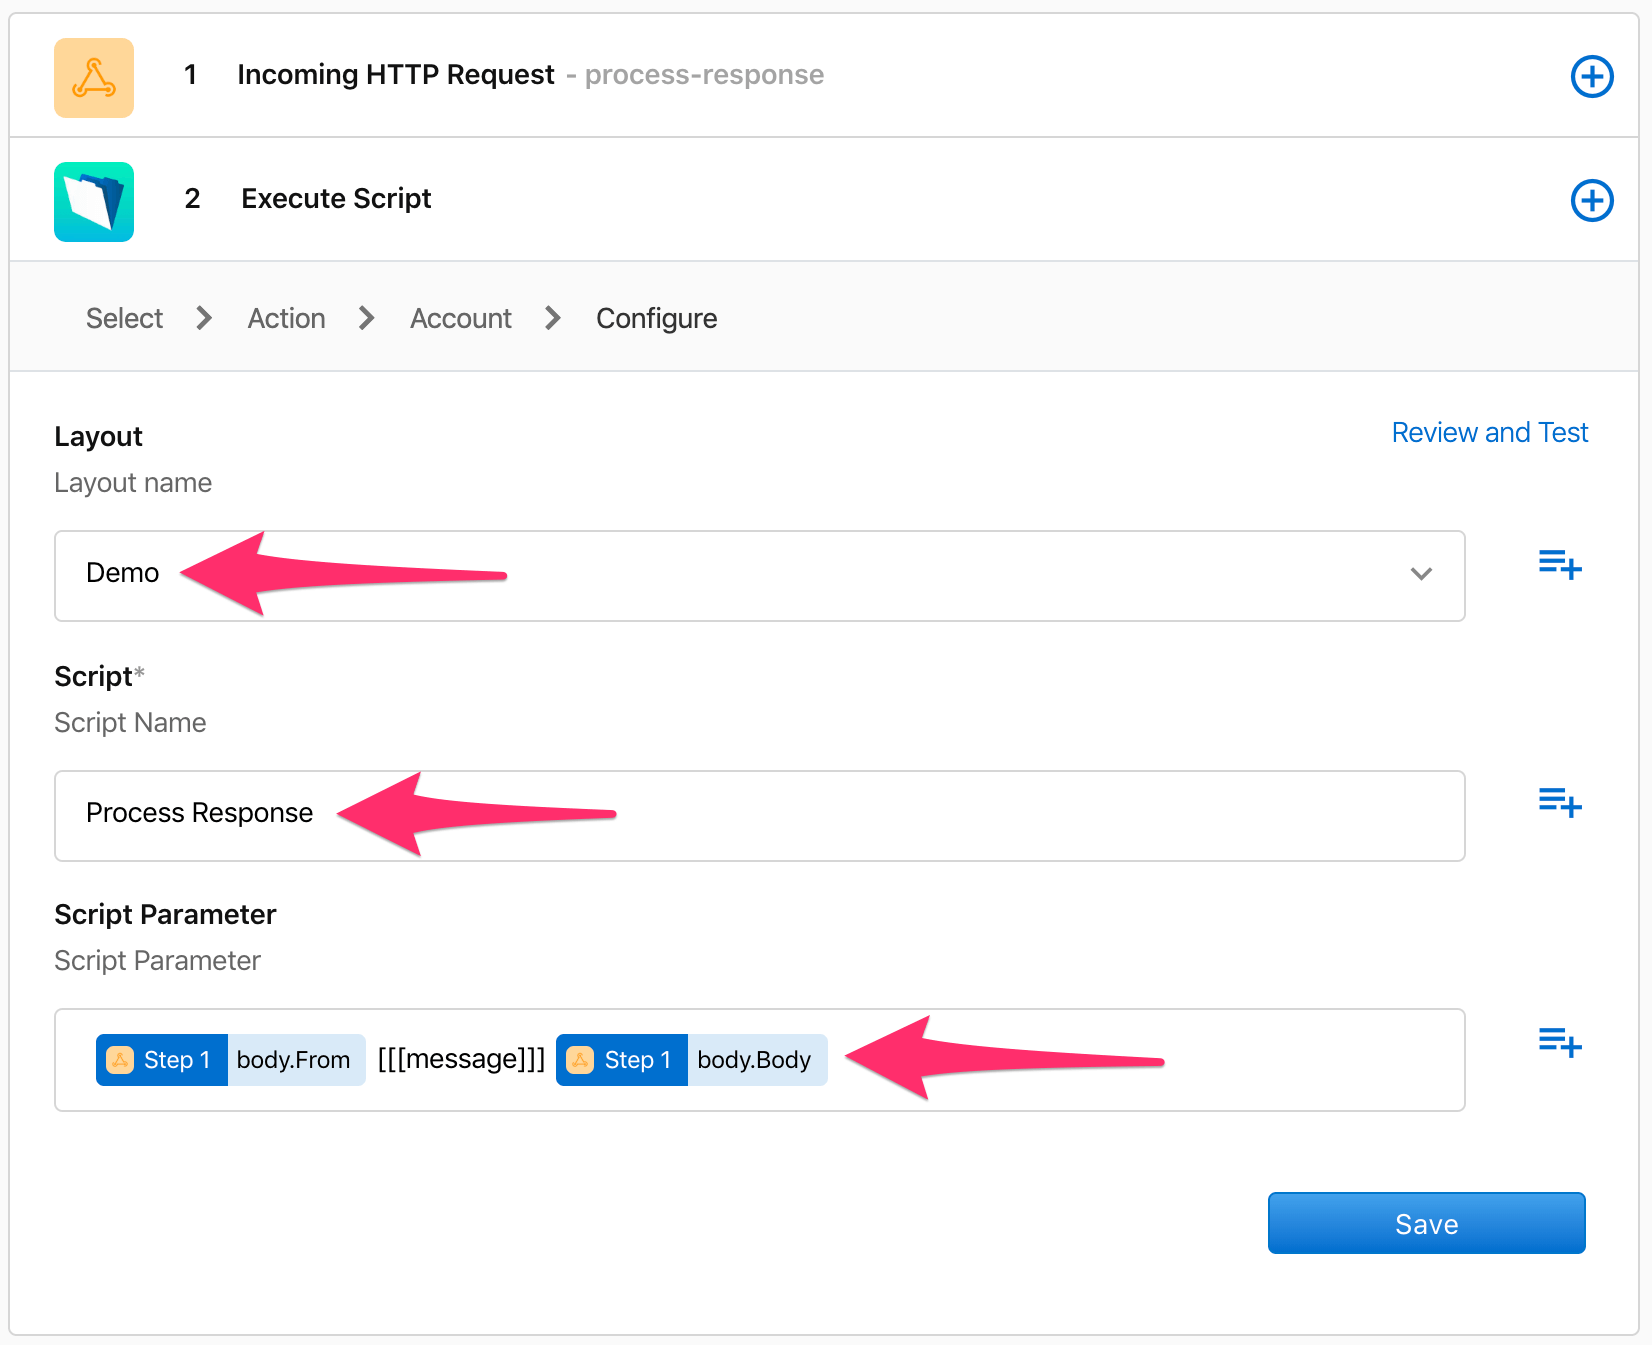
In the next step, we will configure which script should be called and what the script parameter should be. We will use the following script to process the incoming text message:
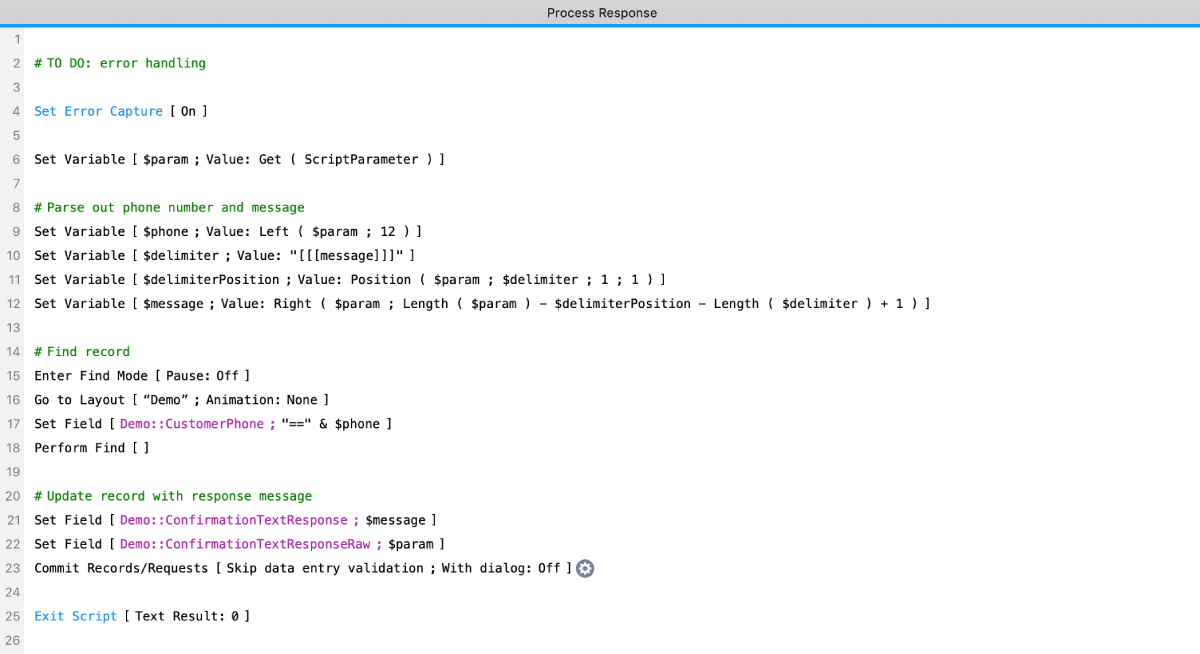
In Claris Connect, specify a layout name – I’m not sure why this is needed – and a script name. Use the blue plus button to select the “body.From” and “body.Body” JSON properties received by the webhook in step 1. These two contain the sender’s phone number and text message received earlier. Add some sort of a delimiter (like “[[[messages]]]”) in between, so that the receiving FileMaker script can parse these out properly.
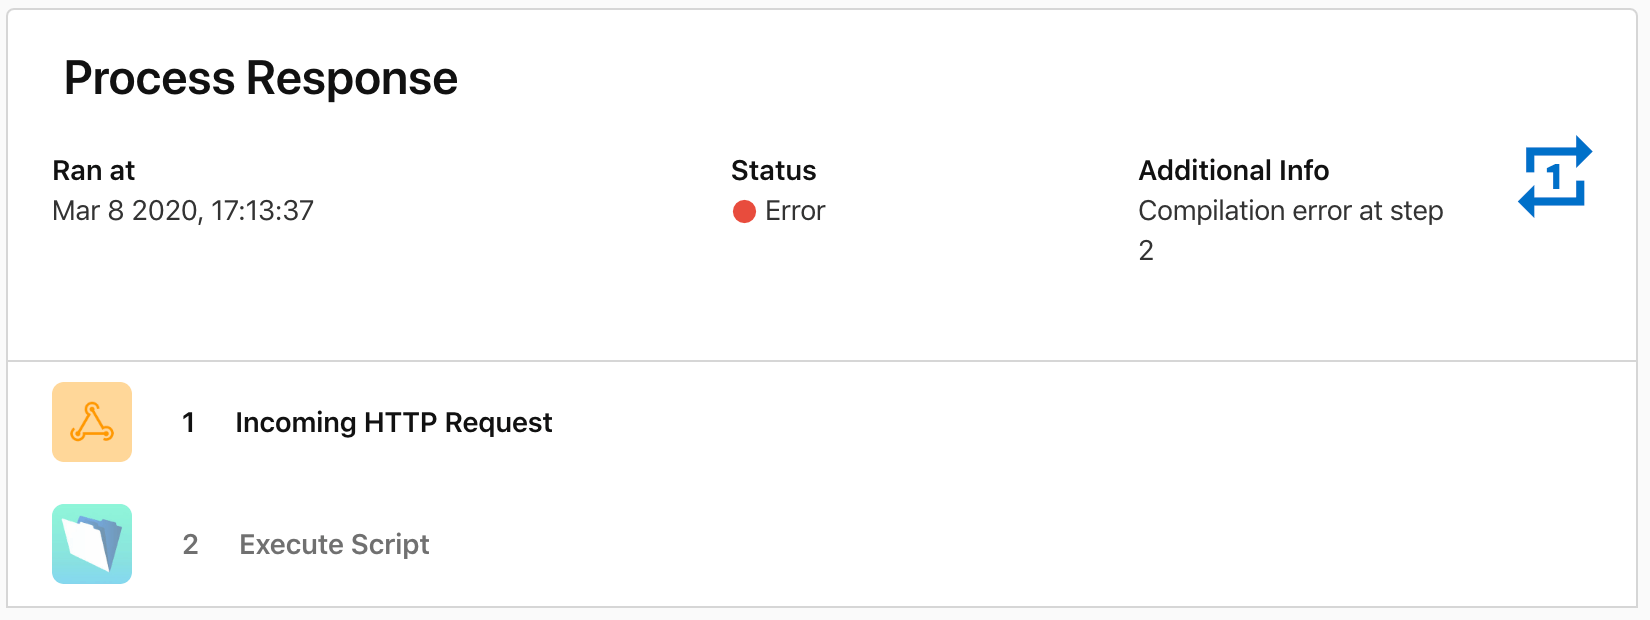
Note that it would be easier to simply select the “body” JSON property. The FileMaker script could then use the JSONGetElement function to retrieve the “from” and “body” child properties. But as of the writing of this blog post, there seems to be a bug whereby using a JSON object in the script parameter causes an error.
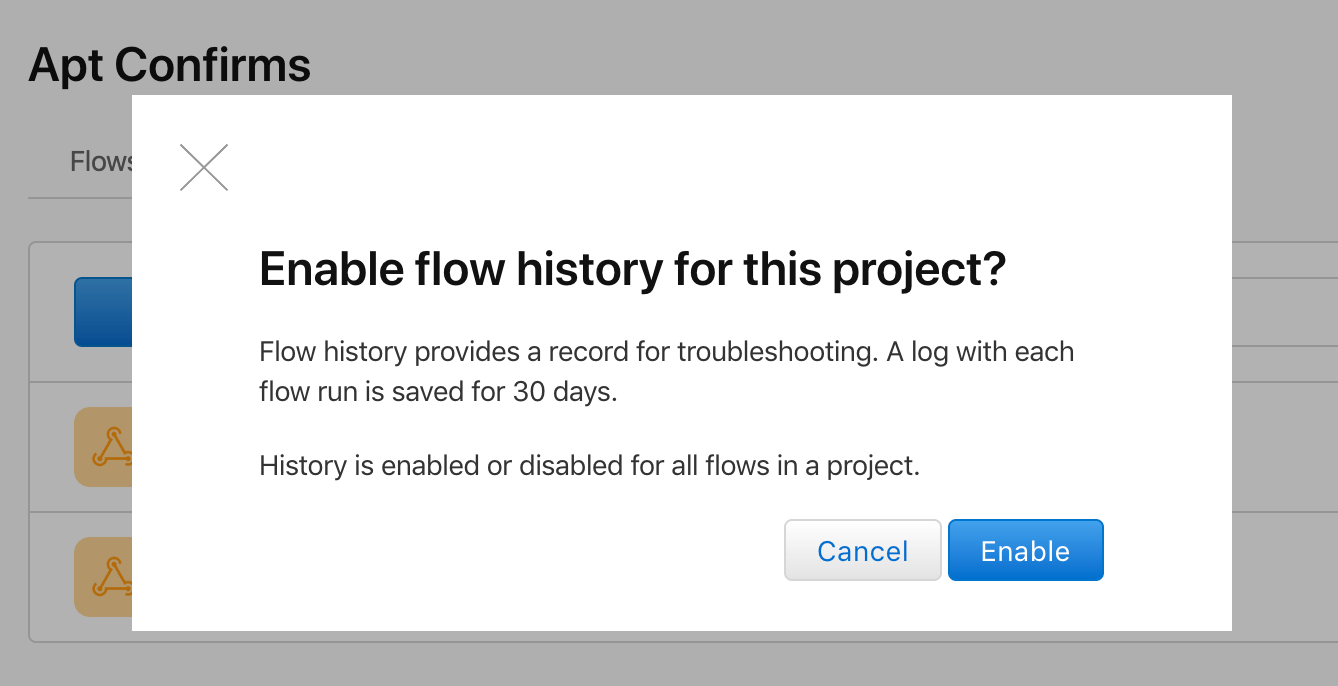
As a last step, enable both of the flows. When asked if you want to enable flow history, say yes. Doing so will make troubleshooting easier if that turns out to be necessary later.
Test Your Flows
We are now ready to test out the flows.
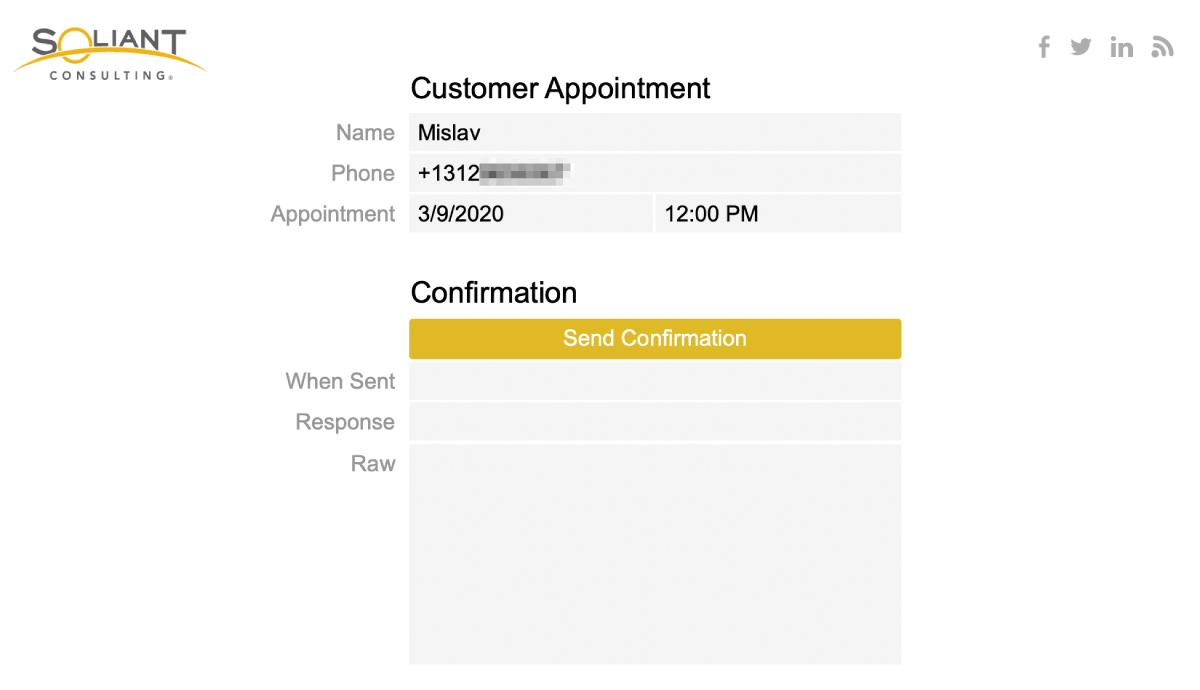
In our FileMaker app, we add a button and link it to our “Send Confirmation Text” script. Note that we previously said this script would run as a server schedule, but for our demo, we’ll tie it to a button instead.
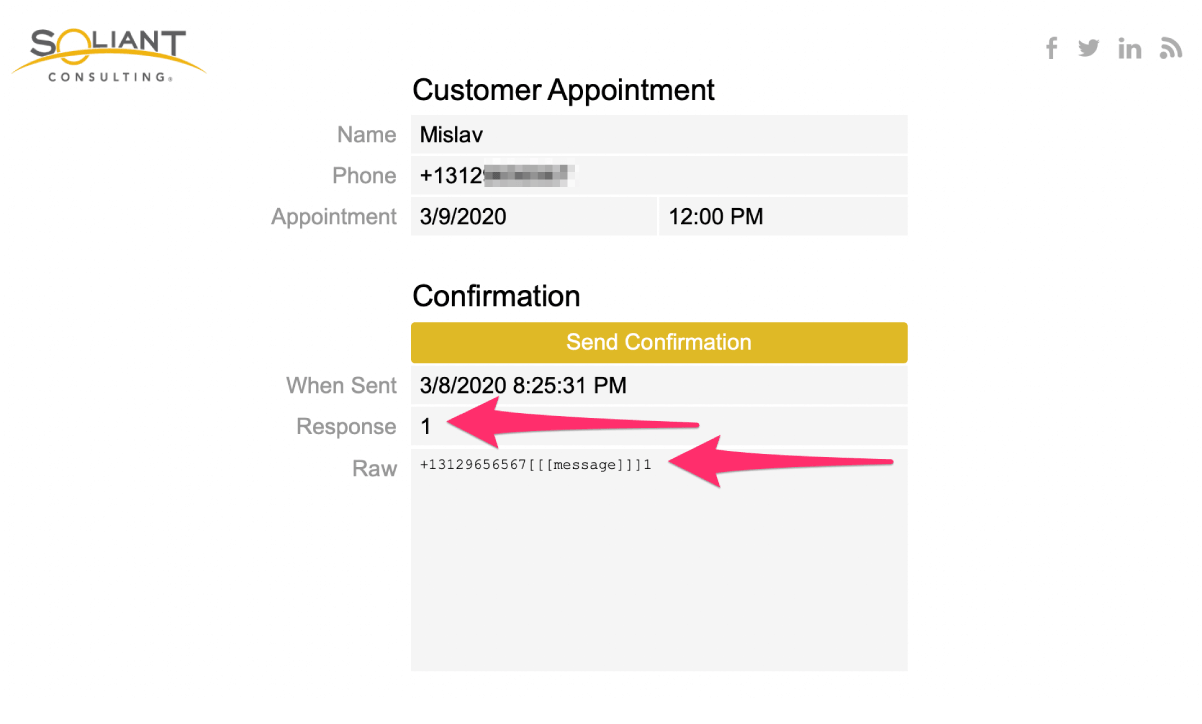
Once this button is clicked, Twilio sends the text message to which we’ll respond with “1” to indicate that we want to confirm the appointment.

Once Twilio receives the response, it sends it to the Claris Connect webhook, which triggers our second flow. That flow sends the response to our FileMaker app.
Demo File
There’s not much to the demo file, but it may save you some time in case you’d like to recreate these two flows yourself.
The full access account is Admin (no password), and the account used by the “Process Response” flow is dapi / door.
Summary
Here’s a quick summary of the steps we took:
- Set up FileMaker app with scripts to send a text message and to process the response.
- Set up a Twilio account and project.
- Create a Claris Connect webhook which our FileMaker app will call to send the text message.
- Create a flow, triggered by the webhook, to ask Twilio to send the message.
- Create a second webhook which Twilio will call once it receives an inbound text.
- Create a second flow, triggered by the second webhook, so that Claris Connect can forward the response to the FileMaker app.
Next Steps
If you’d like some help customizing this process for your FileMaker application, we’re happy to help. Contact our team today.
Hi Mislav,
Thank you for the explannation.
I have a Twilio account enable for whatsapp.
Did you try / manage to connect, send and receive whatsapp with filemaker connect ?
Kind regards.
Antoine
Hi Antoine,
I haven’t tried this, but based on https://support.claris.com/s/article/Claris-Connect-Connectors?language=en_US, it looks like Claris Connect does not yet have a connector for WhatsApp.
I am having some difficulty getting the Twilio number to actually connect with the webhook. I attempt to send a text to the webhook as part of an incoming text and Twilio’s debugger is telling us “error – 11200” Http retrieval failure.
Hi Chris,
Some troubleshooting ideas:
* Double-check that the Claris Connect webhook URL you entered in Twilio is correct.
* Try sending a dummy payload to the Claris Connect webhook manually using a tool like Insomnia or Postman. The idea here is to confirm that the webhook URL is indeed active, publicly accessible, and to see what kind of error message (if any) it returns.
* Post your question in Claris Community (go to https://community.claris.com/en/s/topiccatalog and click “Claris Connect”).
Hi Chris
It’s probably too late for you now but I received the same error.
The cause, for me, was that I inadvertedly set the response webhook to require authentication. So, turn “Use Authentication” to off.
When I disabled that everything ran smoothly.
Alistair
The limitation of Scripts to handle strings is silly and still a limitation as of writing this comment. TBH it sounds more like an internal FileMaker Script limitation more than anything on Connect’s end. Why not just create a field to store the message payload as pure JSON and parse it with an OnRecordCommit script a the layout used to store the incoming sms response?
Hi Mislav,
This is great thanks but I have a problem. The confirmation text is sent from a different (and random) number to the Twilio phone number I used for “Phone number*” in the “send text” flow. If I reply to this number the process response is not picked up. If I reply to the Twilio phone number it works fine. Any idea what I’m doing wrong.
Thanks,
Thomas