When it comes to Claris FileMaker Pro, keeping your file size from ballooning into something unmanageable is a good rule of thumb. Sometimes, you end up with an unwieldy file that you somehow need to make smaller.
While there are some benefits to large files, there are also quite a few serious drawbacks:
- Backups take longer.
- The Data Migration Tool (DMT) takes longer to run.
- There’s more risk of corruption.
If you find yourself struggling with these challenges, it’s time to use one of the strategies described below to make the file size smaller.
Strategies for Decreasing File Size
You have a few options to decrease the file size (roughly from easiest to hardest):
- Relatively easy:
- Delete old data
- Archive data by duplicating the file, renaming it as “archive,” and then, back in the original file, deleting data older than X months
- A bit more complex but still fairly easy:
- If the file size is due to embedded containers, move those out of the file.
- Move table(s) out of the file into a new file (that’s what this blog post is for)
- Hard to do:
- Archive data in a way that moves older records into a new table in a new file but still makes it possible to search and view both archived and non-archived records from a single interface
The rest of this blog post will focus on option 2b. This approach is fairly simple to do, and the result will be two (or more) files that together are roughly the same size as the original file.
Identify Large Tables
The first step is to identify which tables we want to move out of the file. These would be the table(s) that are responsible for a big chunk of the file size.
A simple way to do this is to record the file size, delete all records in a table, then close the file (so file space can be reclaimed), and then see what the new file size is. When deleting the records, use “Truncate Table” so that cascade deletes aren’t triggered. (Or you could simply delete the table itself.)
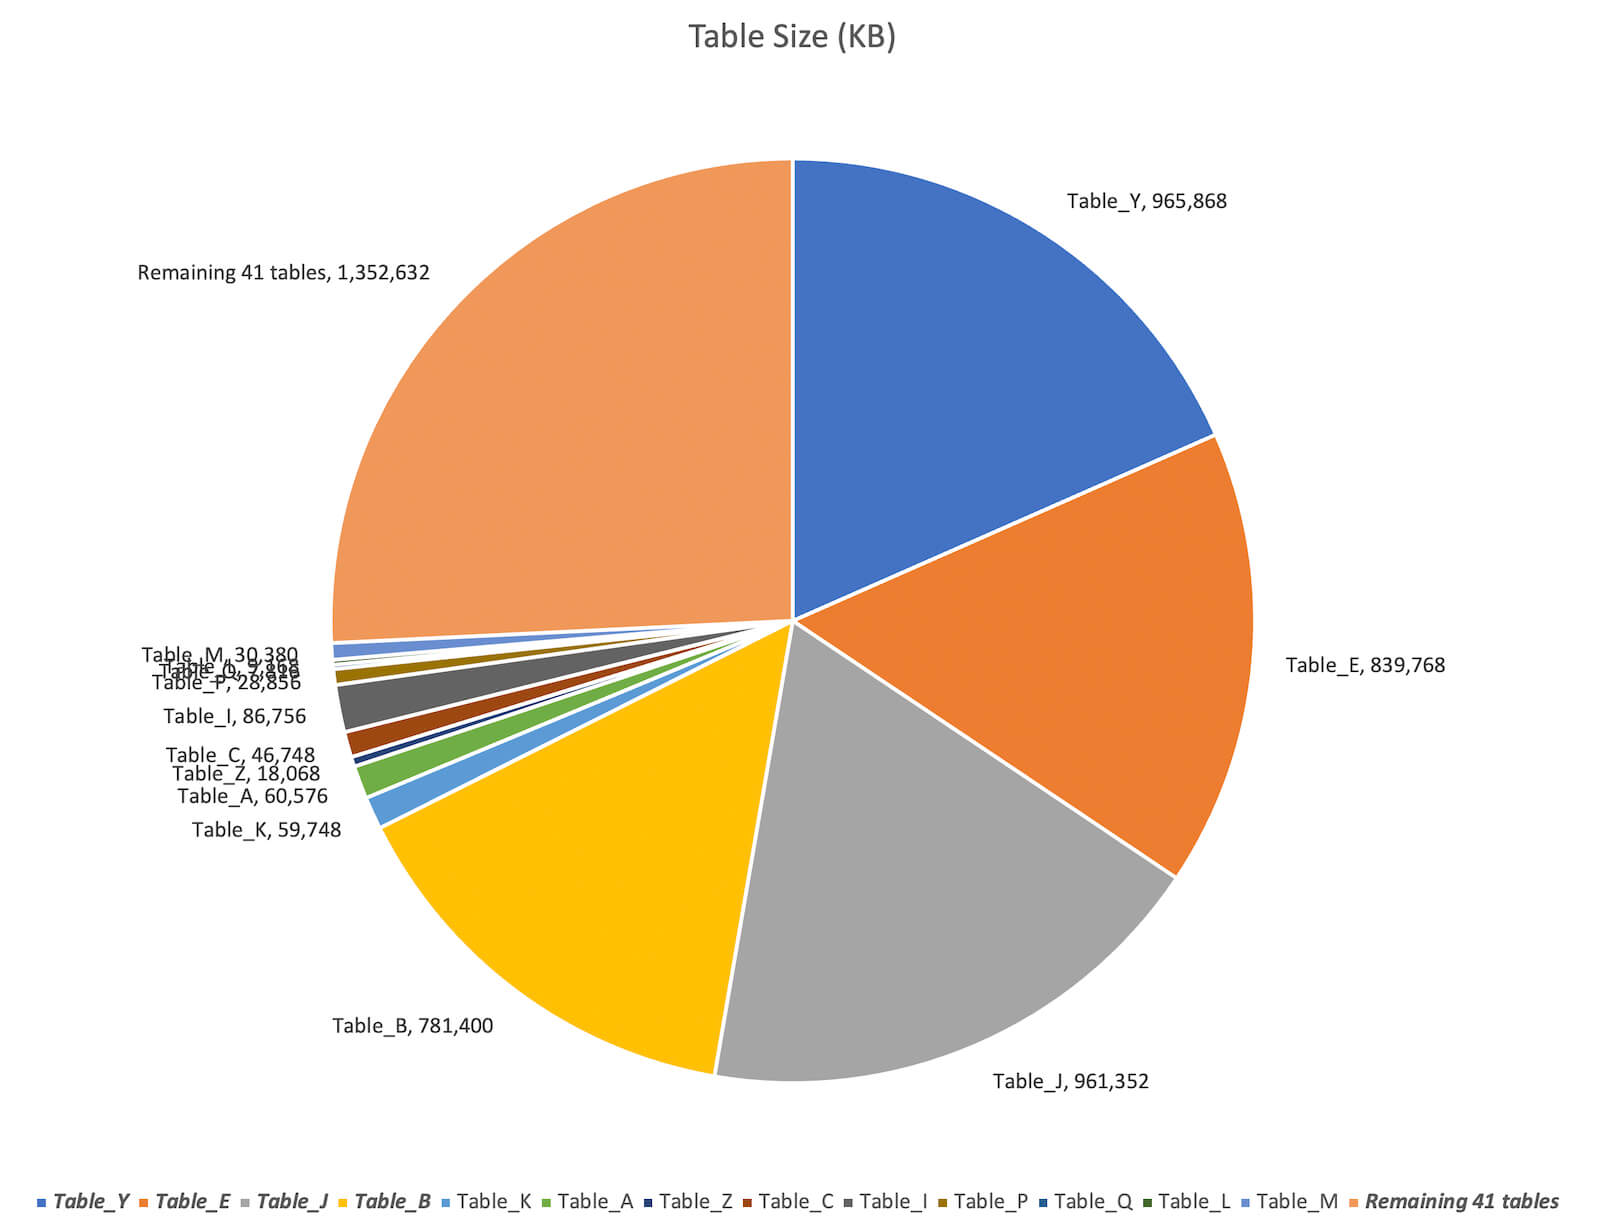
Here’s what the outcome of that exercise might look like:
| Table | Fields | Records | File Size (KB) | Table Size (KB) | % |
|---|---|---|---|---|---|
| Full file (no deletions) | -- | -- | 5,317,752 | -- | -- |
| Table Y | 14 | 1,239,774 | 4,351,884 | 965,868 | 18% |
| Table E | 157 | 547,013 | 3,512,116 | 839,768 | 16% |
| Table J | 1,068 | 22,776 | 2,550,764 | 961,352 | 18% |
| Table B | 53 | 929,051 | 1,769,364 | 781,400 | 15% |
| Table K | 131 | 21,614 | 1,709,364 | 59,748 | 1% |
| Table A | 8 | 210,543 | 1,649,040 | 60,576 | 1% |
| Table Z | 43 | 21,288 | 1,630,972 | 18,068 | 0% |
| Table C | 23 | 22,564 | 1,584,224 | 46,748 | 1% |
| Table I | 120 | 29,977 | 1,497,468 | 86,756 | 2% |
| Table P | 13 | 59,770 | 1,468,612 | 28,856 | 1% |
| Table Q | 18 | 40,997 | 1,460,796 | 7,816 | 0% |
| Table L | 17 | 13,651 | 1,451,628 | 9,168 | 0% |
| Table M | 136 | 18,784 | 1,421,248 | 30,380 | 1% |
| Remaining 41 tables | all < 4,000 | 68,616 | 1,352,621 | 25% |
Create the New File
Our goal is to create a new file that has the large table(s) from the old file. This new file will be a data file; it won’t need to have any user-facing scripts or layouts.
Use developer tools to create a copy of the original file but with a different name. Don’t forget to also rename the file name in Manage > Containers. The renaming process doesn’t always handle this part correctly.
In the new file:
- Delete all tables other than the large one(s) you want to keep.
- Delete all unneeded table occurrences. Note that if a table you want to delete is referenced by an unstored calc field from a table that you’re keeping, then you’ll need to keep that table occurrence and re-point it to the table in the original file.
- Delete all layouts not based on the tables you’re keeping.
- Create a “File Open” layout based on a “blank” table (no fields).
- The layout should say something like “Restricted Access” and have an “OK” button that hides the window
- Set up file options to open to the “File Open” layout and do whatever hardening is appropriate so that if a non-full access user opens this file, they aren’t able to get past the “File Open” layout.
- Delete all scripts other than the onOpen and onClose scripts.
- Update the onOpen and onClose scripts, so they do whatever is appropriate for the new file.
- Update the list of external data sources as appropriate.
Update Your Original File
- Add an external data source to the new file.
- Re-point the relevant table occurrence(s) to the table(s) in the new file.
- This is the crux of the technique. None of the field references should break since you’ll be pointing the table occurrence to a table that is identical to the original (same field names, same internal ids).
- Re-point any direct references to the table(s) that are being moved out so that they point to the table’s new location. Some examples of what would need to be handled:
- “Truncate Table” reference the table directly instead of through a table occurrence
- Any references to “BaseTableName” while querying the virtual schema using ExecuteSQL
- Create a DDR and confirm that the old table(s) are no longer referenced anywhere.
- Delete the old table(s).
Deployment
When it’s time to deploy the changes, use DMT to migrate production data into both the original file and the new file. In the new file, the tables should match up just fine since both the names and the internal IDs will be identical.
For both migrations, you will get errors about missing tables, but that is to be expected. 
Next Steps in Claris FileMaker
If you’d like more insights into how to make your FileMaker application more efficient, we can help. Contact us to learn more.
Watch the Video
Follow along as I demonstrate how to decrease the file size.