A common deployment request is to expose a WebDirect solution to the world while keeping the FileMaker Server itself securely behind a firewall, not directly accessible to the outside world. A setup that looks like the graphic below would put a WebDirect worker machine in a demilitarized zone (DMZ) to make it available while protecting the actual FileMaker Server.

Unfortunately, this setup is very hard to make work properly and reliably. It requires careful fiddling with the required ports in the 16000 range to let the WebDirect worker machine in the DMZ communicate properly with its main server. Part of the issue here is that the load balancing baked into WebDirect requires all requests to be made to the main server that then forwards it to the worker.
FileMaker 19.6 introduces a new feature that helps solve this problem. The feature is somewhat hidden in the new ability to load-balance WebDirect with the use of Nginx Plus or Nginx Open Source.
WebDirect & Ngnix Plus
Nginx Plus is a commercial product that builds on top of Nginx Open Source and adds features such as high availability and active health checks.
Because Nginx Plus has different capabilities, there are some differences in how Nginx Plus vs. Nginx Open Source assigns a session to a WebDirect worker machine in a load-balancing scenario with multiple WebDirect worker machines. Reach out to us for a conversation about those differences.
To achieve that, the free Nginx Open Source CAN be used to great effect. Here’s how.
Instead of exposing the WebDirect worker in the DMZ, all you need is an Nginx server that is exposed to the world.
You do need a WebDirect worker machine still, but it can now live inside your network behind your firewall.

Looking at the schematic, you may be wondering: why not just open the firewall port on your network to allow WebDirect access directly? Why put an Nginx server in front of that?
Multi-tier Protection
The answer is multi-tier protection. Your network can now be set up to allow only incoming traffic from the Nginx server. Your network does not need to allow the world in just to reach your WebDirect solution. This is better protection than putting your WebDirect worker in the publicly available DMZ.
The instruction on how to set this all up are contained in this Engineering Blog: Scaling up FileMaker Server with load balancing and Docker containers on Linux. There is a lot of information packed into that article, most of which you will not need just to achieve a DMZ setup.
The main focus of the article is on achieving load balancing, which involves both a DMZ component and the load balancing mechanism. The DMZ server receives all requests and then decides which worker machine to assign the new session to.
The article breaks down into the following sections:
- Using physical or virtual servers
- Using Nginx Plus as the load balancer
- Using Nginx Open Source as the load balancer
- Using Docker images instead of physical or VM servers
- Using Nginx Plus as the load balancer
- Using Nginx Open Source as the load balancer
For this walkthrough, though, we are not interested in the load-balancing component; we will just focus on the DMZ part.
Unless you are already using FileMaker Server on Docker, #1 is the section for you. And unless you already have a subscription to Nginx Plus, or you do need the extra load balancing features and are willing to pay for Nginx Plus to get them, then 1b is the scenario for you, and it is the path we took for this walkthrough.
The Engineering Blog article assumes that your FileMaker Server and Worker will be using Ubuntu. They don’t need to be; they can be Ubuntu, macOS or Windows or mixed. Keep in mind though that one of the utilities mentioned below that will generate an Nginx configuration file, is only available in the Tools folder on a Ubuntu FileMaker Server. If your FileMaker Server is Windows or macOS you will need to manually create that config file based on a Linux example.
- Install your main FileMaker Server as per normal, including an SSL certificate. Ours is main01.ets.fm.
- After installation, leave the Web Publishing engine disabled (do not enable the web publishing engine or WebDirect)
- Stop FileMaker Server completely.
- Using your favorite text editor, modify the jwpc_prefs.xml file: locate the entry for mwperouting and change its value to no.
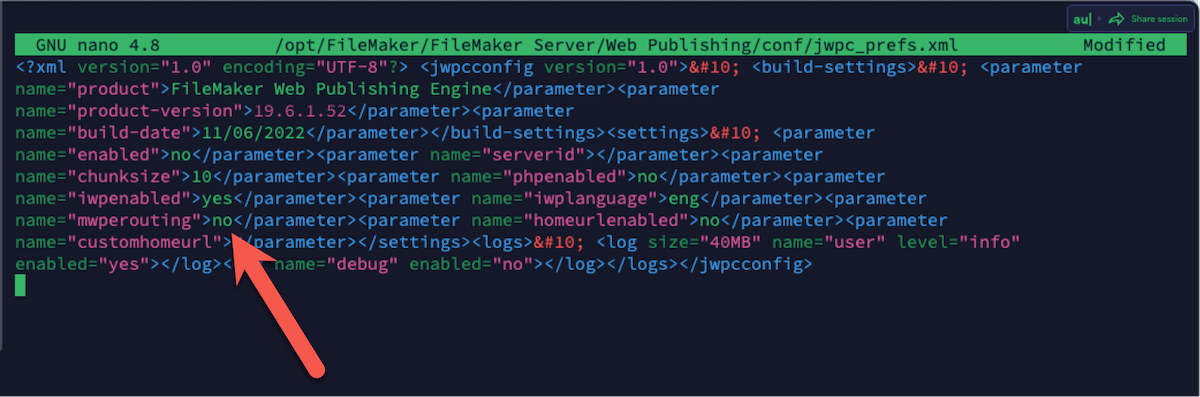
This effectively disables the native FileMaker Server WebDirect load balancing.
- Start the FileMaker Server again.
- Install your worker machine as per normal, including an SSL certificate, but do not add it to the main machine as a worker yet. Our worker is named worker01.ets.fm.
- Just like you did on the main machine, stop FileMaker Server completely and modify the mwperouting setting in the jwpc_prefs.xml file.
- Then start FileMaker Server again.
Assuming you also have your internal DNS entries set up to point those fully qualified DNS names (the names on the SSL certs) to the static IP addresses of your two servers, you can now assign the worker to the main server using their DNS names. In our experience, installing the SSL certificate and setting up DNS right away avoids a lot of hassle down the road.
- From the worker machine, add it to the main server. The easiest way to do this is from the command line:
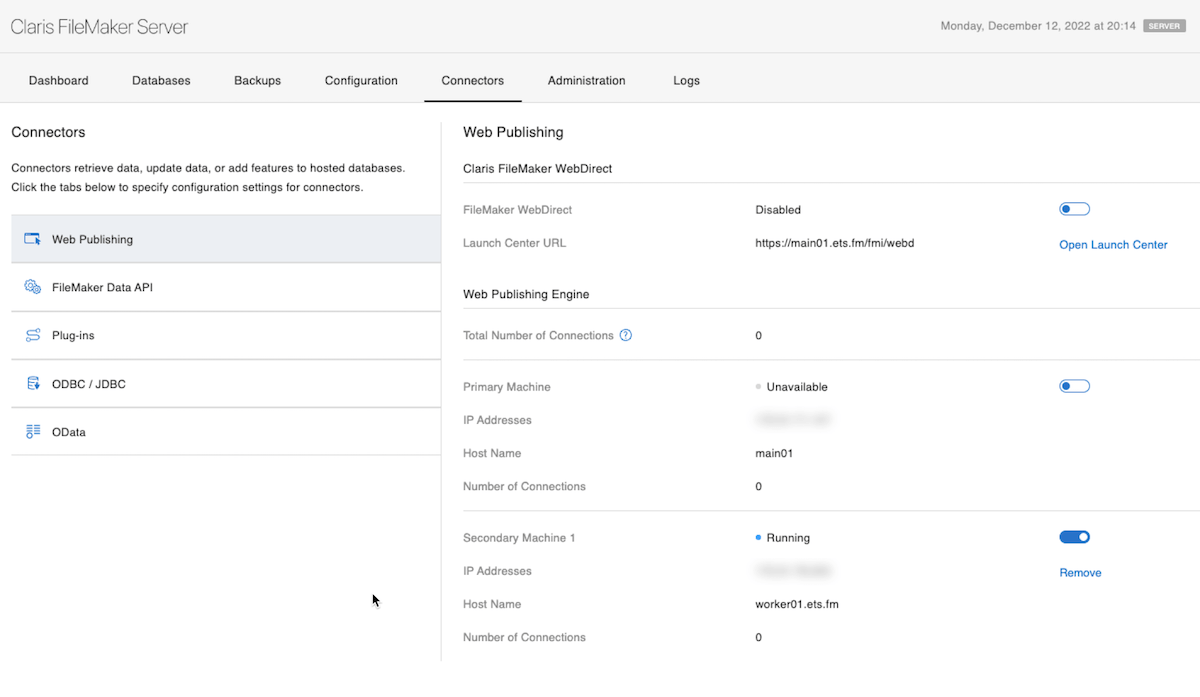
fmsadmin wpe add main01.ets.fm worker01.ets.fm- When successful, the admin console on the main server will look like the image below. With its own web publishing turned off and one active worker machine:
- On your main FileMaker Server machine, in the Tools folder with an NginxLB subfolder, there is a shell script named nginxLB.sh that will generate the required Nginx configuration file
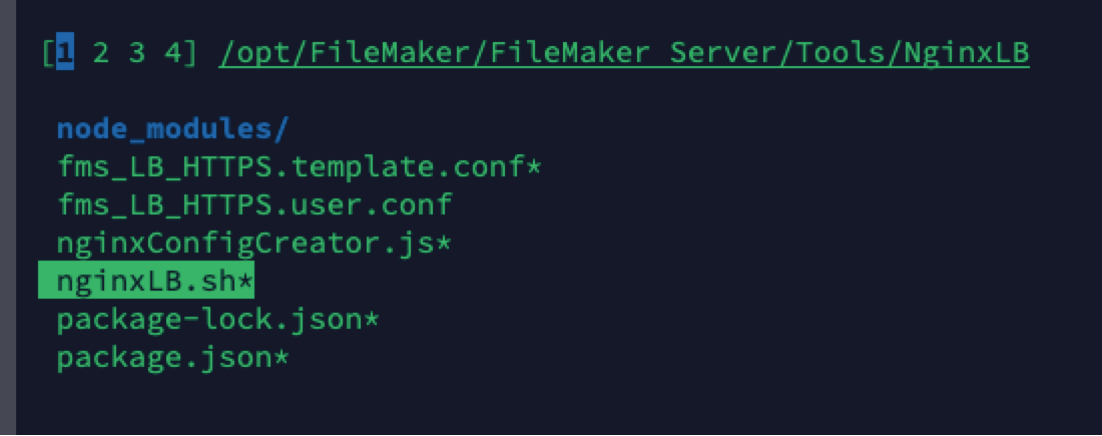
- Navigate to that folder and run
sudo ./nginxLB.sh- When the script runs successfully, it will create a new file named fms_LB_HTTPS.user.conf in that same folder.
- Copy that file to a place where you can get it easily. You will need it on your Nginx server machine.
The next step is to set up that Nginx server. This is the server you will put in the DMZ, and it only requires Nginx; it does not need any FileMaker Server component.
- On a fresh installation of Ubuntu Server 20 or 22 LTS that we named dmz01.ets.fm:
sudo apt update && sudo apt upgrade -y
sudo apt install nginx- Then stop nginx because it automatically starts a web server on port 80 that will conflict with the custom configuration that you will ask it to use.
sudo systemctl stop nginx- Create a folder within your home folder:
mkdir lb(which, in our case, will be /home/ubuntu/lb, your exact path may vary depending on your Ubuntu installation)
- and copy that freshly created nginx config file to it.
- Your nginx server will need an SSL certificate, and Nginx requires two files for that:
- The certificate, including all intermediate certificates bundled into one file
- The private key that matches the certificate (in FileMaker-speak: the serverKey.pem file)
If you have your certificate as an individual file and you have a separate intermediate bundle file, you can combine them easily with one command:
cat your_cert.crt your_bundle.crt > combined.pem- Copy the combined bundle and the private key into that new folder.
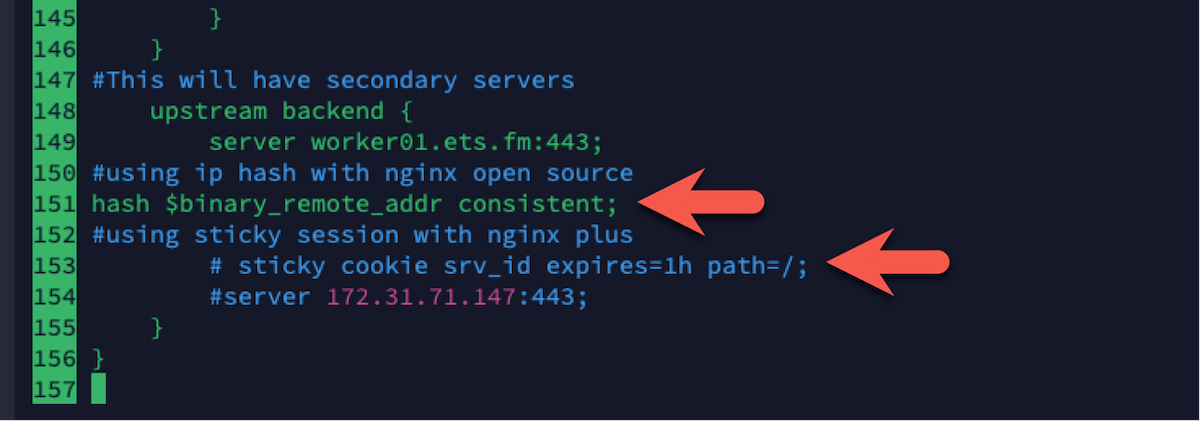
- Use your preferred text editor to modify the nginx config file to match the location and name of your SSL files (lines 25 and 26). Note that I also enabled access and error logging on lines 12 and 14.
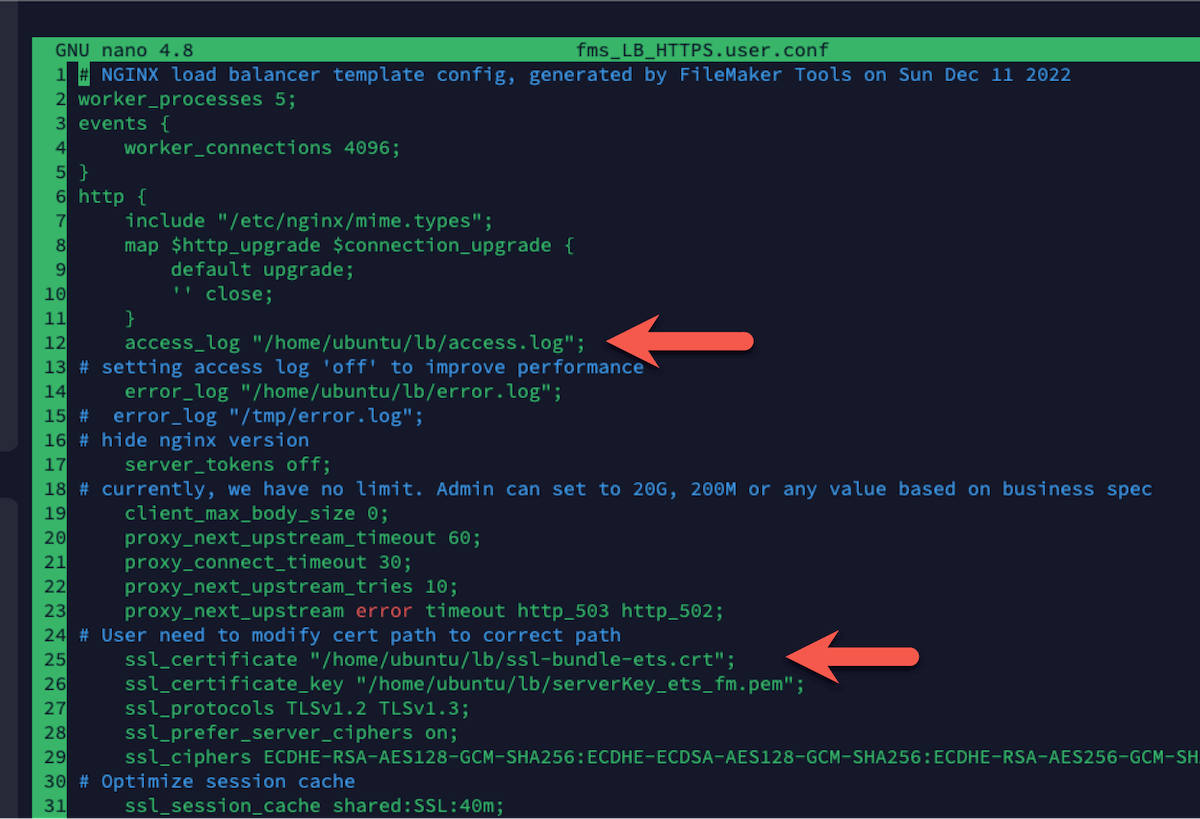
- And further down, change the two indicated lines (lines 151 and 153) to match what you see there since we are not using Nginx Plus but Nginx Open Source.
- The blog calls for starting nginx and pointing it to the custom config file using the following command, but we won’t do that because on the next reboot, nginx would just go back to using its default config file instead of the custom one and your DMZ setup would break.
sudo nginx -c /home/ubuntu/lb/fms_LB_HTTPS.user.conf(-c tells nginx to use a non-default configuration file)
- Find out where the default nginx config file is by running this command:
sudo nginx -t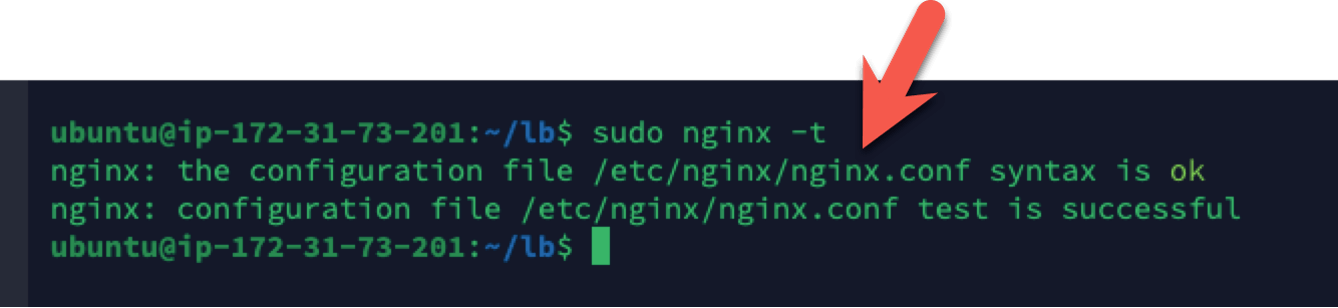
- Using your favorite text editor, replace the contents of the default config file with the following:
include /home/ubuntu/lb/fms_LB_HTTPS.user.conf;

- Run this command again to make sure that nginx is ok with the configuration:
sudo nginx -t- Start nginx
sudo systemctl start nginxIn your browser, you can now use your DMZ server to log into WebDirect:
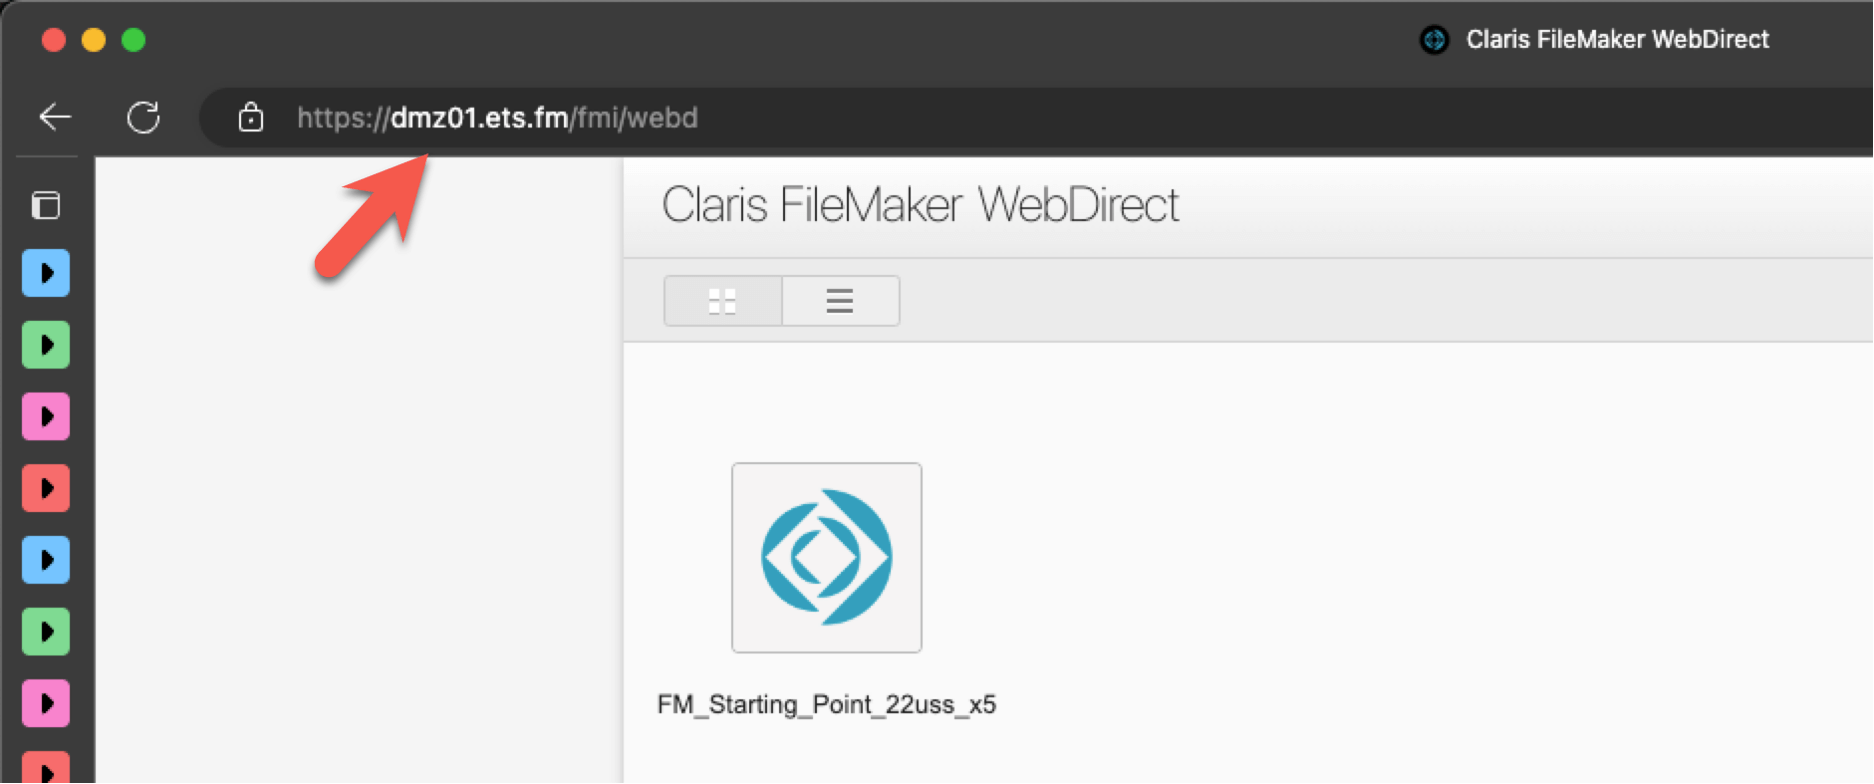
In our setup, both main01.ets.fm and worker01.ets.fm are behind a stateful firewall that only accepts incoming traffic from dmz01.ets.fm. Our FileMaker deployment is isolated from the world, but WebDirect is publicly accessible.
If you inspect the Nginx configuration, you’ll note that it also allows traffic on the admin console. If you do not want that, you can use the new Admin Console setting in 19.6 to restrict access to only certain IP addresses. Or you can remove the reverse proxy rule for the admin console altogether from the Nginx configuration. 
Next Steps in WebDirect
WebDirect continues to evolve and can take your FileMaker application to the next step. If you have any questions about how to get started or your existing solution’s performance, our team can help. Contact us to get started.
Very nice breakdown of what could be (is!) a complex setup!
Do you know if this configuration would also support using MS OAuth to log into the databases? I my attempts to use a worker in a DMZ we will still had to open up access to the main server for OAuth to work – which subverts the DMZ!
It can definitely be made to work. The basis for it is in this blog post: https://www.soliantconsulting.com/blog/filemaker-custom-oauth-login-webdirect/
We will soon have a “Part 2” that describes how to kick off this process from a different web site. It still requires some HTML/JS to be deployed on the main FMS machine but since the communication is from a known source you can whitelist access so that your FMS is only available from whatever known source you have. It’s a couple of extra hoops but I don’t see why it wouldn’t work.
Hi Wim. You say “After installation, leave the Web Publishing engine disabled (do not enable the web publishing engine or WebDirect)” – what if I already have a DB and a Worker up and running, will I be able to install an NGINX server and make these changes, or will I have some unknown issues because I’ve already had the system up and running?
Since this feature requires turning off the normal WebDirect main/worker load-balancing you’ll have to redo your configuration, disconnecting the worker first.
Okay, thank you. I’ll give it a whirl. I appreciate you taking the time to write this up.