It’s a Challenge…
This blog post follows up on my first one on this topic. I showed the Claris JavaScript utility that allows you to create your own login button to kick off the OAuth authentication flow through your chosen identity provider and into your WebDirect solution.
The Claris utility assumes that the HTML page where you will create the login button lives on your FileMaker Server. All the calls it makes are along relative paths to local resources. But what if you want that login button on a website that is not hosted on your FileMaker Server machine?
Clearly, you will need to make changes to Claris’ utility JavaScript to make the calls from your web server to the FileMaker Server, and because of that, you will have to deal with CORS (Cross-Origin Resource Sharing).
Under the hood, the JS utility makes a few API-style calls to your FileMaker Server. Those work without issues when you use tools like Postman or Insomnia. However, when a client’s browser tries to make such scripted calls, CORS kicks in to protect the client.
When the code executes on the FileMaker Server itself, then these calls are considered same-origin, and the calls are allowed. But when the code executes on your web server and makes calls to your FileMaker Server, the browser will refuse to make the calls as it considers them cross-origin: going from one domain to another. This happens even if those servers are sub-domains of the same top-level domain in DNS.
In this example, the web server is on web.ets.fm, and the FileMaker Server is on fms.ets.fm. The use of the term domain is a little misleading as it means different things in the context of CORS vs. the context of DNS server naming.
CORS, then, is a standard to allow browsers to make these kinds of calls from one domain to another, and you’ll need to follow its rules.
CORS Policy on Your FileMaker Server
You will need to reconfigure your FileMaker Server with a CORS policy that will allow the type of calls you will make.
There are good resources in the FileMaker Community on setting up CORS for FileMaker Server on macOS and Windows servers. I’ll take this opportunity to use the newest option: running FileMaker Server on Ubuntu 22. The main difference is that FileMaker Server on Ubuntu 20 or 22 uses nginx as its web server. It uses Apache for Ubuntu 18 and macOS.
The nginx configuration is in this file:
/opt/FileMaker/FileMaker Server/NginxServer/conf/fms_nginx.conf
Before you make any changes to it, stop the FileMaker Server web server:
fmsadmin stop httpserver
Open the fms_nginx.conf file with your favorite text editor. Then scroll down to the server block that listens on port 443 (line 114). The default CORS policy is on lines 132 through 135.
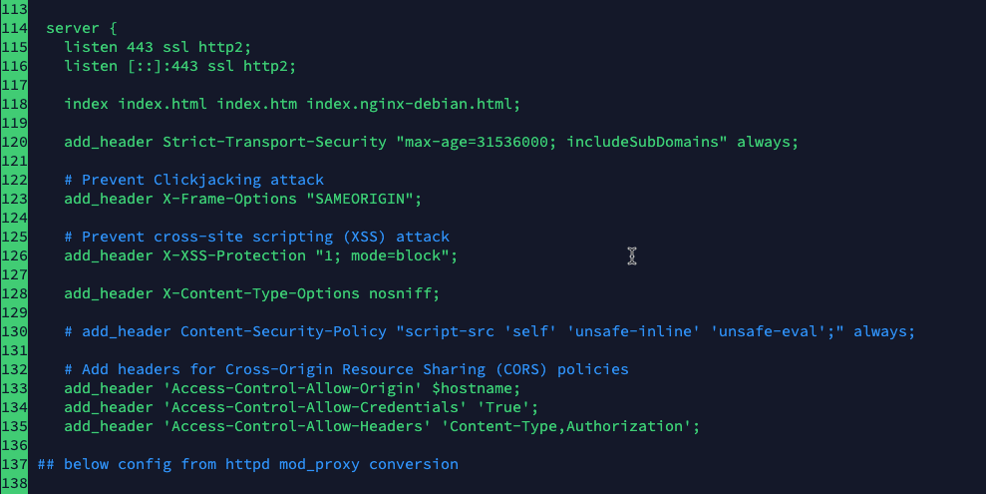
Line 133 explicitly restricts access to calls from its own machine (localhost, the FileMaker Server machine). Line 135 only allows certain headers.
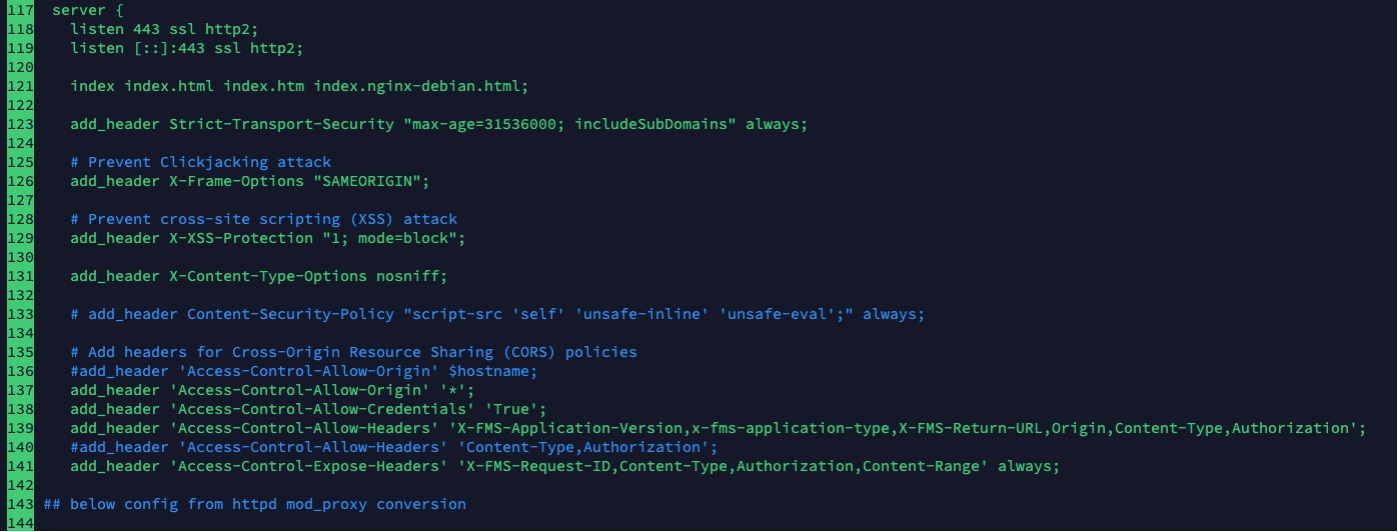
Change the configuration to match the screenshot above. For better security, you will want your Allow-Origin policy to be less permissive than “*”. That would expand the scope of this blog post too much though. Reach out to us to learn more about hardening your FileMaker Server deployment.
The extra headers added to Allow-Headers are necessary because the Claris JS utility uses them. The Expose-Headers line is new and does not exist in the original policy.
Save the file and check to make sure the syntax of your configuration changes is correct. The normal command for that is:
sudo nginx -t
But that just checks Ubuntu’s default Nginx web server, not the FileMaker Server nginx. To check this specific config file, the command is a little more complex:
echo "your SSL cert passphrase here" > /opt/FileMaker/FileMaker\
Server/CStore/.passphrase & sudo nginx -t -c /opt/FileMaker/FileMaker\
Server/NginxServer/conf/fms_nginx.conf
If all is well, the output from the command should display confirmation that your syntax is ok:

Allow the WebDirect Home Url
While you are still on your FileMaker Server, also update the WebDirect configuration that allows the Home Url functionality and whitelist the url that you will be using.
The Home Url is where you want users to return to when they log out of your WebDirect solution.
The configuration is in this file:
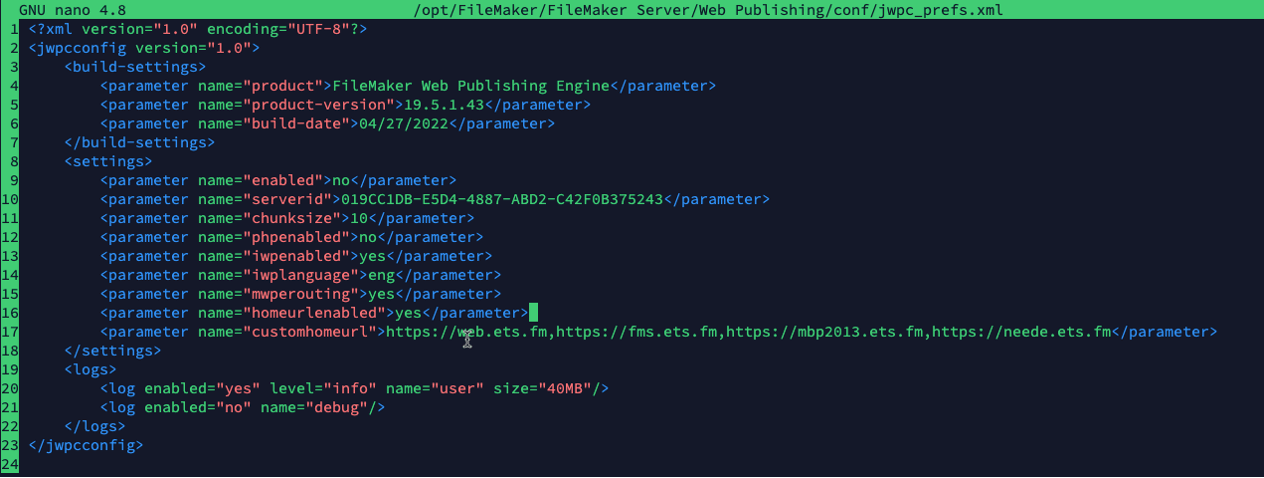
/opt/FileMaker/FileMaker Server/Web Publishing/conf/jwpc_prefs.xml
Use your favorite editor to change line 16 to yes to enable the Home Url functionality, and on line 17, add a comma-separated list of all the URLs that you may want to go back to.
Save the file, and with these changes done, start the FileMaker Server web server again.
fmsadmin start httpserver
Changes to the Claris JS Utility
Switch over to the server that is hosting your website (not your FileMaker Server). That is where you will use the Claris JS utility.
First, let’s recap what is supposed to happen from the user’s perspective:
- The user is on your website (https://web.ets.fm) and clicks a button to open your WebDirect solution hosted on your FileMaker Server, a different server. (https://fms.ets.fm/fmi/webd).
- The button click should take the user directly to your chosen Identity Provider (Keycloak in this example) where the user authenticates.
- If Keycloak recognizes the user, the user should end up inside the WebDirect solution.
- When the user logs out of your solution, they should be taken back to https://web.ets.fm, where they came from.
Under the hood, the code flows like this (and it is very similar to the OAuth flow that you would use to do an OAuth login to the FileMaker Server Data API).
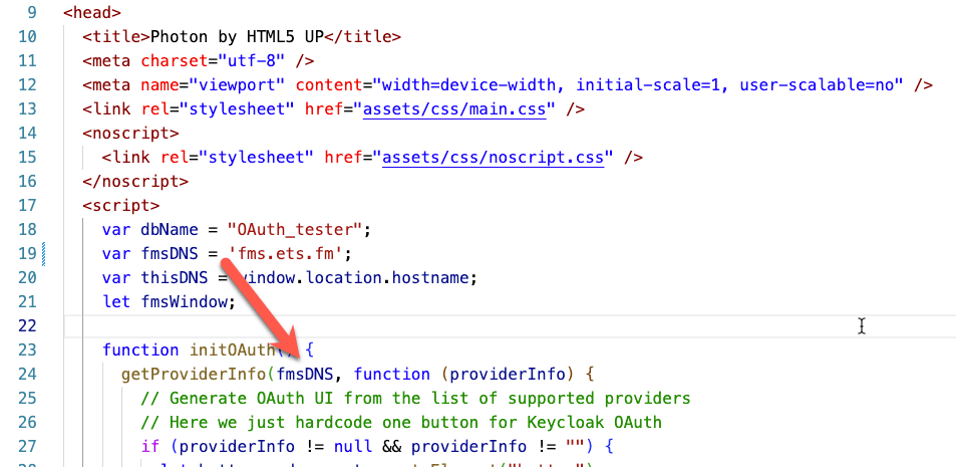
- When your main web page loads, your JS code uses the Claris utility to make a call to your FileMaker Server for a list of configured OAuth identity providers and renders a button based on that data.
- When the user clicks the button, your JS code uses the Claris utility to go grab the authentication URL for the chosen provider and pops up a new window with that url so that the user can authenticate. FileMaker Server also generates a RequestId at this point that will serve as the username for the actual WebDirect login later.
- When the identity provider (keycloak) is done, it redirects to your FileMaker Server with the response. If the authentication was successful, FileMaker Server generates an identifier and redirects, in turn, to a url that you have specified, back to your own website.
- Your JS code on your website now has both the RequestId and the Identifier to pass to the Claris utility. Those serve as the equivalent of the username and password to log the user into WebDirect.
You will need to modify the Claris JS utility so that the calls it makes to the various FileMaker Server endpoints are prefixed with the URL of your FileMaker Server – in essence, create absolute paths instead of the relative paths that are used. In our example demo, we are passing the DNS name of the FileMaker Server into the functions as an extra parameter.
Your HTML / JS Code
Changes to the Claris JS utility (in various places)
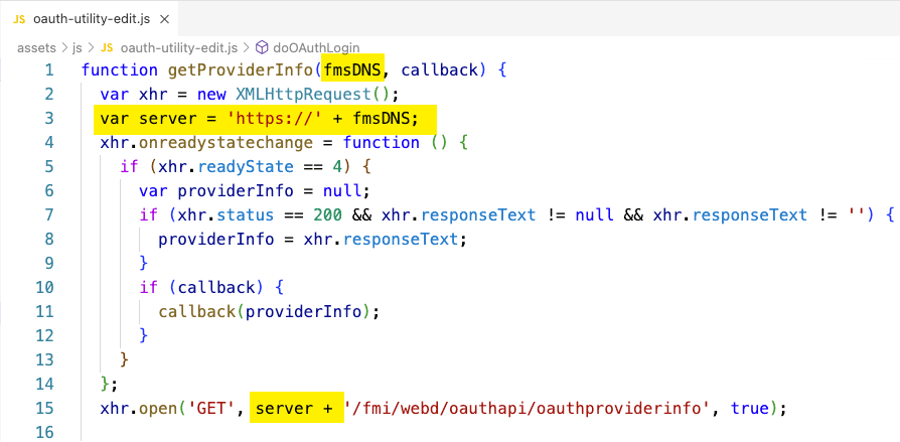
Exchanging Data Between the Servers and Oddity with the X-FMS-Return-URL
The calls between the two servers are allowed by virtue of your updated CORS policy. Ideally, though, you’d want this whole exchange to happen without installing any code on your FileMaker Server so that your web server is the only place that code exists. Ideally, your website makes the calls to FileMaker Server and receives all the data from those calls.
Unfortunately, I have not yet found a way to make that possible. The X-FMS-Return-URL header that is part of the exchange with FileMaker Server is supposed to let you specify a url back to our website after FileMaker Server receives the redirect from the identity provider. This is the redirect that contains the last bit of data that your website needs to log the user into WebDirect: the identifier.
The X-FMS-Return-URL header is added to the call to FileMaker Server when the user clicks the button. The code asks FileMaker Server for the identity provider’s URL (line 42).
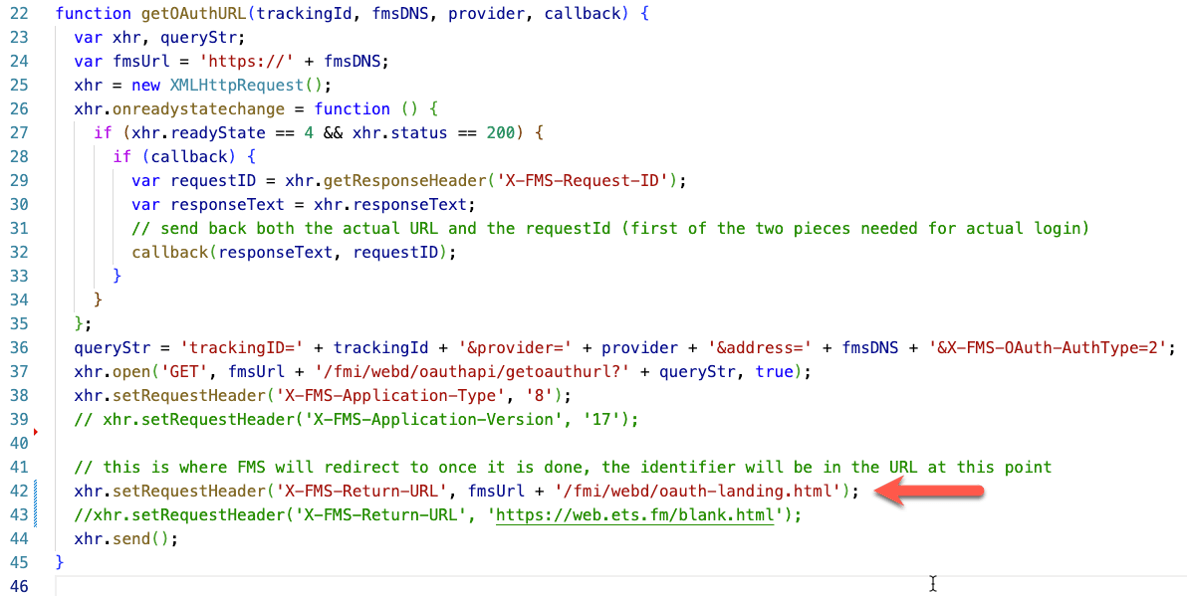
All my attempts to change the URL result in a blank “{}” response from FileMaker Server instead of the identity provider’s login URL. It looks like only that specific hard-coded return url is accepted by FileMaker Server.
That means that after a successful authentication, the two pieces of information we need (the RequestId and the identifier) are only known to a web page on the FileMaker Server. Your own web page does not have that data. We need to find a way to let the two web pages on the two different servers communicate. To be in control over the process, you must install some HTML/JS code on your FileMaker Server.
Here’s how it can work.
On your web server, the login button is still rendered by using the Claris JS utility to go and collect information from the enabled OAuth providers on your FileMaker Server (line 24).
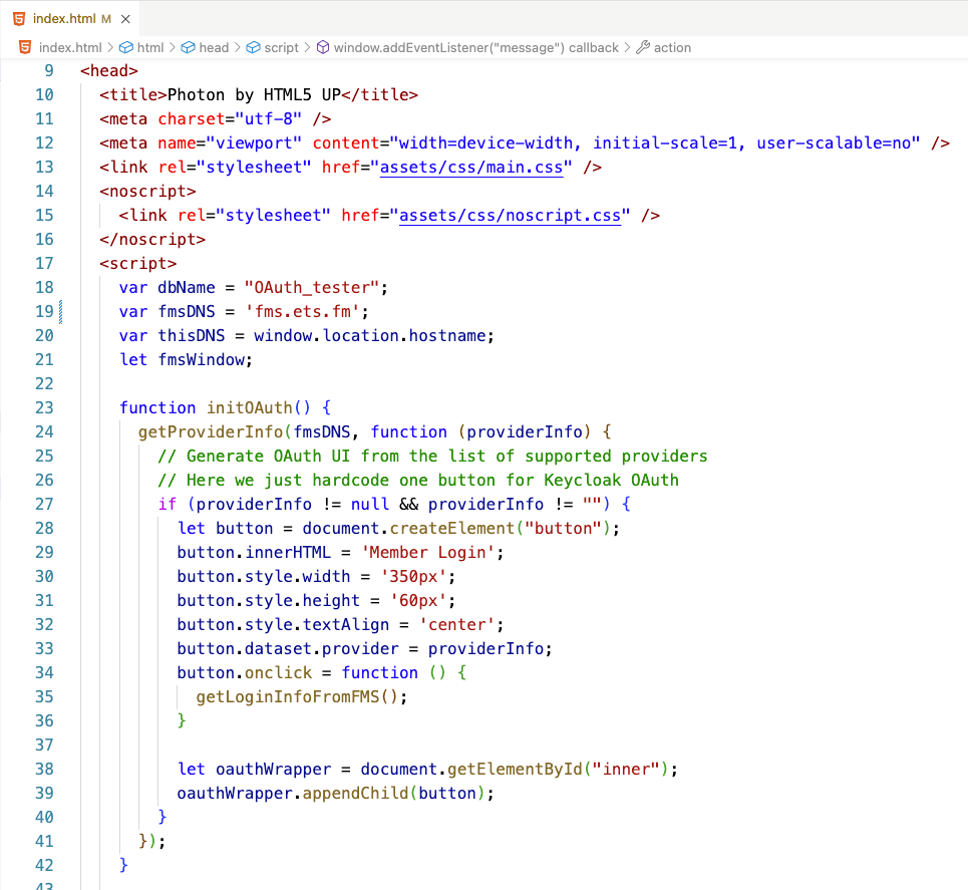
Line 35, however, now calls a function that does not directly call out to FileMaker Server but opens a web page there: identifier.html.

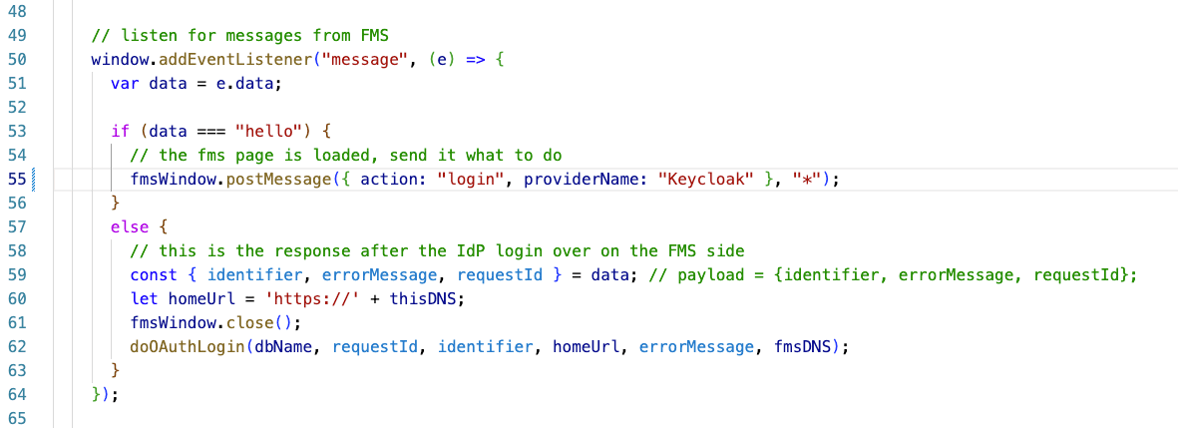
Over on the FileMaker Server, that identifier.html page is set up to send back a message when fully loaded. We are using the postMessage functionality for this. (Here, too, you would make it more secure by not using the “*” wildcard). The caller window is the browser window (tab) that spawned the identifier page, so the caller is our main website.

When the main website window receives the hello, it then tells the web page on FileMaker Server to initiate the login (line 55 below). The message, in this case, is a JSON object that contains the action and what identity provider name to use.

The code on your FileMaker Server receives the message. If the message contains the proper action, it will trigger the authentication (line 30 below). The rest of the code is mostly left unchanged from the Claris example. The code will ask FileMaker Server for the authentication Url of the identity provider. It will pop up a new window to take the user there, then wait for a result. The important changes are on lines 60 and 61 below. We collect the two pieces of data we need: the requestId and the identifier. Then we send those back in a JSON object to the caller window, our own website.
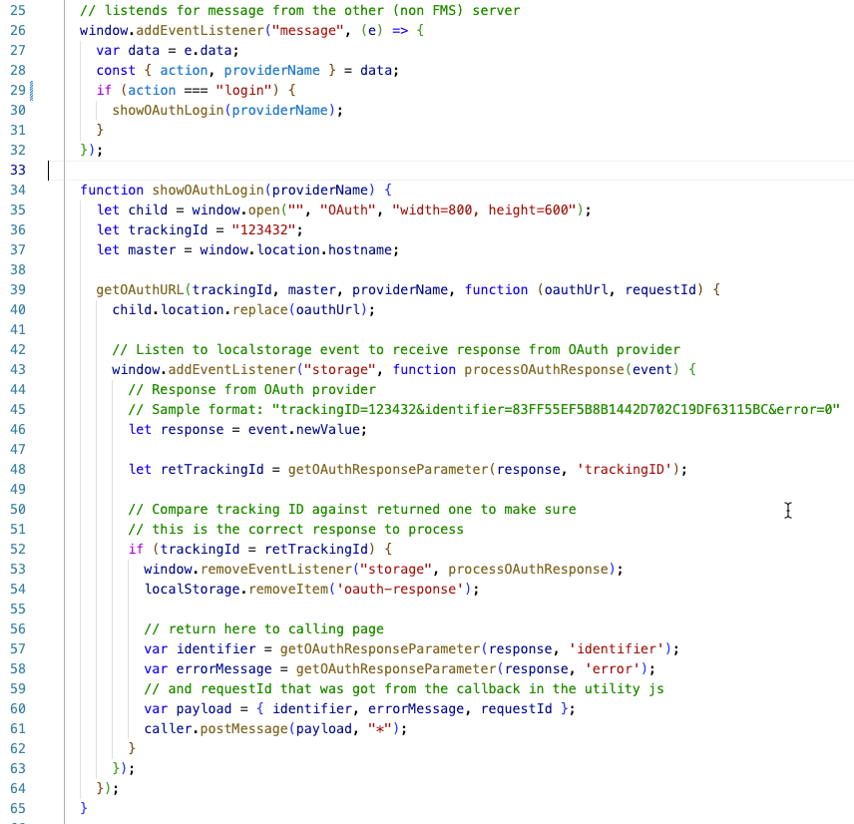
Your main website sees the incoming message and calls the doAuthLogin() function (line 62 below) from the Claris JS utility with the requestId and Identifier that serve as username and password. It also closes the web page from the FileMaker Server that it had opened (line 61).
The Result
The user logs in on web.ets.fm and, after authenticating at your identity provider, ends up in WebDirect running on fms.ets.fm:
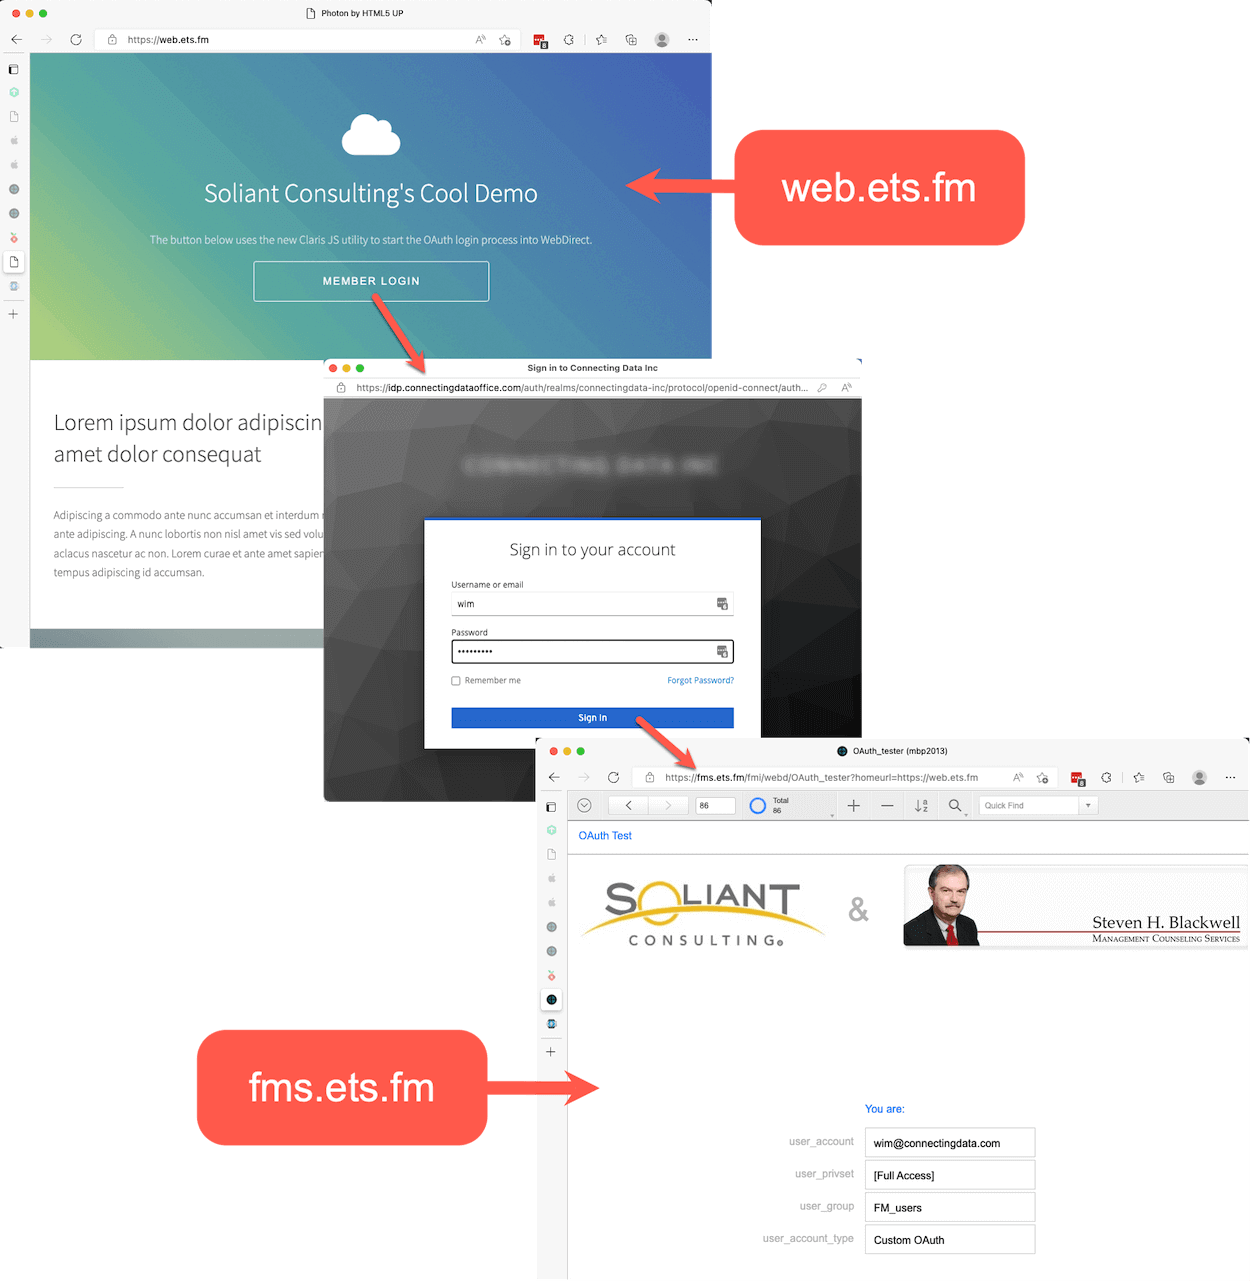
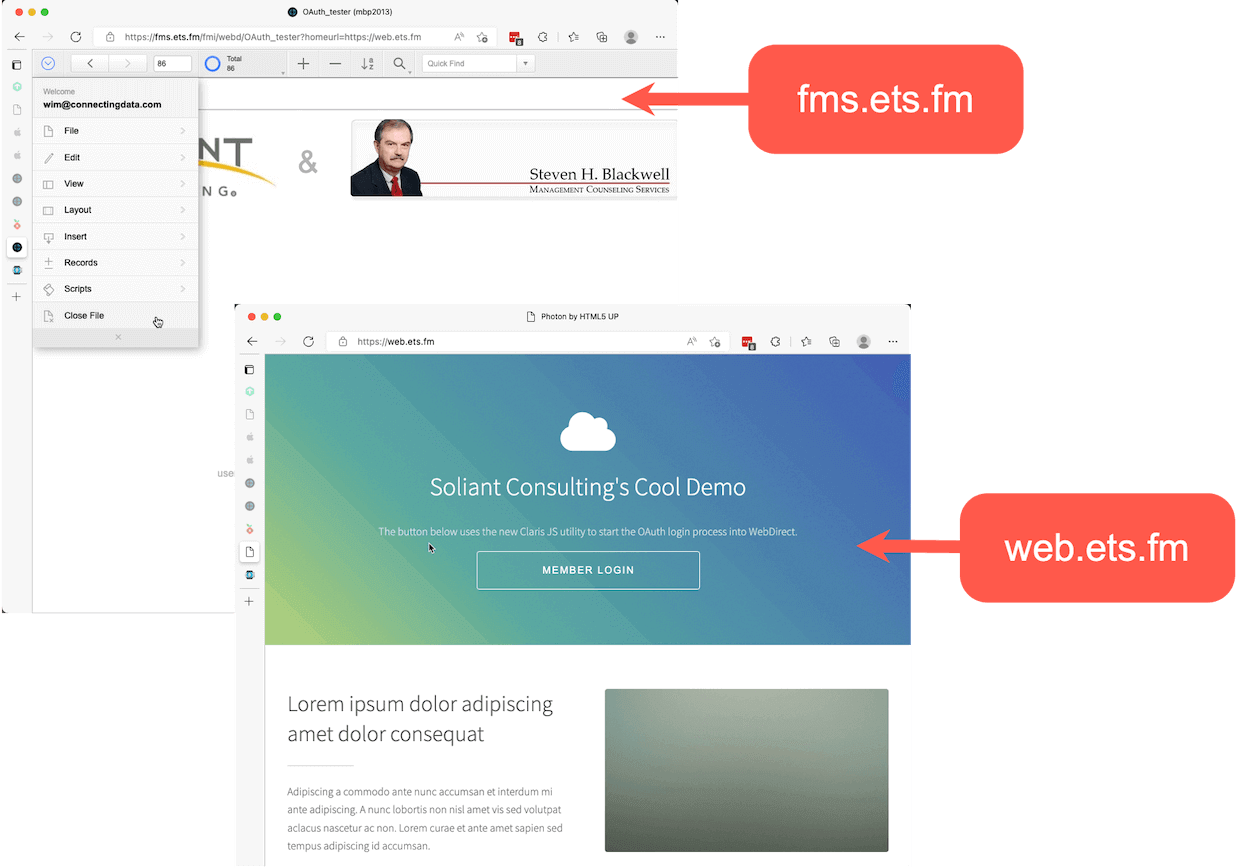
When the user logs out, they are redirected back from your fms.ets.fm WebDirect server to your own website on web.ets.fm
Your Partner for Taking FileMaker Online
If you need help with seamless OAuth login to WebDirect for your FileMaker application or would like to further customize your solution, our team can help. Contact our team to get started. 
Resources
- GitHub repo with a sample website if everything is running on the FileMaker Server: https://github.com/wimdecorte/fms-webd-oauth-local
- GitHub repo with a sample website NOT running on FileMaker Server: https://github.com/wimdecorte/fms-webd-oauth-remote
- And the companion repo for the components that do need to be added to FileMaker Server: https://github.com/wimdecorte/fms-webd-oauth-remote-companion