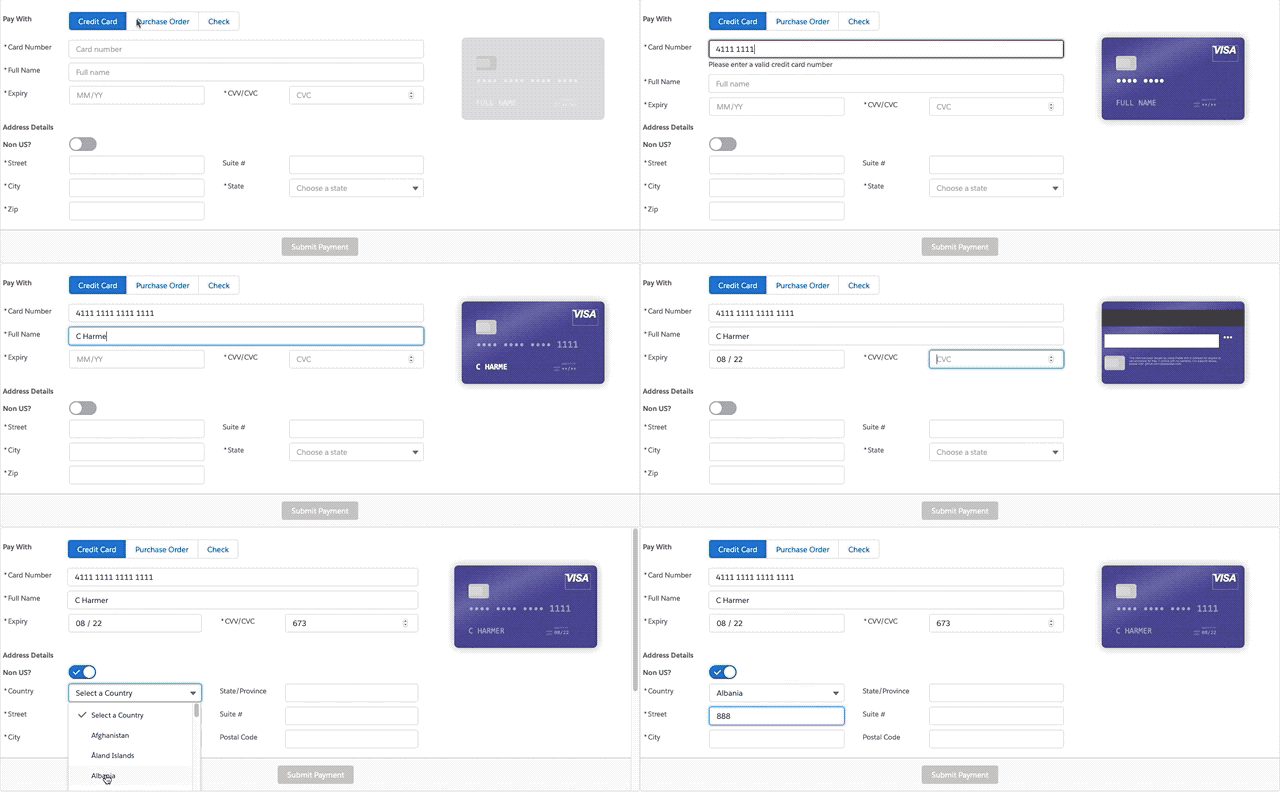
In this post, I will show you how my newest component, PaymentForm, is built and how to use it. This is a component build using Lightning Web Components, which means it is extremely fast to load and to use.
Salesforce Lightning Web Component (LWC) – PaymentForm
This time, I’m going to show you how my newest Salesforce LWC component, PaymentForm, is constructed. I’ll also show you how I built it.
Background
A year ago, I was asked to build a payment input form for a community. I looked around for a Credit Card input validation component for Lightning/LWC and found… nothing (well, not much).

Payment input forms are, of course, very useful, and necessarily very complex. There are many types of validation, visualizations, and error handling to manage. No wonder this sort of component doesn’t exist yet! However, looking around on GitHub, I found several very nice libraries that do this job very nicely. One of the nicest was jessiepollack’s Card.js library, which had very validations and animations. However, adding this to an LWC component is easier said than done!
If I were to convert this component again, I’d probably pull the components directly and gather them together via a series of imports.
The way I did it was still to use imports into a Card.js file, but I deconstructed the built output using an “unwebpack” tool. – The original packaging was very complex, and it seemed best to just grab the compiled output.
The current structure of the project is:
PaymentForm
-AddressInput
-CardInput
–Card.js
—QJ.js
—Payment.js
—Extend.js
…etc.
As you can see, there are a lot of dependencies.
Of course, if you want to just use the component with no modifications, you don’t really need to worry about anything other than the PaymentForm component. You can use the AddressInput or the CardInput components separately – they are entirely independent.
Important features of this component:
- Ability to handle all credit card formats (as of January 2020)
- Beautiful animation of the credit card as data is entered (it flips from front to back as appropriate)
- No third-party static resources used (all imports come with the component)
- Address validation and International address handling
- Both Card and Address components use events to broadcast done/valid/invalid events
Method
To use this component, you can pull the code to your local machine using git clone:
clone git@github.com:rapsacnz/PaymentForm.gitThen open this project with VSCode and choose “Authorize an Org.”
When you have successfully authorized, you should be able to click on the package.xml file and click “Deploy Source in Manifest to Org.”
There are some important methods/code structures you should be aware of to use this form successfully.
The payment button is enabled when both the address and the credit card sections of the form are marked as valid.
Whenever address or credit card data changes, this method runs:
checkIfFormValid: function(component) {
  var formValid = false;

  var paymentValid = this.checkIfPaymentValid(component);
  var addressValid = this.checkIfAddressValid(component);

  if (paymentValid && addressValid) {
    formValid = true;
  }
  component.set("v.formValid", formValid);
},
As you can see, it runs internal helper methods that separately check the address and credit card components. If they are both valid, the form is marked as valid – and you can submit your payment.
This part of the component is just a stub – because there are so many different payment systems, you will be implementing this method in many different ways:
processPayment: function(component){
  //call your back end payment processing engine here
},
You’ll see when you look at the form that it is built to handle both checks and purchase orders. This is quite easily removed by setting the public attribute `otherPaymentOptions` to false.
To use it, just place it in your form.
Download the Files
All the files are located on GitHub.
Enjoy!
Moving Forward in Lightning
Have questions? Let us know in a comment below or contact our team directly. You can also check out our other posts on customizing your Salesforce solution.
More Salesforce Lightning Web Components (LWC)
Learn about the other components I’ve built:
Hi Team, I did install it my person org but not sure How can I see the output as I’m newbie to LWC..can you please tell me how will I able to?
This will be difficult if you have not used LWC before. You should get help from a colleague to do this. Set the “Exposed” member in metadata file to `true` – this will enable the form to be used on it’s own. Then you will need to add some configuation tags to this file. Look here for more details. Also look here
You will then need to create a lightning tab and embed the component in it so you can view and test it. Good luck!
Is this still available? I’ve having trouble pulling from the repository.
Yes, it is. Perhaps Github was having some issues? https://github.com/rapsacnz/PaymentForm. If you really need to you can visit the repo and just copy the relevant parts. There are not too many.