Import Records Command
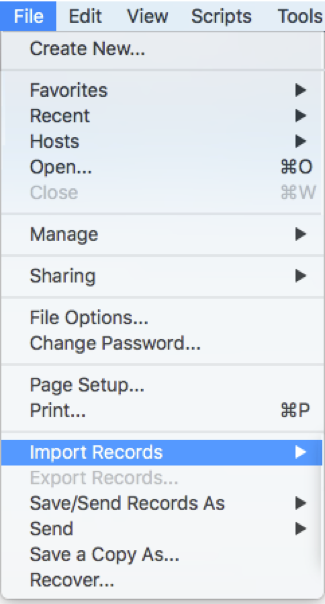
The Import Records command provides one of the most fundamental integration features of the FileMaker Platform. It allows you to import data into your FileMaker solution from other data sources such as text files, Excel files, and other FileMaker databases. Without this feature, you would likely have to perform a great deal of data entry when deploying a solution that replaces existing business processes.
In FileMaker 18, a number of changes make the Import Records command significantly easier to use and more flexible. I’ve chosen the following features to discuss in this article:
- Import actions: Your import can take three distinct approaches: adding a new record for each one imported, simply overwriting the records in your found set with what you are importing, or updating records more strategically based on matching criteria that you provide.
- Data mapping visualization: The data mapping interface helps you to visualize the process of pairing together source fields (the ones you are importing) with target fields (the ones that will receive the incoming data).
- Display of incoming data: Seeing the actual data that you are importing helps you to decide which fields to pair together in your data map. The field names alone are often not enough, and in some cases, you don’t even have field names to work with.
- Auto-enter settings for target fields: Your target fields may have been set up to auto-populate according to various rules. You have the option of skipping this auto-population to preserve your original data.
- Field delimiters: When you are importing a FileMaker file or Excel file, it’s easy for the import process to recognize each of the fields being imported because they are part of the file structure. However, if you are importing a text file, special characters such as tabs or commas are used to separate, or “delimit”, the fields. In order to perform text-based imports, FileMaker Pro needs to know what delimiter is being used.
I’ll describe how each of the above features has changed between FileMaker 17 and FileMaker 18 and discuss the advantages (and a few disadvantages) that result from this.
The Overall Interface
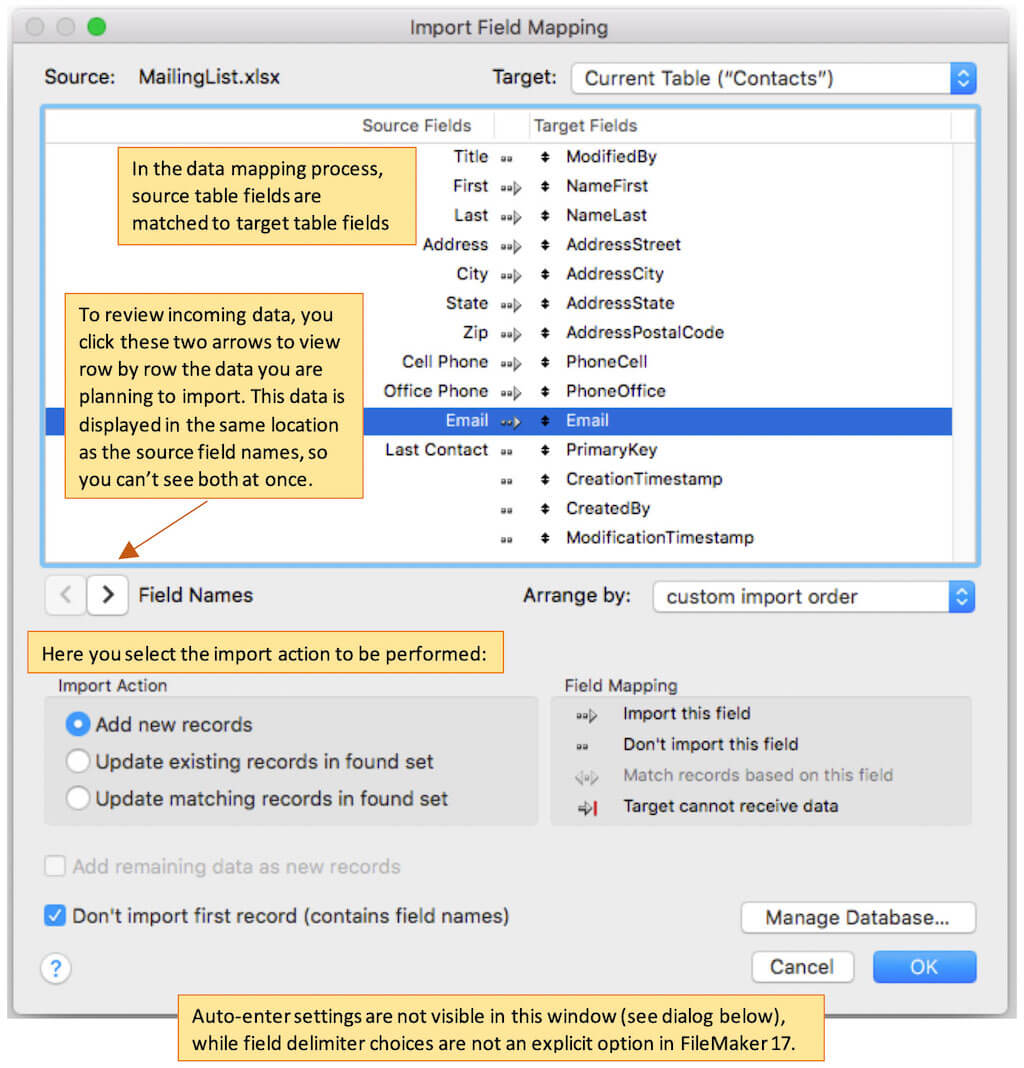
Here’s the interface in FileMaker 17:
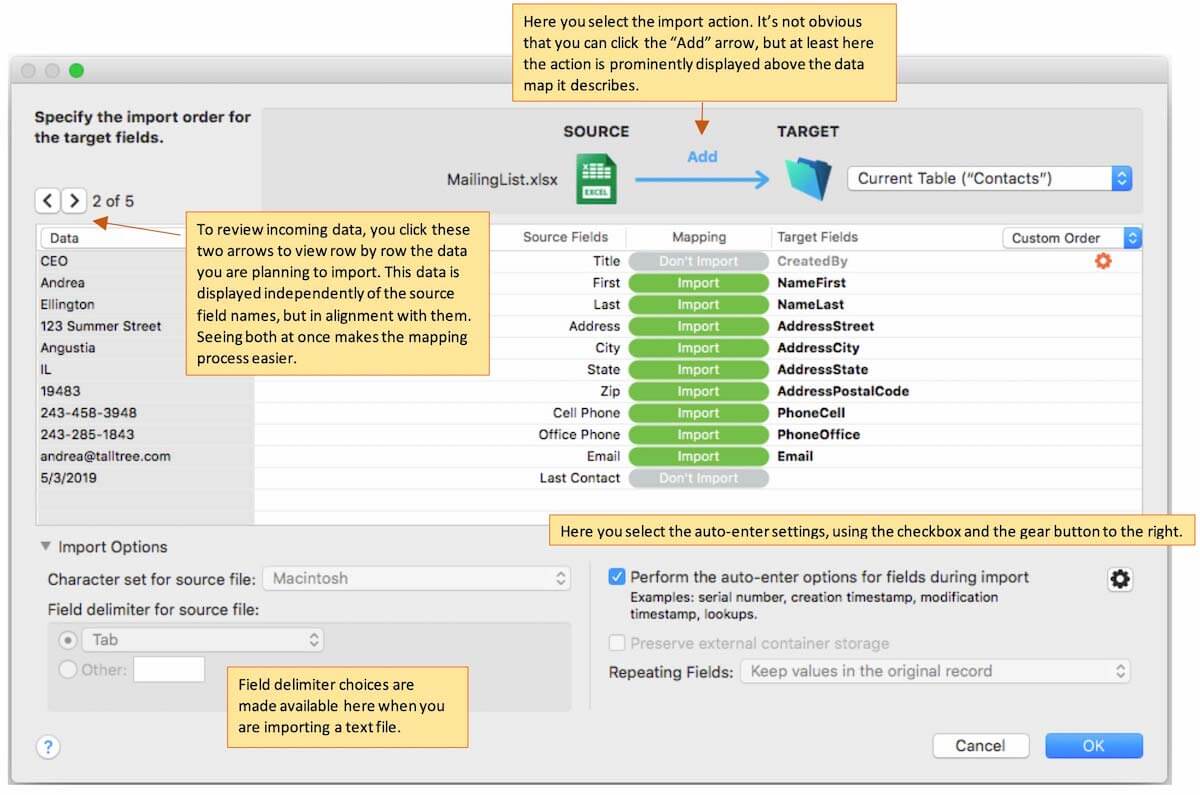
You can see that FileMaker 18 introduces significant changes:
Import Actions
Before starting on your data map, you need to decide which import action to perform. Do you want to add records, update records, or overwrite your found set? (By the way, I have never chosen to overwrite a found set. Just the idea of it makes me squirm a little, but perhaps I’m missing out on something special.)
In FileMaker 17, the import action choices appear in the lower left of the window, which is not a location that gets your immediate attention. Since this is likely the first choice you will make, it ought to be more prominent. FileMaker 18 improves on the situation by placing the Import Action at the top of the screen above the actual data map. This communicates the order of actions more clearly.
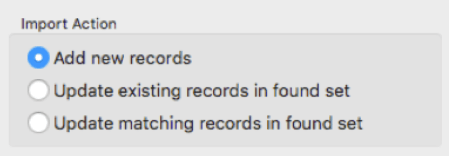
However, in FileMaker 17, it’s much clearer that you have something to do. You see a box labeled “Import Action” with three radio button choices:
In contrast, the FileMaker 18 interface doesn’t communicate that you have a choice to make; you simply see the blue label “Add” with an arrow below it. Unless you have geeky psychic powers, you have to learn somehow that this is actually a button that causes a popover to appear. I didn’t find it obvious myself, and even after using it a number of times, it still takes me a moment to remember that it’s hidden there.
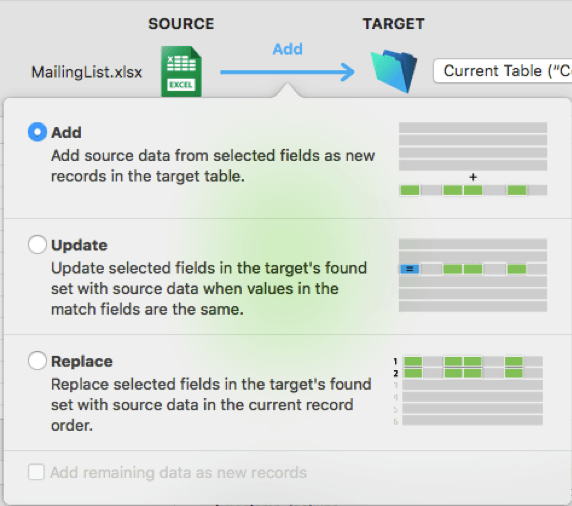
That said, what I do like about the new popover is that it describes the three actions in greater detail and with helpful illustrations. If you are still learning the differences among them, you’ll likely find this information useful.
Data Mapping Visualization
Now that you’ve chosen your import action, you’re ready to start the process of data mapping, where you pair incoming fields from your source table with the existing fields that they will populate in your target table. This often-straightforward process becomes more challenging when you have many fields to pair or aren’t sure how to pair up your fields. To make things easier, FileMaker Pro provides a drag and drop interface that helps you to visualize the process.
Data Mapping Visualization in FileMaker 17
The FileMaker 17 version of the data mapping interface shows all the source fields on the left (with names, when available) and all the target fields on the right, as in Figure 6:
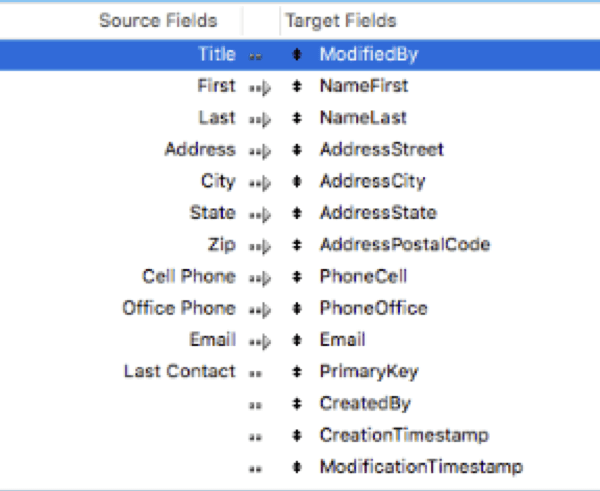
On principle, the task is simple, since you see every matching possibility right there in front of you. A handle appears to the left of each of the target fields. You simply use your mouse to grab that handle and drag each target field until it lines up with the appropriate source field. You continue pairing fields together until the data map meets your requirements.
A little arrow connects each source field to its target counterpart, indicating the flow of data. If you don’t want to import a given source field, you click this arrow to make it disappear. If you change your mind, you can click it again to restore it.
As it turns out, in practice the process can be challenging. As you drag each target field to a new position, it takes the place of the field that was already in that position. When there are many fields, this starts to feel like those puzzles where you slide tiles around to create a picture. The order of the fields becomes quite haphazard to the extent that it can become very difficult to locate a given field that you wish to map. If you don’t know which field you want to map, the interface makes it very difficult to assess your options. Finally, the actual task of dragging and dropping doesn’t work well on large tables: it’s hard to scroll long distances to the location where you want to drop the field in question, and you end up needing to drop it several times along the way just to get there.
Another challenge involves source fields that you’ve chosen not to import. This interface still requires you to make a match for every source field, even if you don’t choose to import it (you can see an example of this in the screenshot where Title is matched to Modified By, but there is no arrow between them). These non-matches have the same visual weight as the matches, causing them to compete for your attention.
Finally, there is minimal visual feedback associated with the action of sliding the fields, which makes it hard for the eye to track whether you dragged the field to the right place. This, combined with the fact that it’s difficult to drag them precisely, means that creating a data map for many fields can require a great deal of patience.
Data Mapping Visualization in FileMaker 18
The new data mapping interface doesn’t involve sliding at all. On the left-hand side of the interface, you still see a comprehensive list of all columns coming from the data source. If the data source contains many fields, this list will still be quite long.
The word “Import” clearly indicates which source fields are being imported. The green color gives further emphasis to the pairings that are being imported, and the black color of the target field name extends the emphasis further. All of this makes the map much easier to read.
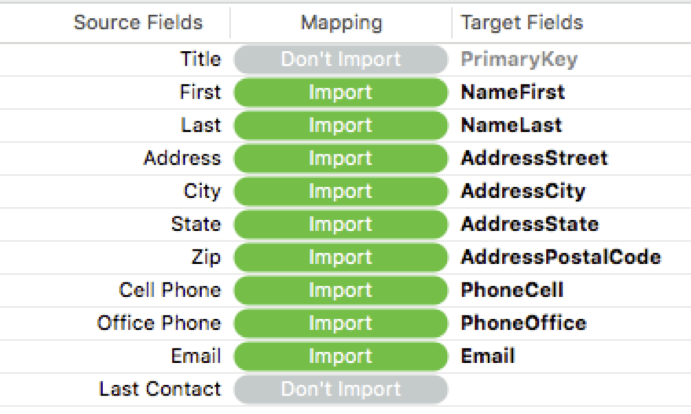
Furthermore, the entire list of target table fields no longer appears on the right, occupying the user’s attention. Instead, only actual matches to each source field are shown. The target fields are selected from pop-up menus as shown in Figure 8.
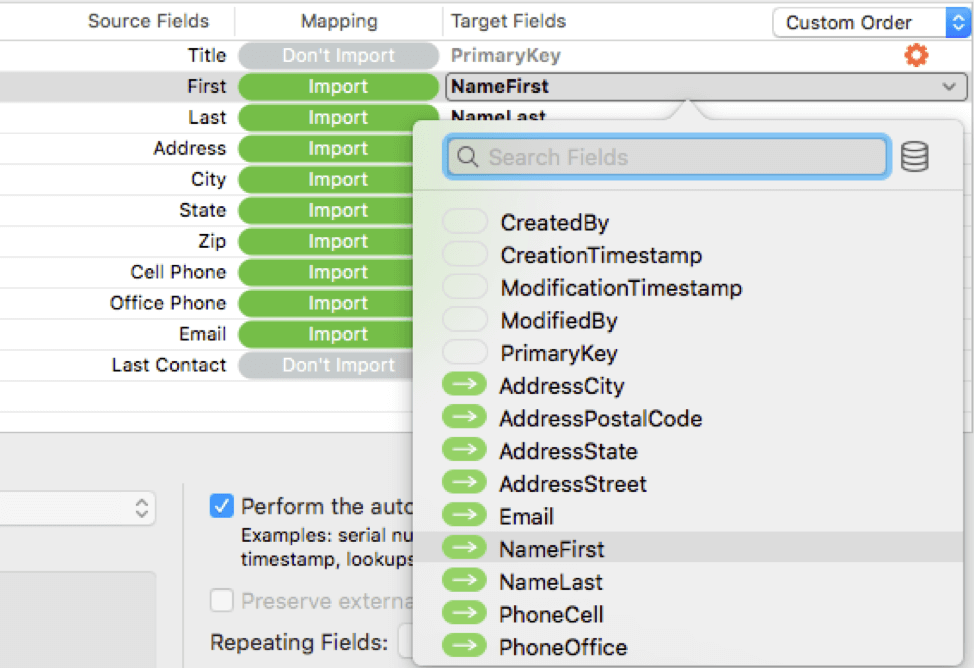
If there are many target fields to choose among, the list is scrollable, or you can search progressively on the field names.
Those fields that haven’t yet been mapped are grouped at the top of the list, then sorted alphabetically, while those that have been mapped are grouped at the bottom, also sorted alphabetically. These changes make it much more convenient to locate a specific field by name.
Matching Options
If you have chosen to update records based on matching criteria, your data map gets a little more sophisticated, as you need a way to designate those matches.
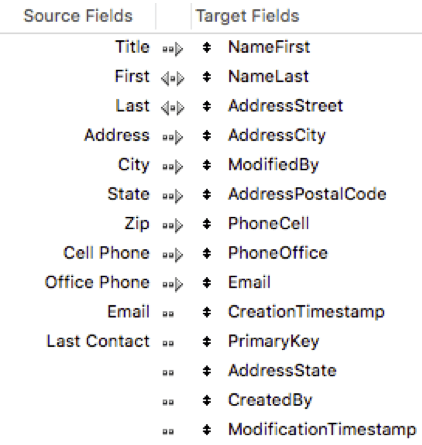
In FileMaker Pro 17, matching criteria are indicated by a two-way arrow, which looks almost the same as the one-way arrow (and both of those are similar to the no-arrow option as well). There is no other designation (color, weight, etc.) to help you see the difference between the three possibilities.
The action to select the matching criteria is simple enough. Instead of a toggle between the right-arrow and the no-arrow, each click cycles you through the three options (right-arrow, two-way-arrow, no arrow). However, it’s awfully easy to make an extra click and get a different arrow than you intended.
In this example, the import process would update (that is, overwrite) records where data in the First and Last fields of a source record match the data in the NameFirst and NameLast fields of a target record:
FileMaker Pro 18 distinguishes things much more clearly using both words and colors:
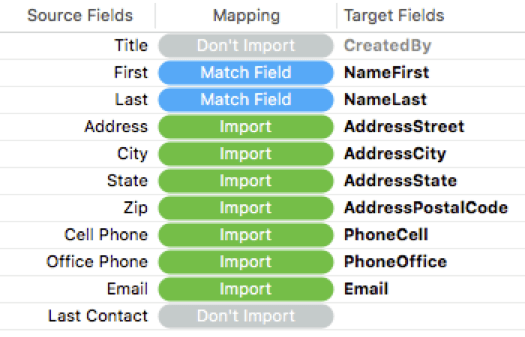
You can see at a glance which pairings are used for matching, which will cause data updates, and which will be ignored.
Display of Incoming Data
It’s important to see examples of incoming data as you make choices about your data map, especially when your source data doesn’t include field names.
In FileMaker 17, you view the incoming data in the same place where the field names appear. In the screenshots below, you see the field names first, then the source data:
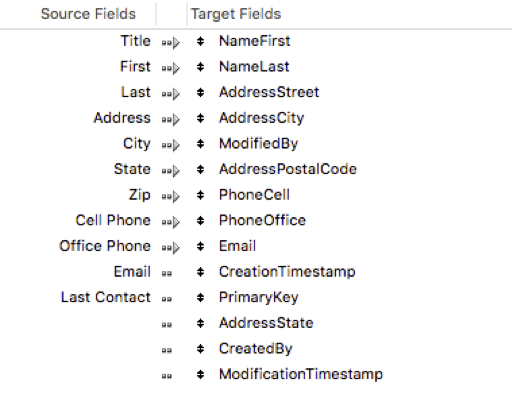

An advantage of this approach is that you see the data values closely paired with their target fields. No effort is needed to associate them with one another.
However, you have to remember the source field names while you are viewing the source field data. That can require a significant cognitive effort. Typically it means you end up thinking about just a few pairings at a time unless the contents of the field remind you which field it is.
In FileMaker 18, the incoming data is presented independently, off to the left of the data map, but with the values in alignment with their fields in question:

It’s so much more relaxing to see both the field names and data at the same time. There’s no effort to remember or infer which fields are being mapped.
When I first published this post, I thought you couldn’t reduce the whitespace between the values and the field names. I learned from Mark Scott (see comment below) that the divider to the right of the “Source Fields” column can be moved, reducing this whitespace. Only that one divider can be moved and somehow it wasn’t intuitive for me to try it, even though this is basic expectation from Excel and other spreadsheet-like interfaces.
Choose your header row
Here’s something else I missed when I first published this post. It’s also due to the interface not quite making sense to me at first glance. As part of reviewing the incoming data, you can choose any row as a header row by selecting “Use as field names” from the dropdown just above where the data is displayed. I assumed that this option only applied to the first row. Regardless of the row you choose, the import starts with the rows below it, which means that all rows above it are skipped. I expect to find this handy when I want to work with formatted reports where the initial lines are used for titles, comments, and other information, all of which FileMaker 17 requires you to delete before you can attempt an import.
Auto-enter Settings for Target Fields
If your table includes auto-enter options that insert values (such as the current date) or that perform calculations (such as stripping surrounding whitespace from a person’s name), you will need to decide whether to apply these when importing data.
FileMaker 17 asks you about this almost as an afterthought. Once you finalize your data map and are ready to perform your import, a second dialog box appears, asking the following:
You are given a single decision that applies to all the fields in the target table: do you want to perform auto-enter options or not?
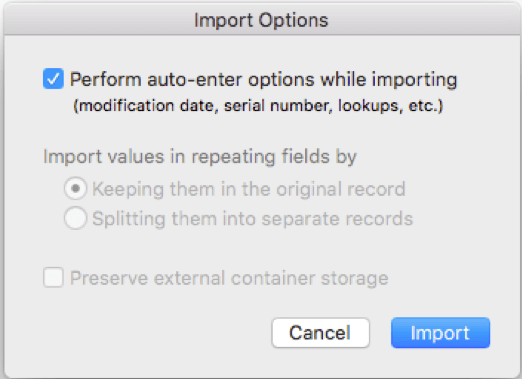
FileMaker 18 improves on this in two ways. First, the choice is presented in the lower right of the main dialog window, as one of your final decisions before performing the import:
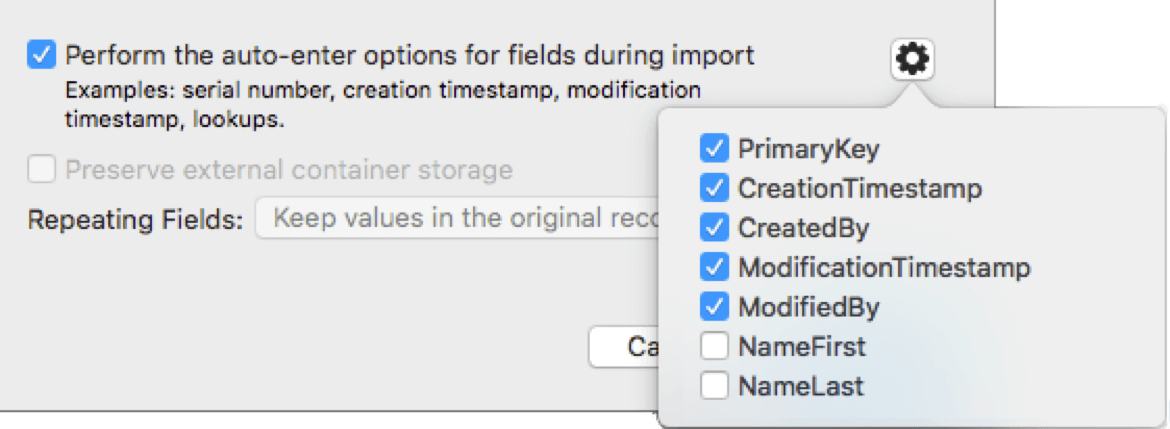
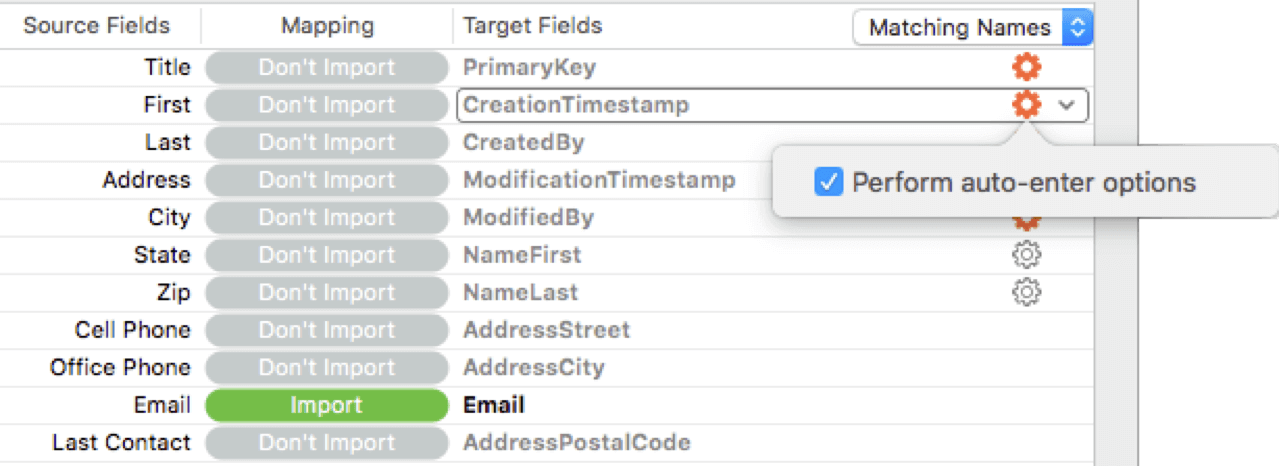
Second, you can make the decision at the field level. For example, you might want to enable auto-enter on system fields that are not mapped, (such as primary key or creation timestamp), but leave the data alone in fields that are mapped (such as NameFirst and NameLast).
You can also make the same auto-enter choices field-by-field on the map itself by clicking the gear on the right of the target field. The gear turns orange when auto-enter options are being performed, and gray when they are not.
Field Delimiters
Importing character-delimited text files is a standard practice in database administration. People use a variety of delimiters: tabs, commas, semicolons, spaces, vertical lines — whatever works best for the data in question. Typically you choose a given delimiter because it doesn’t appear in the actual data and hence won’t interfere with the parsing.
In FileMaker 17, you have two basic options: tab-delimited and comma-delimited. The software decides what delimiter to use based on the file extension of the source file. For example, a “.csv” file uses commas, and a “.tab” file uses tabs. But what about a “.txt” file? In that case, FileMaker makes its best guess and is usually right.
But what if you want to import a semicolon-delimited file? Either you have to substitute commas or tabs for the semicolons before importing, or else import the entire file into a field and then script a process to parse the data.
FileMaker 18 addresses this issue head-on. You can now specify any delimiter that you like. You have a dropdown choice of four common options (tab, comma, semicolon, space), and also the option of entering any other single character.

In the future, I hope we will have the option of entering multiple characters. A combination of characters such as tilde-pipe-tilde ( “~|~” ) is especially unlikely to appear in your text data. It would be great to be able to specify the characters that separate rows of data from one another as well.
The Verdict
Here’s my final assessment of the various changes I’ve discussed. I hope you’ve found this information useful!
Import Actions: MIXED
Actions are more prominently displayed, and in a more workflow-appropriate location. However, they are hard to discover. Clearer descriptions and illustrations make them easier to understand.
Data Mapping Visualization: WIN
Using dropdown menus of target fields rather than a mix-and-match, drag-and-drop approach solves many of the worst problems posed by the FileMaker 17 interface. The interface presents less cognitive load through the strategic use of color and text labels. Dropdowns sort target fields to present unmapped fields first, making fields easier to locate. A search filter by field name assists with this as well.
Display of Incoming Data: WIN
Presenting source field names and source field data simultaneously frees up the mind to think about mapping rather than remembering. The whitespace between them can be reduced (hooray) though this option wasn’t obvious to me.
Choose Your Header Row: WIN
The option of choosing any row from your incoming data as the header – and skipping all rows before it – will simplify the task of importing more complex spreadsheets. The interface didn’t make it immediately obvious to me that this was an option, however.
Auto-enter Settings for Target Fields: WIN
Auto-enter options are now incorporated into the main interface rather than as an afterthought in an intrusive dialog. Enabling auto-enter options on a field-by-field basis allows for greater precision in determining how “purely” an import should be performed.
Field delimiters: WIN
Custom field delimiters greatly widen the options for text data sources and do away with programmatic workarounds.
What do you think?
How do you feel about these new options? Share your thoughts in a comment below.
Hi, Mark.
This is a great overview of the changes – however I must point out that in Figure 9 you have inadvertently shown just how difficult the import mapping can be to work with in its historical form. Your text says that you’re matching on the NameFirst and NameLast fields but the graphic shows matching from First = NameLast and Last = AddressStreet.
Here’s hoping that the new system prevents these sorts of errors that all of us have encountered. 🙂
And this comment system has stripped out the symbols I used to show the matching between the field names. It’s not obvious that such a process will be applied.
I’m not sure why WordPress strips these comments in that way, but alas that it how it works.
Hi Daniel, your comment made me laugh. I guess I’ll leave the screenshot as-is since it does in fact embody the challenges that we encountered in the past. Thanks for sharing! Mark
Great article Mark. And ONLY once did I “overwrite a found set” AND the result — I paid dearly for it and will probably never use it again but I digress. . . ( lol )
Thanks, Dominick! Sounds like I dodged a bullet there 🙂
Hi Mark,
Great overview! One thing I’ll add is that the columns (Source Fields, Mapping, and Target Fields) are resizable. Therefore, you can overcome one of your quibbles by dragging the divider between “Source Fields” and “Mapping” to the left. That’ll get rid of that gulf between source field names and data.
Hi Mark, thank you for that information! It makes all the difference. I may edit this article to cut that complaint. I realize that there is a general interface expectation that dividers like that are moveable — but interestingly, only the one to the right of the “Source Fields” column is… and somehow it just wasn’t intuitive to me to even try it. Are you satisfied with it as-is, or how would you make that affordance more obvious?
Thanks for this important review of the new features.
The only complaint I have about the new format is the requirement to choose a delimiter field for my client users.
Most of them are data entry people and do not know or need to know what type of delimiter is required.
The script they currently use requires them only to choose the required file from a browse screen then the script performs the remaining steps. Do you know if there is a way to select a delimiter as default and not have the popup appear?
Hi Wayne, I may be misunderstanding you, but the delimiter choice is one of the options saved when you choose “With Dialog: Off”. In addition to determining the import order and so on, you can store which delimiter is used. You just need to have a sample text file to use when setting up the import appropriately. Does that answer your question, or are you looking for something else?
When creating a script that imports an external file using the “Import Records” script step, how can I designate the Header Row so that it is not imported. When I create the “Import Records” script step there is no source data file and therefore no data so the data row arrows are disabled. In the old old interface I had the option to select my data has a header row which I would use to prevent the header row from being imported. I assume there has to be a way to do this in the new interface but I cant figure it out. Any help would be great.
Hi Joe, thanks for your comment! I add a temporary reference to a data file and create a temporary data file if needed, configure whatever settings I need, and then remove the reference when I’m done. Could that work for you?
What happens if one of the fields you want to import is from a related table and is not the key in that table, but instead a field within the related table?
Example: [Address] and [City]
CITY = Seattle
In the CITY table, Seattle has ID = 5 and Portland = 6.
How would you import the following file:
123 Main Street, Seattle
234 Second Street, Seattle
345 Third Street, Portland
What needs to happen in the import is:
123 Main Street, 5
234 Second Street, 5
345 Third Street, 6
There are different ways to do this, but I’d probably look for “natural” keys, that is, one or more data fields which provide a reliable match between the two entities. In the case of your example, the city would work, though in real life, you might have cities of the same name in different zip codes or states (in which case, you’d use these fields in your match as well).
Let’s stay with your example data. I’d perform the import as-is to your address table (assuming that you’ve set up the city table already). Then within FileMaker, I’d set up a relationship based on the city name between the address and the city tables. Next I’d populate the city ID foreign key field (5,6) based on that match. Then I’d create a new relationship matching by this city ID. Finally, if I didn’t expect to need to match this way again, I’d delete the city name relationship.
Does that make sense? Please let me know if it answered your question. Thanks!
Note that sometimes you can’t get a reliable match across the entire data set using one set of natural keys. In that case, you would make several passes, using different matches to populate the foreign key for different subsets of records.
Typically I don’t recommend using natural keys as the primary criteria for your relationships. They can paint you into a corner in terms of the freedom to manipulate your data. They might also make the FileMaker engine work a little harder to make matches depending on how complicated they are.
Not everyone will agree with me on this. There is always a judgment call to make about what kind of keys to use, how much to normalize your data, etc. If you get too enthusiastic about breaking everything into subtables, it can impose a hefty performance cost.
This is a topic of eternal debate. If you Google “FileMaker natural key” and/or “FileMaker normalization,” you’ll find plenty of points of view on these topics.
How do you review the reason why a record is skipped by an error during the import? Is there a way to know what records are skipped by errors and what those errors may be? So far, you only get a window saying the number the records imported and the number skipped. Thanks
I don’t believe that much more information is available. FileMaker Pro does create an import.log file under some circumstances, but I don’t believe that it contains the information that you (and others) would like to see.
Rather than importing directly into production tables, I recommend that you create an “import” table designed to receive the data. The idea is that importing to this table won’t encounter any issues (or if the whole thing fails, you can just start again).
Once your data is imported to the temporary table, write a script that updates your production data based on the data in your import table, handling only one record at a time. That way, if you are updating existing records, you can ensure that each production records is in an open state and that you have updated it successfully — and if not, you can handle and log any errors yourself.
My gripe is that they’ve moved the “add remaining data as new records” to the ‘hidden’ dropdown as well. It’s not at the bottom like it has been for years. Great now I know that, but there was quite a bit of swearing involved while trying to debug why extra records were not being imported. Couldn’t find it anywhere to start with.
Hi Andy, I had the same experience. Definitely not immediately discoverable.
I am importing records without any difficult from Excel files. However is there a way I can set the number of records to import.
Hi Florence, I’m not aware of a way to limit the imported set of records from the FileMaker side of things. However, you can limit what gets imported by modifying your Excel file: simply removing the rows that you don’t want to import.
I suppose there is a way to limit the imported set of records when you perform an import-matching (since the found set of records controls that) — but I don’t believe that’s what you are looking for here.
Hi Mark, thank you for this post. It’s been over 12 years since I attended a Filemaker training course at Soliant in Chicago, which was very helpful.
I have been having some recent and unfortunately more frequent challenges with Filemaker (running V 19.1.3.315 on a MacBook Pro with 32 GB and 2.6 GHz Intel Core i7 Processor) getting hung up while importing data into certain tables in my solution. This requires me to force quit and revert to a backup, which I’ve learned from experience to make regularly. I’m guessing that the problem is related to the table having over 50 auto-entry calcs, which I’m considering scripting, but I previously never had this issue. The specific table has just over 700,000 records and I’m importing rather small files with under 3,000 records (just adding) per file.
Could you answer any of these questions if you have any perspective to share:
1. Is there a rough limit to how many auto-entry calcs a solution should have in one table?
2. Should I remove the auto-entry option from all of these fields and set them by script?
3. Or should I leave them in place for the occasion when a random record is added to the table, and just uncheck the Import setting for Perform Auto-Entry for these specific fields?
4. Also, would you consider the auto-entry fields less taxing if they are pulling data from other fields in the same table versus fields from other tables pulled via various relationships?
With my initial troubleshooting, I did already set up scripting to set a few text fields that were previously unstored calc fields using the list function over a self-join relationship with this table. But that didn’t eliminate the import from hanging my solution so looking for some direction before I proceed if you can reply.
Any ideas would be appreciated. Thanks!
Hi Kevin, thanks for getting in touch! I don’t have definitive answers to your questions, but I’ll ask around and see what I can learn. It sounds like you’ve done some experimenting with disabling them, but perhaps you could be more systematic: try disabling the auto-enters individually and see if one of them is causing the problem (or whether things improve incrementally as you do so). I’d start with any that involve relationships. Then try disabling them additively until all are disabled. Or alternatively, disable them all and then enable them one at a time… whatever seems to you to be the best approach. Have you tried an import with all of the auto-enters disabled?
Another possibility is to limit the data your are importing. Perhaps there is bad data in there somewhere that is interacting with your auto-enters or something else. Maybe try one record and see how that behaves. Then try half of the records. If that work, add 25% of the remainder. If it doesn’t work, just do the first 25% of the data set. Repeat this process with the remaining data in the hope it helps you pinpoint problem data.
Hope this helps!
Mark
Thanks for the quick reply Mark – I have executed over a dozen additional import attempts into this same table, and so far all have failed with the file hanging as the import starts requiring a Force Quit and reverting back to the prior backup.
First, I removed the Auto-Entry option from about 30 of the 50 fields, including all that referenced a field in another table. Then I systematically went through the import dialogue unchecking more fields with the “Perform Auto Enter” option before importing. I did this until I only had the primary key field selected, and the file was still hanging, FYI: I’m importing from a layout that displays only data being imported with no related data and I even added both “Freeze Window” and “Flush Cache to Disk” script steps before import as well as.
Recently, I duplicated one of the 6 source files and saved it as an XLS file instead of XLSX, which is the normal format I routinely import data. The only glimmer of hope was when I adjusted one of the files by reducing the size to just 10 records – that file imported properly, but when the script continued (through a loop setting the global filename with a unique reference # to match each filename), the very next import attempt on a normal size file with about 1,000 records froze up again. It seems like a bug, but I don’t know. Understand that I routinely import files with thousands of records without any issues and have only needed to create smaller files when importing files with millions of records and hundreds of fields.
The current files have 22 fields and less than 2,000 records each so this shouldn’t be causing my file to crash.
If you or your colleagues have any other suggestions, I’d welcome any and all.
Thanks again.
Hi Kevin, it sounds like you’ve been quite thorough here in trying to limit the variables involved. Have you tried this with a local copy of the target file? Using a copy of the file (local or hosted), have you tried turning off all indexes on the fields in the target table? In a copy of the file, have you tried truncating the target table so that it is empty before the import takes place?
Hi Kevin
I have the following problem: when importing data from an Excel file which shows different fonts and sizes, how I can normalize (obtain the same font/size) which I have set up In Filemaker fields ?
Hope my question is clear
Thanks
Francesco
Hi Francesco, could you give some more details about your process? It’s always been my assumption that FileMaker strips formatting from text data imported from Excel files, but I decided to test this to make sure I was remembering correctly:
I created an Excel file with 4 columns and two rows. In each cell I typed the word “test” and formatted it in different ways (point size, color, typeface, etc).
Then I dropped the Excel file onto FileMaker Pro 19.4.1.36 to convert it into a FileMaker Pro file. The data was converted with all the formatting stripped from it.
Finally I re-imported the data from the Excel file using the Import Records… command. Again, the data was imported with no formatting applied.
Is this the outcome that you wanted? If so, are you getting different results than I am? Please let us know what your desired outcome is, what steps you are taking to try to reach it, and what the actual outcome is instead. Thanks!
Is there a way to script both the Export and import process by defined scripts?
Exporting a found set from a SOURCE table of FileMaker to an TARGET table in FileMaker,
After Massaging the Date fields etc. and then that Exported table becomes the SOURCE for Importing back to the original SOURCE table as added records etc. IE SOURCE and TARGET tables swap ROLES.
Is there a way to script both the Export and import process by defined scripts?
Hi David, thanks for checking in about this, and my apologies for overlooking it. The answer is yes, though we’d probably need some specifics to fully visualize it. This is what I’m understanding:
Table A in File 1 -> Table B in File 2
(data gets manipulated)
Table B in File 2 -> Table A in File 1
The location of a table in a given file doesn’t require you to locate your scripts in that file. You could have a table occurrence for Table B in File 1, or Table A in File 2. Or even have a File 3 with table occurrences for both Table A and Table B.
Furthermore, FileMaker file references for imports and exports can be stored in variables, giving you even more flexibility.
I’m afraid my answer is as abstract as your question… I think the next step is to ground things in your specific requirements.
Cheers —
Mark
Is there any tips in uploading a data without duplicating the existing data on the file maker
Hi Shane, you would use the “Update” option and match on the field or fields that determine uniqueness. Typically that’s the unique key field that gets created for you when you make a new table, but under some circumstances, you might decide to match on one or more “natural” keys, like a phone number or email address.
To choose “Update”, look for the blue arrow at the top of the import dialog and the blue word “Add” above it. If you click on these, a popover will appear with the other two options, “Update” and “Replace”.