A client came to me with a problem: they send out hundreds of emails a day mostly manually, and there were many hundreds more waiting to be sent every day. That manual process was a big burden on their productivity, and it was limiting them.
First, I created an automated SMTP sending process for them, but that came with a different set of limitations, one of which is the looming end of legacy authentication (and we definitely want our client’s solutions to be future-proof). Furthermore, the client needed to send more emails than Google will allow with SMTP, and they needed the emails to come from department-specific email addresses. Billing emails need to come from billing@client.com, and promotional emails need to come from promotions@client.com.
This led me to explore the Gmail API and the world of server-to-server OAuth authentication. Server-to-server OAuth allowed me to develop a secure solution without storing and managing multiple sets of user credentials or requiring the users themselves to enter more credentials while already logged into the database.
This diagram from Google shows, at a high level, how server to server OAuth works.

Let me outline this process from the perspective of a developer with one additional preliminary step added before this flow can happen:
- Create a Google service account.
- Create a JSON Web Token(JWT).
- Request an access token from Google.
- Use the token to make the API calls.
I recommend following Google’s guide for the OAuth server to server integration when setting up a service account. It will walk you through creating your service account and generating your RSA Private Key. You’ll download a JSON file that contains the private key as a value within one of its elements, it was in the “private_key” element for me, and use that key to create a signature for your JWT.
After you’re done with that guide, there is an additional step if you want your application to act on behalf of other users. You’ll need the G Suite admin to delegate domain-wide authority to the service account. Your G Suite admin can read this guide for the full process, including some background information, or follow the excerpt below to give your service account the required privileges.
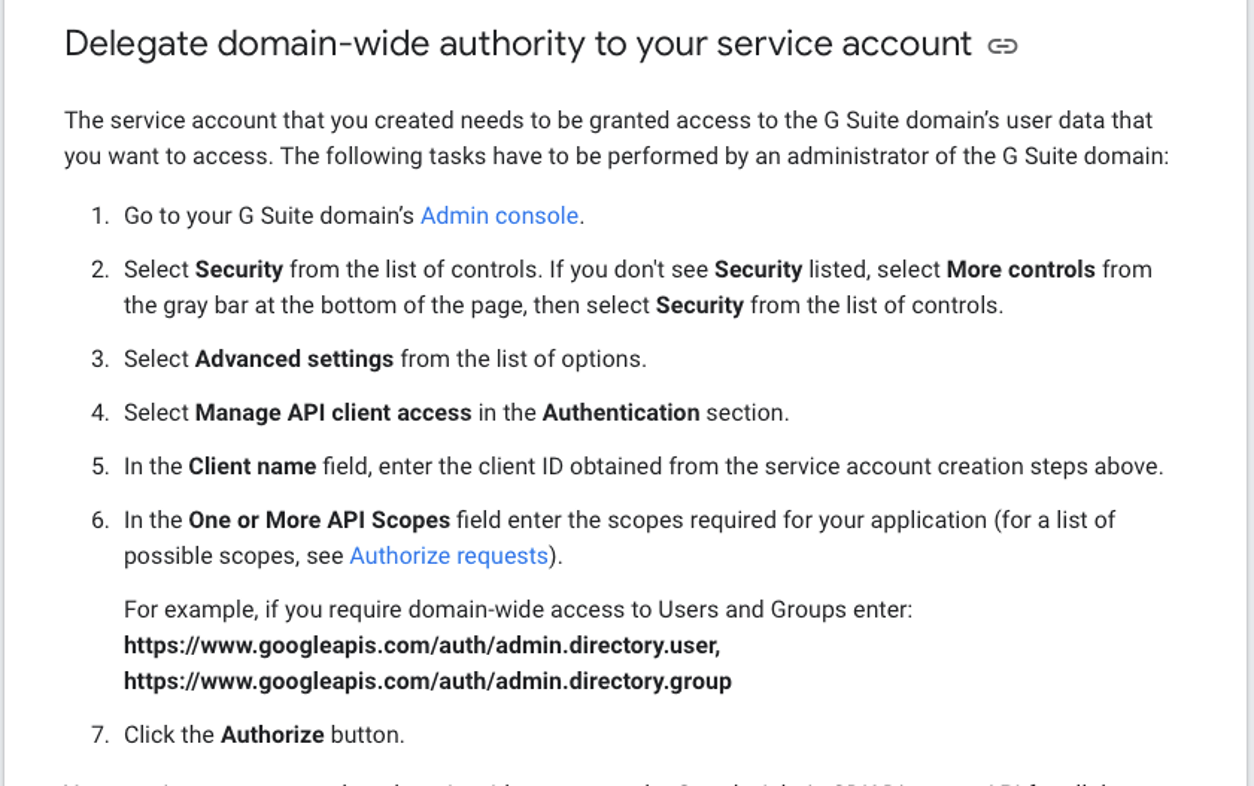
This is what the Manage API Client Access screen looks like.

At this stage, you’ll be asked to authorize scopes for your service account. Think of scopes as the access privileges required to make specific API calls. If you want your application to make calls to the Users.messages: send API endpoint, the documentation recommends at least one of the following scopes:

Make sure you authorize, at the same time, all of the scopes required by the APIs you intend to use. Re-authorizing a service account on this screen replaces the previous scopes that you authorized; it does not add new scopes.
Now your service account is set up and ready to impersonate domain users.
On to the first step of the API flow itself: creating a JWT token. JSON Web Tokens (JWT) were new to me when I started this process. Here is a site that I referenced continuously to help myself understand what I was attempting to create. It gives a very clear explanation of what exactly comprises a JWT, as well as some good background information about JSON Web Tokens in general.
A JWT is composed of three parts, each part Base64URL encoded and separated by a decimal character.
- Header – A JSON object
- Claim Set/Payload – A JSON object
- Signature – A SHA-256 hash of the Header, Claim Set, and RSA Private Key
Notice the type of Base64 encoding you’ll need for your JWT is URL-safe Base64Encoding. DO NOT use the original FileMaker Base64Encode function. It will shorten lines to 76 characters and place a CRLF character at line endings. You want to use the Base64EncodeRFC function with RFCNumber 4648 to avoid line breaks and carriage returns. You’ll also need to remove/replace a few characters to make it URL safe. Below is a Custom Function that does the proper encoding:
Let([
string_B64 = Base64EncodeRFC ( 4648 ; data ) ; // Regular base64 encoder
string_B64URL = Substitute ( string_B64

    ; [ "=" ; "" ]
    ; [ "+" ; "-" ]
    ; [ "/" ; "_" ]

    ) //URL safe characters
];

string_B64URL
)
Header
The Header is always the same for Google service accounts. It contains the signing algorithm, SHA-256, and the token type, JWT.
JSON representation:
{ "alg": "RS256", "typ": "JWT" }Base64URL representation:
eyJhbGciOiJSUzI1NiIsInR5cCI6IkpXVCJ9Claim Set
The required claims for the Claim Set are as follows.
- iss – The service account email address. Found on the service account set up screen
- scope – A space-delimited list of all the API scopes you intend to use
- aud – The target of this request. Always https://oauth2.googleapis.com/token
- exp – The requested expiration time of the token. Maximum of one hour after it is issued
- iat – The time the token is issued (use the current host time)
If you plan to use this token to impersonate a domain user, you also need to include one additional claim in your Claim Set.
- sub – The email address of the user you wish to impersonate.
Signature
To create the signature, you will need to take advantage of one of the cryptographic functions new in FileMaker 18:
CryptGenerateSignature ( data ; algorithm ; privateRSAKey ; keyPassword To learn more about this and the other new FileMaker 18 cryptographic function, read this blog post by Mislav Kos.
Here is the signature generating function you’ll use:
CryptGenerateSignature ( _encoded_header & "." & _encoded_claimSet

 ; "SHA256"
 ; $RSAkey
 ; ""

)
$RSAkey being the key from the JSON file you downloaded while creating your service account. After you’ve generated your signature, you can now construct your full JWT and prepare to make an access token request using Insert from URL. Construct your JWT by concatenating the encoded header, claim set, and signature together with a single period as the delimiter between each part.
$jwt_full = _encoded_header & "." & _encoded_claimSet & "." & _encoded_signatureThe final step in the authentication process is to make your call to the Google authorization servers via Insert from URL with the following options:
Target: https://oauth2.googleapis.com/token
cURL options:
-X POST /token HTTP/1.1
-H "Host: oauth2.googleapis.com"
-H "Content-Type: application/x-www-form-urlencoded"
-D $responseHeaders
-d "grant_type=urn%3Aietf%3Aparams%3Aoauth%3Agrant-type%3Ajwt-bearer"
-d "@$jwt_full"
I used the FileMaker Help cURL options page as a reference to help build the above curl call.
If your request is successful, you will receive back a JSON object that looks similar to this.
{
 "access_token": "1/8xbJqaOZXSUZbHLl5EOtu1pxz3fmmetKx9W8CV4t79M",
 "scope": "https://www.googleapis.com/auth/prediction"
 "token_type": "Bearer",
 "expires_in": 3600
}
You’ll need to save the access token for your API calls, but I also recommend saving the expiration time(exp) and the impersonated user(sub) you sent in your claim set. The token is only valid until the expiration time you requested, and for the user, you requested to impersonate. If time runs out or you want to sub as a different user, you’ll need to request another token.
That’s it! With this token, I can send emails from any email address on my client’s domain, and my daily allotment of sent emails is many more thousands greater than with SMTP. With the right scopes, You can use this token to make calls to any Google API that requires OAuth authorization, and your users will not need to enter their credentials to compose and send emails, add events to a calendar, or access their Google drive.
A big thanks goes to Wim Decorte, Mislav Kos, and Brian Engert, all of whom I leaned on very heavily while developing this FileMaker process.
Hello Michael, Thanks to you and everyone at Soliant Consulting for putting this explanation of Google Service Accounts here. I now have the “keys” to integrate my G-Suite to all of my FileMaker apps. Excellent work!
Thank you , very helpful. However, I could not find any reference to $responseHeaders apart from in the CURL options. Leaving this line our of the CURL options resulted in me receiving
{
“error”: “invalid_request”,
“error_description”: “Missing required parameter: assertion”
}
What should be in the variable $responseHeaders please?
Hey Ian,
I’m glad you found this helpful. You’re not sending any data in the $responseHeaders variable. Just as your API request to the Google servers contains two parts, header and body, the Google security servers will respond to you with a header and body. $responseHeaders is a receptacle for the header part of that response. It doesn’t contain anything before you make the API call, but it should contain some data after you make the call.
Does your API call succeed when you include the $responseHeaders line?
Thanks Michael, I have been struggling with this. Wim has helped me in the Community. The $responseHeaders is now clear to me.
However, I was getting an error Missing parameter : assertion.
Following a suggestion from Wim, I have changed the line
-d “@$jwt_full”
to
-d “assertion=eyJhbGciOiJSUzI1NiIsInR5cCI6IkpXVCJ9.ew0JImF1Z __….___ HX7TBpEYvlLg”
(the value being the contents of $jwt_full)
Wim suggested -d “assertion:@$jwt_full”. I have not tried that yet.
Then, once I had got my exp and iat values right (seconds from 1/1/1970), I now have a id_token. It does look different to your example returned json (just the one element “id_token”).
I can now proceed to try actual API calls – I am seeking to use Google Sheets.
I am still having trouble – so I have started again with your instructions.
Do I need a “G Suite” or “Google Workspace” to achieve this Service Account functionality?
As far as I know, they are the same thing. All of the integrations I used a service account for came before G Suite was rebranded as Google Workspace. None of my previous integrations were broken by the change, but I haven’t started a new one since then.
Thank you, I have yet to establish either, so I guess I should not be expecting my Service Account to work. I will set one up and try again !
While setting up my Google Workplace, it seems to be saying that it will take over / redirect via gmail all the accounts in the domain I specified. I specified the domain that I have multiple email accounts defined on. Can you confirm or deny that this will happen if I complete the process? If it is so, I will have to use a different domain that does not have email accounts on it.
Can I post screenshots to you ?
I have I think successfully set up a Google Workspace and a Service Account with appropriate delegation. I just skipped the email “migration” set up.
With the new values, I am still getting an “id_token” returned from my JWT call, not the “access_token” expected. (I still need the “assertion” modification shown above).
Any thoughts?
I now have an access_token in my JWT response. I achieved this by only specifying one scope in the Claim Set. It works for both
https://www.googleapis.com/auth/spreadsheets or
https://mail.google.com/
but not both comma separated.
{“access_token”:”ya29.c.Kp8BAghNK9KCA2NuIJtp947eZ3h4-qFaIOfOmLvjNwS_______……_____kjNnE_O_1JcbwCmdnjqdiSXq24I29J-wn89E”,”expires_in”:3599,”token_type”:”Bearer”}
Thank you – another mistake of mine.
Space delimited works – I have an access-token.
I’m stuck!
Google service account all setup, encrypted header and claim set look ok – but signature just returns a ?
Any help anyone?
Signature (a container field) is set to
CryptGenerateSignature ( _encoded_header & “.” & _encoded_claimSet
; “SHA256”
; $RSAkey
; “”
)
header=
{
“alg”: “RS256”,
“typ”: “JWT”
}
claim set=
{
“iss”:”my_email@.iam.gserviceaccount.com”,
“scope”:”https://www.googleapis.com/auth/drive”,
“aud”:”https://oauth2.googleapis.com/token”,
“exp”:”3600″,
“iat”:”1626188650″
}
RSAkey=
“—–BEGIN PRIVATE KEY—–\nMIIEvAIBADAN…..B53UkJGw==\n—–END PRIVATE KEY—–“
Hey Steven,
Could you show me how you’re encoding the header and claim set?
sure – using your custom function:
Let([
string_B64 = Base64EncodeRFC ( 4648 ; data ) ; // Regular base64 encoder
string_B64URL = Substitute ( string_B64
; [ “=” ; “” ]
; [ “+” ; “-” ]
; [ “/” ; “_” ]
) //URL safe characters
];
string_B64URL
)
then my signature is set in a script step (container):
CryptGenerateSignature ( PREFERENCES::_encoded_header & “.” & PREFERENCES::_encoded_claimSet
; “SHA256”
; $RSAkey
; “”
)
It looks like in your claim set you are setting exp to 3600. If that’s accurate you’ll need to change exp to iat + 3600 to get the maximum one hour token lifespan.
I tried this – same ? error…
{“iss”:”myemail@iam.gserviceaccount.com”,”scope”:”https://www.googleapis.com/auth/drive”,”aud”:”https://oauth2.googleapis.com/token”,”exp”:”1626358667″,”iat”:”1626357419″}
sorry – could the mod remove my email from that last post 🙂
{“iss”:”myemail@iam.gserviceaccount.com”,”scope”:”https://www.googleapis.com/auth/drive”,”aud”:”https://oauth2.googleapis.com/token”,”exp”:”1626358667″,”iat”:”1626357419″}
The JSON looks pretty solid. A few rapid fire items to check. Make sure:
your layout has the container field on it.
the layout context is the same as the context of the container field.
there is an open record in the found set before writing to the container field.
Do you get a FileMaker error in the script debugger when you try to generate the signature?
thanks –
container – yes
layout same table – yes
1 record in set – yes
no error in debugger…very frustrating!
Without seeing your script myself, the last thing I would suggest is to change the formatting of the RSAkey. Remove any quotation marks and replace the “\n” characters with actual line breaks so that it reads in paragraph format.
Instead of:
“—–BEGIN PRIVATE KEY—–\nMIIEvAIBADAN…..B53UkJGw==\n—–END PRIVATE KEY—–”
You want:
—–BEGIN PRIVATE KEY—–
MIIEvAIBADAN…
…B53UkJGw==
—–END PRIVATE KEY—–
I hope that helps.
Thanks to Michel for a very informative article.
Currently, assertion parameter is required, so I was able to get access token without any problem by doing the following.
“assertion=” & $encodedHeader & “.” & $encodedClaimSet & “.” & $encodedSignature
Hi Guys, I was playing with this for hours until I realized SHA is not supported anymore on the *CryptGenerateSignature* 😅
Quote: The following calculation functions no longer accept “SHA” (the SHA-0 cryptographic algorithm) for the algorithm parameter, and now returns “?”:
• CryptAuthCode
• CryptDigest
• CryptGenerateSignature
• CryptVerifySignature
Source: https://support.claris.com/s/article/New-and-Changed-Calculations-in-FileMaker-Pro-19?language=en_US
Hey Martin, Thanks for pointing this out. In FileMaker 19 the CryptGenerateSignature function does not accept the SHA-0 algorithm as a parameter.
You can still use the SHA256 algorithm I use in the example above. Hopefully that resolves the issue you’re running into.
https://help.claris.com/en/pro-help/content/cryptauthcode.html
Oh, I thought all the SHA were deprecated… because I was getting the “Question Mark of death”
I’ve found this CF just in case anyone is interested: https://gist.github.com/fsans/6c88cb755837c22b265f31d9aa8fdc23
Also, I confirm the need for the “assertion=” as HIRO commented.
Hello,
I’m having trouble with this and was wondering if you could help?
When I use the curl command:
“-X POST /token HTTP/1.1\
–header \”Accept: application/json\”
–compressed\”
-D $responseHeaders
-d \”grant_type=urn:ietf:params:oauth:grant-type:jwt-bearer\”
-d \”&assertion=@$$jwt_full”
I get:
{
“error”: “invalid_request”,
“error_description”: “Bad Request”
}
I have tried it many ways, but still no luck. Any help would be appreciated. Thanks, b.
Hey Braham,
I noticed you don’t have the -H “Host: oauth2.googleapis.com” header listed in your curl options. See if adding that resolves your issue.
I tried it with that header. Still didn’t work
sorry to be a pain…
This is what I have:
1. Set Variable [ $curl ; Value: “-X POST /token HTTP/1.1 -H \”Host: oauth2.googleapis.com\” -H \”Content-Type: application/x-www-form-urlencoded\” -D $responseHeaders -d \”grant_type=urn%3Aietf%3Aparams%3Aoauth%3Agrant-type%3Ajwt-bearer\” -d \”@$jwt_full” ]
2. Go to Layout [ “System” (System) ; Animation: None ]
3. Insert from URL [ Select ; With dialog: Off Off ; Target: System::responseHeader System::responseHeader ; “https://oauth2.googleapis.com/token” ; cURL options: $curl $curl ]
Any ideas from anyone would be appreciated.
Thanks,
Braham
A couple of things in the cURL options:
– don’t specify HTTP/1.1
– you have “/” before token
– you have curly quotes, make sure that those are straight quotes
– don’t use quotes around the @$jwt_full
– your insert from URL script step shows the $curl variable twice
Thanks for creating this. it’s 5 years later and a fair amount seems to have changed in the google workspaces so i’m not sure about some of the set up. did you ever post a sample fmp file with the scripts for building the api call and cUrl options? that would be super helpful
Hey Christi,
We didn’t create a sample file for this process. We’re happy to help with specific questions as time allows.
i have my cUrl variable set up as: “-X POST /token HTTP/1.1” & ¶ &
“-H \”Host: oauth2.googleapis.com\””& ¶ &
“-H \”Content-Type: application/x-www-form-urlencoded\”” & ¶ &
“-D $responseHeaders” & ¶ &
“-d \”grant_type=urn:ietf:params:oauth:grant-type:jwt-bearer\”” & ¶ &
“-d \”assertion:@$signedJWT\””
which results in:
-X POST /token HTTP/1.1
-H “Host: oauth2.googleapis.com”
-H “Content-Type: application/x-www-form-urlencoded”
-D $responseHeaders
-d “grant_type=urn:ietf:params:oauth:grant-type:jwt-bearer”
-d “assertion:@$signedJWT”
which results in an error of “error” : “invalid_request”,
“error_description” : “Missing required parameter: assertion”
how do i get the assertion to be recognized in the curl option?
I’m using “assertion=” instead of “assertion:” in my curl options.
i have my cUrl variable set up as: “-X POST /token HTTP/1.1” & ¶ &
“-H \”Host: oauth2.googleapis.com\””& ¶ &
“-H \”Content-Type: application/x-www-form-urlencoded\”” & ¶ &
“-D $responseHeaders” & ¶ &
“-d \”grant_type=urn:ietf:params:oauth:grant-type:jwt-bearer\”” & ¶ &
“-d \”assertion:@$signedJWT\””
which results in:
-X POST /token HTTP/1.1
-H “Host: oauth2.googleapis.com”
-H “Content-Type: application/x-www-form-urlencoded”
-D $responseHeaders
-d “grant_type=urn:ietf:params:oauth:grant-type:jwt-bearer”
-d “assertion:@$signedJWT”
which results in an error of “error” : “invalid_request”,
“error_description” : “Missing required parameter: assertion”
how do i get the assertion to be recognized in the curl option?
With some help from my colleague, we got it to work with these 2 changes: The header now needs one more element (the key id)
JSONSetElement ( “” ;
[“alg” ; “RS256” ; JSONString ] ;
[“typ” ; “JWT” ; JSONString ] ;
[“kid” ; API::KeyID ; JSONString ]
)
The curl options on the insert from URL step now needs the signed JWT to be included as the ‘assertion’ parameter. (or however you word that) The grant type needs this little bit added in:
$data = “grant_type=urn%3Aietf%3Aparams%3Aoauth%3Agrant-type%3Ajwt-bearer&assertion=” & $jwt_full
So the full cUrl option ends up being:
-X POST -H “Content-Type: application/x-www-form-urlencoded”
-D $responseHeaders
-d @$data
This worked.