This post is one in a series of guides that walk you through installing, configuring, and using Zabbix to monitor your FileMaker servers:
- Part 1: Getting Started with Zabbix
- Part 2: Installing Zabbix as an Appliance
- Part 3: Installing Zabbix from Scratch (this post)
- Part 4: Installing Zabbix Agent
- Part 5: Zabbix Configuration
- Part 6: Using Zabbix
- Part 7: Maintaining Your Zabbix Server and Agents
This guide will walk you through installing Zabbix Server. These steps assume you are somewhat proficient with Linux and the use of the command line or that you are willing to expand your skill set in this area. If this does not describe you, see the guide (2a – Zabbix as an Appliance) about using the Zabbix Server Appliance.
Choose Your Linux
Zabbix Server only runs on Linux, so we will have to pick a flavor of Linux we are comfortable with that is supported by Zabbix.
The Zabbix download page guides you neatly through the available choices of operating systems, versions of the chosen operating system, and backend-databases you want Zabbix Server to use to store its data:
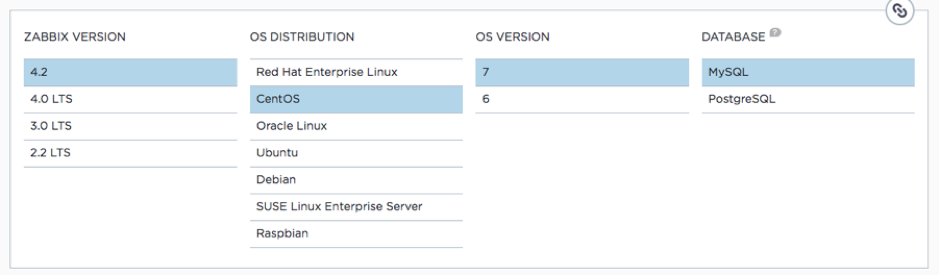
We chose CentOS, because it is also the operating system used for FileMaker Cloud, so whatever skills we pick up working with CentOS will serve us well both in working with the underpinnings of Zabbix Server and FileMaker Cloud. CentOS is also the operating system used in FileMaker Inc’s installation guide.
Note that the white paper that FileMaker Inc. published with the release of FileMaker 18 back in May of 2019 uses Zabbix Server version 3.x. The current version of as July 2019 is Zabbix 4.2 and its installation instructions are just slightly different. But the FMI guide is still a good reference.
For complete reference, the official installation guide is here:
https://www.zabbix.com/documentation/4.2/manual/installation/install_from_packages/rhel_centos
and the one that FileMaker Inc has put together:
https://community.filemaker.com/en/s/article/Using-Zabbix-for-Monitoring-FileMaker-Server
Between those two and this guide you are reading now, you should have all the information you need to get to a successful Zabbix Server installation.
Selecting the OS, version, and database on the Zabbix download page, update the command line information further down on the page that you need for the installation of Zabbix Server and its components:

Those steps assume that you already have a running Linux server of your chosen version so that you can copy and paste these commands into the command line terminal. Let’s take a step back and get one up and running.
There are a couple of different ways to get a running CentOS depending on whether you want it on-premise on physical hardware, on-premise as a virtual machine, or in the cloud.
Choose Your Location
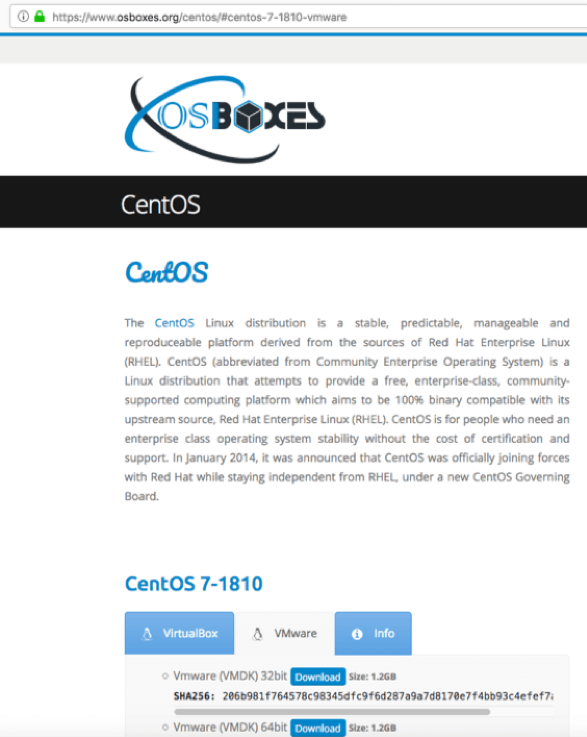
For an on-premise install on physical hardware, you can grab the ISO installer directly from https://centos.org/:

You can also use that ISO image to install it on-premise as a virtual machine. Or, if you want to cut out a few steps, you can download a pre-built virtual machine image from https://www.osboxes.org/centos.
Setting Up CentOS On AWS
If you prefer a cloud server, pre-built images are available as well in the cloud provider’s market place. For AWS, centos.org provides an official instance for CentOS 7:
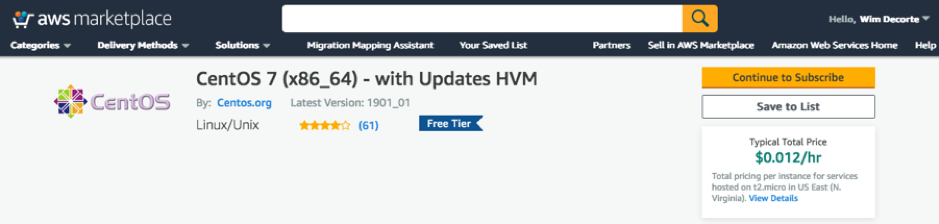
The default instance type is a t2.micro (one virtual CPU and 1GB of RAM with 8GB of disk space), which is very cheap and more than capable of handling a Zabbix server monitoring multiple FileMaker Server hosts.
For this guide, we will use AWS, since it is easy to spin up a new instance (and abandon it) without having to make changes to our in-house infrastructure.
Once you go through the few steps required in AWS to have the machine launched, you will see it in your EC2 console. The “Name” column will be empty initially. I named it centOS7:
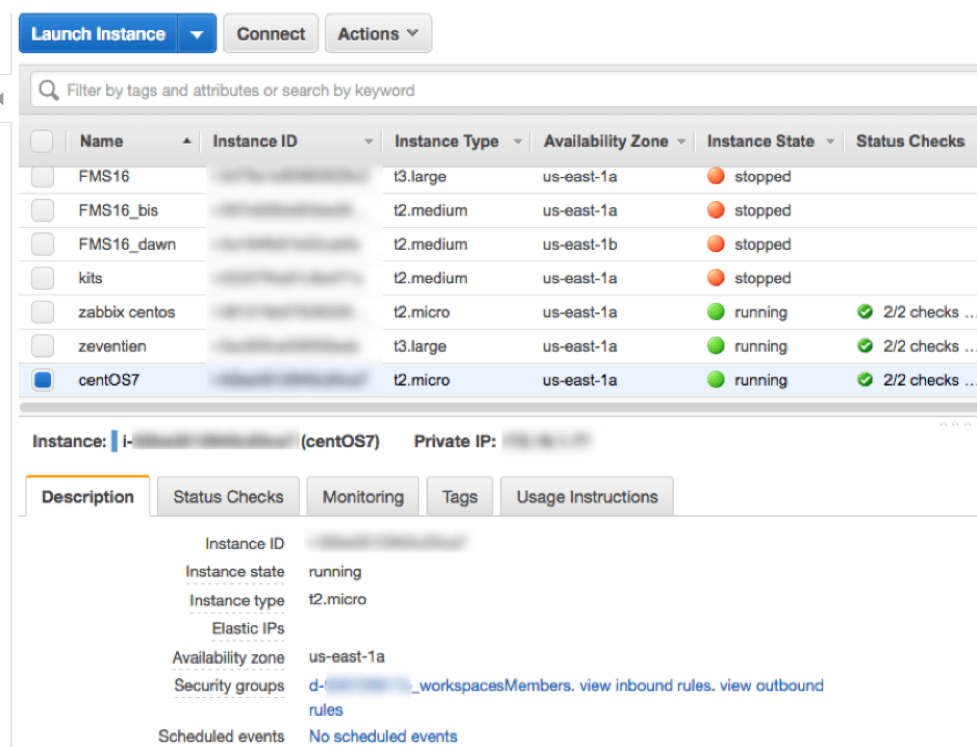
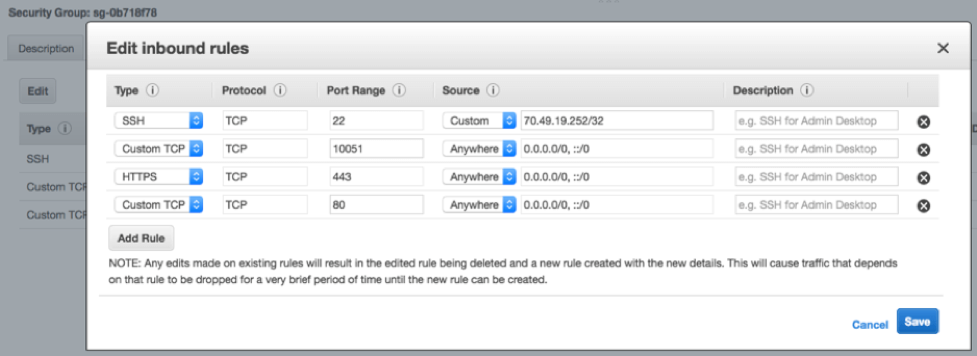
The first thing we will do is click on the security group at the bottom of that screenshot to view and update the AWS ‘firewall’ so that we can use SSH to remote into the instance.
Specifically, we want to work with the “inbound rules.” By default, there will be none, so we will add the ones that we need:
- Port 22 for SSH
- Port 10051 for incoming data from the Zabbix agents that we will deploy later
- Ports 80 and 443 for access to the browser-based Zabbix admin console
SSH To Server
At this point, we have a working Linux server. To connect to it, open your favorite SSH client (on macOS I am just using Terminal) and issue the proper SSH command:
ssh -i /Users/wimdecorte/Documents/projects/ETS18/zabbix_resources/wim_ets_15.pem centos@xxx.xxx.xxx.xxxThe path to the .pem file is required by AWS to allow SSH connections. “centos” is the default username for CentOS, and what comes after the @ is the public IP address or DNS name of your Linux server.
The first time you log in you will be asked for confirmation to connect and then will see the command prompt of an SSH session on your Linux server.

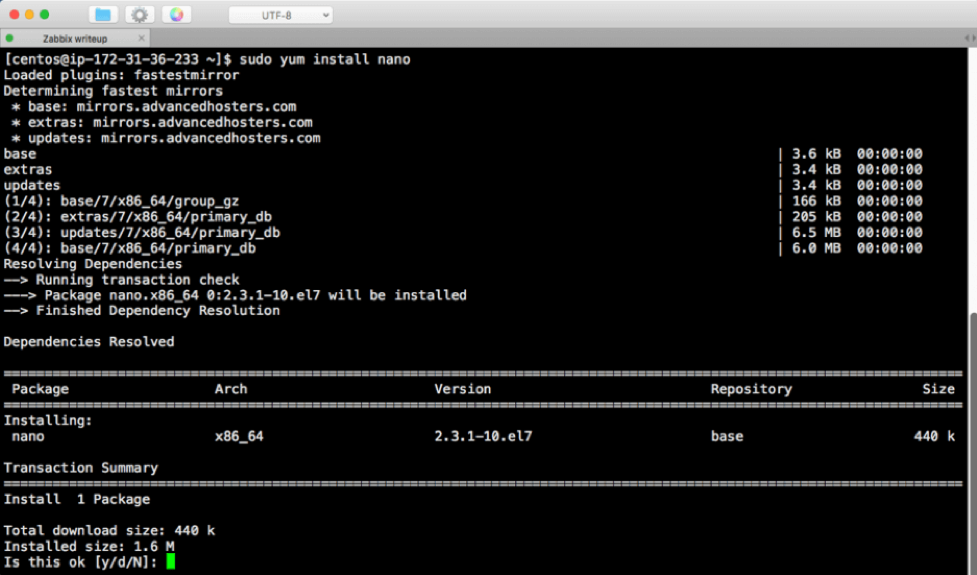
Install nano
The very first thing we will do is install “nano,” our favorite Linux text editor.
Type in:
sudo yum install nano(yum stands for YellowDog Updater, Modified and is the CentOS default software manager. It is used to install new software and system updates).
As with all installations and updates, you will see a bit of an overview of what will happen, and you will be asked to confirm with “Y” that you want to proceed:
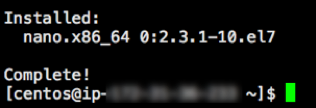
A few seconds later, we will be finished:
SELinux Configuration Change
Second on our to-do list is to change a security setting in CentOS’s default configuration. By default, CentOS has SELinux enabled, which will get in the way of Zabbix Server functioning properly, so we need to adjust it:
Type in:
sudo nano /etc/selinux/configChange the line that starts with “SELINUX” to read “SELINUX=permissive”
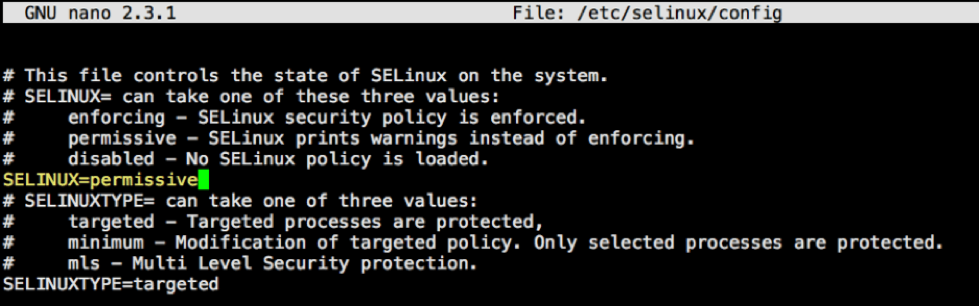
Press control-o and then enter to save the changes and control-x to quit the text editor.
Install Zabbix
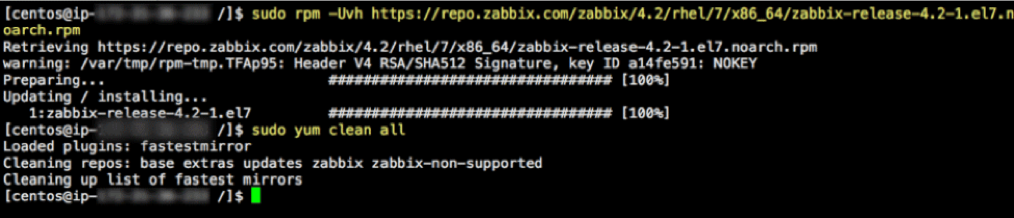
Now we can go back to the instructions on the Zabbix download page that tell us how to install Zabbix Server:

The first set of commands is basically telling ‘yum’ where the installers are located and to clean its internal database of available software locations.
Remember to run all of these commands as ‘super user’ by prefixing them with ‘sudo’. The first command will look like this:

The result of running the first two commands will look like this:
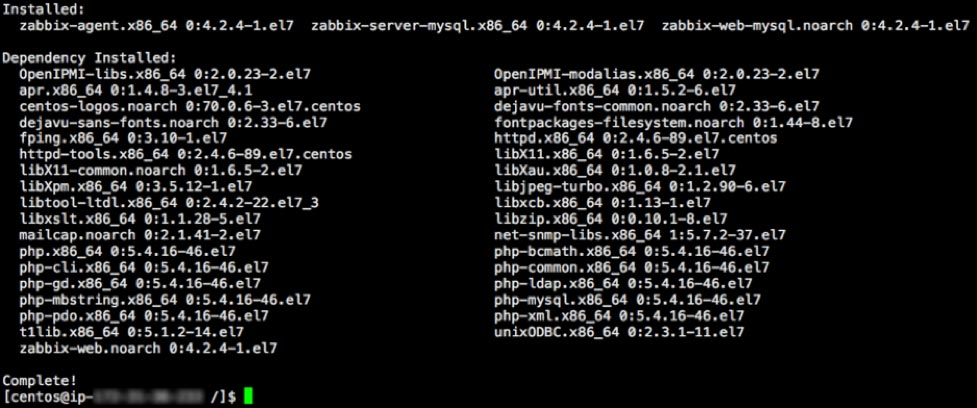
The third command on the Zabbix downloads page (under b) is where the actual installation happens:
sudo yum -y install zabbix-server-mysql zabbix-web-mysql zabbix-agentThat one will run for a little while, install everything needed, and report back what it has done:
Install MySQL
The next step is to configure the underlying MySQL (c and d on the Zabbix downloads page). But this is where the instructions may fail; MySQL is likely not installed at this point yet. You can try the command, but if an error comes back, follow the steps below to install MySQL:
Add the MySQL 8.0 repository to your server:
sudo yum install https://dev.mysql.com/get/mysql80-community-release-el7-2.noarch.rpmThen install MySQL itself:
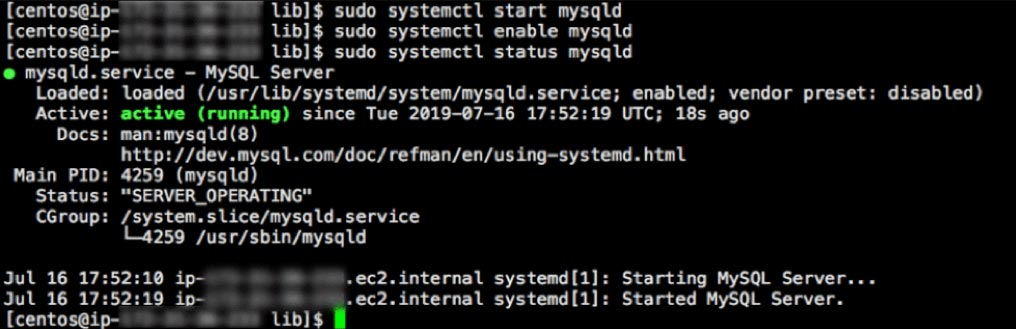
sudo yum -y install mysql-community-serverThis one is a fairly hefty download and will take a while. After it is installed, start the MySQL service:
sudo systemctl start mysqldEnable it to auto-start when the machine starts:
sudo systemctl enable mysqldAt any time, you can check if MySQL is running by using this command:
sudo systemctl status mysqldWhen all is well, you will see an output from that ‘status’ command, confirming MySQL is up and running
MySQL installs with a temporary password that we need to grab before we do anything else. To do this, type in:
sudo nano /var/log/mysqld.logand make note that the master user is ‘root’ with the password listed there.

Hit control-x to quit the text editor.
Create the Zabbix Database
Now we are ready to resume our Zabbix installation following the step c instructions on the Zabbix downloads page to create the required database:
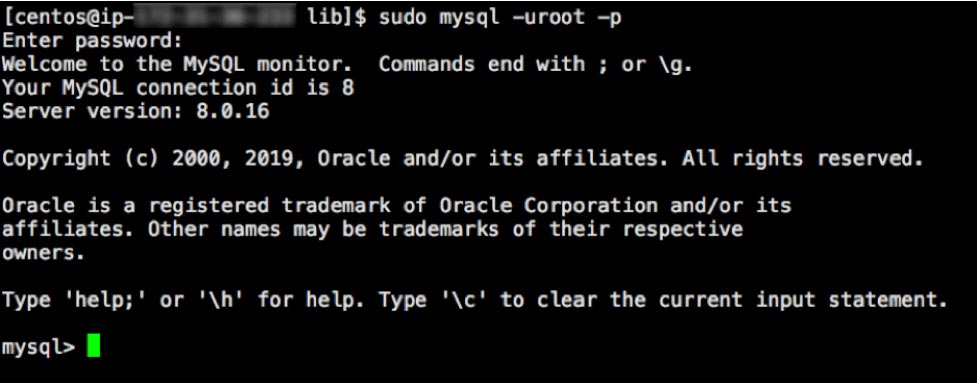
The first command is to enter ‘mysql mode’:
sudo mysql -uroot -pAt the password prompt, use the password that you retrieved earlier. After doing so, you will find yourself at a MySQL prompt.
Before we execute the commands listed on the Zabbix page, we need to change the password for the root user, since that temporary password cannot be used beyond this point. (The commands listed in step c will fail if you try.)
Type in:
alter user root@localhost identified by 'someNewPassword';The new password is in-between the single quotes. Don’t forget to add the “;” at the end. This is how MySQL knows you are done with the command.

Now type in (or copy/paste) the first of the three separate MySQL commands of step c to create the database named “zabbix..”
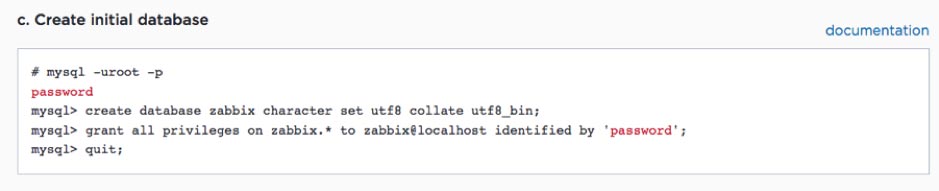
Before we do the next command, we actually have to create the Zabbix user in MySQL. Older versions of MySQL allow you to use the GRANT command to both create the user and assign rights to that user, but that is no longer supported in the newer version of MySQL (versions 8+).
Type in the following to create a MySQL “zabbix” user with a password you specify:
CREATE USER zabbix@localhost IDENTIFIED WITH mysql_native_password BY ‘MyOtherN3wP@ssword’;Then instead of the command shown in the Zabbix instructions, use this slightly modified one to grant rights to the “zabbix” database for the “zabbix” user:
GRANT ALL PRIVILEGES ON zabbix.* TO zabbix@localhost WITH GRANT OPTION;
The last command is easy and just drops out of the MySQL mode and back into Linux:

The last item in step c is to import the schema for the “zabbix” database:
sudo zcat /usr/share/doc/zabbix-server-mysql*/create.sql.gz | mysql -uzabbix -p Zabbix
Note that the password requested here is for the newly created “zabbix” user.
Configure Zabbix Server
The next step in the Zabbix instructions calls for an edit to the Zabbix config file to make sure that Zabbix knows the MySQL password for the “zabbix” user:

Type in:
sudo nano /etc/zabbix/zabbix_server.confto open the Zabbix configuration file and scroll down to the entry for the database password:
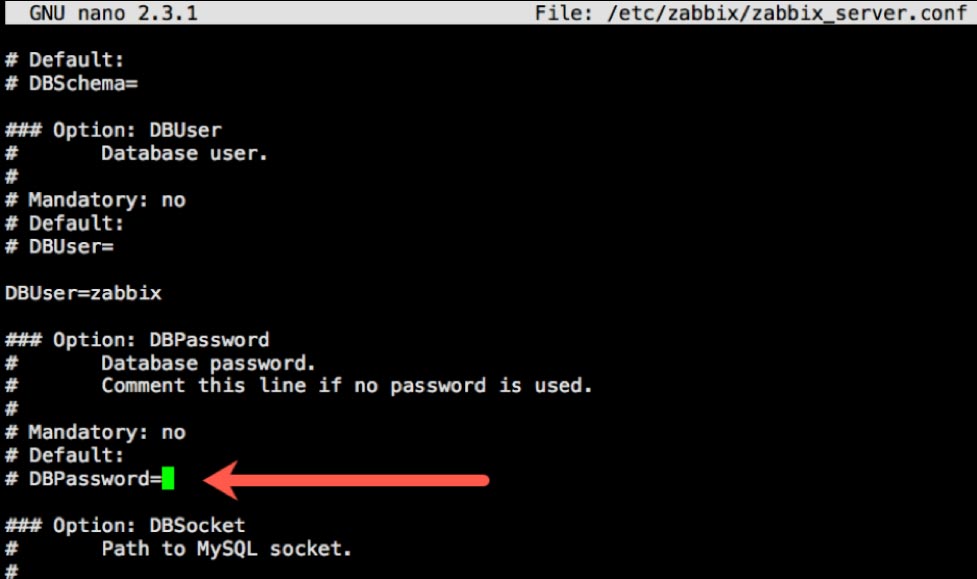
Remove the “#” at the start of the line and add the password for the Zabbix MySQL user.
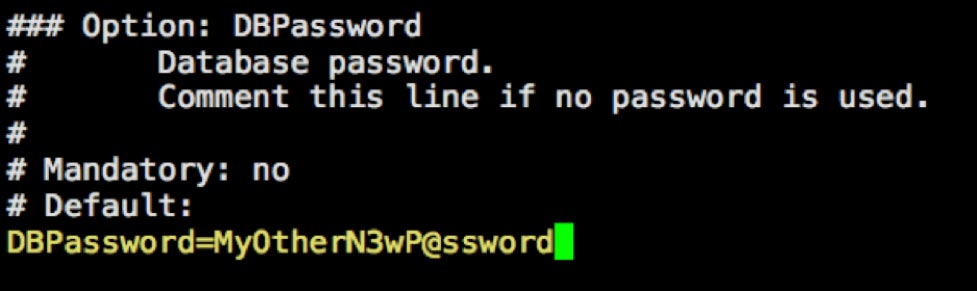
Hit control-o and then enter to save the change and then control-x to quit nano.
At this point, much of the heavy lifting is done; the next step listed on the Zabbix download page is to update the time zone that will be used by Zabbix:

Type in
sudo nano /etc/httpd/conf.d/zabbix.confand scroll down to the time zone setting:
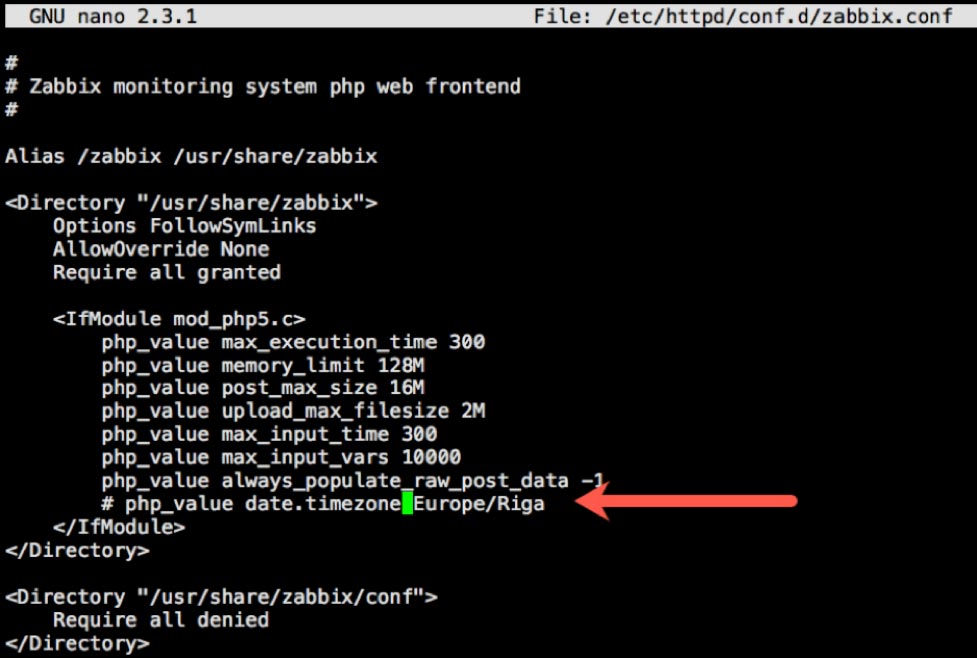
And change it to your time zone. All supported time zones are listed here: https://www.php.net/manual/en/timezones.php Since we are on the East Coast, we changed it to America/New_York and removed the “#” at the start of the line:
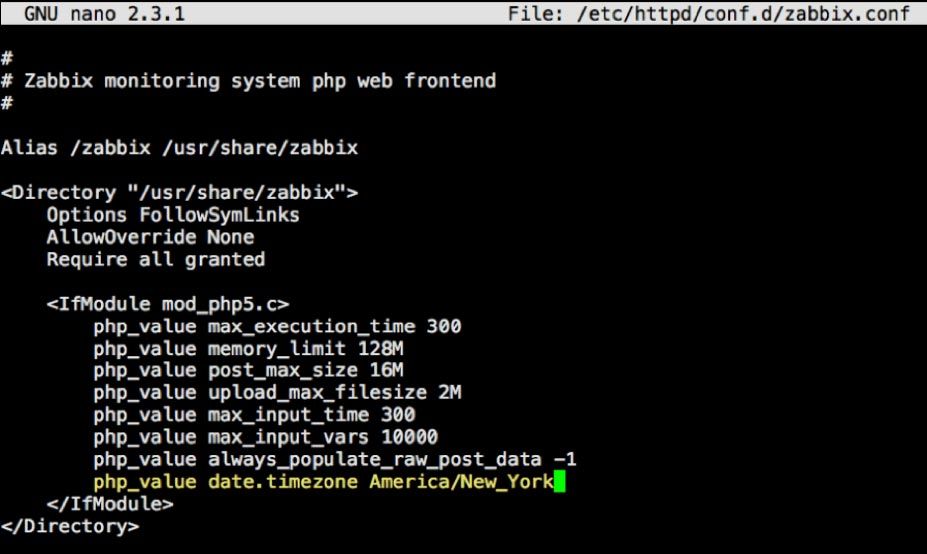
Hit control-o and then enter to save the change and control-x to exit the text editor.
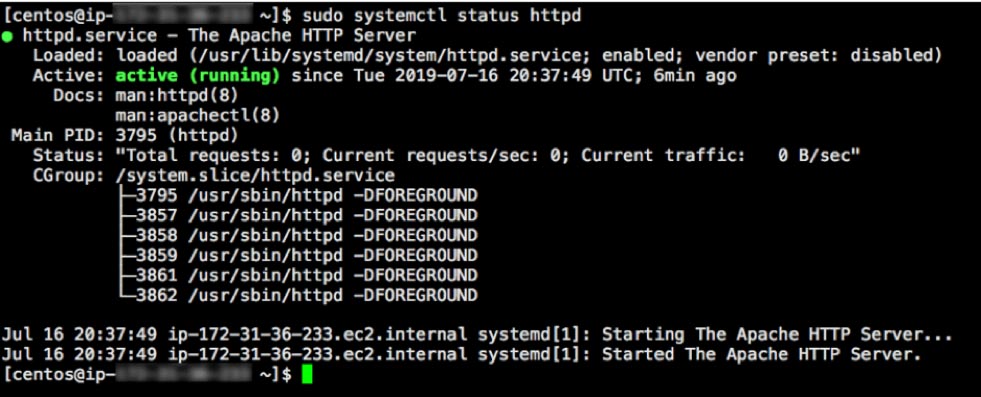
At this point, we can start the Zabbix server so that all the changes we have made take effect.

sudo systemctl restart zabbix-server zabbix-agent httpdThis command is actually restarting three services:
- The Zabbix server
- The Zabbix agent (each Zabbix server also monitors itself)
- The web server (https)
The 2nd command under step F ensures that all three of these services will auto-start when the machine restarts:
sudo systemctl enable zabbix-server zabbix-agent httpdAt this stage you will want to confirm that all three of these services are properly working by running these three checks:
sudo systemctl status zabbix-server
sudo systemctl status zabbix-agent
sudo systemctl status httpd
After each command you should see the service “in the green” next to ‘Active’:
Configure Zabbix Frontend
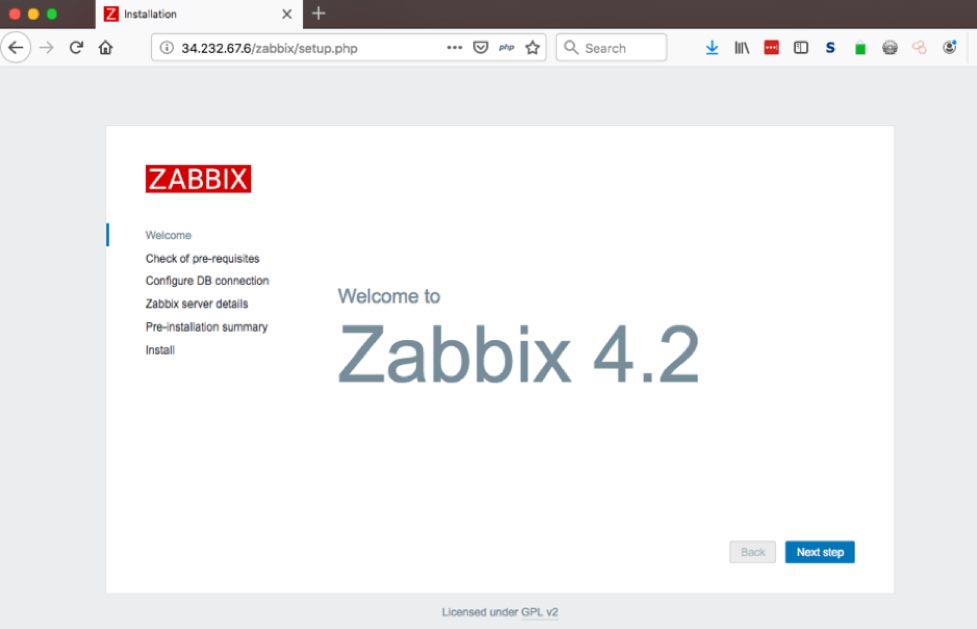
Going back to following the instructions shown on the Zabbix download page, we can now turn our attention to the Zabbix frontend by opening it in the browser:
Use the URL as indicated in your favorite browser, and you should see this:
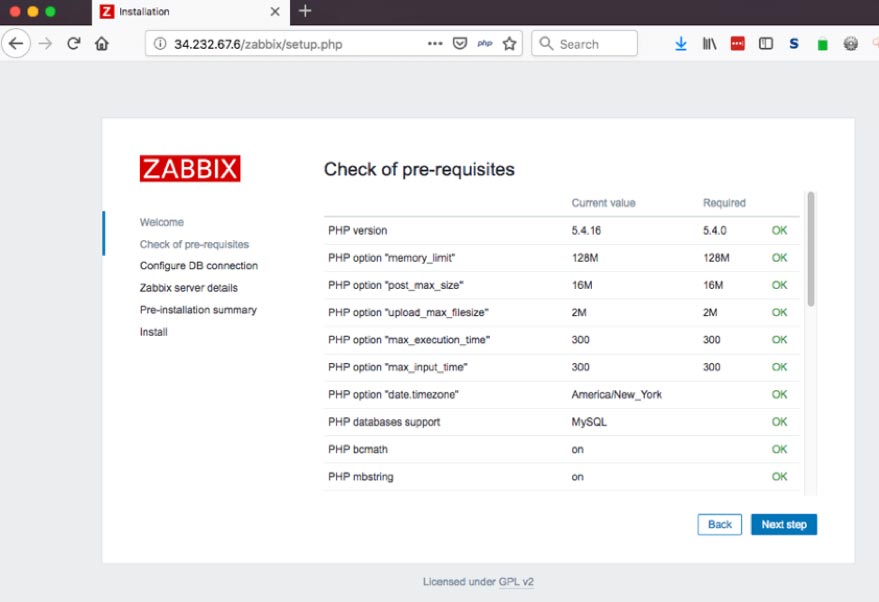
“Next Step” brings us to an overview of the PHP pre-requisites, and if we did the installation correctly, everything here should be in the green:
The following step is a confirmation of the Zabbix MySQL database. Enter the password here for the “zabbix” user that was added earlier on.

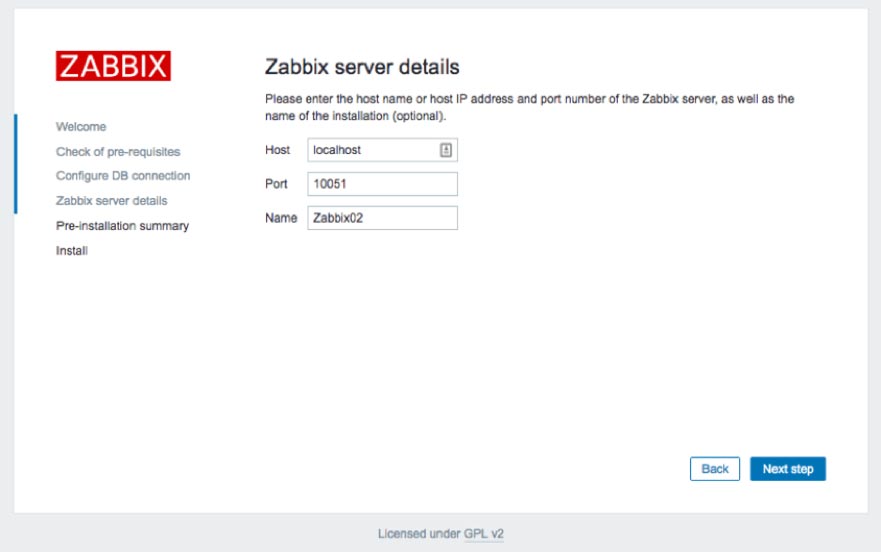
Provide a name for your Zabbix installation:
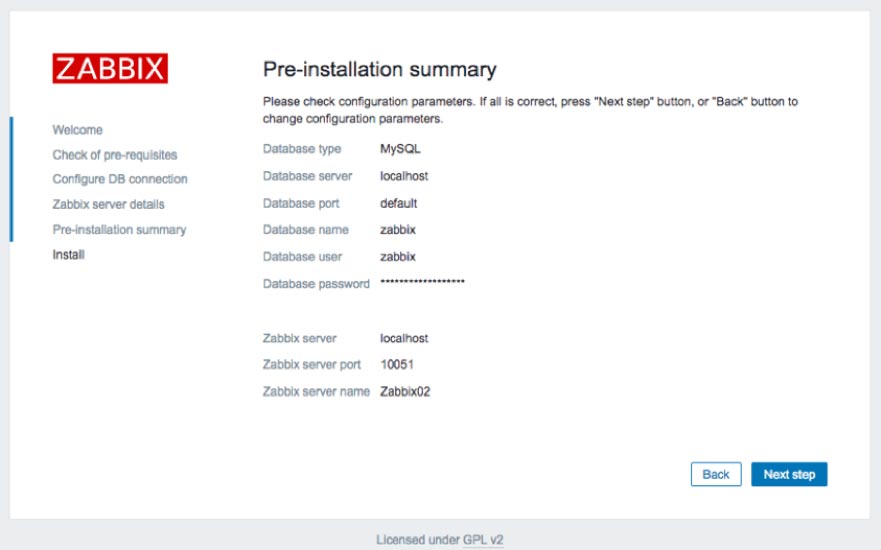
And you get one last chance to confirm all the settings:
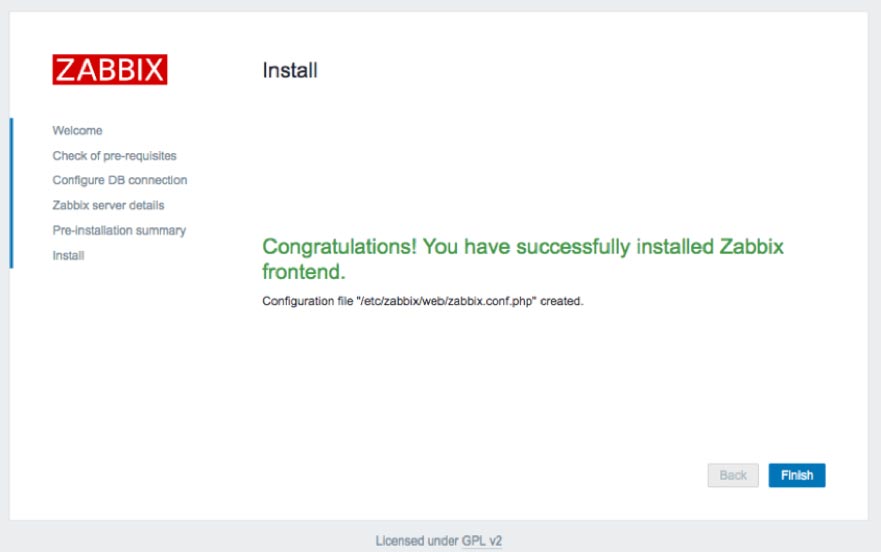
And we are done:
Now you can log in to the Zabbix admin console. The default credentials are username Admin (with a capital!) and password zabbix.
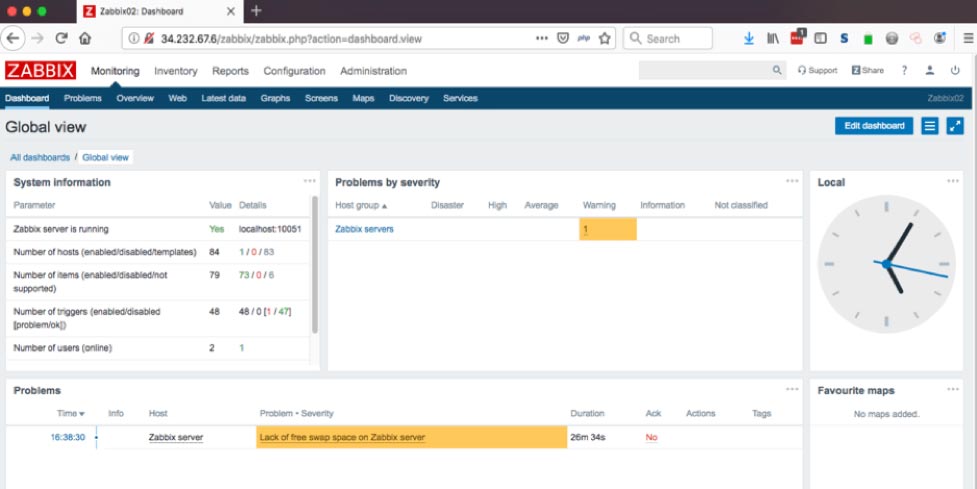
Congratulations, you have a fully functional Zabbix Server:
Next Steps
The next guides in this series explain how to install Zabbix agents on your FileMaker Servers (Part 4 – Zabbix Agents) and how to add those FileMaker Servers as hosts to monitor here in the Zabbix Server (Part 5 – Zabbix Configuration).
Disable MySQL Binary Logging
But there is one more important change that we want to make to MySQL before Zabbix Server starts to collect data.
We are running on an AWS t2.micro with 8GB of disk space, and at the end of the installation, we have just more than half of that disk space still available:
To check, type the following command and look at the Use % of the root directory (/):
df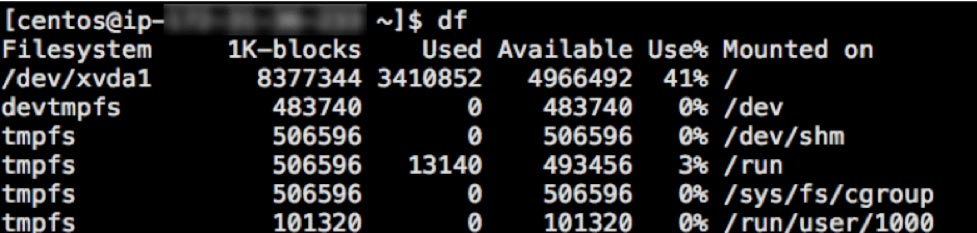
MySQL will collect binary logs (in folder /var/lib/mysql/) that will very quickly fill up that disk space. Those binary logs are only required if you intend to replicate this particular MySQL instance with others, and for our purpose, we do not. If you do want that default MySQL behavior, you will need to increase the disk size for this server.
In our deployment, we want to disable those binary logs.
Type in:
sudo nano /etc/my.cnfand scroll down to the section indicated in Figure 42:
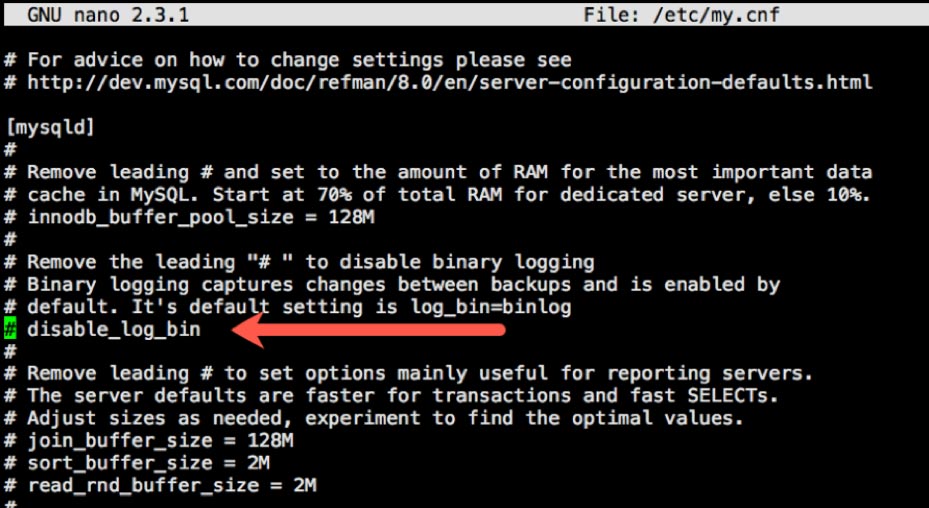
Remove the “#” at the start of the line so that “disable_log_bin” becomes active:
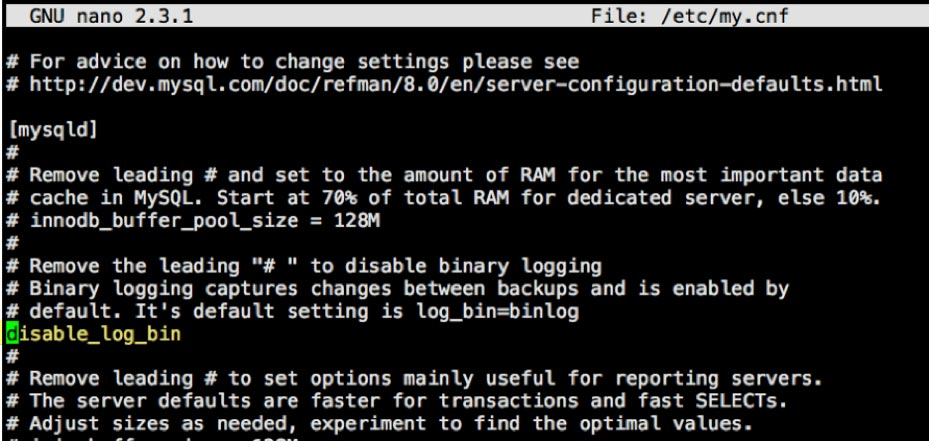
Hit control-o and then enter to save the changes and then control-x to quit the text editor.
Restart MySQL for the change to take effect:
sudo systemctl restart mysqldOn to the next guide and installing Zabbix Agents (3 – Zabbix Agents).
References
Between these two and this guide you are reading now, you should have all the information you need to get to a successful Zabbix Server installation.
Work with Zabbix FileMaker Server Experts
Would you like to set up Zabbix for your FileMaker solution but would like guidance? Our team has worked extensively with Zabbix, and we’re happy to help. Contact our team to get started.