This post is one in a series of guides that walk you through installing, configuring, and using Zabbix to monitor your FileMaker servers:
- Part 1: Getting Started with Zabbix
- Part 2: Installing Zabbix as an Appliance
- Part 3: Installing Zabbix from Scratch
- Part 4: Installing Zabbix Agent
- Part 5: Zabbix Configuration
- Part 6: Using Zabbix (this post)
- Part 7: Maintaining Your Zabbix Server and Agents
Here we will cover how to use the Zabbix web frontend to view the item data that collected as well as problems and actions identified and taken. We aim to provide a reasonably thorough overview of the parts most useful to you as a FileMaker developer or administrator. Please refer to the Zabbix documentation if you would like to learn additional details about a particular section.
Monitoring Items and Problems
Overview
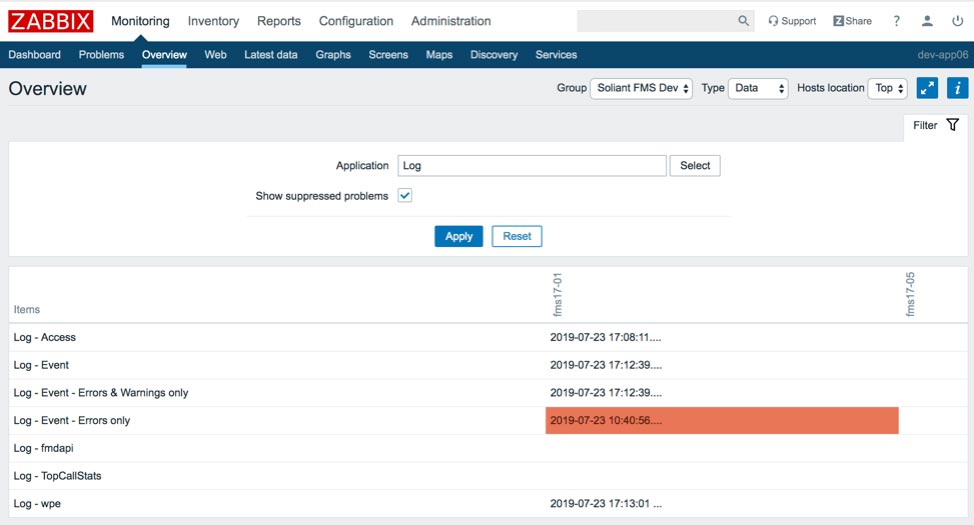
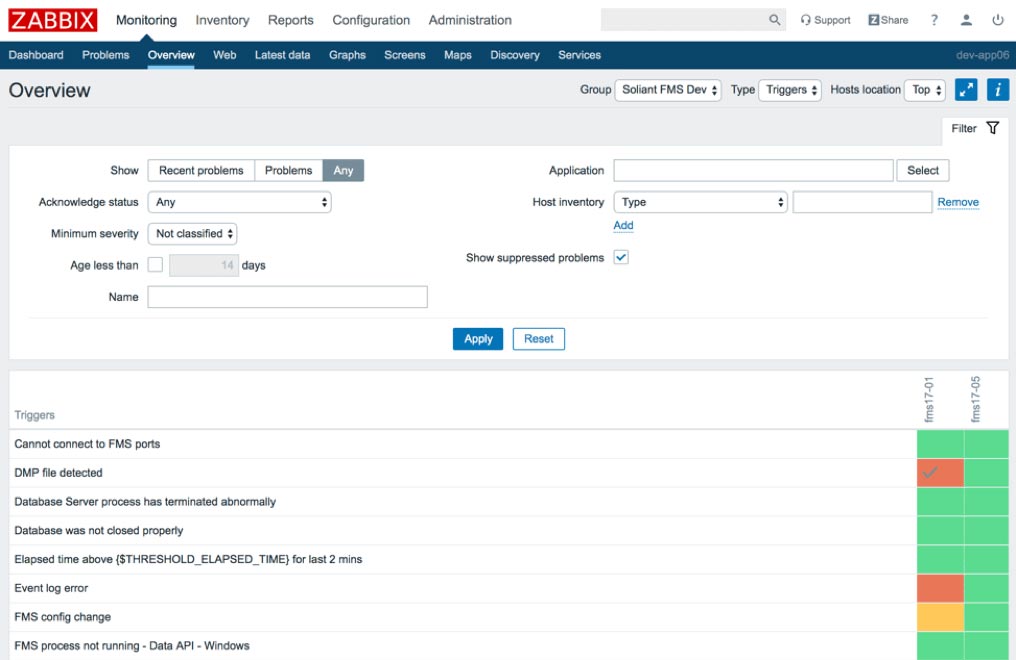
The Monitoring > Overview section shows either item or trigger data depending on the Type that is selected.

The item data overview shows a list of the most recently collected values – similar to the Monitoring > Latest data section, which we will cover next – for the hosts in the selected host group. You can filter the list further by application. Clicking on the filter tab will toggle the display of the filter section.
The trigger overview shows a list of triggers for the hosts in the selected host group along with their states and severity. Green is used when the trigger status is OK. The other colors indicate severity for triggers in the Problem state. A checkmark indicates that the problem has been acknowledged. The filtering section provides several additional filtering options unavailable for the item data overview.
Latest Data
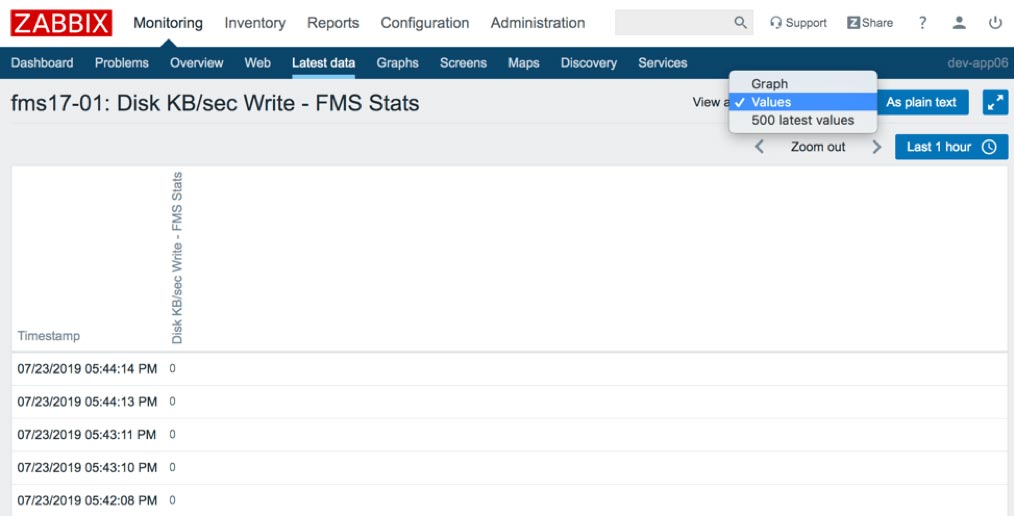
The Monitoring > Latest data section shows the most recently collected item data and the time at which it was collected. The values are grouped by host and application. Somewhat confusingly, if an item has been tagged with multiple applications, it will appear in the list multiple times. The filtering section allows for searching by host group, host, application, and name.
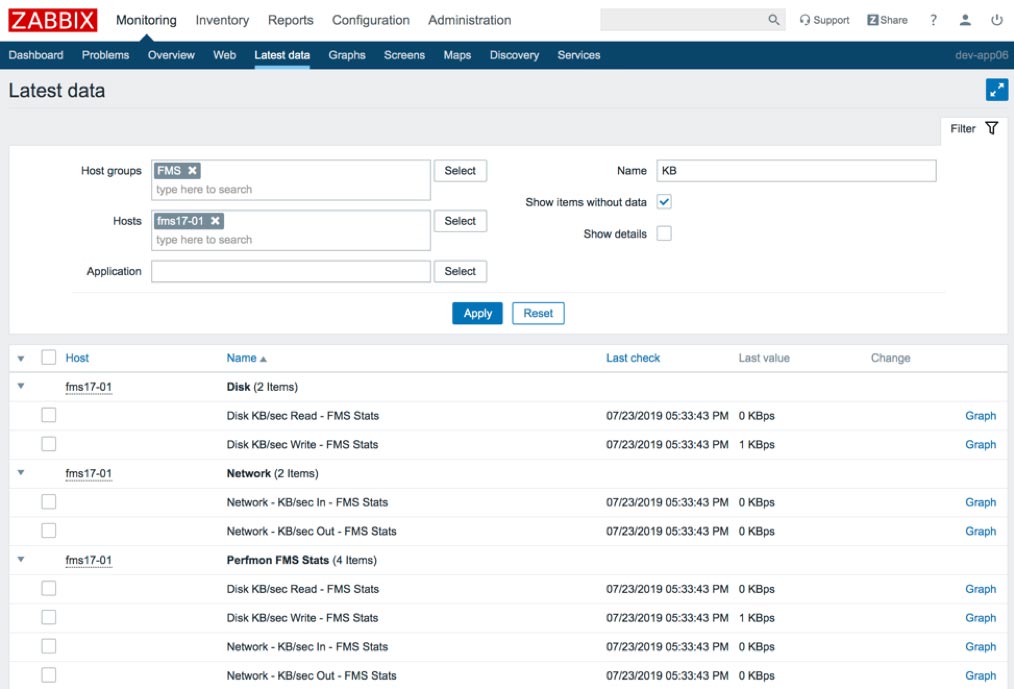
This section confirms your item data is being collected as expected. You can see a history of the values in an ad-hoc graph by clicking on the Graph link. Text-based item data will have a History link instead to view a list of all collected data for that item. Once you switch to the detail for an item – by clicking Graph or History – you can adjust the time period using the filter section.
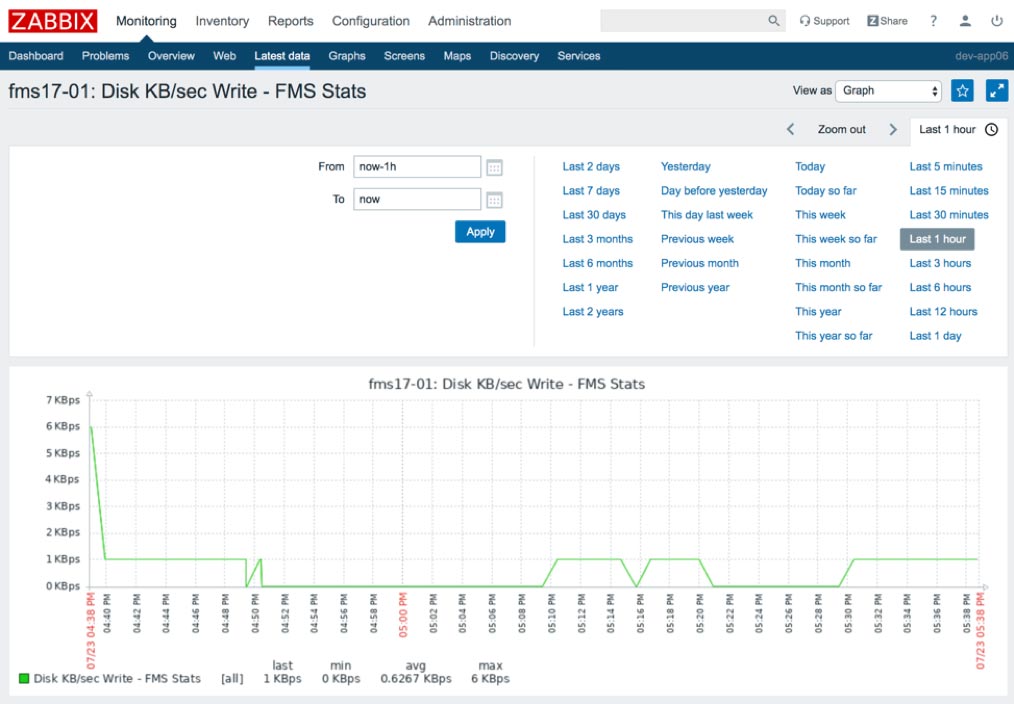
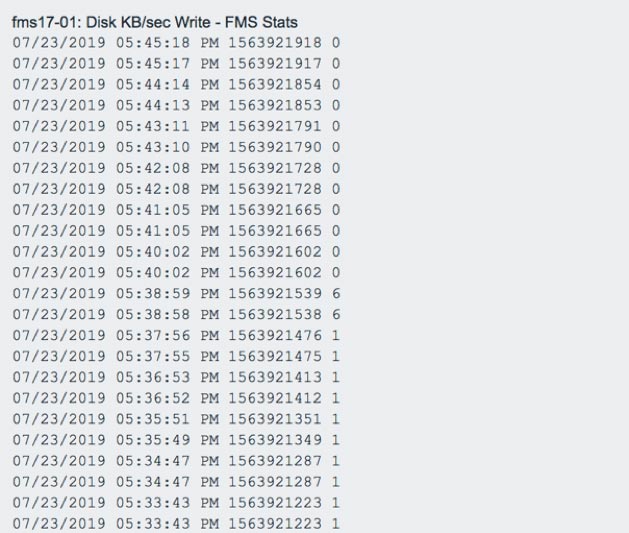
You can also view data shown in a graph as a list of values by changing the View as option.
You can quickly transfer rhe data shown to Excel or some other software for further analysis by clicking the As plain text button and then copy-and-pasting the values.
Problems
The Monitoring > Problems section will display the problems generated by triggers.
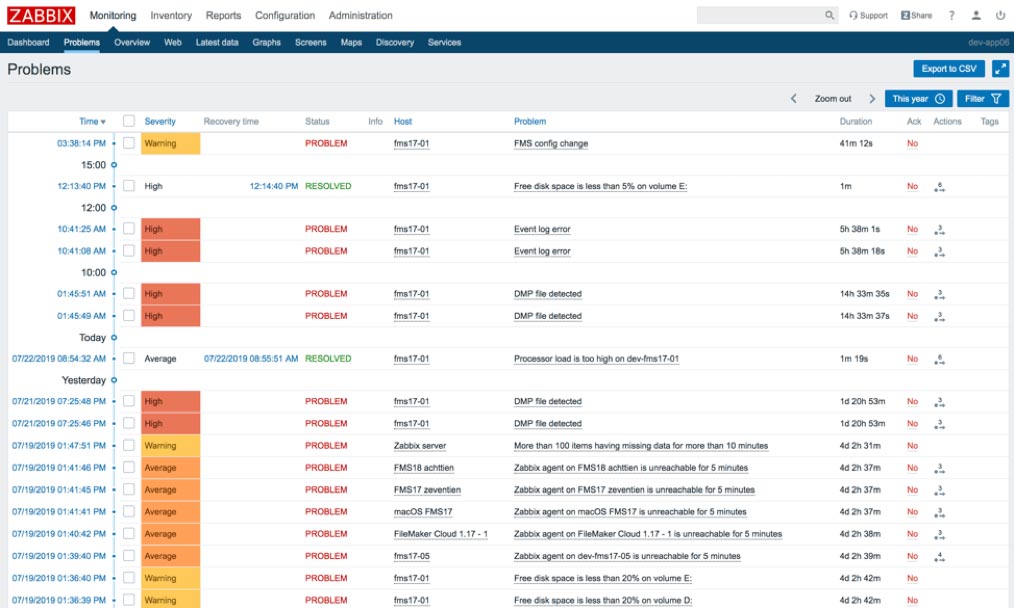
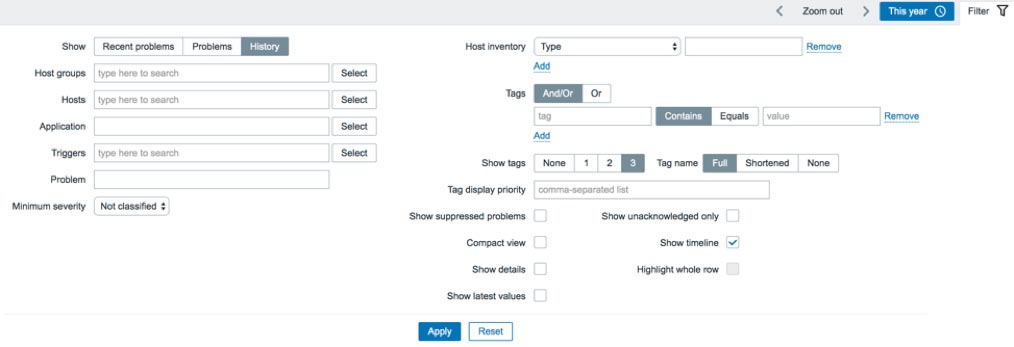
The filter section provides many criteria through which you can winnow down the data. The default filtering option will show only Recent problems, so if you do not see problems that you expect to see, make sure to set the Show option to Problems or History. You can sort the data in different ways by clicking on the column header. The timeline view can help break up the data into meaningful chunks, so make sure you have the Show timeline option enabled.
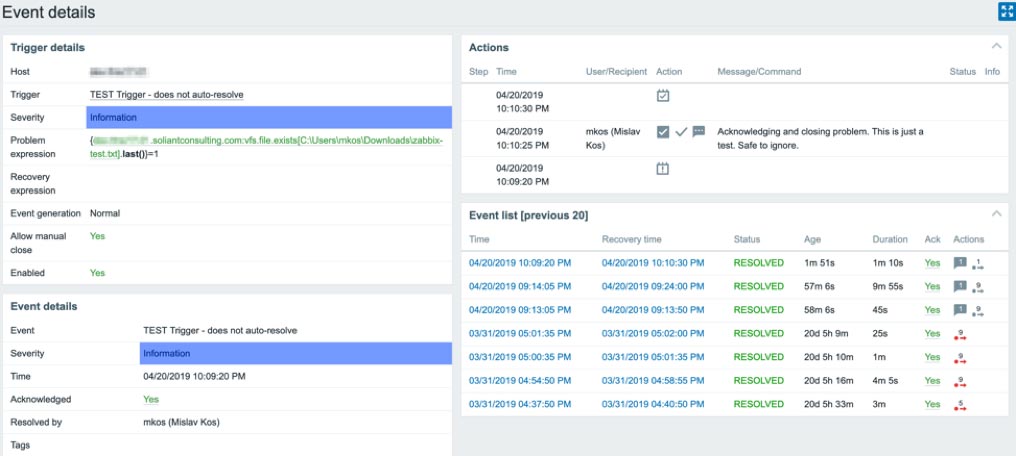
Time Column
Click on the problem creation timestamp to view details about the problem event, including information about the trigger that generated the problem, a list of automated actions taken, and a list of times when this problem occurred previously.
Host Column
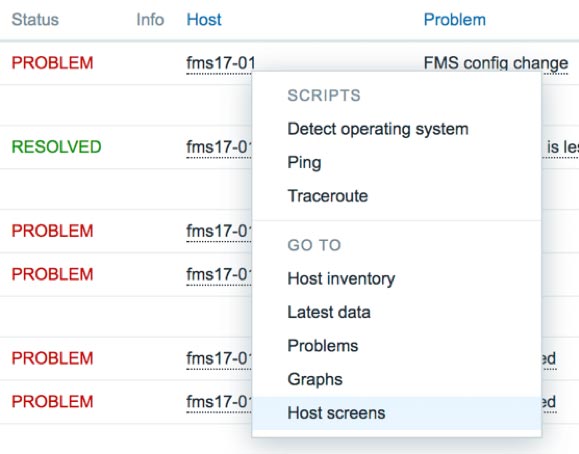
Clicking on the hostname brings up the host menu which makes it possible to jump to other Monitoring sections with the filter automatically adjusted for that host. This popup host menu is available in the same way – by clicking on the host name – in several other sections of the frontend as well where the hostname is displayed with a dotted underline.
Ack Column
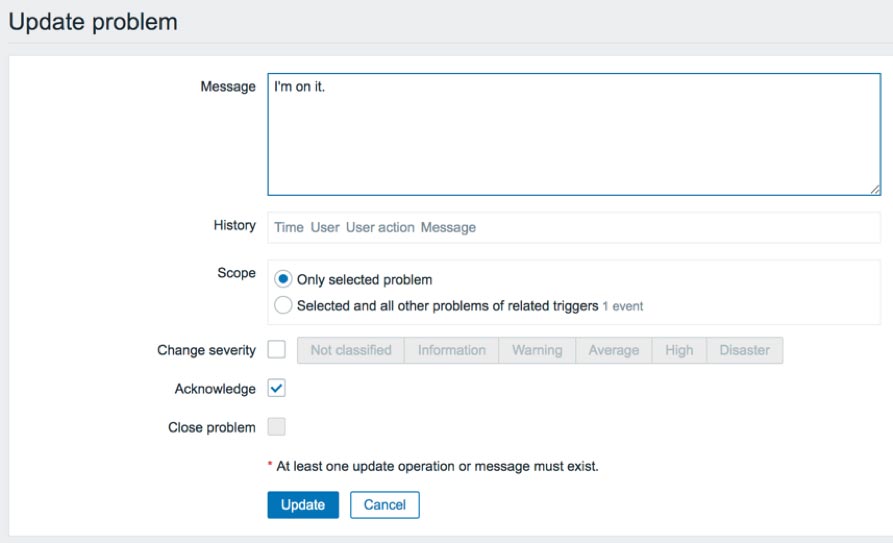
You can click on the Yes/No value in the Ack (Acknowledge) column of the problem list to bring up a screen where you can update the problem. For example, you can add a message to keep notes about the problem, you can acknowledge the problem (to let your teammates know that you are working on it), or you can close the problem (if the trigger settings allow for manual resolution).
Actions Column
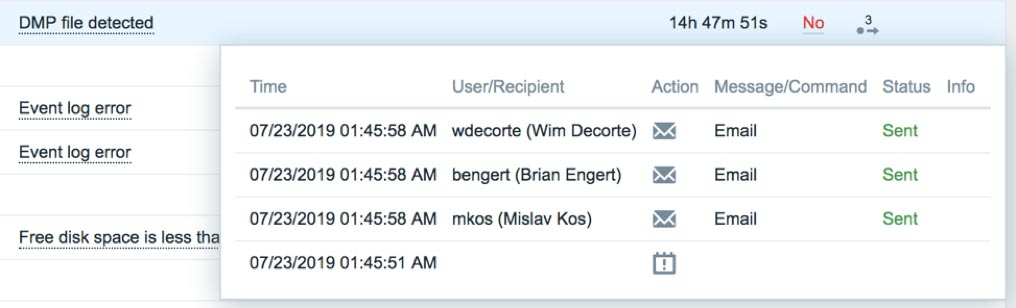
This column shows a count of how many actions – notifications or remote commands – taken in response to a problem. Hover or click on the count to see the list of actions.
Dashboard
Zabbix makes it possible to create multiple dashboards, each of which can display summaries of various types of data. You cannot share dashboards using templates – discussed in the Zabbix Configuration post – so you will need to create your own from scratch or modify the Global view dashboard that comes predefined with a Zabbix installation.
You can view a list of available dashboards by navigating to Monitoring > Dashboard. Click on any dashboard shown in the list to view its details. You can also create new or edit existing dashboards from here.
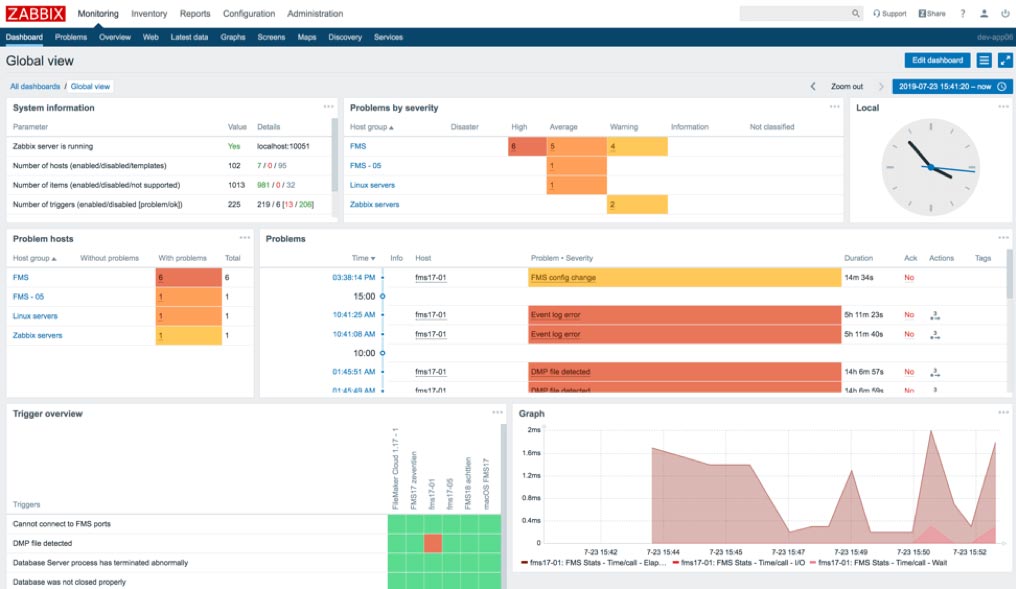
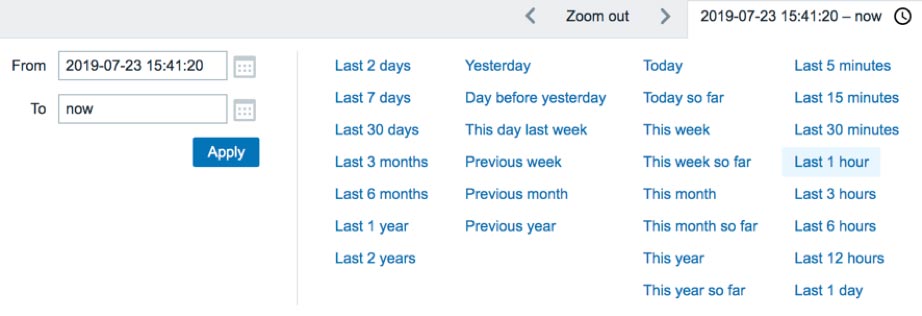
As with many other Monitoring areas in the web frontend, when viewing a dashboard, you can adjust the time filter using the time period selector. You can choose from quite a few pre-defined time filters, or you can specify a custom range.
Here’s a partial list of widgets you can view in a dashboard:
- Data overview – Shows latest item data filtered by host group, application, and other criteria
- Shortcuts to graphs and screens you marked as favorites
- Graphs – Custom graphs created for the dashboard (different from the graphs defined for a host or template)
- Problems – filtered list or cross-tab summarized by severity
- Trigger overview – list of trigger states (OK or problem) for a group of hosts
- Action log – list of recent actions taken (notifications or remote commands)
Graphs
In the Monitoring > Latest data section, we saw how you can create ad-hoc graphs to view item data. You can also predefine graphs or a particular host or, more generally, for a template (which would then be inherited by the hosts using that template). These pre-defined graphs can be viewed in screens – which we will cover in the next section – where they will typically be grouped with other information, or they can be viewed individually in the Monitoring > Graphs section.
To view one of these pre-defined graphs, navigate to Monitoring > Graphs, select a host group and a host, and then select one of the available graphs. You can adjust the time period using the section at the top. You can also click-and-drag to quickly zoom in on the portion of the graph you’re interested in.
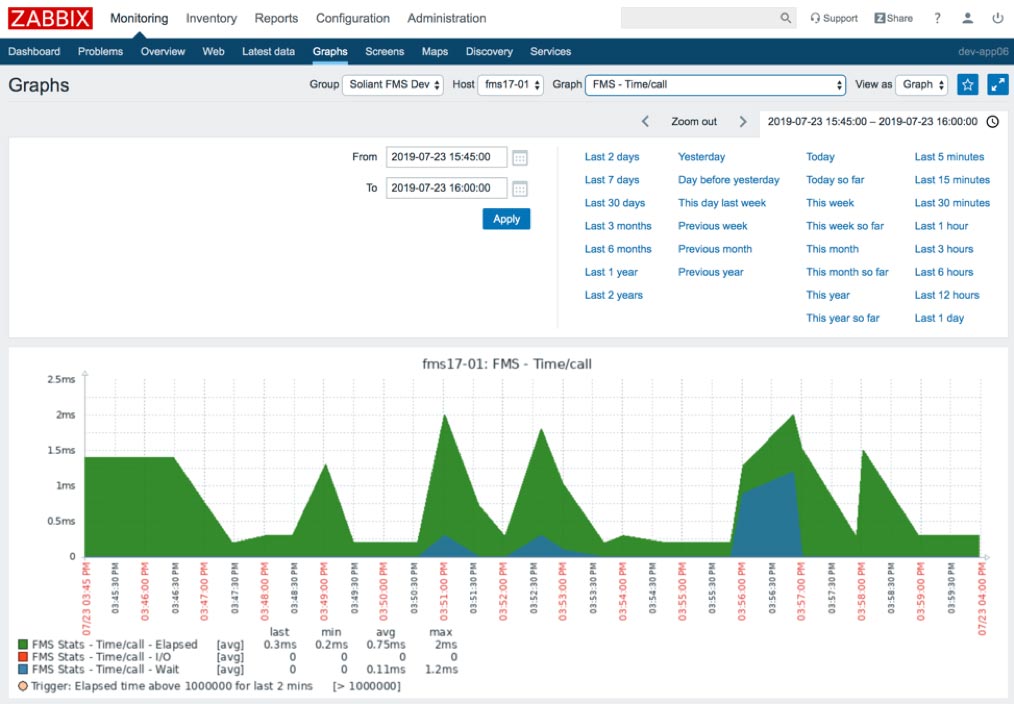
You can view graphed data values in a table by changing the View as option.

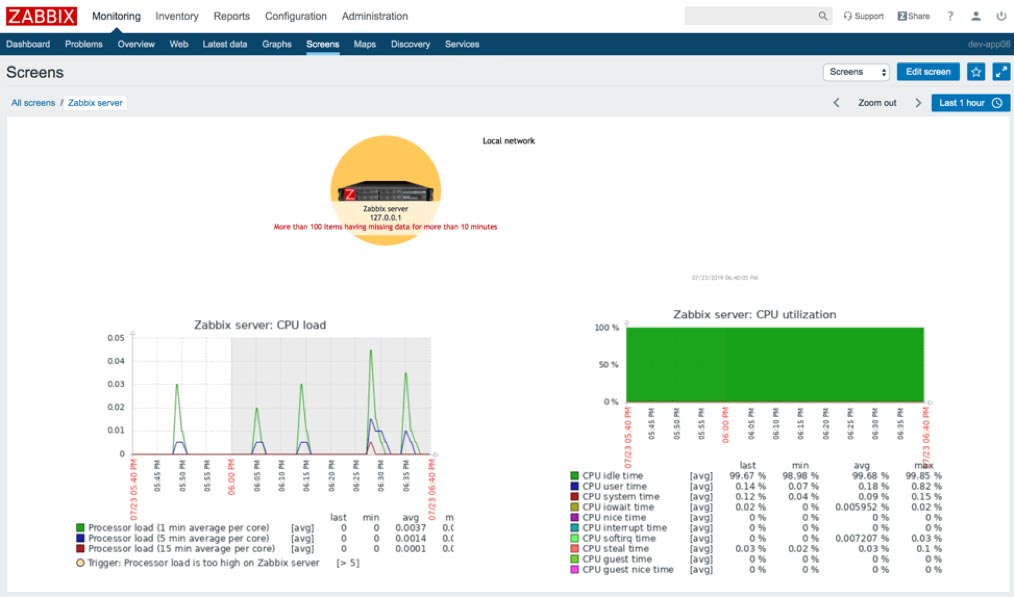
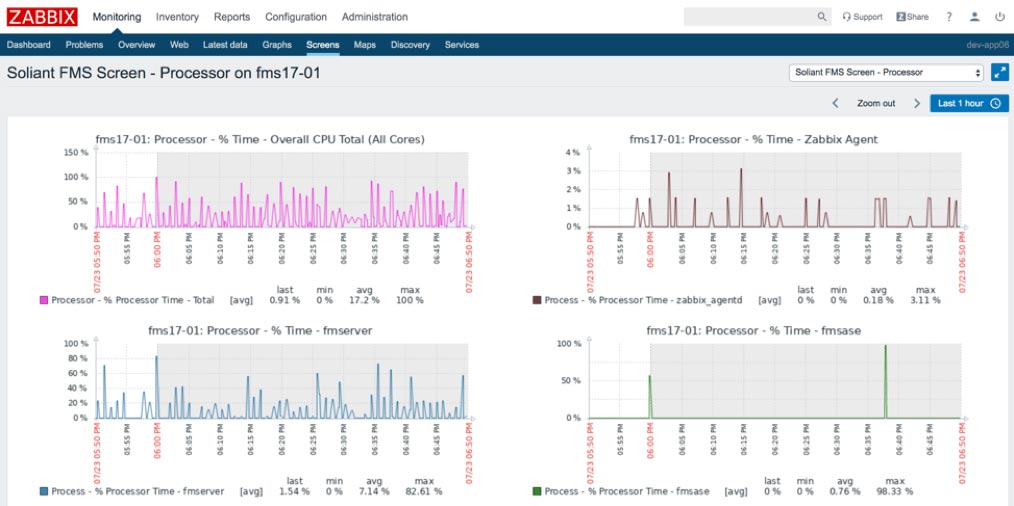
Screens
Like dashboards, Zabbix screens display different pieces of information on a single page. In fact, screens can include much of the same components as dashboards:
- Data overview
- Graphs
- Problems – list or cross-tab summarized by severity
- Trigger overview
- Action log
There are two kinds of screens. Global screens can display information from multiple hosts, and host screens display information from just one host.
Global Screens
You manage and view global screens from Monitoring > Screens. Like with the Dashboard section, you can view this section as a list of global screens or as the detail of an individual screen – somewhat similar to how FileMaker has form and list views for any given layout.
Host Screens
You manage host screens within a template and viewed by selecting the Host screens option in a host menu, a popup menu you can access in various places by clicking on the host name. (We already touched upon host menus briefly in the Problems section of this post.) Some of these places include:
- Monitoring > Problems
- Monitoring > Overview
- Monitoring > Latest data
For example, in the Monitoring > Problems section, you can click on the name of a host and then on Host screens to access the screens available for that host.

Doing so will display one of the available host screens – whichever one viewed most recently. You can switch to the other screens available for the host using the dropdown menu located in the upper-right section of the screen.
You can share host screens across Zabbix installations using templates. Sharing of global screens is less feasible. Save global screen configurations by exporting them to an XML file, and loaded them by importing that XML file. However, this file will contain hardcoded references to specific hosts, so importing the file to another Zabbix server which doesn’t have those same hosts defined will not work.
Zabbix Reports
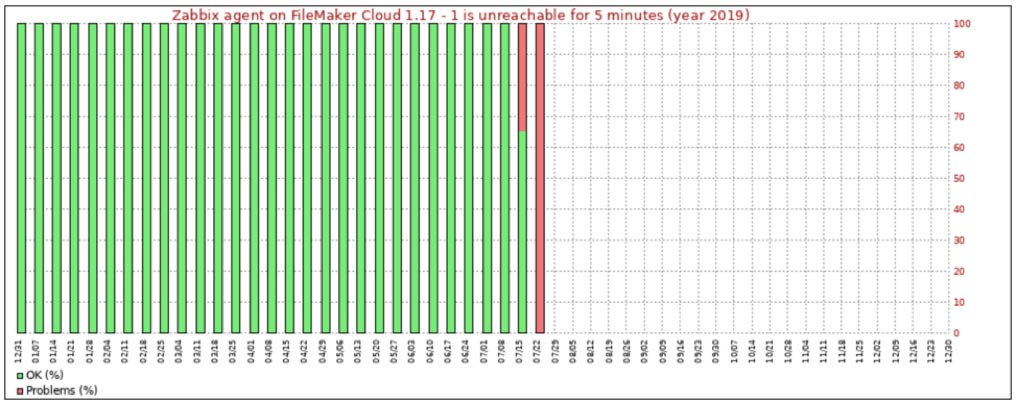
Availability Report
The availability report shows what percentage of time each trigger spent in the OK and Problem states. You can filter the report data by time period, host, and host group.
In the example below, we can see that the Zabbix agent on our FileMaker Cloud 1.17 development server has been unreachable 18.6% of the time.
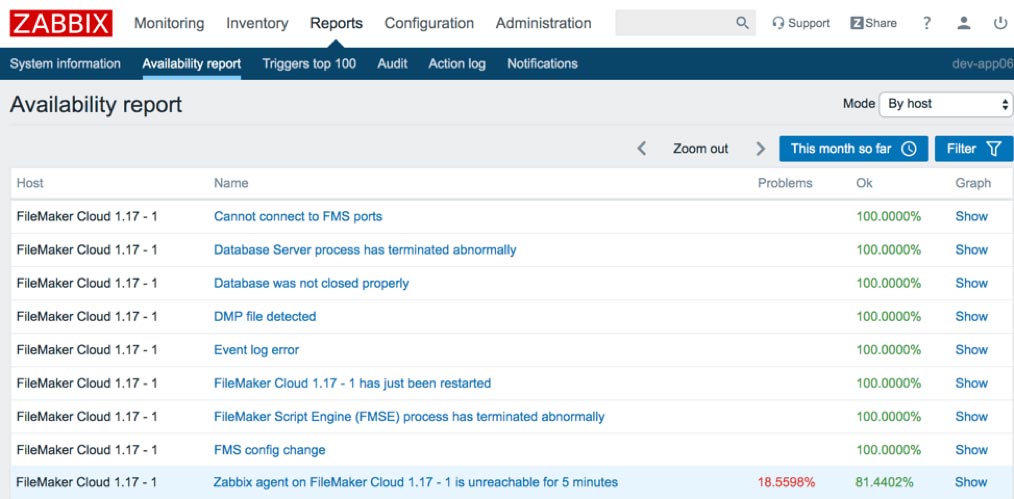
You can click on the Show link to view the data in more detail and in a chart format.
Triggers Top 100
This report shows up to 100 triggers that have changed their state the most frequently in the selected time period. You can filter the report data by time period, host, host group, and trigger severity.
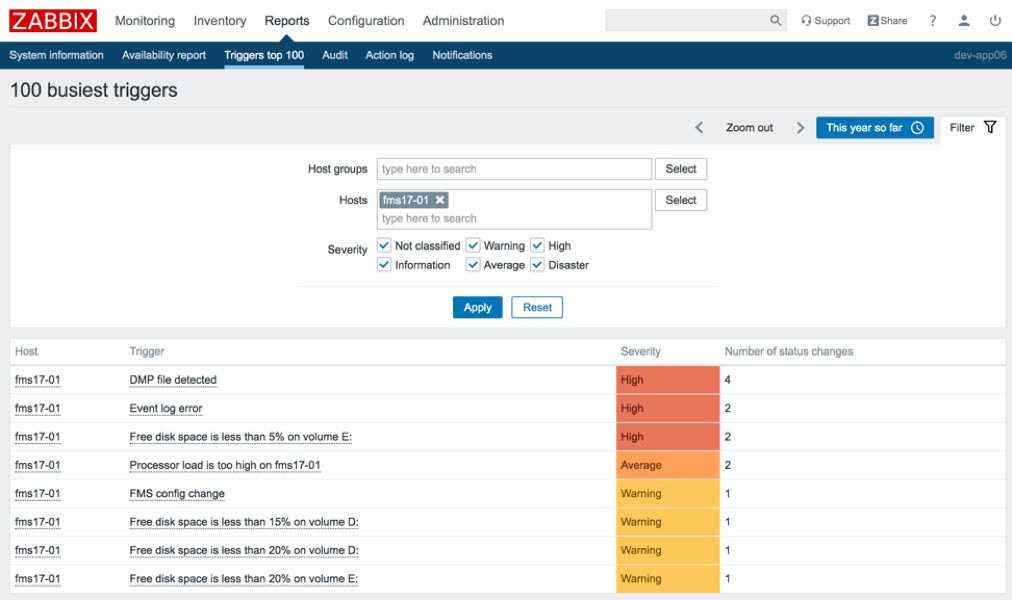
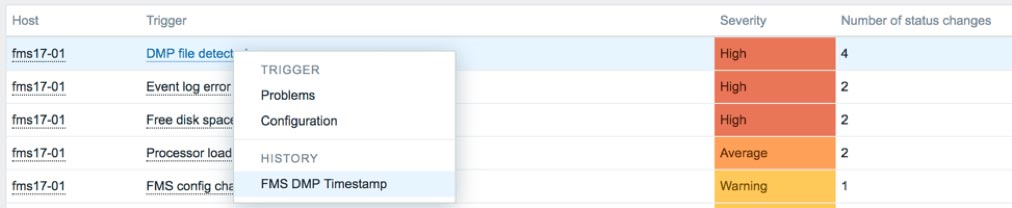
As with other areas of the web frontend, clicking on the information shown with a dotted underline – in this case, host name and trigger name – will reveal contextual menus used to jump to related views of the data.
Audit Log
The Audit log is different from the other reports in that it does not to inform about the monitored hosts. Instead, this report shows the activity that has taken place within the web frontend. This includes information about user logins and changes made to templates, items, triggers, and other resources.
For example, we can see a list of updates made to screens.
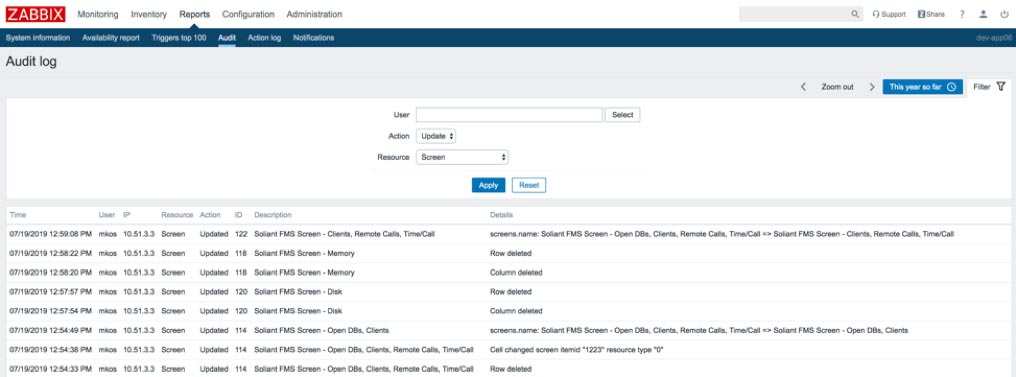
In addition to the usual time period selector, you can filter the information by the type of action and by the resource added, modified, or deleted.
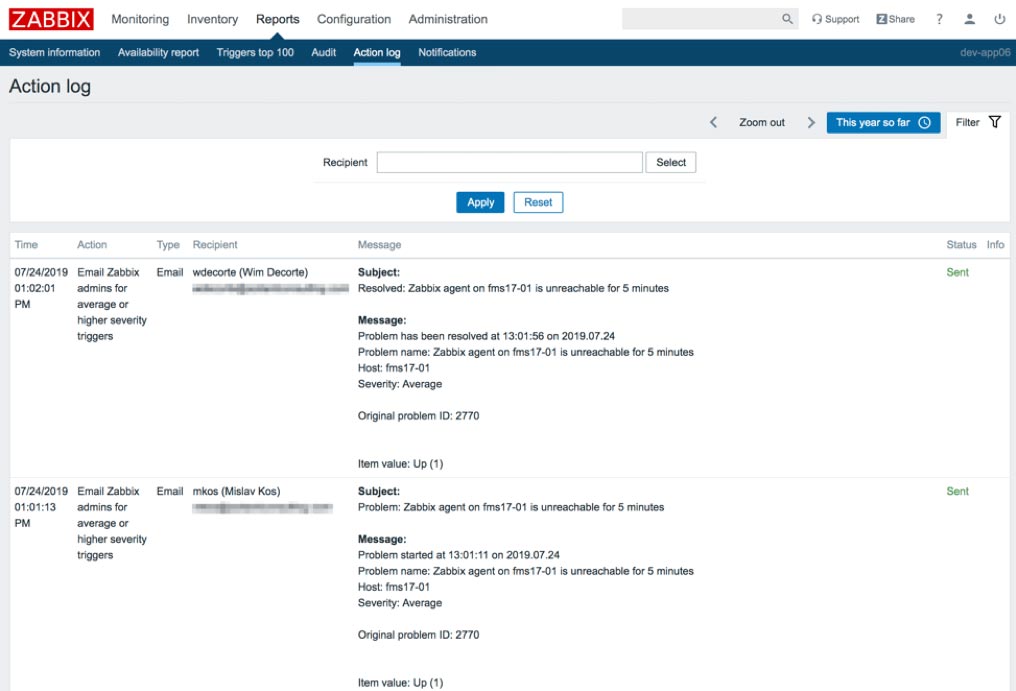
Action Log
The Action Log displays a list of actions – notification emails or remote commands – taken, for example in response to triggers. You can filter the actions by notification recipient and time period.
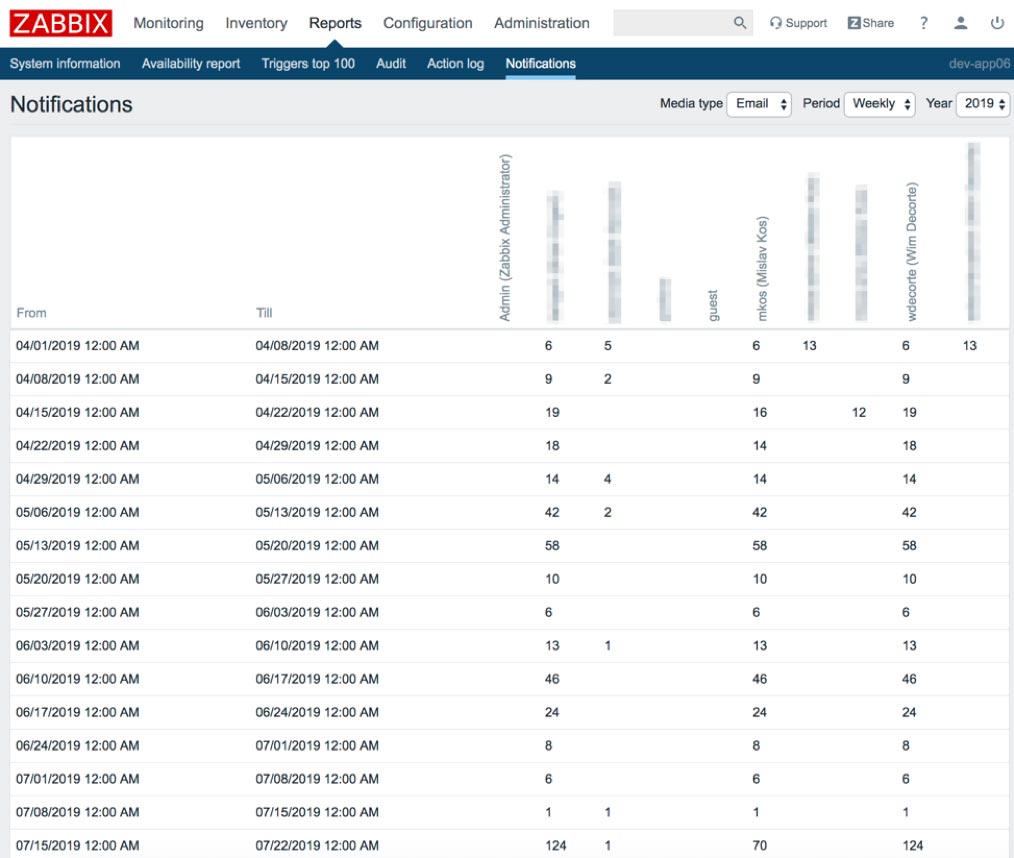
Notifications
The notifications report displays a summary of notifications sent out for the selected year, summarized daily, weekly, monthly, or yearly. Each recipient will have their notification totals displayed in a separate column.
Down a PDF of this post
Work with Zabbix FileMaker Server Experts
Would you like to set up Zabbix for your FileMaker solution but would like guidance? Our team has worked extensively with Zabbix, and we’re happy to help. Contact our team to get started.