Wouldn’t it be nice to have a button bar that you could place on every layout that handles basic FileMaker navigation and would automatically update itself when you make changes like rearranging, renaming, or adding layouts.
The appeal of this functionality is that it can be applied to most any FileMaker solution. I’ve seen other approaches over time, although not all have met all requirements that I would want of such a tool. These requirements include:
- Works in Browse and Find mode
- Uses Themes and Styles
- Allows manually navigating to layouts
- Works in List View
- Works in Pro (both local and hosted), Go, and WebDirect
- Works with multiple windows
- Works natively (no plugins required)
- Does not require additional schema
- Handles a reasonable number of layouts
- Minimal scripts required
Other nice-to-haves
- Does not require custom functions, which is better for portability
- Retains the last visited sub-section, allowing for navigation of multiple tiers

This has been something that has been in the back of my mind for a long time. An earlier version I created used a web viewer to display navigation but only supported two tiers. That solution had its drawbacks, notably a “clicking” sound on Windows that happens when a web viewer is loading. That original version was done some 10-plus years ago and was due for an update using modern techniques.
The newest iteration supports three tiers of navigation and uses only native FileMaker objects. You can also utilize Themes and Styles with current versions of FileMaker, allowing you to easily change the look and feel of your standardized navigation in all layouts that use the same theme. All layouts that use a common Theme will reflect updates across the entire file when you update the Theme.
Three Tiers Deep
This solution has three button bars, first introduced in FileMaker 14, that are stacked on top of one another. Your first tier is the top bar. Therefore, the minimum version of FileMaker for this technique is at least 14. Clicking on one of the top tier buttons takes you to the second tier and so on. If you think of the layout names as data, where we define a delimiter to separate the layouts, we can structure a naming convention that works with the navigation framework to build out the navigation scheme. Consider the following:
Home
Home__Dashboard
Home__Reports
Home__Reports__Additional
Company
Company__Details
Company__Contacts__Info
Company__Contacts__One
Company__Contacts__Two
Prefs
This is a straightforward list of values, which is easy to understand. If we consider each individual value as having a list of its own, this could be considered a multi-dimensional array. For example, “Company__Contacts__Info” is a list with three values delimited with an underscore.
In the above list, we have “Home”, “Company” and “Prefs” on the first tier, and the second tier would be dynamic, based on the first tier we have selected. Company on the first tier has “Main,” “Details,” and Contacts” that appear on the second tier. Similarly, selecting “Contacts” on the second tier will show “Info” “One” and “Two” on the third tier. If there are no values to display on the second or third tier, that button bar is hidden.
That also means it is easy to change your navigation by simply rearranging the order of layouts. The next time you run the “Load Nav” script, or just close and open the file again, your FileMaker navigation will update through your entire solution.
Building the List
Since we can get all the layout names with a Design function, it is possible to parse through those values to build a series of global variables that will display those values on a button bar. Once we determine which first-tier section we are on – based on the current layout name – we can evaluate which second and third tiers need to display.
You may optionally set your own list of layout names to use, instead of using the design function. That gives you more control over naming layouts you do not want to appear, or layouts that may physically be out of order. If you want to keep it dynamic, there is a developer definable prefix to use that will omit layouts you do not want included. If you override with a static list, you can simply include only those layouts you wish to appear.
This solution supports up to three tiers, with each tier being able to support up to ten values. That means 10 x 10 x 10 for a total of 1,000 layouts that can be maintained automatically. That should suffice for most of the solutions that I work on.
Order is important
Since we parse through the layouts to build the navigation interface, those layouts need to be in the order you want them to appear. This makes it trivial to update your user interface. Did you want “Prefs” to appear before “Company”? Then simply re-order your layouts and open the file again. Your UI will update to reflect the change.
To populate all the needed variables, we need to run a script once when the file opens. In this version, all the buttons in the button bar get routed through a centralized “Nav” script, where exceptions can be handled. Alternatively, that script can simply use “Go to layout” by name.
We also handle support for multiple windows in the “Nav” script if the user holds down a modifier key. The command key on OS X, the “ctrl” key on Windows, or the shift key will open a new window before navigating to the desired layout.
Dynamically named variables
The solution makes heavy use of dynamically named variables, so it may limit the characters used in layout names because they are used to name variables. If your layout names follow the naming convention explained above, it all just works. Global variables are all “namespaced” with a “NAV” prefix to avoid collisions with other variables you may set in your solution.
BONUS
FileMaker supports Unicode pretty much everywhere, so you can include emojis in layout names. They will display as icons in the navigation bars. Note: this also means you can have emojis in variable names.
Under the Hood
Button bars make it possible to use calculations to specify the active button segment. The calculations that determine which segment should be active for each of the three tiers are dependent on each other. For example, to know what the active segment should be for the second tier, we need to have already calculated the active segment for the first tier.
So that we can more easily control which active segment is calculated first, the three active segments are determined using a single calculation, which has been placed in the top-most button bar. Layout objects are rendered left-to-right, top-to-bottom, so once the first-tier button bar evaluates its active segment calculation, the next two button bars will be ready to go.
Second and third tiers with a null value are assigned a default value to display, like “Main.” Buttons that are not used are hidden so that they cannot be clicked. The remaining space is filled in with invisible buttons that have no action assigned to them and act as filler, so the buttons stay at even width.
If there are layouts you do not want automatically included in your navigation, you can exclude them by naming the layout beginning with “//”. The notations used for the delimiter and exclude flag are configurable in the script that loads the navigation variables. If you want to use a different convention, you can change it to whatever you want, but the default is double underscore for tier delimiters and double slash to exclude the layout.
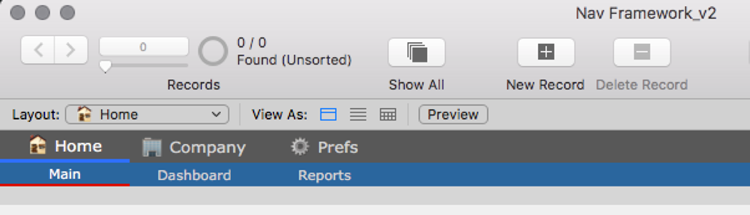
This screenshot shows what the navigation scheme looks like. You can also see this in my accompanying demo file, which includes some sample layouts. The different tiers have been styled differently to set them apart.
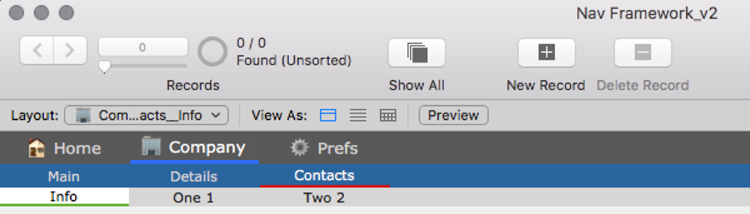
The next screenshot shows how navigation appears when viewing the “Company__Contacts__Info” layout.
Because button bars are easy to manage, you can modify their placement and appearance easily. Would you rather display the third tier at the bottom of the layout? Just place the third button bar at the bottom of the layout. Layout size is wider than the sample file? Just resize the button bars to the desired width, setting the anchor points as needed.
Save Your Place
In each section, we can retain the last visited sub-section when navigating multiple tiers by setting the variables used to link to different layouts when navigating through the lower tiers. You would not want to keep having to navigate through 2nd and 3rd level tiers every time you go to “Company” for example. If you are drilled down, need to go to “Prefs” and go back to “Company,” you will arrive at the 2nd or 3rd tier you last visited.
Multi-Window Support
As we use global variables unapologetically, each window gets its own set of global variables to reference. These are set in the scripts and buttons, so there is nothing for you to update; it is all done for you.
Is this a little heavy-handed, brute force setting so many variables? YES! But the work is done all up front and only once, so you can benefit from it in lots of places.
Dynamic FileMaker Navigation Bar Instructions
To use this in your own solution, follow these steps:
- Import the Theme, or create styles for the parts. This can be done later if you already have a Theme in use.
- Copy the “Load Nav” and “Nav ( layout )” scripts, paste it in your solution, and configure “Load Nav” to run when the file opens.
- Copy the navigation buttons bars and paste them into your layouts.
- Configure a script trigger to run when opening a new window (File->File Options…->Script triggers: OnWindowOpen) to include the “Load Nav” script. If you do this, you can disable the script steps to run this script when checking for a modifier key in the “Nav ( layout )” script.
I will often use this technique on files that I have developed where I do not have time budgeted for layout navigation. With this solution, I have nice looking navigation available that can be implemented in a short amount of time.
Try it yourself. Download the sample file.
Next Steps for Your FileMaker Solution
If you have any questions about building your own dynamic FileMaker navigation functionality, please don’t hesitate to ask in a comment below. For insights on how to make your FileMaker solution more powerful using this functionality, please contact our team today.
Hello there
Thank you so much. it makes a lot of work
Best regards
Hello Mike,
Is it correct that I cannot access the scripts in the sample file and also cannot modify the layout?
Kind regards,
Baran
Hi Baran,
The sample file is completely open, so you can examine all code and make changes if needed.
Mike
Pingback: Build a Dynamic FileMaker Navigation Bar - FileMakerProGurus
This solution is excellent! It saves me a ton of time!
The one problem I have run into, is that if my secondary button has multiple words in it, that section is not shown as active unless you click on it a second time. For example, in your sample file, if you change the layout name from “Company__Details” to “Company__Company Details”, that segment no longer shows as active when you click on it once. If you click that same segment a second time, it then shows the segment as active. It is interesting, as it does not seem to be a problem with the primary or tertiary bars.
Any help would be greatly appreciated.
Thank you!
Caroline
Hi Caroline,
I was able to replicate the issue on my end. Seems to have been an oversight, as I was handling spaces in the third tier, but not the second. I just added that support as well and updated in my GitHub repository. You can download a new copy from there. All you will need is the updated first tier and copy/paste that in your solution, as none of the scripting or anything else changed. The “Active” state of all tiers is evaluated in the top most button bar.
Thanks
Mike
Hi, I have been unable to disable line 30 and enable line 32 in the Load Nav script and still get the secondary and tertiary tiers to load. Once I make this change the bottom two tiers do not appear to load. I was hoping to set names (that are not layout names) and then handle them as exceptions. I can only assume I am not doing something correctly?
Hi Katy,
Are you using the same delimiter to indicate tiers? The default delimiter is two underscores, and is something that can be modified on line 21 of the Load Nav script. You would then handle the exceptions in the Nav ( layout ) script.
Hi, Great tool and explanation.
Just one note:
To install I also had to copy the CF’s: USER_ABORT_SETTING, #ParameterToVariables, and #t over into my solution.
Thanks!
Hi Mike, yes I have $this.layouts set to:
“Home” & “┬╢” &
“Home__Dashboard” & “┬╢” &
“Home__Reports” & “┬╢” &
“Home__Reports__Additional” & “┬╢” &
“Company” & “┬╢” &
“Company__Details” & “┬╢” &
“Company__Contacts__Info” & “┬╢” &
“Company__Contacts__One” & “┬╢” &
“Company__Contacts__Two” & “┬╢” &
“Prefs”
I have not changed what was provided in the sample. If you swap out lines 30 and 32 and re-run the Load Nav Script it will appear to have worked but the minute you close the file and then re-open it then the second tier does not show. I have spent a couple of hours with the dubugger but had no luck spotting the problem. I have a solution with over 800 layouts and it needs new nav put through and I really like this concept but I cannot rename the layouts so am hoping to use the alternative of setting names and using the exceptions.
Thank you for replying. I am sure this is a busy time for you.
From what I can work out today there is a disconnect between the calculation for ActiveSegmentCalc on button bar where it is setting the .PRIMARY.ACTIVE to the LayoutName and then when the button hide and name calculation try and evaluate “$$NAV.” & $the.win & “.PRIMARY.ACTIVE” ) ; ” ” ; “_” ) it is not working as the PRIMARY.ACTIVE is not evaluating. Just have not worked out how to get around this when you are not using the actual layout names. Have to say this is pretty impressive. I was not even aware you could specify a calculation for Active Segment! Sorry that I cannot quite work this one through.
Hi Mike, I have this working but am pretty sure there is a more elegant fix. I have amended the ActiveSegmentCalc to use a global variable for $this.layout rather than get(LayoutName) and then I have added something into the Nav (layout) script to set this variable. I now also need to run this script on first window open and have had to put a “Refresh Window” after any Go to Layout (specific cases/exceptions) script steps in Nav (layout) script for the active button underline to refresh to correct position. So feels like although I have got this working there was probably a much better change that would have achieved the same thing. I look forward to hearing from you. I really like the way the nav remembers what level you were on and am hoping to implement with a table that contains records with button label, navigation script to run and parameters to pass to nav script. I already had the table set up when trying to implement another nav solution but I like the tiers in your solution so am hoping to mash them.Thank you for sharing. P.S Fine if you want to delete any of my posts if they are taking up to much space on the page and swap them out for something more succinct! Can’t wait to kick myself when I see the simpler fix you suggest. 🙂
Hi Katy,
I will have look into it more, since my solution still relies on the layout name being set to match the variables being set, even if you put overrides in place.
Hi Mike, I have nearly finished implementing the new navigation in our solution. I hit a small but significant issue where all the go to related buttons in portals are currently single script steps and moving between layouts via these did not update the navigation tiers. I have turned about 80 of them into Perform Scripts now but have at least that amount again to go. One thing I just need to query with you is if you know why [1] does not evaluate, all others do like [2], [3], [4] but not [1]? Is it something internal to FM that makes it not evaluate? I just ask because a couple of places like the hide and specify calc’s on Tier 1 and the hide on Tier 2 have [1] included but this value never appears in the data viewer? I have learnt so much from your solution so thank you again for sharing.
Hi Katy,
Note sure I quite understand, but the main calculation that sets global variables is in the active button calculation on the top button bar. You might also want to change the z order of those objects so the evaluate correctly top to bottom. I found that z order matters but also within the layout part, so header part at the top will evaluate first, then body and footer, for example. Does that help?
Hi Katy,
In FileMaker, as you know, in $$Var[3] 3 is the subscript. When a variable is not subscripted it’s written as $$var.
The weird thing is that if you assign $$var[1] it will store that as $$var. No subscript designation is needed for [1]. This makes the variables sort out os order in the Data Viewer which only adds to the confusion.
So, in my current solution I have active globals:
$$NAV.1.Attendance
and
$$NAV.1.Attendance[2]
Hi Mike,
I have a card window used for navigating between layouts. I use a lot of my keyboard while working and I don’t know how to move between the list view rows in my card window through the up and down arrows. Could you be of some help to me in solving the problem. Thanking you for your support.
Very nice solution, is it possible to use your own icons ? Or how does the icons work ?
See the “Bonus” section above. If you use emojis to name your layouts, then they will appear as icons. Emojis are part of unicode fonts and are well supported in FileMaker.
Mike,
Love this — and have been using it for a while in some of our internal dbs. A couple of quick things that I’ve found that I was wondering if you have fixes for.
– I didn’t realize until writing this today that a cmd-click on the menu does another window. I had been using the “New Window” menu item, but what I found when using the FileMaker menu to do this is that the Nav menu is empty. Any ideas how to make it so that “New WIndow” FileMaker menu does the same thing as cmd-click on a Nav menu item?
– Often when I create a new layout, it’s not named right the first time. When I update the menus by running the “Load Nav” script — it will redo the menus. But, if for example, there’s LESS menu items (for say the top level menu) than the last time Load Nav ran, Load Nav will leave a remnant, and orphaned, menu text. The only solve I know of is to close the database and reopen. I suspect one of the variables needs to be re-initialized.
Again, great stuff — and so appreciate you publishing it. The above are minor nits to be sure.
Thanks!
Neil
Hi Neil,
When I open a new window with “New Window” it seems to work as expected, just tested with FMP 19.2.2 on both Win and Mac. As long as the variables are defined, it should be rendered when the layout loads.
For the issue with remnant variables, I suppose you could keep track of the variables that you are declaring in order to then clear them out when “refreshing” but there is no way to get currently declared variables on their own, so it is easiest to just close and re-open the file, where all variables are reset. The thinking is that you typically would not be changing the navigation that often in cases where you remove layouts. It is possible to address, but may not be worth the effort.
Thanks
Hello Mike,
I could install your elegant solution in a project and it saves a lot of time !
One step was missing for me, it’s worth mentioning it in the Instructions : I had to import your functions (Let functions #, ##, etc. and USER_ABORT_SETTING) in my project .
Thanks again.