Safer than what?
Your Claris FileMaker Server 2024 comes with a set of shell scripts that allow you to request and renew free Let’s Encrypt SSL certificates. This is functionality that Claris only supports on Ubuntu Linux and macOS but not Windows.
If you have ever requested an SSL certificate, you know that there is a step in the process that requires you to provide proof that you have control over the domain for which you requested the certificate. There are a few ways of doing this. Most SSL vendors require either an email address on the domain or a DNS entry on the name server for that domain.
Let’s Encrypt offers two methods:
- The http challenge: you need to create a specific file in a specific folder on the web server on the machine for which you request the certificate.
- Or, you need to create a specific TXT dns record on the DNS server that manages that domain. This is the dns challenge.
The scripts that Claris provides use the http challenge. But the dns challenge is more secure.
Safer how?
This is how the http challenge flow works. When you see it visually, it’s easy to spot its weak spot:
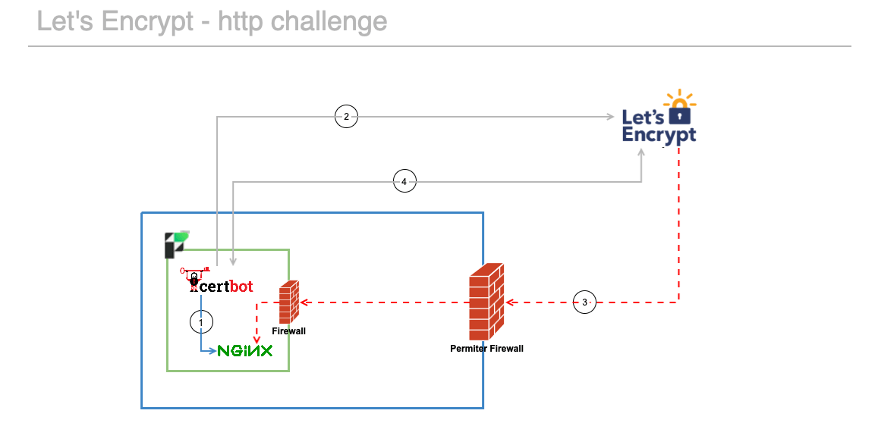
- The certbot agent that you install on your FileMaker Server creates the required text file in FileMaker Server’s web server location. (http://server.domain.com/.well-known/acme-challenge/)
- That certbot agent then tells Let’s Encrypt what cert it needs and where to find the text file.
- Let’s Encrypt will try to connect to your FileMaker Server on port 80 to verify that the specific text file exists there.
- Certbot will have been checking periodically if Let’s Encrypt can connect and see the file where it expects. When Certbot gets the ok, certbot will download the SSL certificate. Then the Claris scripts will use the fmsadmin command line to install the cert.
Step three is the problem. You do not want to expose your FileMaker Server to the world on port 80 just to make this functionality work. That’s incredibly risky.
Mitigating Risk
The Claris scripts try to solve this by including code that temporarily opens port 80 on the machine’s firewall for the duration that the script runs. But often, that is not enough. You would also have to open port 80 on the network perimeter firewall and do the required setup to forward traffic to your FileMaker Server. It is very easy to leave that exposed unintendedly. This gives attackers an easy way to try and exploit your FileMaker Server.
Also, you may not be running the FileMaker Server web server if all you need is FileMaker Pro or Go access, which then just adds to the setup you need to do to enable this type of challenge.
The dns challenge, on the other hand, does not require any access to your FileMaker Server from the outside. You don’t need to adjust your firewall or set up port forwarding.
Also note that in step two above, you must use the full dns name of your server anyway. Dns is already involved and needs to be functioning properly anyway. Under the hood, Let’s Encrypt verifies that the IP address sent by the certbot agent matches the IP address it gets back from checking your dns server for the dns record for the domain name you request the cert for.
Also, note that the dns challenge is the only method to use when you want to ask Let’s Encrypt for a wildcard certificate.
How does it work?
With the dns challenge, these steps happen in sequence (see the numbers on the infographic).
- The certbot agent on your FileMaker Server is configured to make an API call to your DNS server to add the specific TXT dns record that Let’s Encrypt expects to find.
- Together with the API call to Let’s Encrypt to initiate the issuing process.
- Let’s Encrypt verifies that the DNS record exists.
- The certbot agent and Let’s Encrypt issue and download the SSL.

Since the certbot agent initiates and controls the whole process, there is no point at which Let’s Encrypt needs to connect to your FileMaker Server directly. No hole needs to be punched in your firewall; everything can stay as secure as you have it configured.
So why don’t the Claris scripts do this by default? Because the http challenge is more generic. The details of the dns challenge vary depending on the DNS provider. This makes it harder for Claris to build a single script that will work everywhere. It’s a compromise and one that – in my humble opinion – is a bit risky, given the level of attention that needs to be given to network security to make the http challenge work.
Our Recommendation: Use the DNS Challenge
I would recommend you use the dns challenge, and we’ll show you how. Let’s step through the details of how this works. We use AWS Route53 as our DNS provider. It’s cheap, performant, and has excellent APIs. And no, you will not have to write any API calls. The certbot agent has support for all leading DNS providers: Cloudflare, Google, ovh, DigitalOcean, Linode, DNsimple, DNS Made Easy, Gehirn, LuaDNS, NS1, RFC 2136, Sakura Cloud, and many more. I am confident that you will have support for your DNS provider in that list.
For the rest of this walkthrough, I will use Claris FileMaker Server on Ubuntu.
TL; DR – at the end of this walkthrough, you’ll find a link to a GitHub repo that has all the scripts and configurations for you to run.
Certbot
Let’s Encrypt uses the Automated Certificate Management Environment protocol, or ACME for short. That is how you’ll interact with LE. The easiest way to work with these protocols is through an agent. Certbot is the agent that Let’s Encrypt itself recommends.
The Claris scripts use the Certbot agent, but Claris FileMaker Server does not install that agent. You have to install it manuall. If you prefer another ACME client, there are plenty to choose from. However, you will have to adjust the scripts accordingly.
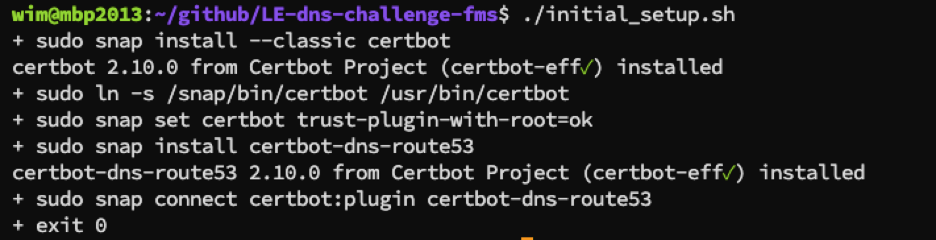
Installing Certbot is as simple as these two commands:
sudo snap install --classic certbot
sudo ln -s /snap/bin/certbot /usr/bin/certbot
Adding support for the Route53 DNS provider only takes three more commands to install the Route53 dns plugin and make it available to Certbot.
sudo snap set certbot trust-plugin-with-root=ok
sudo snap install certbot-dns-route53
sudo snap connect certbot:plugin certbot-dns-route53
The GitHub repo has an installer script that helps with this: initial_setup.sh
AWS Policy
Certbot will make API calls to Route53, so it must have permission to do so. The most crucial part here is to grant the absolute minimal set of permissions, only just enough to create the required TXT dns record. You do not want to expose more than that.
In addition, Certbot will need to be able to read dns records, but that is not highly sensitive. Dns records are, by nature, public.
The proper AWS Identity and Access (IAM) policy will look like this:
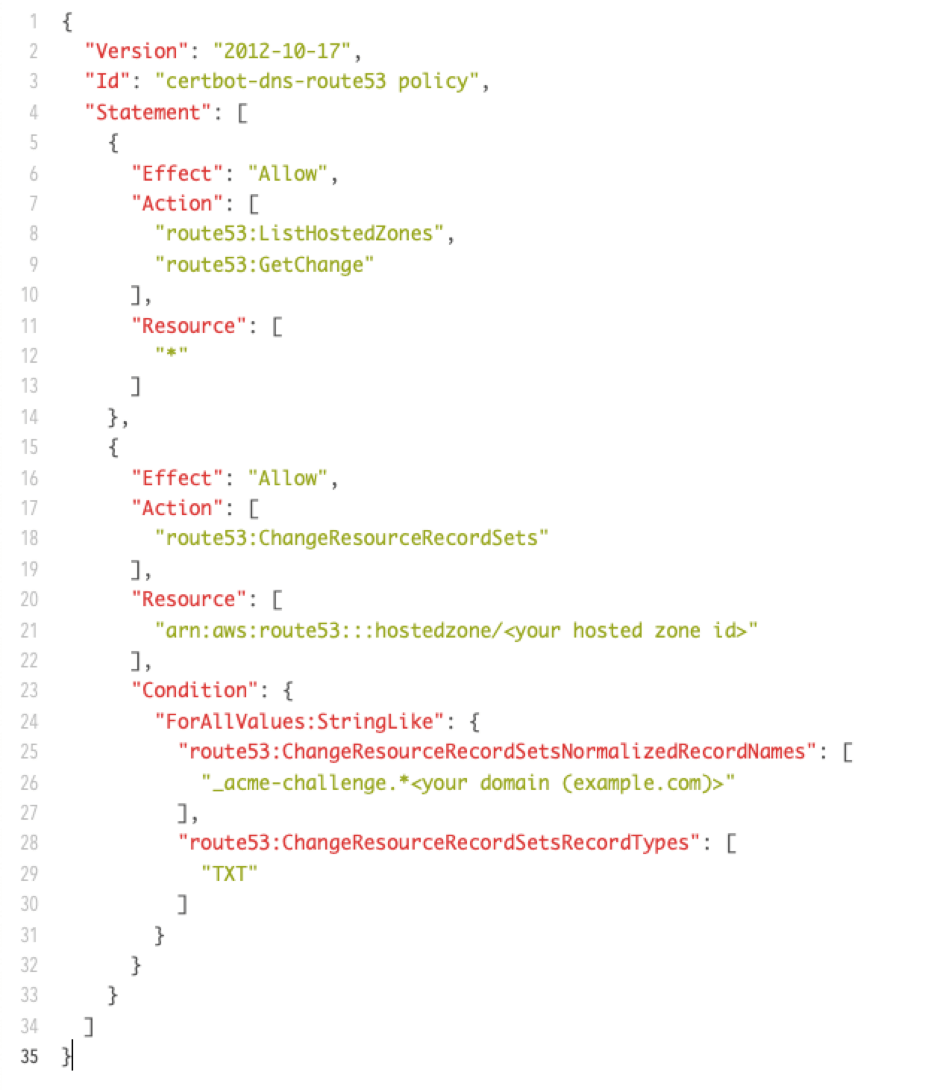
There are two blocks of permissions in this policy. Lines 5 through 14 allow reading the hosted zones in our DNS and get a list of changes. The second block, on lines 16 through 33, locks down the ability to create/change the dns records to only the very specific type of dns record that Let’s Encrypt expects — a dns TXT record named _acme-challenge.server.domain.com.
These permissions do not allow anything else. If the credentials used later were to be compromised, they could not be used to try and impersonate us. The policy does not allow for the creation or editing of the server.domain.com dns record itself.
You can then assign this policy to an AWS user so that you can generate an access key and secret.

If you have a DNS provider that does not offer this level of fine-grained controls, then I would highly recommend switching providers. If that is not possible, then you can find a workaround here, directly from eff.org, the entity behind Let’s Encrypt.
Credentials
At the end of the process, the SSL certificate must be imported into FileMaker Server through the fmsadmin command line. The scripts need those credentials too.
The Claris scripts offer two options to authenticate. You can store the credentials in the operating system user’s environment so that the scripts can run fully automated and hands-off. Or, you can run them interactively and will be prompted to provide the credentials. Our modified scripts do the same when you set it to prompt.
For the automated initial request and scheduled renewal, though, we chose to store the credentials and settings in a config file with three sections:
Setting the FileMaker Server options:
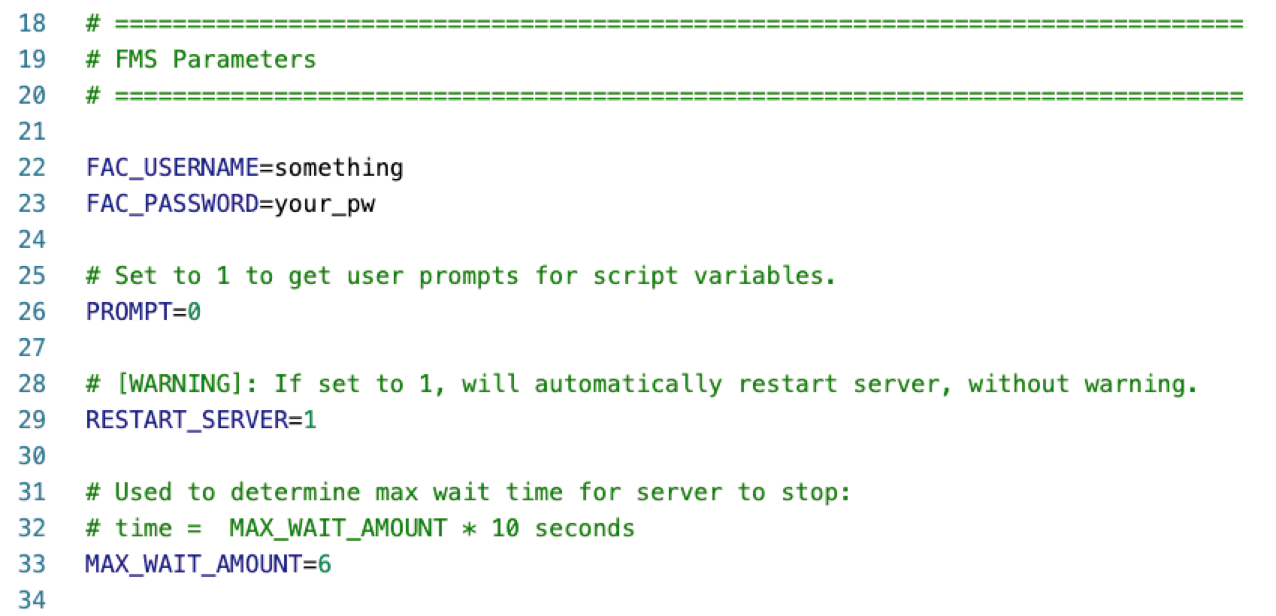
The AWS options:
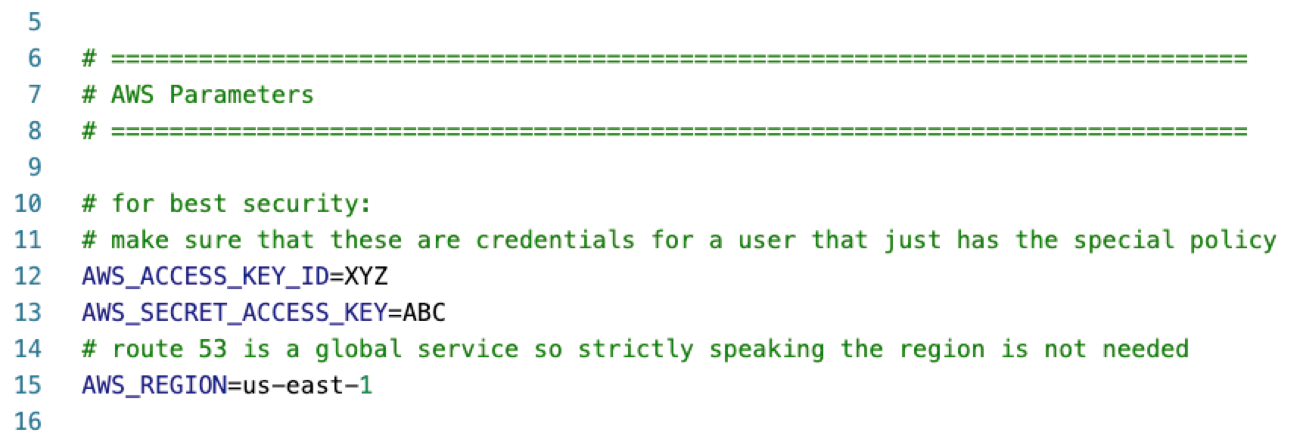
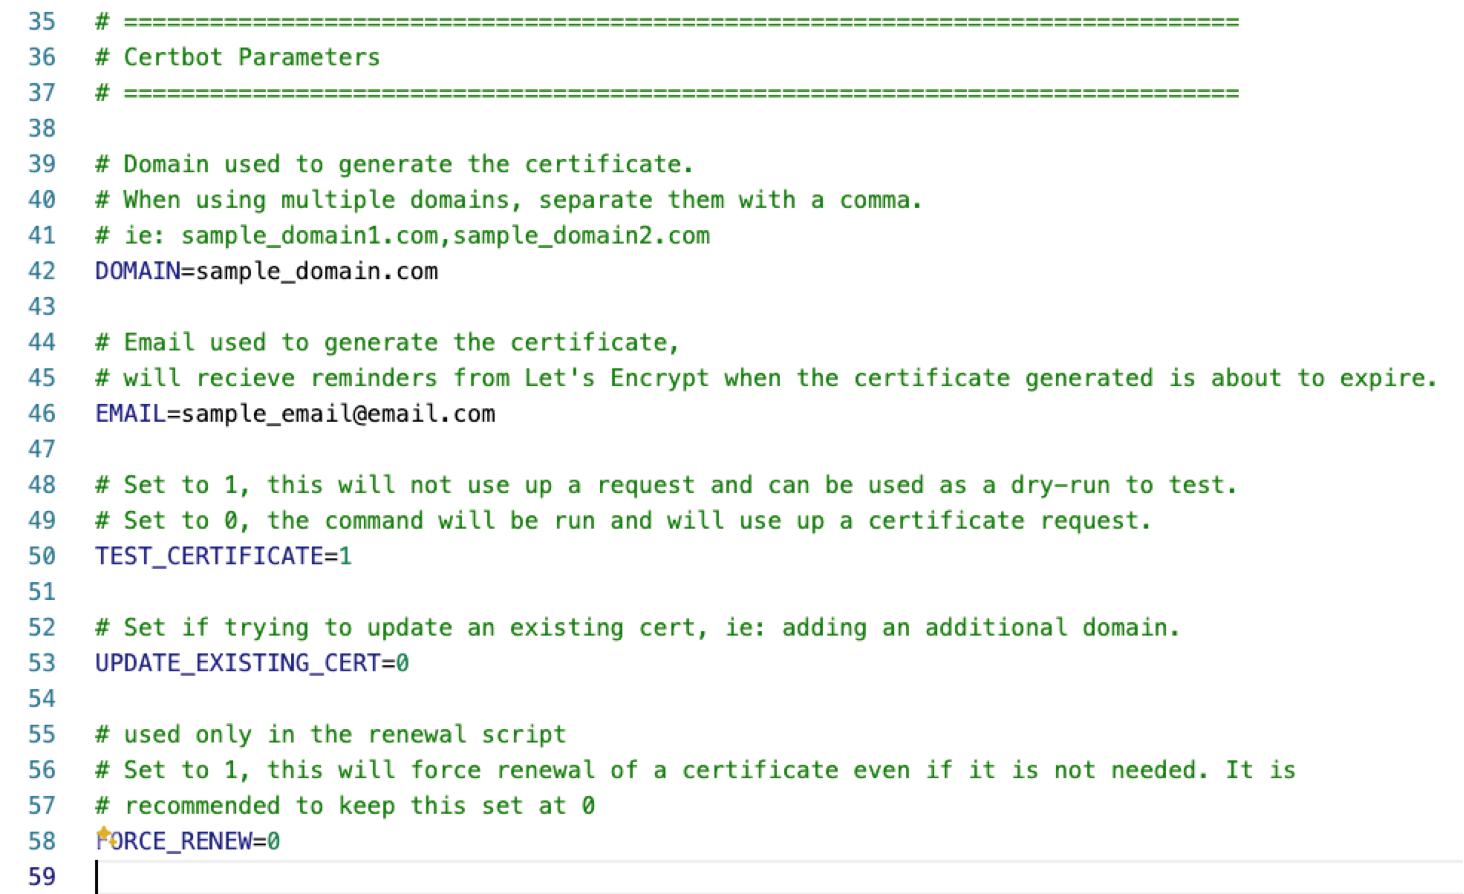
And the specifics around the certificate:
Note that the exact names of these environment variables are important. There are other ways to store these AWS credentials if you prefer not to have them in this config file.
In general, if your FileMaker Server is running on an AWS EC2 instance, you can replace this config file with the proper secure API calls to the AWS Secrets Manager and Parameter Store. That’s a topic for another blog post.
Script to Make the Request for an SSL Certificate
With everything configured properly, requesting an SSL certificate is as simple as running this command from the folder where you have the script:
./fms-request-cert-dns-route53.shYou do not need to run this script as sudo. The script will use sudo in all the right places. You will be prompted for your password when it comes to this.
You’ll want to test things out first. Note that Let’s Encrypt has some rate limits in its production environment. If you are just trying things out, beware that there is a limit of five failed validations per account per hostname per hour. The LE sandbox environment has no such limits, so use that for testing until you have everything set correctly.
In our config file, it is the setting on line 50:

When you run the script in testing mode, you will see an output like this:

When your testing is successful, you can change the configuration out of testing mode and execute the same script again to get the actual SSL certificate.
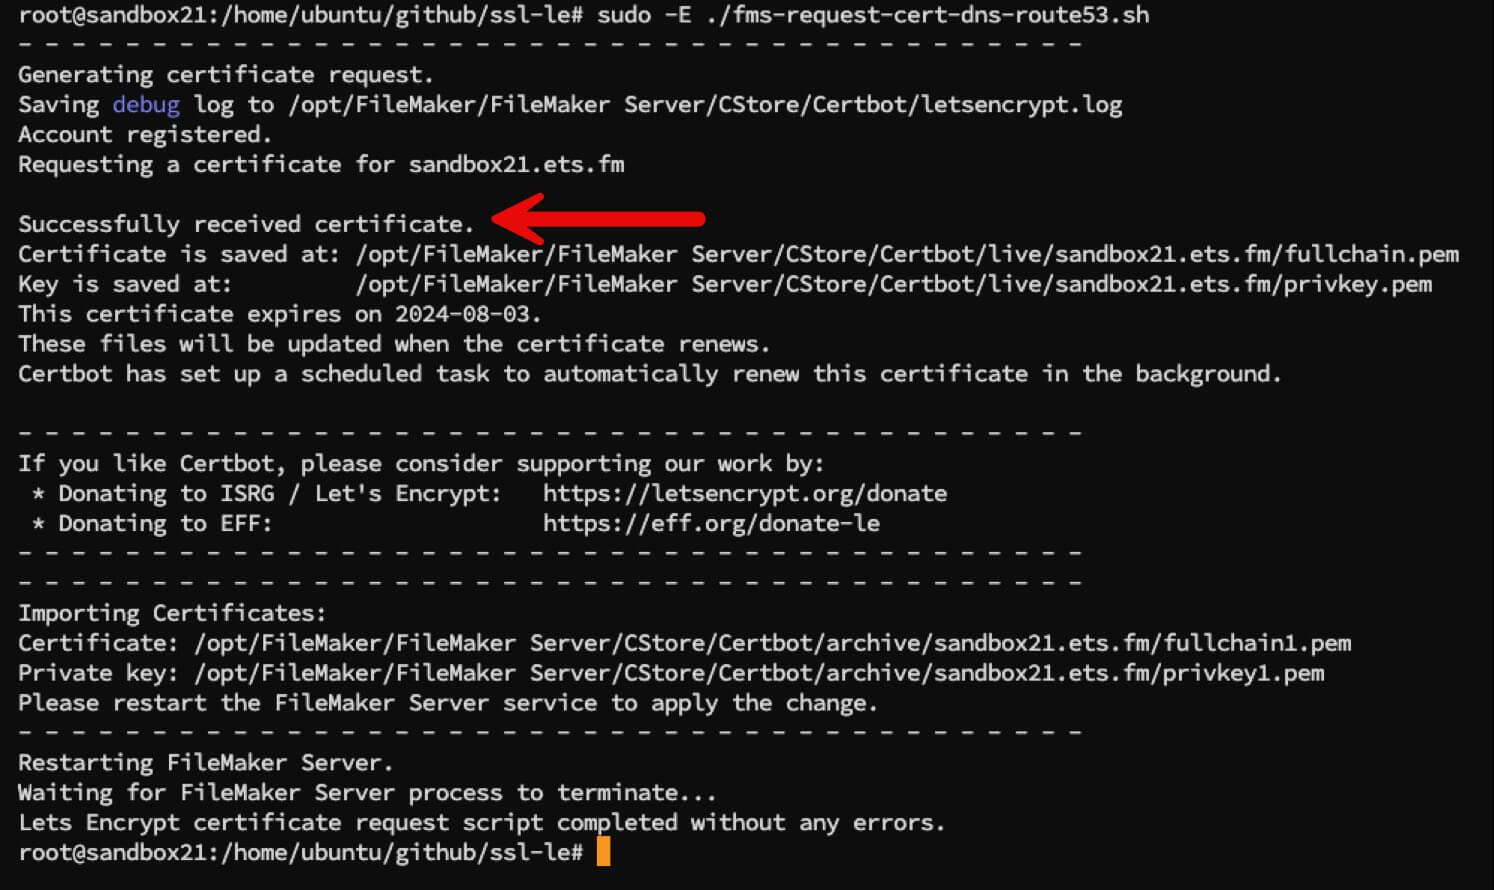
The process takes a bit of time since the DNS needs to propagate. Count on 1-2 minutes for everything to complete.
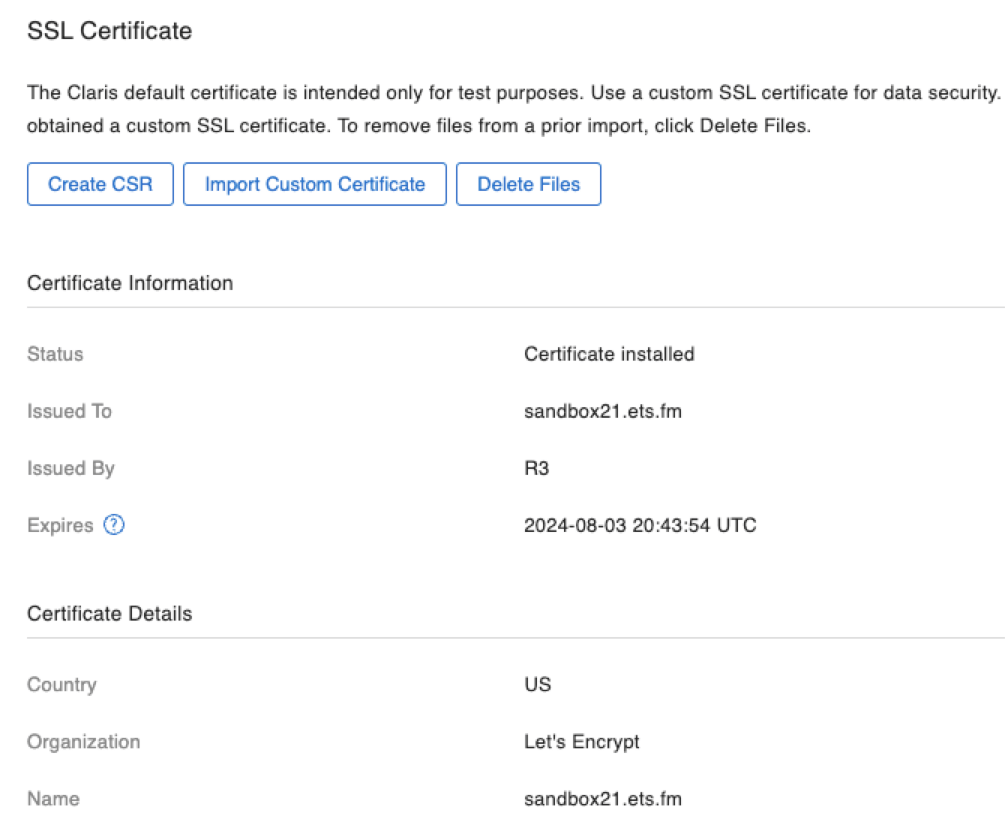
Depending on your configuration settings, FileMaker Server will restart automatically to enable the SSL certificate. Or, you will have to restart it manually. At the end of it all, you will see the Let’s Encrypt certificate listed in your Admin Console:
These certificates expire every 90 days, so you will have to schedule (or manually run) the renewal script before that. The email address you specified in the settings will receive a notification when the certificate can be renewed. This is typically 30 days before it expires.
Script to Renew the Certificate
To set up the automated renewal for your Let’s Encrypt SSL certificate, first copy the config file, the renew script, and import script to the FileMaker Server scripts folder and make sure that the ownership and execute rights are set correctly:

Creating a System Script
Next, create a System Script schedule on your FileMaker Server, select the renew script. Then set the schedule to run once a day. While this may seem overkill, it is the recommended frequency to make sure that your SSL cert will renew on the first possible opportunity while giving it plenty of runway to do so. Don’t try to time it just right and have it attempt just once before the expiry date.

In the screenshot above, the renewal script is executed by the default fmserver account that runs all of FileMaker Server. You can specify another account here if you want to; just make sure to follow the instructions in the Notes section of this help article that explains how to adjust the sudoers file.
Making sure fmserver Can Use Sudo
If you do want to stick to the default account, and because the renewal processes require root privileges for most of the Certbot activity and to import the certificate into FileMaker Server, you will need to add a line to the sudoers file to make sure that fmserver can use sudo without being prompted for the fmserver password.
To do this, launch the sudoers editor with:
sudo visudoand then towards the end of the file, before the @includedir line, add this one line:
fmserver ALL=(ALL:ALL) NOPASSWD: ALL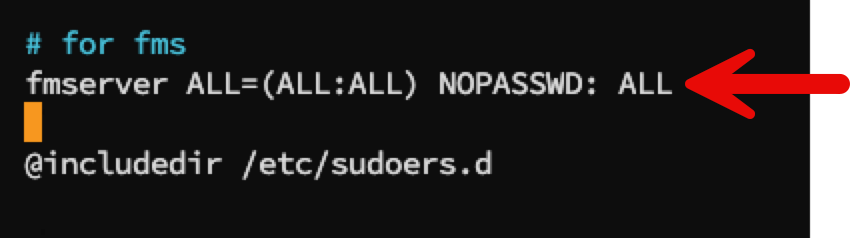
Under the hood, in the renewal script, Certbot will check if a new SSL cert is needed. If so, Certbot will take care of the issuing process and download the SSL certs. Only then will it run the import script that uses the fmsadmin command line to import the new certs into FileMaker Server.
But all of my FileMaker Servers are on-premise?
Good news: none of this requires your FileMaker Server to be in the cloud. The only “cloud” activity that is required in this process is for Let’s Encrypt to be able to check your DNS server. This is even if you don’t use that public DNS server for name resolution for your servers inside your network.
Here’s an example of a machine inside my network that is not reachable through the Internet. I use pi-hole as my internal DNS server. It has an A record that points to the LAN IP address of my server:
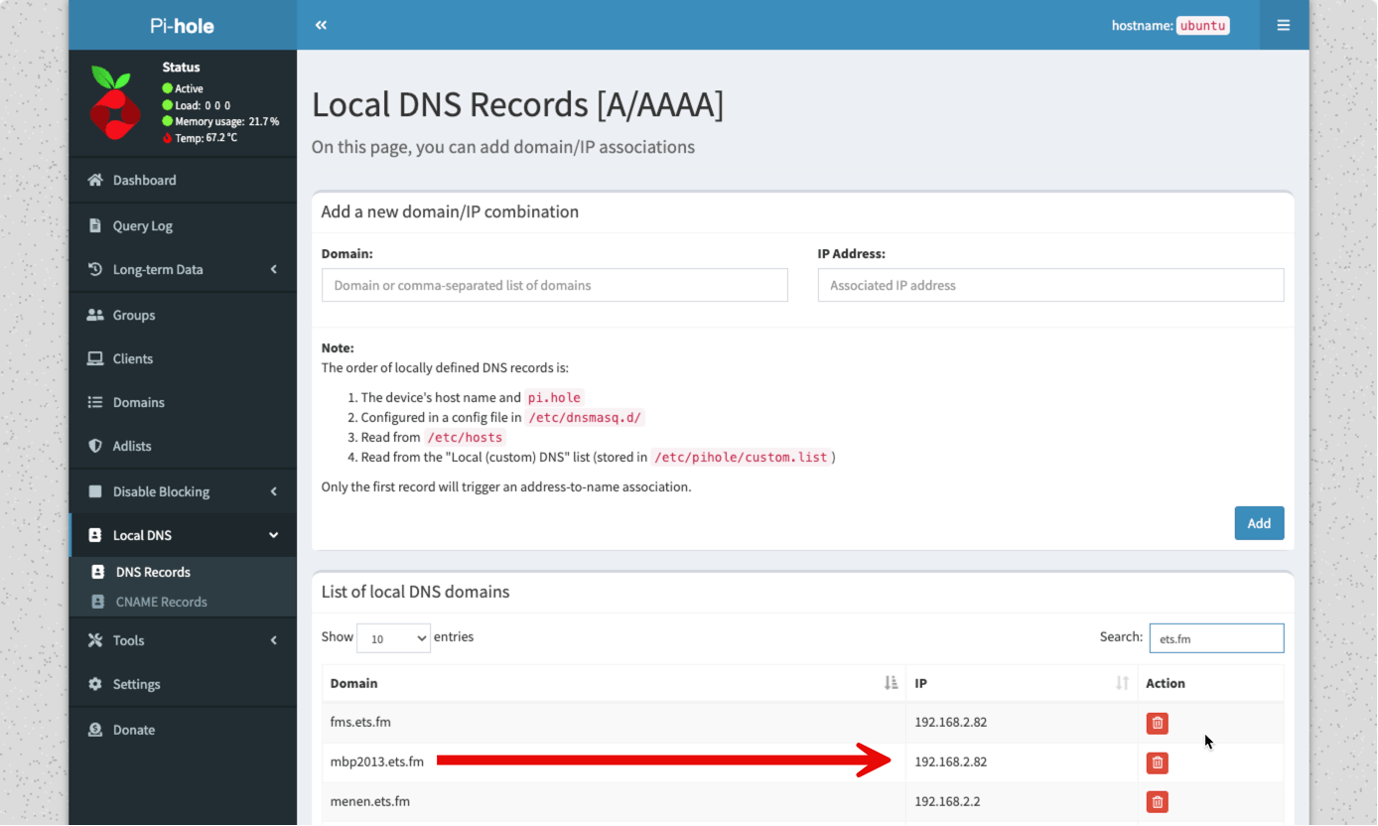
There is no A record in external Route53 DNS for this server because there doesn’t need to be one. There is no outside access to my FileMaker Server.
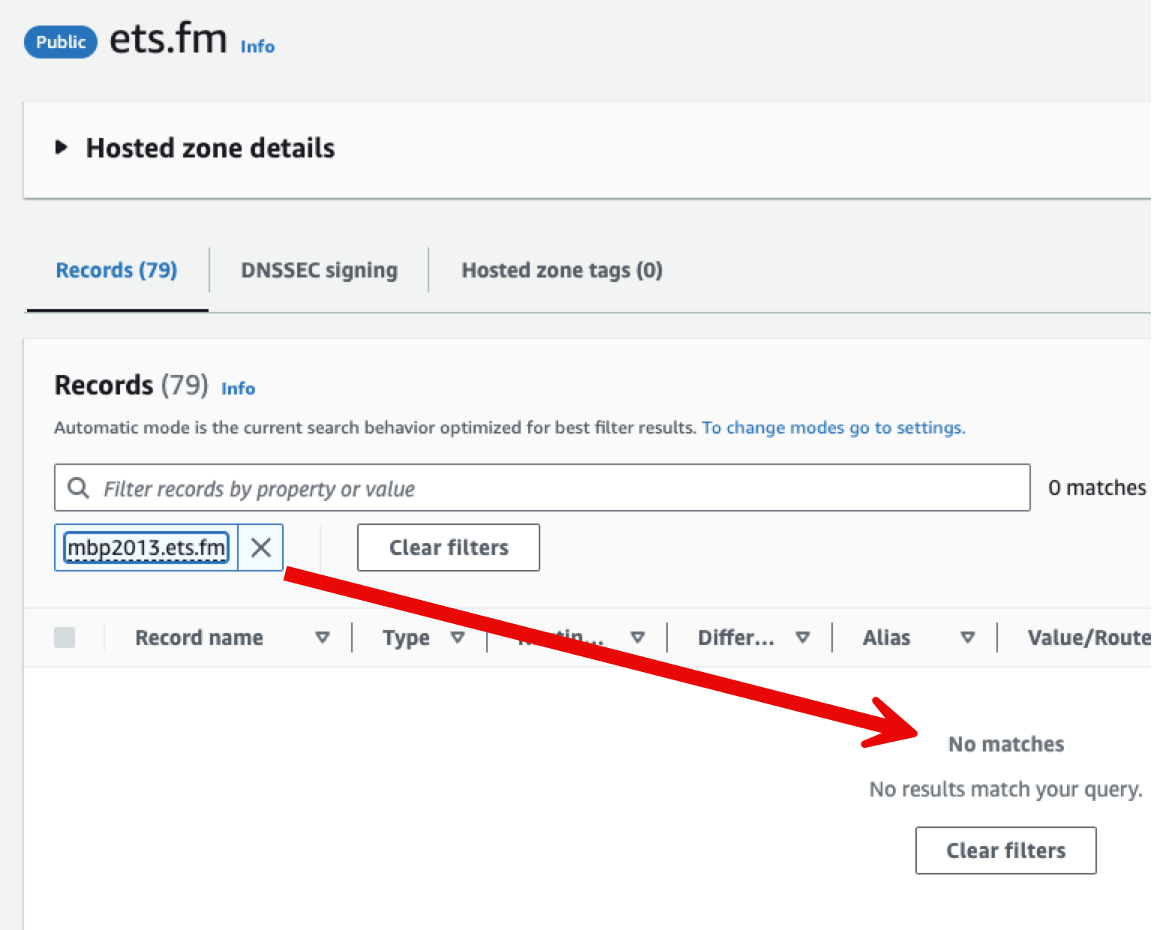
But because I control the ets.fm domain and it has an external DNS server, Certbot can create the TXT record for Let’s Encrypt to verify that I am legit. The TXT record does not point to my server so I’m not exposing anything.
Where do I get it?
All of the scripts are available on GitHub.
Moving forward with New FileMaker 2024 Functionality
Our team of FileMaker consultants regularly leverage insights, best practices, and tools like these to help our clients scale and grow their businesses with FileMaker as a core application. We also have an entire practice dedicated to cloud services and solutions built with AWS. To talk with one of our Claris platform experts, contact our team today.
What is the url of github repository ?
Here it is: https://github.com/wimdecorte/LE-dns-challenge-fms
Great article Wim, and a reason for me to switch to Route 53. I have been using GoDaddy for years now, but they don’t support an API for small companies like mine. I support this project completely, and have already posted feedback on your github pages.
Thanks for those contributions on GitHub!
Wim pointed out to me recently that it appears GoDaddy has changed their policies, and their API is now available to users with just 1 domain.
Hi, but I have an error to install certbot
root@Filamaker:~# snap install –classic certbot
error: system does not fully support snapd: cannot mount squashfs image using “squashfs”: mount:
/tmp/syscheck-mountpoint-1928960270: mount failed: Operation not permitted.
root@Filamaker:~# snap version
snap 2.63+22.04ubuntu0.1
snapd 2.63+22.04ubuntu0.1
series 16
ubuntu 22.04
kernel 6.8.12-2-pve
root@Filamaker:~#
That means that your ubuntu is not a standard ubuntu with snap fully functioning. You can try and re-install snap. Or follow the alternative install instructions here: https://eff-certbot.readthedocs.io/en/latest/install.html
Great article Wim, thank you.
Small note: you have “sudo visidp” to launch sudoers editor. I think it should be “sudo visudo”. At least this is what works on my Mac and Linux servers .