One of Filemaker 18’s most exciting new features is the addition of new data file manipulation scripts steps. Let’s explore each one and see how to use them!
To test out each script step as you go through this blog post, please download our companion sample file.
Create Data File
FileMaker’s help documentation describes this script step as follows:
“Creates an empty, closed data file, to then open with the Open Data File script step and add data to using the Write to Data File script step.”
This means that this script step works hand-in-hand with several other script steps that I’ll explore further along in this post.
When setting up options for this step, you must specify the file path with the specific file dialog. If you leave the file path blank, it will return error code 100: file is missing. There is another option of “create folders,” which defaults to off. If your file path is missing folders, and you set “create folders” to on, the script step will create the missing folders. If you leave “create folders” to off while missing folders, you will receive an error code of 100: file is missing. If the file already exists, FileMaker will overwrite the original.
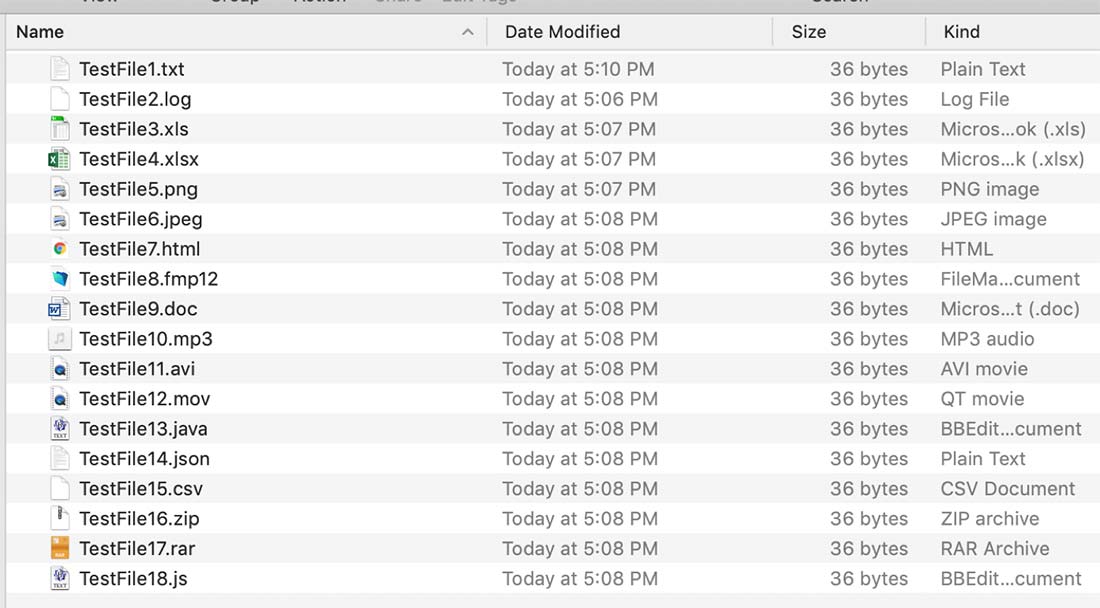
What type of files can you create? The help doesn’t specify, so I tested the following:
.txt
.log
.xls
.xlsx
.png
.jpg
.html
.fmp12
.doc
.mp3
.avi
mov
.java
.json
.csv
.zip
.rar
.js
I was pleasantly surprised to find that they all were created successfully.

Open Data File
Before you can start writing to a file you’ve created (or one that already exists), you must first open the file with the script step “Open Data File.” The file will be considered opened until you close it with the “Close Data File” script step (or quit FMP or close down your computer). If you do not enter a path or you enter an invalid path, you will receive an error code of 100: file is missing.
This script step also asks for a target. The target is where you would like to store the File ID of the data file. You will need this value to use some of the other script steps, so don’t forget to set it to something you can reference later (field or variable).
You can also use a new function, Get(OpenDataFileInfo) to find the File IDs if you did not store them in a field or variable. If you try to open a file that’s already been opened, you’ll get an error code of 300: File is in use. There’s a limit of 25 data files that can be opened at the same time, and if you attempt to open more than that, you’ll get an error code of 2: Memory error.
Write to Data File
Now that you know how to create and open a data file let’s explore writing to one. This script step has four parameters. The data source, which is the data you’d like to write to the data file, can be a field or a variable. In addition, you’ll have to select the character encoding type: UTF-16 or UTF-8.
Which one should you select? According to Wikipedia, “UTF-16 is used internally by systems such as Windows and Java and by JavaScript, and often for plain text and word-processing data files on Windows. It is rarely used for files on Unix/Linux or macOS. It never gained popularity on the web, where UTF-8 is dominant (and considered “the mandatory encoding for all [text]” by WHATWG). UTF-16 is used by under 0.01% of web pages themselves. WHATWG recommends that for security reasons, browser apps should not use UTF-16.”
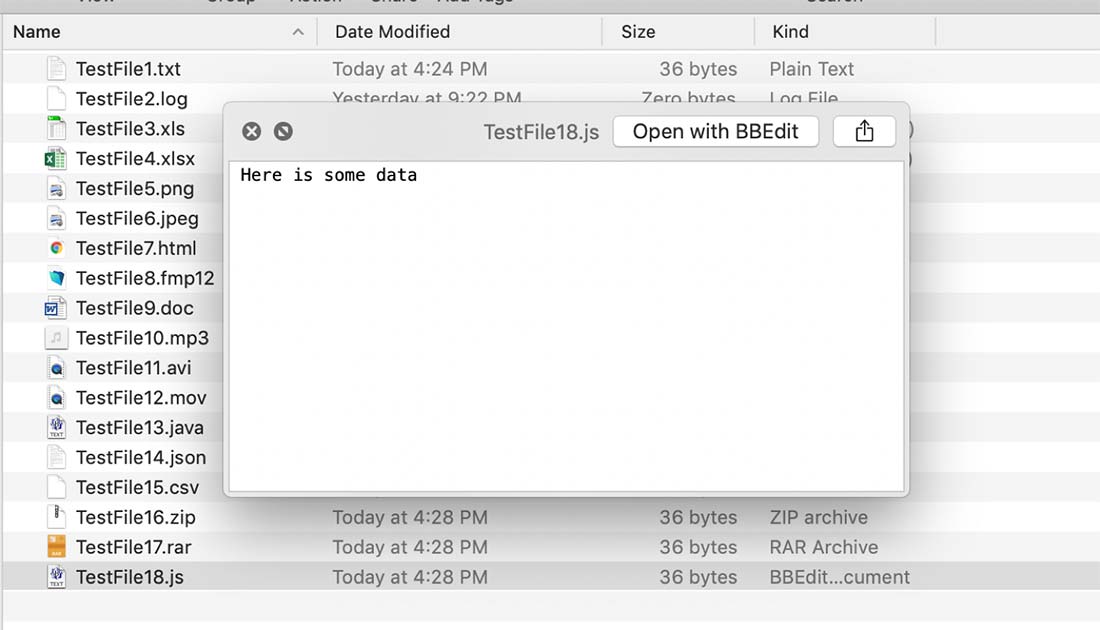
This definition gives some hints on the types of files you can write to using this script step, but I tested them all to make sure they all work. I set the data source to the text “Here is some data” and set the encoding to UTF-16, then tried writing that data source to all of the files. Happily, none of the file types gave me an error; all of them worked fine, and I could see that the file size increased after I wrote to each file.
As expected, the only file types that I could actually open and view the data I added was .txt, .html, .java, .json, .csv, and .js. Therefore, you cannot write to binary files in any meaningful way. I do not recommend using these script steps to create, read, or write to anything other than text-based files, such as .txt, .html., .java, .json, .cvs, .js, and .log.
I ran the same test with UTF-8 instead of UTF-16 and got the same error-free results; the only difference I noticed is that the file sizes were smaller.

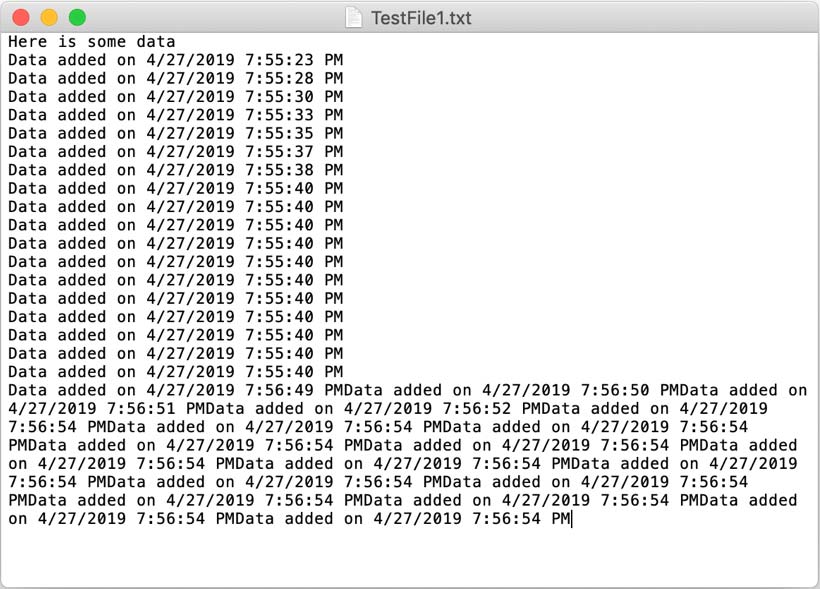
The largest amount of data you can write to a file in a single script step is 64 MB. You can, however, add 64 MB of data multiple times in a row to the same file, appending the data each time.
The last option in this script step is “Append to line feed.” It’s a checkbox which is selected by default. All this does is add a return character before adding the data to the file. You’ll see here the difference from adding data multiple times in a row with the append line feed on versus off.
Read from Data File
The “Read from Data File” script step requires a Target, which is the field or variable that will store the information read from the data file. You must choose if you’d like the data to be read as bytes or UTF-8 or UTF-16; bytes is the default.
This script step also asks File ID. If you’d like to limit the data inserted into your field or variable, you can set a numerical value in the Amount parameter. If you selected “Read As” as Bytes or UTF-8, then the Amount value’s unit of measure is bytes. If you selected UTF-16, then the Amount value’s is interpreted as the number of Unicode code units to read. When playing with this, I recommend using UTF-16, I found it easier to work with. Leave the amount value blank to read the entire file.
One thing I learned from my testing – if you do enter the amount value to something other than empty, there’s a good chance you’ll need to set the position first (see below about setting positions). When you leave the amount as empty, you’re reading the entire file, so the current position of that file doesn’t matter. This will make more sense after reading about the position script steps.
The read from data file script step cannot read more than 64 MB at a time, so if you need to read more than that, you’ll need to break it up into multiple calls. You can see an example of this in the Help (Example 3).
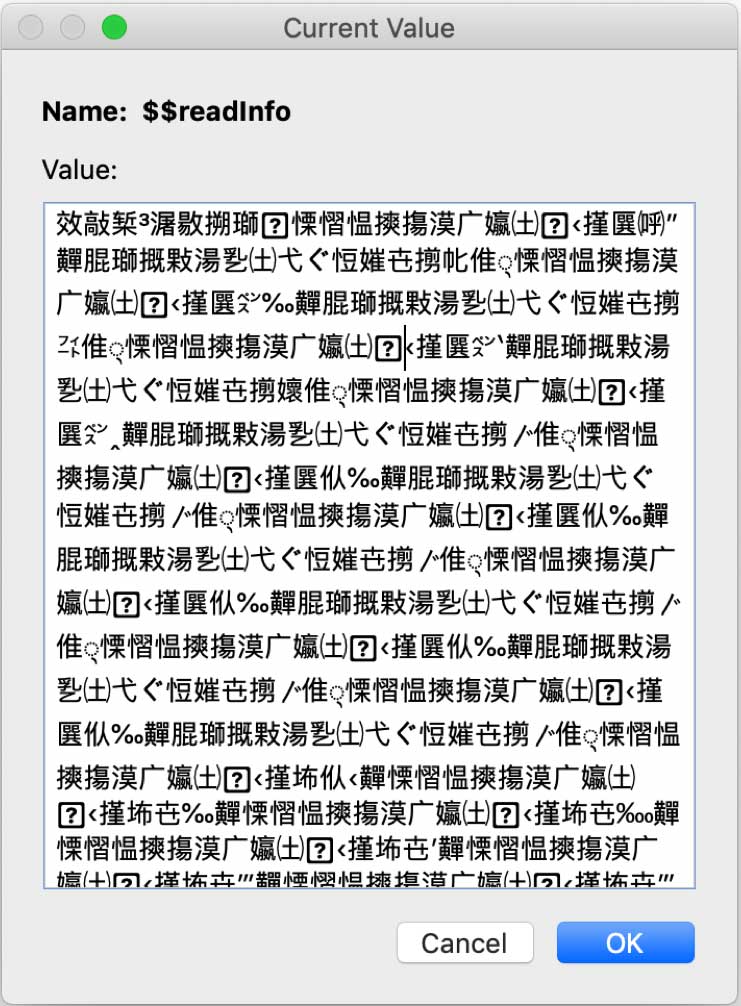
If the file you are reading is UTF-8 encoded, you should set the “read as” to UTF-8 encoding as well. The same goes for UTF-16 encoding – choose “read as” of UTF-16. When I tried reading a UTF-8 file as UTF-16 encoded, I received back a lot of nonsense (to me!) characters.
| Created In | Read In | Result |
|---|---|---|
| UTF-8 | UTF-8 | As Expected |
| UTF-8 | UTF-16 | Nonsense (see below for example screenshot) |
| UTF-8 | Bytes | FileName only |
| UTF-16 | UTF-16 | As Expected |
| UTF-16 | UTF-16 | As Expected |
| UTF-16 | Bytes | FileName only |
Below is a summary of what happens when you mix and match encoding methods when reading and writing to data files.
If the file you are reading is binary (anything that’s not a text-based file), then you should set the “read as” as bytes. In most cases, using the Read From Data File script steps for binary files is very similar to Insert File script step, because you’ll be saving the binary data into a container field. One key difference, however, is that Read From Data File is compatible on the server – but only in server compatible locations, which are the documents folder and the temporary folder.
Close Data File
The Close Data File script step is pretty straightforward. It only takes one parameter: the File ID. Closing a file makes it unavailable for reading and writing to the open data file and allows you to complete script steps that require a closed data file, like delete the file.
If you’d like to close all open files in one script step, simply assign the parameter to an asterisk with double quotation marks surrounding it (“*”). In addition, quitting FMP will also close all opened data files. If you attempt to close a file that’s not open, you will receive the error code: 100 File is Missing.
At this point, you might think I’ve covered all the basics, but there’s still more! Let’s take a look at what else we can do besides open, read, write, and close data files.
Get Data File Position
This script step will not return the “physical” position of the data file on your monitor, which is what I initially expected. Instead, it returns the read-write position inside of the data file – which is the number of bytes from the start of the file text where the file reading or writing data will start. When a file is first created, the read-write position defaults to 0. At the end of the data file, the position is the same as the size of the file.
This script step takes in 2 parameters, File ID and Target; the target is where you would like to store the results of the read-write position.
Set Data File Position
This script step takes two parameters, the file ID and the new position to which you’d like to set the file. The new position is the number of bytes from the beginning of the file. When you read or write to a file, it will start at this position. If there is data after this position when writing to a file, it will get overwritten. For example, if my file says “123456789,” and I reset the data position to 0 and then write to the file “hello,” the data file will now say “hello56789.”
Get File Size
This script step will tell you the size of any file in bytes. It takes two parameters: the path to the file and the field or variable to which you’d like to store the file size. You can use this script step in conjunction with the Set position script steps above if you’d like to set the position to the end of the file.
Delete File
This script step just takes one parameter: the path to the file. And the file must be closed to be deleted. If you attempt to delete an open file, you will receive an error 300: File is locked or in use. Note that this script step and the one before it both reference “File” instead of “Data File.” That’s because you can use them to the size and delete any type of file, not necessarily just a data file.
Get File Exists
This script asks for the path to the file whose existence you’d like to check, and also for field or variable that stores the result ( 1 = true, the file exists, and 0 = false, the file does not exist). I recommend including this step before using any other of the file script steps that require a path, such as Delete File, Get File Size, Create Data File, Open Data File, and Rename File.
Rename File
This file is asking for the path to the existing file and the new name for the file in the path provided.
Try It Out Yourself
I have created a demo file where you can play with all of these new script steps and get a better understanding of how they work together. This file keeps track of all the files you create, open, close, and delete in the Data Files portal.
You’ll also notice a switch for turning the Error Logging on and off. This is another new script step that will automatically log any script errors into a file and save it in the “ScriptErrors.log” file, which is created in your documents folder when you log your first error. You can even add your own expression fo evaluation whenever a script errorr ace is logged.
Another object you’ll notice is a button for refreshing the portal. This button uses the new FileMaker Pro 18 function Get ( OpenDataFileInfo). The script attached to this button takes all the open data files and adds them to the list if they aren’t already there.
Questions?
At this point, you may be thinking “Hmm… I still have some questions…” Well, I did too! Here are some of my questions along with the answers I came up with. If you have any other questions, please add them to the comments below.
Question 1
If you never modify the data file position, it should always read at 0 and write at the end of the file, right?
Answer
From my testing, that checks out. It always reads starting at 0 and writes to the end of the file, unless I change the position.
Question 2
If you write to a file, and then partially read the data file, and then write to it again, will it write to the end of the file or where you left off?
Answer
It will write to where you left off when reading, Also, it will override the characters that follow your last read position.
Question 3
Where do these functions work? FileMaker Go? FileMaker Server? FileMaker WebDirect?
Answer
For all of these new script steps, the answer is the same: no to FileMaker WebDirect and Runtime, but yes to everything else! It’s important to note that FileMaker Server still has a limitation on the locations it has access to (temp folder and documents folder) and that still applies to the data file script steps.
Question 4
Will opening a file from one FileMaker Pro file make it accessible to all open FileMaker Pro files?
Answer
Yes! And if you close the FileMaker file that originally opened the data file, that data file would still be considered opened until you quit FileMaker Pro.
Question 5
Is turning error logging on file specific? Or will it capture errors from other open files?
Answer
Enabling error logging is file specific, so turning it on for one file will not record errors in any other open file. However, all file errors will write to the same log file.
And probably the biggest question of all…
Question 6
In what ways can I use these data file manipulation script steps?
Answer
Here are some possibilities… Please let me know what else you come up with by posting in the comments below!
- Custom Logging/ Capturing user-specific environmental information
- Creating HTML/JSON/XML files in FMP and exporting them for external (or internal) use
- Inserting custom headers into an exported file
- Exporting field contents (for text files only)
- Using it in context with the Set Error Logging step
- Recreating the Insert File feature on the server-side, by using the script step Read From Data File and saving it to a container
- Saving “hardcoded” data outside of FMP – for example an API key, your SMTP settings, or a plugin license. Perhaps you’re currently saving that data in a custom function. Now you can keep it in a text file on the server and have the client files read that data using Perform Script On Server and Read From Data File. (You’ll need to place the file on the FMS’s documents folder.) The file even could be encrypted if needed.
I quickly found that you can use create file as a tool to create folders without a plug-in
Just create a temp.txt file in the path you want a folder created.
Check ON on create folders
create the file then delete the file, leaves the empty folder in place.
#
Set Variable [ $FileName ; Value: “temp.txt” ]
Set Variable [ $FileExists ; Value: 0 ]
Set Variable [ $Path ; Value: “testFolder/” ]
Set Variable [ $FilePath ; Value: $path & $FileName ]
# Create the folder with a temp file :temp.txt
Get File Exists [ “$FilePath” ; Target: $FileExists ]
If [ not $FileExists ]
Create Data File [ “$FilePath” ; Create folders: On ]
# Now delete the temp.txt file, leaving the newly created folder
Delete File [ Target file: “$FilePath” ]
End If
Great idea! I love it. There are several existing script steps that allows folder creations, but I think this one is the easiest to use for just that purpose. Thanks for sharing!
We’ve been using the Scribe plugin from 360Works to export Word templates from container fields and substitute merge tags with data from fields in the database. Haven’t had (made) time to test whether or not these new features can replace the plugin…yet. I’m envisioning the following:
1. Export (container) field contents
2. Read data file
3. Use Substitute function to replace merge tags with data
4. Write to data file
5. End
One of the key elements will be retaining the colored text in the Word docs. Currently, all merge tags are red in color to make them easier for users to verify that the correct data made it into the proper locations and to highlight areas that they need to double-check. I haven’t yet checked, but do you know already whether my envisioned process has a chance of working?
Interesting! I do not know, and I have not tried. We had talked internally at a meeting about the possibility of doing what you described with excel files, in order to replace the header labels that are the field names when FileMaker creates an export, with more user friendly headers. However I have not tested it out either. I think the possible hold up would be the read data file script step. On this community post, Steve Romig from FIleMaker did advise to be very careful when doing this because it can cause file corruption: https://community.filemaker.com/en/s/question/0D70H0000055Bfu/goodmorningdoes-anyone-know-what-file-types-are-supported-for-the-write-to-data-file-function-is-it-just-txt-or-are-there-more-filetypes-supported?s1oid=00Di0000000eyqY&s1nid=0DB0H000000fxYs&emkind=chatterCommentNotification&s1uid=0050H00000Bq7sV&emtm=1559569831056&fromEmail=1&s1ext=0
Thank’s for your post because show clear in little things as UTF encoding for example.
I’ve trying at this moment a different use for this…
I want to create a text file and write on it a python script (python script from a variable). This file is created in “/usr/local/bin/scriptname.py” path because I want use it like another standard CLI command (this script protect with password any PDF file)
Works so well but it’s necessary (I think but it’s not clear) save with UTF8 option because if you open the file after save with UTF16 with BBedit you can see a lot of weird characters. With UTF8 file is perfect.
After file/script creation you must change his permissions with “Execute Applescript” and “do shell script chmod +x …” script step and that’s all.
It’s perfect… in any worker machine (with Mac OS) you can check if script is installed, create if not and use for protect any pdf from any container field of your solution (of course, it’s only for pdf’s from container fields)
In the past I’ve used a table to store text files into container fields of my bash scripts but It’s better if you can store the text of the script and generate if it’s necessary. You can modify this scripts in a more easy way as obvious.
Hi Angel, you make some great points. Some applications need specifically UTF8 or UTF16, so it’s good to find out, test, and if it fails try the other format. The permissions update to the file is also a great point, I didn’t think about that one. Thanks for sharing your experiences, I hope it helps other readers.
I wanted to open a txt file that already existed. I did open data file, read from data file, close data file. Repeating the process causes the file ID to increment each time. nothing populates in the portal. The “*” closes all files but does not reset the file id to one?
Hi Charles,
Closing the data files does not reset the file ID to one. The only way to reset it back to 1 again is to close the FileMaker file.
I notice that on a Windows machine, I can’t select UTF-8. The encoding is fixed to UTF-16. My solution in running in Windows, but I had to use a Mac to change the setting on that function.
Interesting! I use a mac so I haven’t had a chance to play with it on windows. Sorry to hear that it seems limited and difficult to change.
Careful. It was disabled on Windows for a reason. I forget the exact bug but UTF-8 on Windows is not supported.
Good write up which gives information about data file manipulation using FileMaker 18, Makah. The create data file, open data file, write to data file and more features are explained in detail. It is very easy to understand. The question answer write up is useful and helps to clear the doubts
Thank you Saurabh! I appreciate that kind feedback!
Through testing I’ve discovered that Write Data File can, in fact, output binary encoded data to a file, so long as the data source is a container field. This means that while arbitrary manipulation of binary files is still impossible, it’s now possible to simulate an Export Field Contents step on the server side.
I’ve verified this works both for PDFs (which can contain embedded binary blobs) and PNG encoded images.
The step I used was:
Write to Data File [ File ID: $fileID ; Data source: Container::field ; Write as: UTF-16 ]
Interesting! Thanks John!
Hello! I realize this thread is a few years old, but I have run into a roadblock with Read from Data File and haven’t been able to find much on the forums about it. I have a basic csv file and all I want to do is to use Read from Data File to set the content of the csv to a variable in FM so I can parse it and do magical things. But all I get in return is the file name, not the content. What am I missing here? Thx!
Hi LP,
We’d have to see the script to see what can be tweaked. Post on https://community.claris.com and tag me (@wimdecorte) and post a screenshot of the relevant parts of your script.
Best regards,
Wim