Table of Contents: Claris Connect Series
- Claris Connect and Amazon Web Services (AWS) – Getting Started
- Using Claris Connect with AWS Simple Notification Service (SNS)
- How to Implement Custom Responses in a Claris Connect Flow
- Claris Connect and AWS S3
- Trapping and Handling Errors in Claris Connect Flows
- How to Integrate Claris Connect with Amazon SES
- How to Create Custom Connectors in Claris Connect
In the previous post in our series on Claris Connect and Amazon Web Services (AWS), we explained how to send email notifications from a Claris FileMaker solution via AWS Simple Notification Service (SNS) using the Claris Connect connector for SNS.
There, we demoed how to use the Claris Connect “Claris FileMaker Server” app as a trigger for the Claris Connect flow. That app offers one trigger, “Trigger by script,” which is a “fire and forget” type trigger. The moment Connect receives the call from the FileMaker solution, Connect replies with HTTP code 200 (OK) and response body “OK.” This occurs regardless of whether the rest of the Connect flow succeeds or not, or even whether the flow is enabled or not.
This type of behavior is the desired behavior in some cases. But what if we want to know in the calling application – be it FileMaker or another application – whether the Connect flow succeeded or not? And how do we capture, for example, the SNS confirmation message ID for the notification sent? In this post, we will explore how to use a Connect webhook and the HTTP utility to return a custom JSON response once a flow completes.
Create a Webhook
The Connect HTTP utility requires a webhook. A webhook is a URL to which FileMaker – or another client – can send an HTTP call. To create a webhook, select a project in Connect, then press the webhook link on the left pane, as shown in the screenshot. Type a name for your webhook and press the “Create” button. This generates a URL that we’ll call from our FileMaker script.
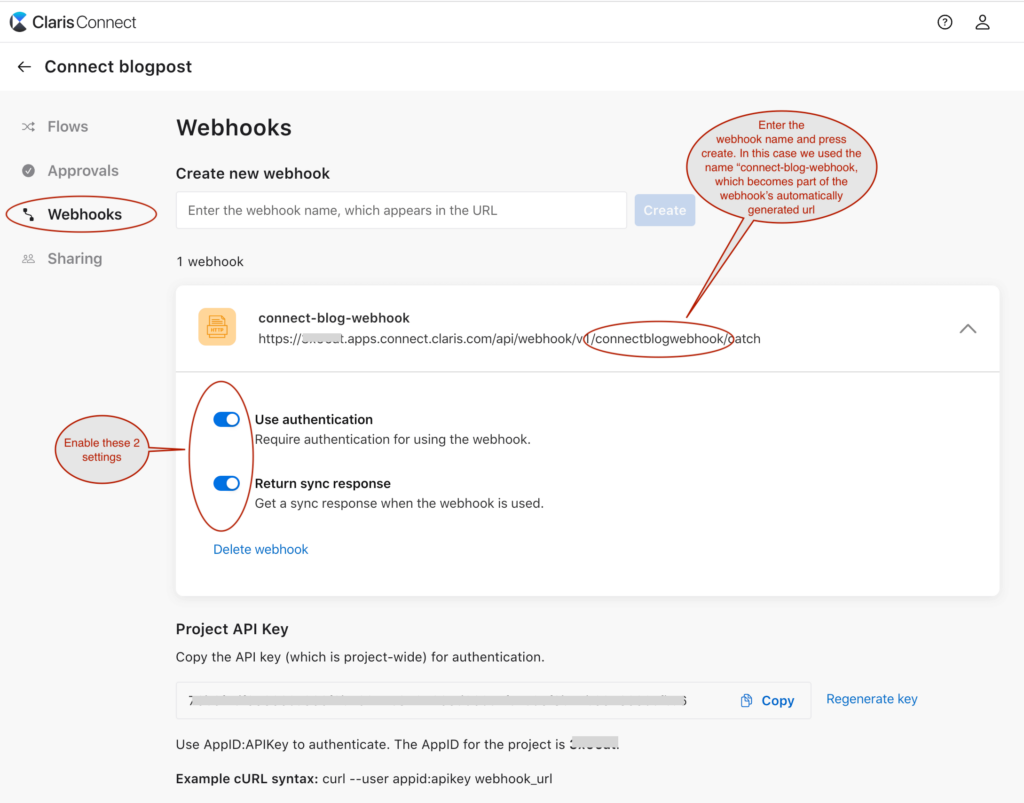
Note that the “Use authentication” and “Return sync response” options are turned off by default. We’ll enable the “Use authentication” option to only allow calls to our webhook that include the API key that Connect automatically generates for us. Otherwise, anyone that guesses or learns the webhook’s URL could send a request to it.
We’ll also enable the “Return sync response” option to return a custom response. If this option is disabled, the flow will behave similarly to the “Trigger by script” trigger. It will return a standard response immediately instead of waiting for the flow to complete.
Take note of the AppID, the API key, and the webhook’s URL. We’ll need all three to call our webhook. Notice also on this page the example given for how to send the AppID and API key separated by a colon when using cURL. We’ll need to use this cURL syntax if we use the Insert from URL script step (instead of the Trigger Claris Connect Flow script step available in FileMaker 2023).
Finally, note that webhooks live at the project level. A given webhook can be used by any other flows that exist within the same project.
Create a Flow Using the HTTP Utility
Inside the same project where you created the webhook, create a flow, then add a trigger. Instead of using the “Trigger by script” trigger that we used in our previous post, we’ll select the HTTP utility. Within it, we’ll choose the only available trigger action, which is “Incoming HTTP Request” (see screenshot).
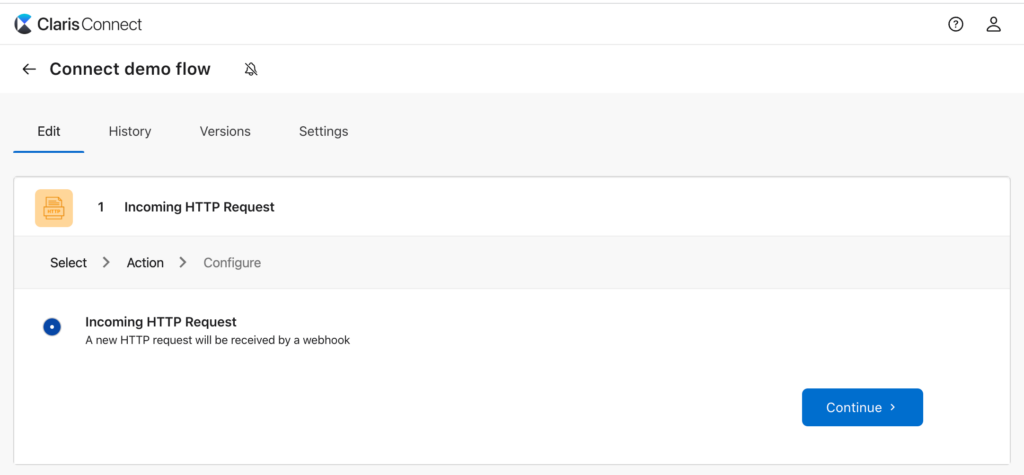
Then, from the provided dropdown, we can select the webhook we created. Upon doing so, we are prompted to send an HTTP request to the webhook:
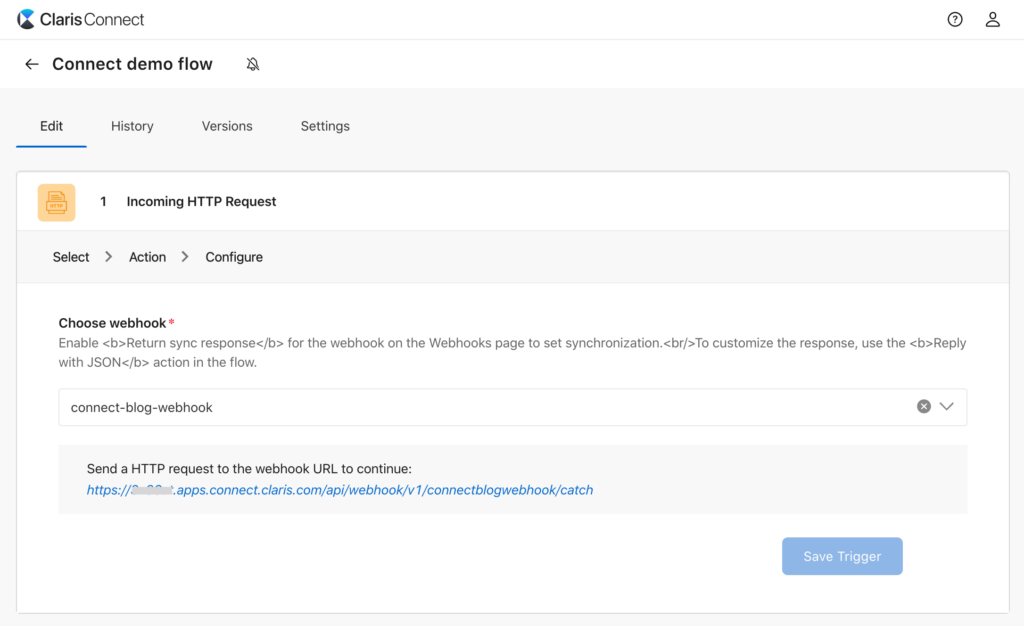
If we had not enabled the “Use authentication” option in our webhook, we could simply click on the webhook’s URL on this page. That would result in the “Save Trigger” button being enabled, such that we could save our work. However, we chose to secure our webhook by requiring that an API key is sent with each HTTP request. Therefore, if we click on the provided link at this point, we get a response that looks like this:
{
  “error”: {
    “message”: “Unauthorized”,
    “status”: 401
  }
}
Therefore, next, we’ll create our HTTP request so that we can call our webhook with the proper authentication header. This will allow us to save our trigger.
Build the HTTP Request
If using FileMaker 2023 (aka FileMaker 20) or later, you can use the new Trigger Claris Connect Flow script step. (See screenshot.) In the AppID and API Key section of that script step, we enter the webhook’s AppID and API key separated by a colon. (See the arrow in the screenshot.)
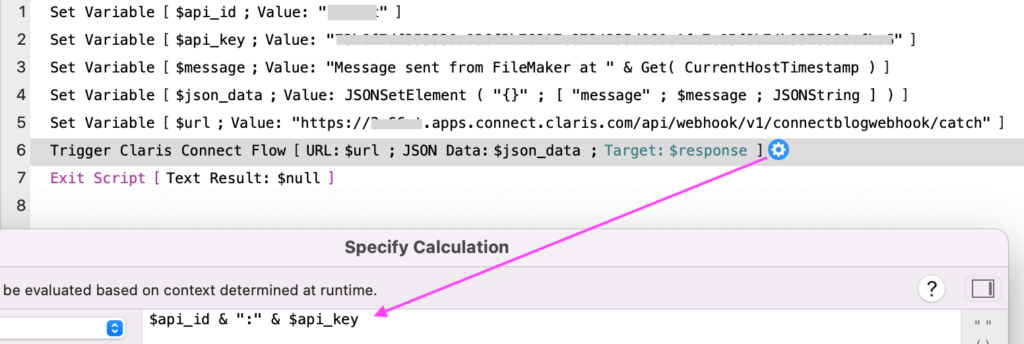
If using FileMaker Pro 12 or later (including FileMaker 20), you can write a script like the one in the following screenshot using the Insert from URL script step instead:

Specifying cURL Options
When using the Insert from URL script step, we have to specify cURL options. For the authentication header, we are using the format provided by Connect when we created the webhook, i.e., –user appid:apikey. The cURL data option is not necessary to activate the flow’s trigger, but we’ll need it later.
It’s also handy when we add an action to our flow next, so we include it at this point. The -D cURL option is short for –dump-header. We include it for troubleshooting purposes and to extract the webhook’s response HTTP code. The Content-Type header tells Connect to interpret the content of the $json_data variable, which we are sending in the body of the post request, as JSON and not as a string.
Insert from URL v. Trigger Claris Connect Flow
The script step you use to make the HTTP call is up to you. If you use Insert from URL, you have to understand some basic cURL options. On the other hand, cURL gives you more options than the Trigger Claris Connect Flow step.
Triggering a Flow from a non-FileMaker client
As a reminder, we don’t need to use Claris FileMaker to send a notification via the Claris Connect SNS connector. You can use another application instead. If you want to test your flow independently of FileMaker, you can use a tool such as Insomnia or Postman. In that case, select the Basic Authentication option to authenticate against the webhook. Then, enter the AppID in the username field and the API Key as the password. The full cURL command, including a JSON object containing the message that we’ll send via SNS, would look like this:
curl --request POST \
  --url https://<AppID here>.apps.connect.claris.com/api/webhook/v1/connectblogwebhook/catch \
  --header 'Authorization: Basic M3g2NmF0O…NGI5OTc4OTkwY2ZiYTY=' \
  --header 'Content-Type: application/JSON' \
  --data '{"message":"Test message sent from Insomnia"}'
At this point, go ahead and make the call to the webhook. If using FileMaker, that means executing the script.
If the HTTP request is properly formatted, you should get a successful response. Back in Connect, the “Save Trigger” button should be enabled.
Create the Publish Message Action
We are going to use the AWS SNS connector to send the message so we can build on what we learned in our previous blog post on Claris Connect and AWS services. However, for the sake of returning a custom JSON response, you could use another AWS connector or any other Connect connector, for that matter.
Building an SNS Connector
Please refer to our previous post in this series and extend the flow you are building as you read this post to have a functioning SNS Connector action. You will also need to have created an SNS topic that you can publish to (again, refer to our previous post on SNS and Claris Connect). You can test the “Publish message” action using the “Review and Test” button located in the top right corner within the flow’s action.
At this point, your flow should look something like the screenshot below. The region and SNS topic ARN will be specific to your configuration. Note that the “Default message” field’s step data reference may look different depending on whether the HTTP request comes from FileMaker or another client. If using FileMaker, it may look different whether you are using the Insert from URL or the Trigger Claris Connect Flow script step. Just be sure to select the JSON property that contains the message to send from the flow’s previous step’s data. (See our previous blog post.)
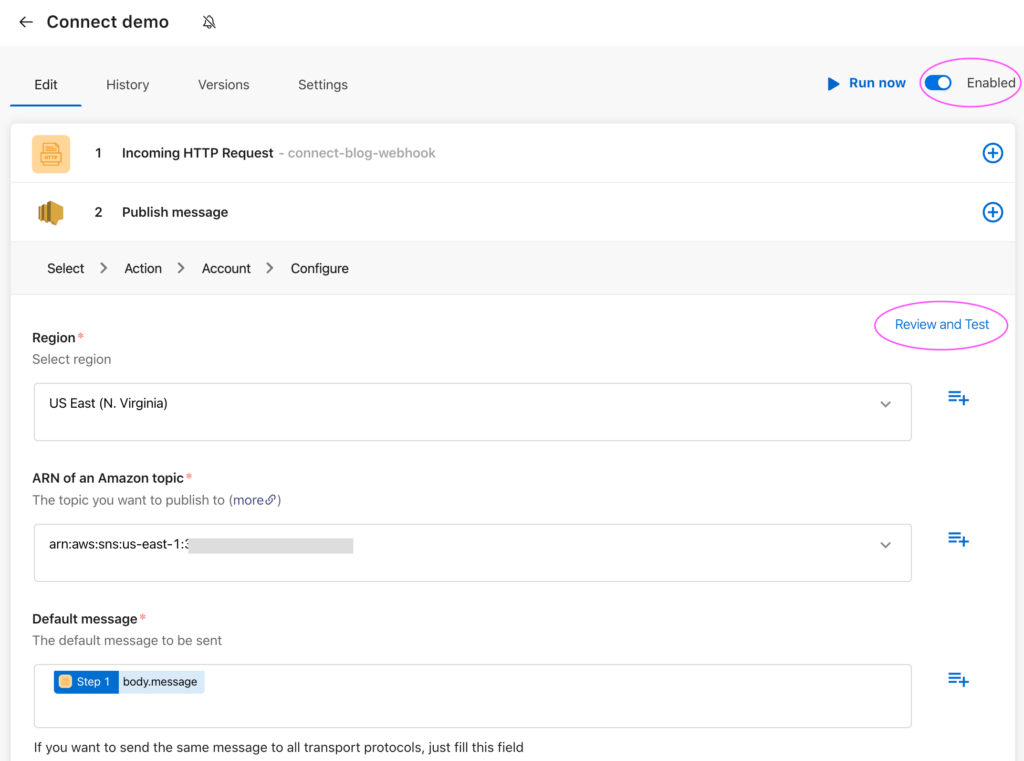
Finally, don’t forget to enable the flow using the slider in the top right corner.
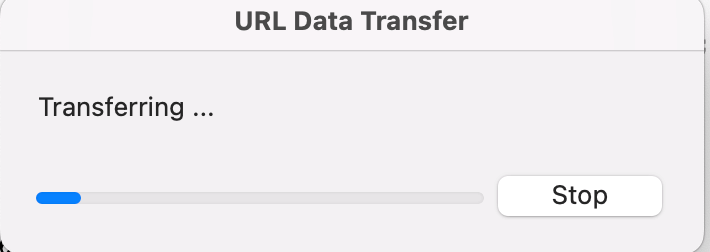
If we were to send an HTTP request to initiate the flow now, the flow would execute, and the message would effectively be published. However, no HTTP response would be returned. While we have the “Return sync response” webhook option enabled, our flow doesn’t include an action to return a custom response. If we were to send an HTTP request from FileMaker at this point, we would see a popup dialog, which we would have to manually dismiss:
Let’s complete our flow by adding the final action that will return a custom response.
Return a Custom Response
Add a new action to the flow by selecting the HTTP utility again. This time, we are adding the utility as an action instead of as a trigger. We therefore have a number of options to choose from. Select the option “Reply with JSON data.”
Your flow should now look like this:
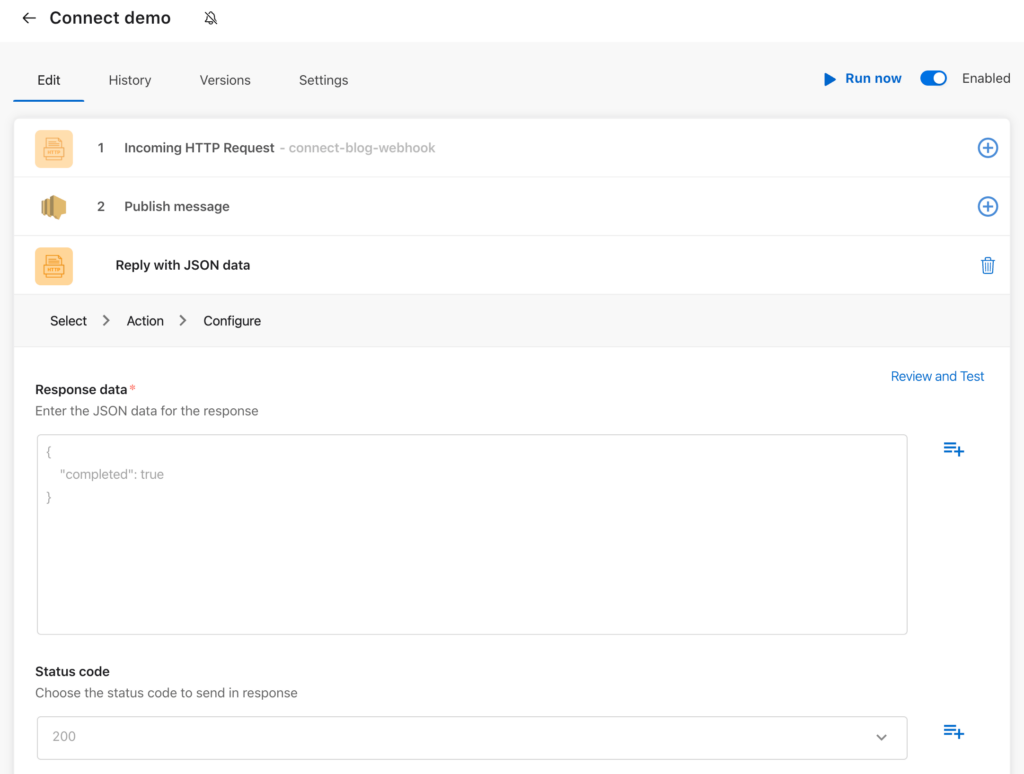
In the “Response data” field, we’ll create a simple JSON object that captures the ID of the published message. To do this we’ll manually type some JSON in that field. Like we’ve done before, we’ll use the step data from the previous step, in this case to grab the message ID.
For the status code, you can leave the default 200, i.e., “OK.” Or, if we think of the newly published SNS message as a new resource, we may choose to return code 201, i.e., “Created.” We’ve chosen to return 201.
The final action would look like this:
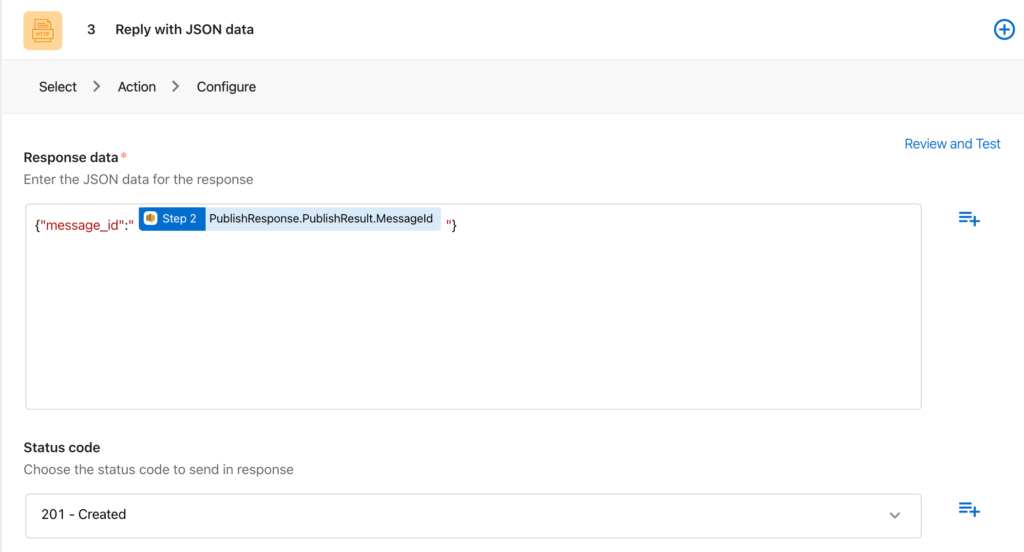
At this point, we suggest using the “Review and Test” option again to test the newly added action.
Parse the Flow’s Response
When using FileMaker Pro to call the flow’s webhook, if we step through our script in the Script Debugger and use the Data Viewer to inspect the webhook’s response, we’ll see something like this:
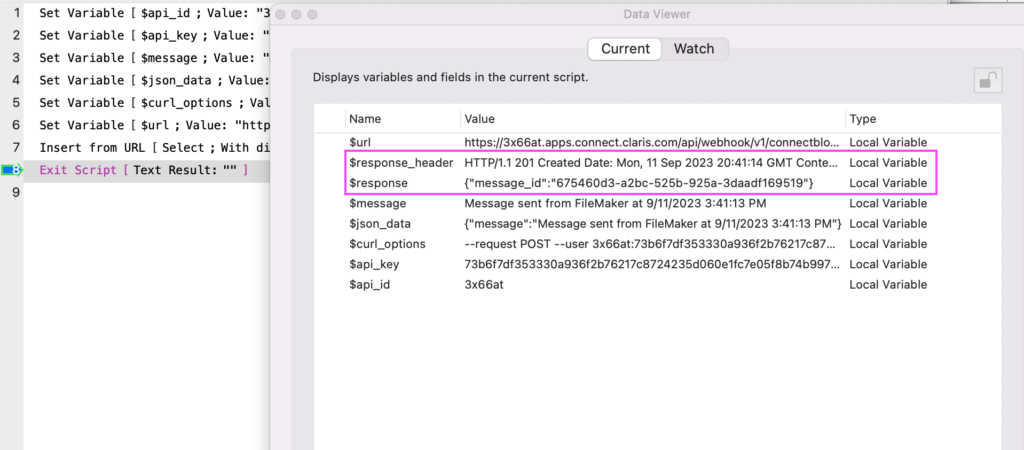
The flow’s response is captured in the $response variable. We’ve specified this as the “Target,” both in the Insert from URL and in the Trigger Claris Connect Flow script steps. When using the former, we’ll also see the HTTP headers from the flow’s response, captured in the $response_header variable. From that variable, we can easily extract the HTTP response code, i.e., 201, since the HTTP protocol follows the standard format HTTP/1.1 <response code> <etc>
Moving Forward
By using Connect’s HTTP utility, we can return a custom JSON object as the response for a Connect flow. This response can contain dynamically parsed data from previous flow steps using Connect’s step data selection tool. This response can then be parsed by the client initiating the HTTP request to the flow’s webhook.
In upcoming posts on this series on Connect and AWS connectors, we’ll cover the sometimes overlooked but crucial topic of how to trap – and handle – errors in a Connect flow. We’ll also cover Connect’s connectors for AWS Simple Storage Service (S3) and for AWS Simple Email Service (SES). Stay tuned!
If you would like to work with our team on custom responses in a Claris Connect flow, contact us today.
Hey Marcelo,
Very helpful article thank you for sharing.
Question: I can’t find the ‘Reply with JSON data’ in the current claris connect actions do we have alternative?
Click on the plus icon to the right of a flow step and select the Action option. Then search for the “HTTP” utility and select it. There you should see the “Reply with JSON data” option to add to the flow.