JSON (JavaScript Object Notation) is an open standard format to send data that consists of an object with name-value pairs. JSON has its origins with JavaScript, but as many other programming languages have adopted it as an alternate to XML, since JSON is far less verbose than XML. Many web services return data in JSON or XML, and sometimes both are offered as options. FileMaker 16 introduces native functions to create and extract data from JSON, making interactions with web services easier and more streamlined. This article focuses on how to create JSON objects from within FileMaker 16 with new, native functions.
JSON Structure
JSON objects begin and end with braces – { } and may contain arrays, other JSON objects, strings, numbers, null values, and Boolean values. Although JSON objects can contain one single element, the power of JSON is that it allows for nested arrays and objects. It’s important to note that the keys are case sensitive, so “firstname” and “FirstName” aren’t seen as identical. However, the order of the JSON keys, and any whitespace between text, does not affect how systems read the JSON object.
FileMaker 16 Function
The FileMaker 16 function used to create a JSON object is called JSONSetElement.
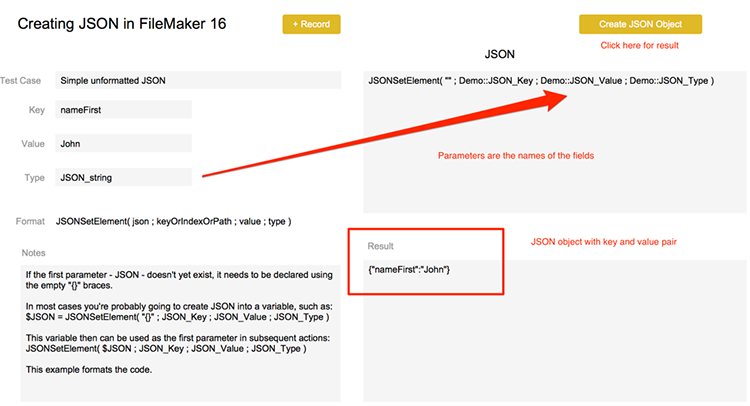
JSONSetElement ( json ; keyOrIndexOrPath ; value ; type )There are four required parameters.
- The “json” parameter references an existing JSON object ( e.g. script variable ), or it initializes a new JSON object.
- The “keyOrIndexOrPath” identifies the JSON element, which can take many forms. For example, if you are adding a key-value pair like “firstName” (key) and “John” (value) to the JSON, then “firstName” would be used for this parameter. In addition, this key can consist of other elements, all covered in examples below.
- The “value” parameter refers to the content of the element. This might be a string of text, such as “John” if the key is “firstName.” However, it also could be an array containing multiple values, such as “[1,2,3]” or even another JSON object. This is covered in more details in the examples below.
- Finally, the type parameter identifies the key-value pair as either string, number, etc. The type is specified with a number, with 0-6 corresponding to raw, string, number, object, array, Boolean, null. (Instead of remembering which number corresponds to which datatype, creating a set of simple custom functions with a name such as json_string, json_number, etc. with just the corresponding number, might be a useful action if you have FileMaker Pro Advanced. There are at the moment hidden functions that work the same way, such as JSONString, JSONArray and so on, but as these are undocumented, there is a possibly these may be removed or renamed in the future).
Examples
The examples listed below are taken from a demo file. Some examples appear in records, so that you can test different values and see these create JSON in real time. Other examples are illustrated using scripting techniques. This screenshot illustrates the record example, which provides instant feedback.
There are many ways to accomplish similar goals in FileMaker. Being able to step through a script a see how the JSON is created in smaller increments is something I see a good starting point for anyone new to this type of data format, especially when constructing complex objects.

Simple JSON elements
Setting a key-value pair with a string, number, Boolean, or null value is the simplest JSON one can create the following combinations For example:
- JSONSetElement ( “” ; “firstName” ; “John” ; 1 ) -> { “nameFirst”:”John” }
- JSONSetElement ( “” ; “age” ; 35 ; 2 ) -> { “age”: 35 }
- JSONSetElement ( “” ; “active” ; false ; 5 ) -> { “active”: false }*
- JSONSetElement ( “” ; “resident” ; “something or nothing” ; 6 ) -> { “resident”: null }**
*Boolean types don’t require quotes. If you use “false” this is considered a string.
**Null data types ignore any values in the third parameter.
Multiple sets
It’s also possible to pass multiple sets of “keyOrIndexOrPath ; value ; type” input in one function call, using the square brackets, much like the Substitute function.
JSONSetElement( "{}" ;
  [ "firstName" ; "John" ; 1 ] ;
  [ "lastName"; "Doe" ; 1 ]
)
The following examples are illustrated on the Contacts layout in the demo file.
Arrays
A JSON array is a collection of values enclosed within square brackets and separated by commas. When present in a JSON object, arrays still have a key, such as “phoneNumbers”, but are extracted using the index, or order within the array. Arrays are zero based, so the first index value is 0, the second 1, and so on. For example, this simple array uses the key of “random” for both values in the array, but to get the first value you add the index – random[0].
{ "random" : [ 27, 69 ] }Creating an array, therefore, means you populate it by specifying the index number.
To declare an array in JSONSetElement you need the “[]” which the actual JSONSetElement refers to when adding data. Below is a loop in a script to populate an array. The $counter starts at zero as array indexes have zero as the first value. Each element in the array matches a numerical index, from 0 to n.
Set Variable [$json ; "[]" ]
Set Variable [$counter ; 0 ]
Loop
  Exit Loop If [$counter > 2 ]
  Set Variable [ $json; Value: JSONSetElement( $json ; $counter ; Int( Random * 100) ; 2 ) ]
  Set Variable[ $counter; Value: $counter + 1 ]
End Loop

Result:
[ 27, 69 ]
This array is now ready to be added to a JSON object.
JSONSetElement( "" ; "random" ; $json ; 4 )The “4” here is the data type, which corresponds to an array.
Result:
{ "random" : [ 27, 69 ] }This simple array is now ready to be understood by any program that interprets JSON.
From an example with random numbers we move to actual data. In a contact record with phone numbers, the array might end up looking like this:
{ "phoneNumbers" :
  [
    {
        "number" : "907-345-0962",
        "type" : "Phone"
    },
    {
        "number" : "907-345-1215",
        "type" : "Fax"
    }
  ]
}
In this case the array elements are objects, since there are multiple items, like number and type. The same principle applies, although we would first contrast the number and type object, insert this into an array, and then create the JSON with the phoneNumbers object. For the data parameter, instead of using a number, I’m relying on a custom function that makes it more obvious as to the data type, such as JSON_string vs. JSON_object.
Set Variable [$json ; “[]” ]
Go to Object [ObjectName: “portalPhones” ]
Go to Portal Row [Select: On; First ]
Set Variable [$counter ; 0 ]
Loop
    Set Variable [ $json; Value:
         Let([
        ~json = JSONSetElement ( "" ;
        ["type";Phones::Type; JSON_string ];
        ["number"; Phones::PhoneNumber; JSON_string]
        )
         ];

         JSONSetElement( $json ; $counter ; ~json ; JSON_object )
)]
    Set Variable[ $counter; Value: $counter + 1 ]
    Go to Portal Row [ Select: On ; Next ; Exit after last: On ]
End Loop
Note the “~json” variable inside the Let statement uses square brackets to feed multiple sets of keyOrIndexOrPath, value, and type parameters in a single JSONSetElement function call.
Nested Objects
Like arrays, objects can store multiple values. Whereas arrays are grouped inside the square brackets like peas in a pod, objects are strung together, but still in a sense separate. Not to cloud an existing FileMaker concept, but objects are more like anchors with buoys strung along, or a fishing line with multiple hooks; they all relate back to the main key.
Objects can be nested within the main JSON object. The root, or main, object doesn’t have a name (or key), but all other objects are nested within the main object and are linked to a name (or key), such as “address” in these examples.
This process is far simpler than arrays, at least for something like the address. Instead of a loop, we construct the content of the object first, and then link this to the parent object.
# Build the content
Set Variable [ $json_address ; Value: JSONSetElement ( "{}" ;
   [ "Street" ; Contacts::Street ; 1 ] ;
   [ "City" ; Contacts::City ; 1 ] ;
   [ "State" ; Contacts::State ; 1 ] ;
   [ "Zip" ; Contacts::ZIP ; 1 ]
 )
]
# Create the parent with content as the value
Set Variable [ $JSON ; Value: JSONSetElement ( "{}" ; "address" ; $json_address ; JSON_object ) ]Result:
{
     "address" :
     {
    "City" : "Anchorage",
    "State" : "AK",
    "Street" : "14225 Hancock Dr",
    "Zip" : "99515"
     }
}
Gathering it all together
Now that you have key-value pairs, arrays, and nested objects for the contact record, creating one single JSON object with all this information is just a matter of putting together all the elements into one JSON object as can be seen in the demo file’s “Create JSON Contact Info” script.
JSON in FileMaker 16, in Summary
There are both external and internal uses for JSON.
Knowing how to create JSON is a requirement for using many web services. Combined with cURL features in the Insert from URL script step, you can now send JSON built from FileMaker records.
Within FileMaker, JSON could be used to handle multiple script parameters, store users preferences in a single object instead of across multiple fields, gather changes in an audit log, and even duplicate records including data in portals. Imagine the possibilities.
Get the Demo File
Moving Forward with FileMaker
If you have any questions about how leverage JSON in your FileMaker solution, please contact our team. We’re happy to help your team determine the best way to drive more efficiency in your organization using the platform.
Great information, thank you!
In the first example of JSONSetElement, there are some HTML tags in there, ““.
Later, in the Simple JSON elements section, we see the character “├á” where I think you meant to put an arrow of some sort. And in the first example, the input contains “firstName”, while the output is “nameFirst”.
In the script example under “Arrays”, there is a right bracket missing on line 5 (end)
Thanks for catching those issues. The and á have been fixed. The Array example has a square bracket; you may need to scroll to the right to see this.
The data-type custom functions shouldn’t be necessary since there are named-constants that do the same thing: https://fmhelp.filemaker.com/help/16/fmp/en/#page/FMP_Help%2Fjsonsetelement.html%23ww1172134
So, instead of using the custom function JSON_string, or the number 1, you can just use the built-in named constant: JSONString.
A good point. I mention that those functions exist in the section on the data types. As they’re hidden I used custom functions as a fall-back.
Ah yes, I couldn’t see either bracket but I didn’t realize the text area was scrollable. Thanks.
Sorry, I didn’t see where you mentioned that already; my mistake. I wouldn’t call it undocumented though. It is in the official documentation, and there is precedence for named constants in functions like TextStyleAdd: https://fmhelp.filemaker.com/help/16/fmp/en/#page/FMP_Help%2Ftextstyleadd.html
Yes, good point. My concern was more along the lines that you don’t see these constants in the function listing. Given that they’re in the documentation examples, that might no longer be an issue. I’d speculate that FMI initially started with numbers, then added the named constants later.