FileMaker Cloud running in Amazon Web Services (AWS) delivers tremendous value and cost savings over owning and operating a traditional on-premise server. However, there are still costs involved and it is a good idea to be mindful of those costs. Indeed, tracking costs is part of a well architected application.
This also applies to the standard version of FileMaker Server running on an AWS EC2 instance, so lessons learned here will also be applicable in the greater context across all AWS services.
I especially recommend trying out FileMaker Cloud and AWS Services in general, which have free trial and free tier services, respectively. Just remember, the free trial has a limit, so either continue will annual licensing for FileMaker or stay within the threshold when evaluating the services you will need.
Minding the Till
CloudWatch is an AWS service that offers the ability to, among other things, set Billing Alarms that let you know when you have exceeded spending thresholds. In the age of virtual servers where everything is scriptable, it makes good sense to take advantage of this feature to avoid unexpected charges when you get a monthly bill. It is also easy to set up, so why not?
Step 1 – Enable Billing Alerts
First, you will need to do this from the “root” account, which is the account you first created when setting up your AWS account. If you only use one account, then your account is the root account.
- Log in to the AWS console and open the Billing and Cost Management dashboard.
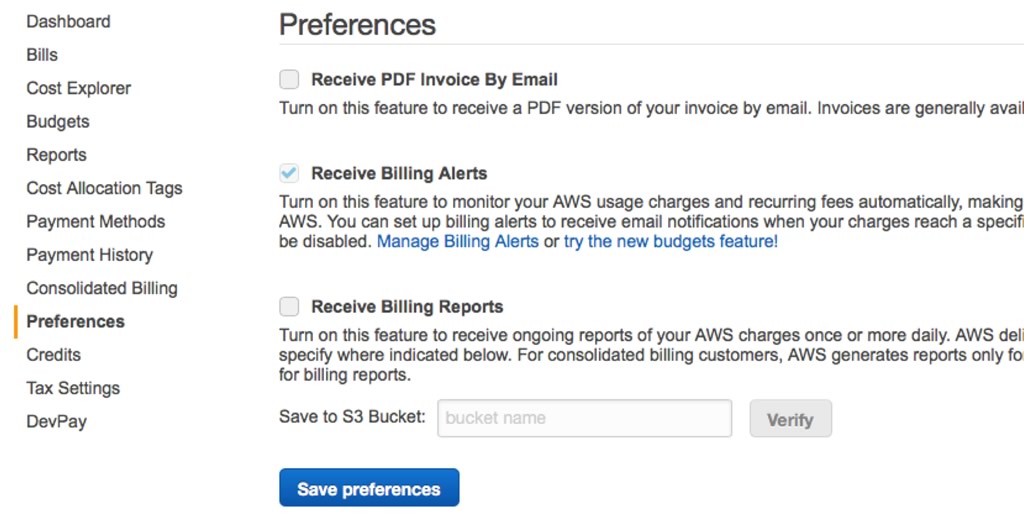
- Select “Preferences” from the left-hand navigation (see Figure 1).
- Check the box next to “Receive Billing Alerts” to enable the service.
- Click “Save preferences” to save changes.
Step 2 – Create an Alarm
Once you have enabled billing alerts, you can create a billing alert in CloudWatch. Open the CloudWatch console by opening the Services menu and selecting CloudWatch from the Management Tools section. Make sure you are in the US East region. This is the region that billing data is stored in, regardless of what worldwide region you have services running in.
- Choose “Alarms”.
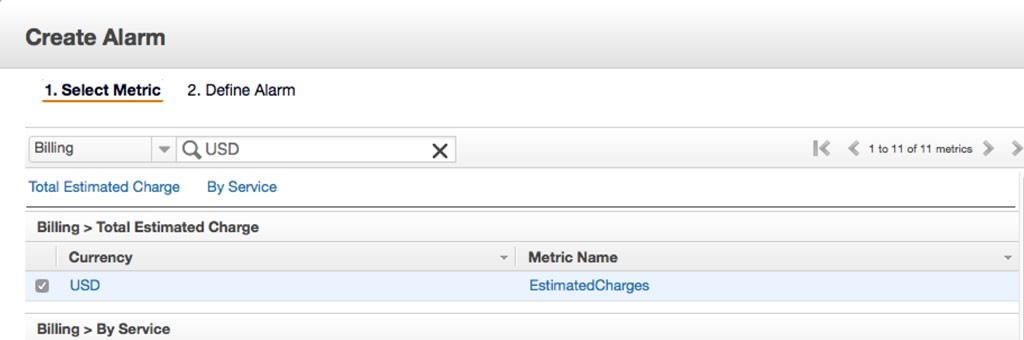
- Click on “Create Alarm”.
- Then click on “Billing Metrics” to select that category (see Figure 2).
- Check the box on the line with “USD” under the Total Estimated Charge section.
- Click “Next” to continue.
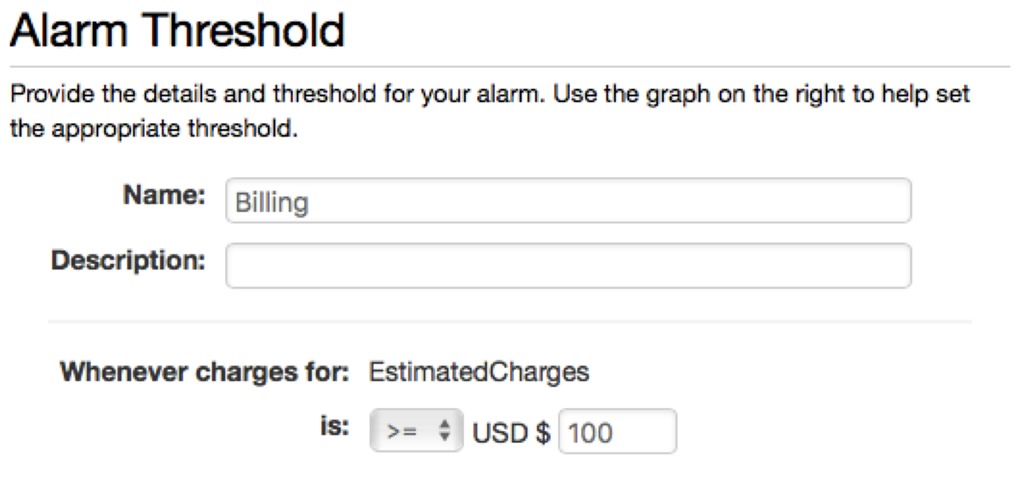
- Give the alarm a name, like “Billing” (see Figure 3), and set the threshold you would like to be notified at. For example, whenever charges exceed $100 a month.
Step 3 – Specify Alert Recipients
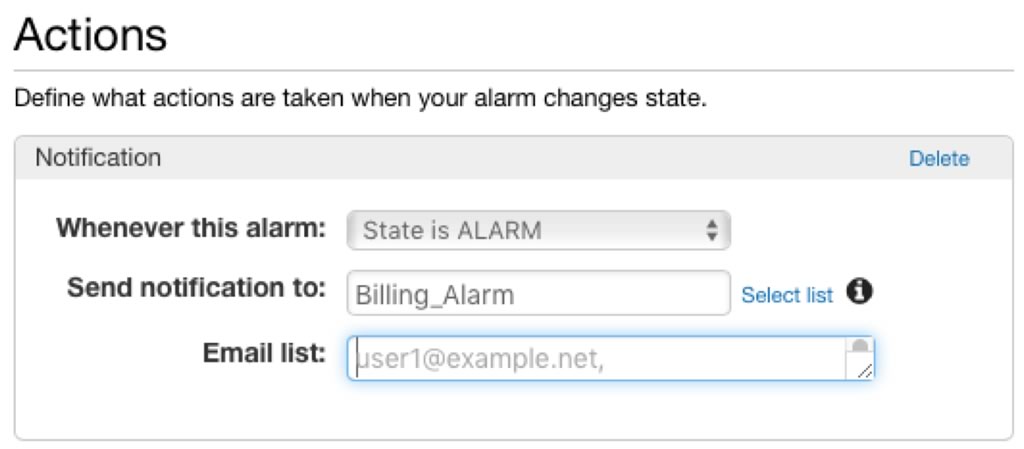
Next we need to set up a distribution list of those who will get notified in the Actions section of this dialog (see Figure 4).
- Click on “New list” next to the “Send notification to” drop down list.
- Then you can add email addresses to the “Email list”.
- Separate multiple email addresses with commas.
- Make sure to give your notification list a name.
- Click on “Create Alert” to finish.
The recipients will receive an email to validate their email addresses. Once confirmed, the recipients will start receiving alerts.
AWS Simple Notification Service
You may not have been aware of this, but you created an SNS Topic in the preceding steps. Simple Notification Service (SNS) is another very useful AWS service used to send various kinds of notifications. In this case, the notification is in the form of emails, but it could also include HTTP endpoints or text messages.
If you are interested to see details about the Topic you created, you can navigate to the SNS dashboard by opening the Services menu and selecting SNS from the Messages section. From there click on Topics to see the distribution list we created above. Click on the link for the ARN (Amazon Resource Name) to view the list of subscriptions to this topic. You will see the email addresses you entered above and their subscription status.
If you ever need to update the billing alert recipient list, you can do so here in the SNS Topic.
Cost Optimization
Cost optimization is one pillar of a well-architected framework and an essential part of a deployment strategy. Billing alerts can help with this objective. They are easy to set up and configure, so I would recommend utilizing this service to aid in a successful FileMaker Cloud (or FileMaker Server) AWS deployment.
Be sure to read these other AWS related posts to learn more:
- FileMaker Server on Amazon Web Services Quick Start Guide
- FileMaker Hosting Info and More Fun with Amazon Web Services
- Backups in the Cloud with AWS
Launch Billing Alerts
If your solution requires a custom solution for billing alerts and cost-tracking, my team and I may be able to help. Contact us here to learn more.
Pingback: Self-Updating Apps, FileMakerTalk Podcast, AWS Billing Alerts - FileMakerProGurus