This is the second post in a four-post series on leveraging the Salesforce Marketing Cloud to effectively engage more audiences with less effort through automation. This post focuses on automating audience segmentation.
In my introductory post on Marketing Cloud automation, I highlighted a major problem facing smaller marketing teams – personalizing email marketing at a level that drives real engagement just takes too much time and too many resources. It’s not a feasible strategy.
Fortunately, more and more technology addresses this problem and minimizes this challenge for these marketing teams. Automation in Salesforce’s Marketing Cloud, for example, helps.
In this post, I address how to automate audience segmentation and list development based on specific criteria to remove 95% of the work for your team, allowing you to focus on the more important aspect of personalized email marketing – the content itself.
This content does include several technical steps, so I encourage marketers to read through this to understand the automation process but then to pull in a developer for the more complicated steps.
Understanding Data Extensions’ Role in Audience Segmentation
Marketing Cloud stores data in Data Extensions, which are similar to tables in a database or custom objects in Salesforce. To categorize your contacts into lists in Marketing Cloud, you’ll need to use the Salesforce Data Extension, which is integrated with – you guessed it – Salesforce!
Let’s step through how to create one and assemble our initial target audience by looking for contacts whose birthday is today.
Learn more about Data Extensions.
Step 1: Create a Salesforce Report
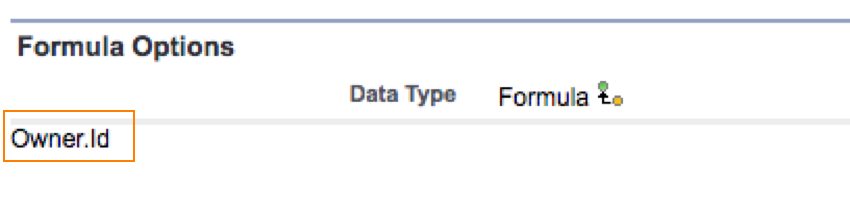
Start with creating a Contact report in Sales Cloud with the fields that you’d need for your audience segmentation and email customization, such as first name, last name, email, etc., and filtered by “Birthdate equals TODAY.” Be sure to include the contact owner’s ID in the report by including a custom formula field on Contact based on the contact owner lookup field (Figure 1).
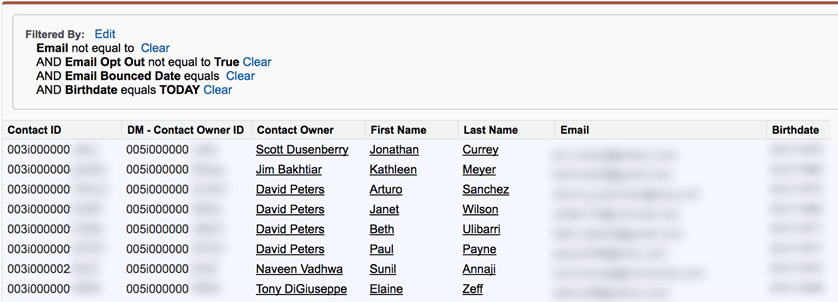
Here is what my sample report looks like (Figure 2):
Step 2: Import Contact Data into a Marketing Cloud Data Extension
Prior to doing this step, you need to integrate Marketing Cloud and Sales Cloud. For that, you need to run through installing and configuring the Marketing Cloud Connect app, as described here. This ensures the source report we created above in the Sales Cloud is available for selection in the Marketing Cloud when you are ready to import the data.
The details of how to create an import activity are described here, in the “How to Create an Import Activity” section. I will just highlight parts where you will have to do something different than described.
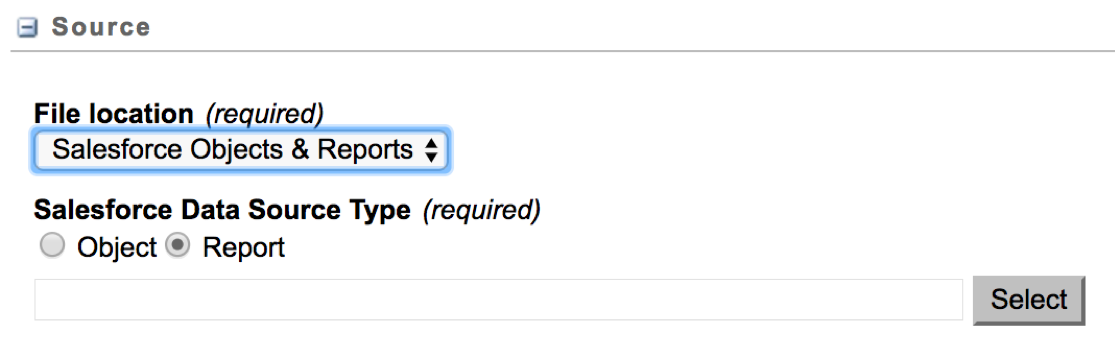
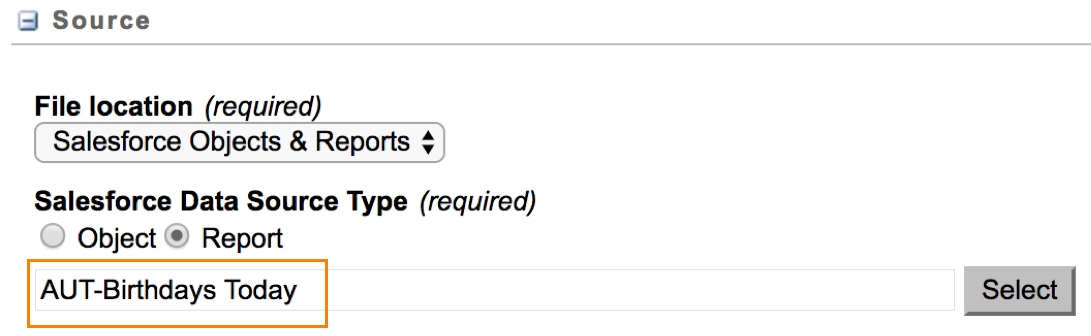
In the Source section, select Salesforce Objects & Reports in the File Location field and Report option in the Salesforce Data Source Type (Figure 3).
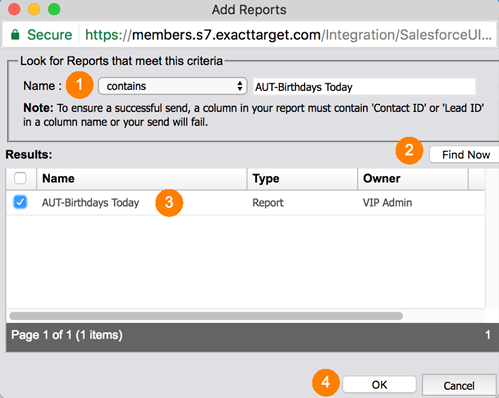
Click Select to launch the report selection dialog (Figure 4). Here, you can search for and select the report we created above.
- Name: Specify criteria (for example, report name contains a certain string).
- Find Now: Click to view a list of reports that match the search criterion.
- Results: Select a report from the available list of reports.
- OK: Click to use the selected report for the import.
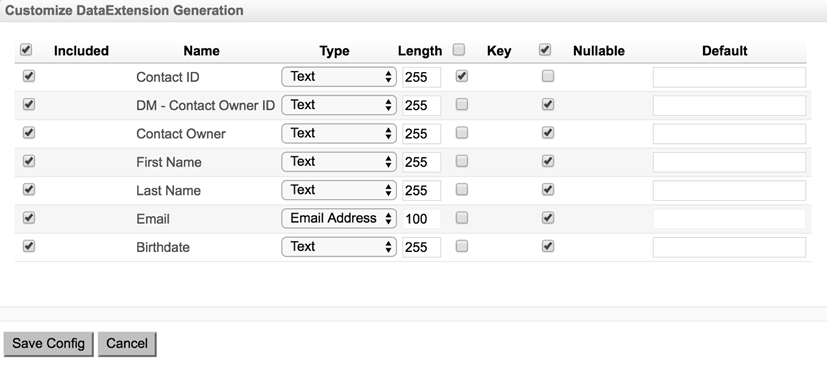
This allows you to read the source report and customize the data extension automatically generated and populated with report data.
Make sure you take the following two steps:
- At least one column needs to have the Key checkbox checked (Contact ID field, in my case)
- At most one column needs to be of type Email Address (Email field in my case)
I’ve selected all columns in my case. You, however, can choose to keep several unselected and use the same report to import into different data extensions with different columns.
At this point in your audience segmentation efforts, your screen should look something like Figure 5.
Click the Save Config button. You should land back on the Create Import screen, and the Source section should indicate the report we selected (Figure 6).
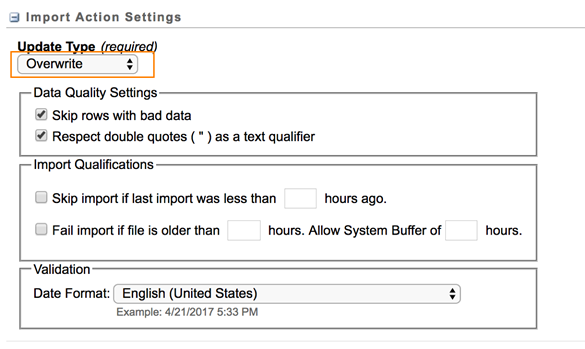
In the Import Action Settings, choose Overwrite in the Update Type field (Figure 7).
In the Import Completion Settings, enter your email id to receive a notification when the import is complete (Figure 8).
Click Save, which returns you to the list of Imports.

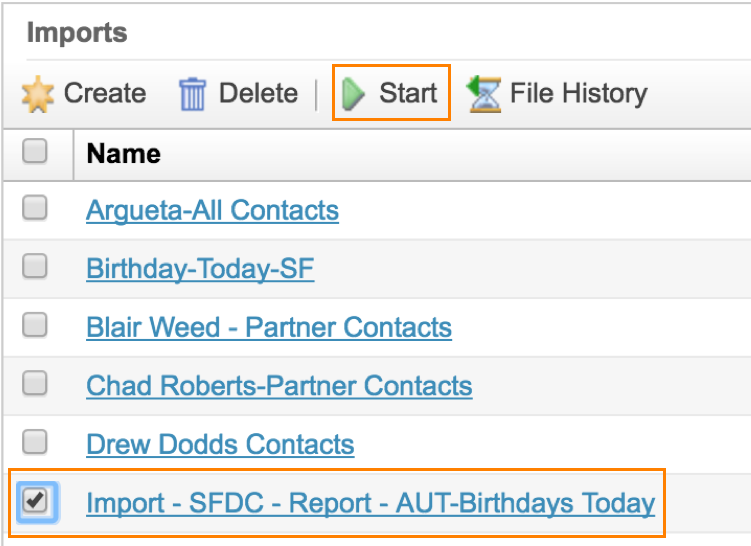
To test the import, locate yours on the list, check the checkbox next to it, and click Start at the top of the list (Figure 9).
Its time to check the results of the import!
Step 3: Check Your Result Data Extension
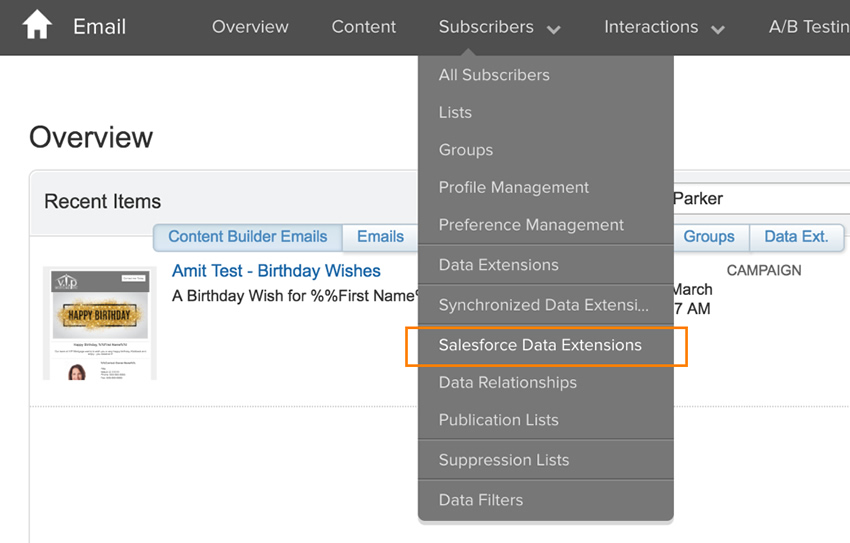
To ensure you built your data extension correctly and stored it correctly in Salesforce, start by selecting the Salesforce Data Extensions menu in the Subscribers menu (Figure 10).
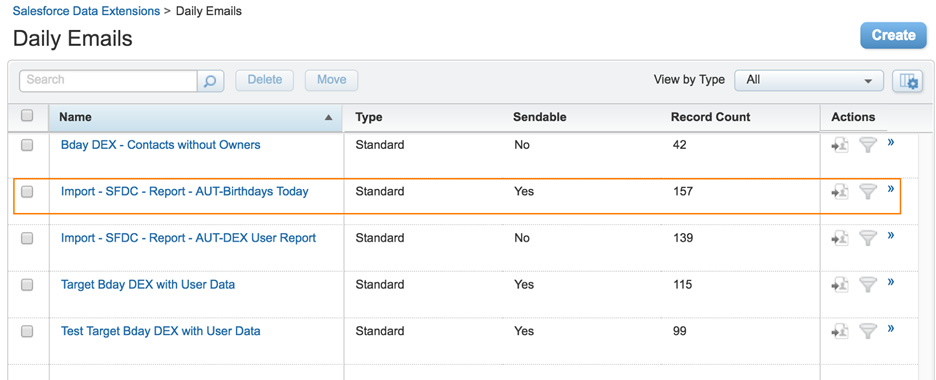
This should bring you to the Salesforce Data Extensions folder. You should see a data extension by the same name as your import name in this folder. For better organization, I’ve created a subfolder called Daily Emails under which I will store all data extensions related to this email automation. I have moved my data extension into this sub-folder using the move button. You don’t have to take this extra step, but if you plan to create many audience segments – which is the goal for most marketing teams – I recommend you carefully organize your folder system to make things easier on your team.
If your import was successful, your data extension should show the expected number of records in the Record Count column (Figure 11).
Our initial audience segmentation is ready!
Step 4: Import Contact Owner Data into a Marketing Cloud Data Extension
Our next step ensures each audience member receives the marketing email from a specific point of contact and also adds personalization in the email. For example, a great personalization detail can include a unique email signature for the sender.
This procedure is essentially the same as described in the previous step, except that it will be based on a User report. The User report should contain at the very least the User ID, User Name and User Email fields. In addition, the report should contain all User fields necessary for your intended personalization.
This builds another data extension containing the relevant user data. Once again, make sure to move the resulting data extension into the same folder as the previous data extension (Figure 12).

Step 5: Combine the Two Data Extensions
Note: Unless you’re SQL-savvy, this audience segmentation step requires help from a developer!
This step requires a Query Activity. It is another type of activity, much like the import activity we used above for the import step. This allows you to write SQL queries to join two or more data extensions.
First, you need to create a target data extension to store the results. Here are great instructions explaining for this task. Make sure your target data extension contains as many fields with the same data type and lengths as the source fields from the two data extensions you expect to combine and store in the target data extension. Data types and lengths must match for your query to succeed.
Note: Sometimes, queries fail, seemingly for no reason. I recommend filing a ticket with Marketing Cloud support to determine the exact error.
Now, let’s create the Query Activity.
This essentially brings together all the data points from the user record and merges it with targeted data points from the contact record. This allows your team to construct a personalized email signature specific to a given contact owner.
For more information on Query Activity, check out this official documentation from Salesforce.
Here is the full query text in my example:
SELECT
b.[Contact ID],
b.[First Name] as [Contact First Name],
b.[Last Name] as [Contact Last Name],
b.Email as [Contact Email],
b.Birthdate as [Contact Birthdate],
u.[User ID] as [Owner ID],
u.[First Name] as [Owner First Name],
u.[Last Name] as [Owner Last Name],
u.[Full Name] as [Owner Full Name],
u.Email as [Owner Email],
u.[External Email] as [Owner External Email],
u.[External Full Name] as [Owner External Full Name],
u.Title as [Owner Title],
u.[Company Name] as [Owner Company Name],
u.Address as [Owner Address],
u.City as [Owner City],
u.State_Province as [Owner State],
u.[Zip_Postal Code] as [Owner Zip],
u.Phone as [Owner Phone],
u.Cell as [Owner Cell],
u.Fax as [Owner Fax],
u.[Website URL] as [Owner Website URL],
u.[LO Application Website] as [Owner LO Application Website],
u.[Website Image] as [Owner Website Image],
u.[NMLS ID] as [Owner NMLS ID],
u.[LOID] as [Owner LOID],
u.[Linked In] as [Owner Linked In],
u.[Facebook] as [Owner Facebook],
u.[Twitter] as [Owner Twitter]
FROM [Import - SFDC - Report - AUT-Birthdays Today] b
INNER JOIN [Import - SFDC - Report - AUT-DEX User Report] u
ON b.[DM - Contact Owner ID] = u.[User ID]
Please note the join condition (highlighted in bold in the query text) and the column aliasing – b.[First Name] as [Contact First Name]
The second query ensures a source column from source data extension can map to a target column with a different name in the target data extension. In this example, the source data extension [Import – SFDC – Report – AUT-Birthdays Today] has a column called [First Name] whose data will be stored in the [Contact First Name] column in the target data extension.
It is also essential to enclose the field names and/or data extension names in [] if they contain spaces in the names.
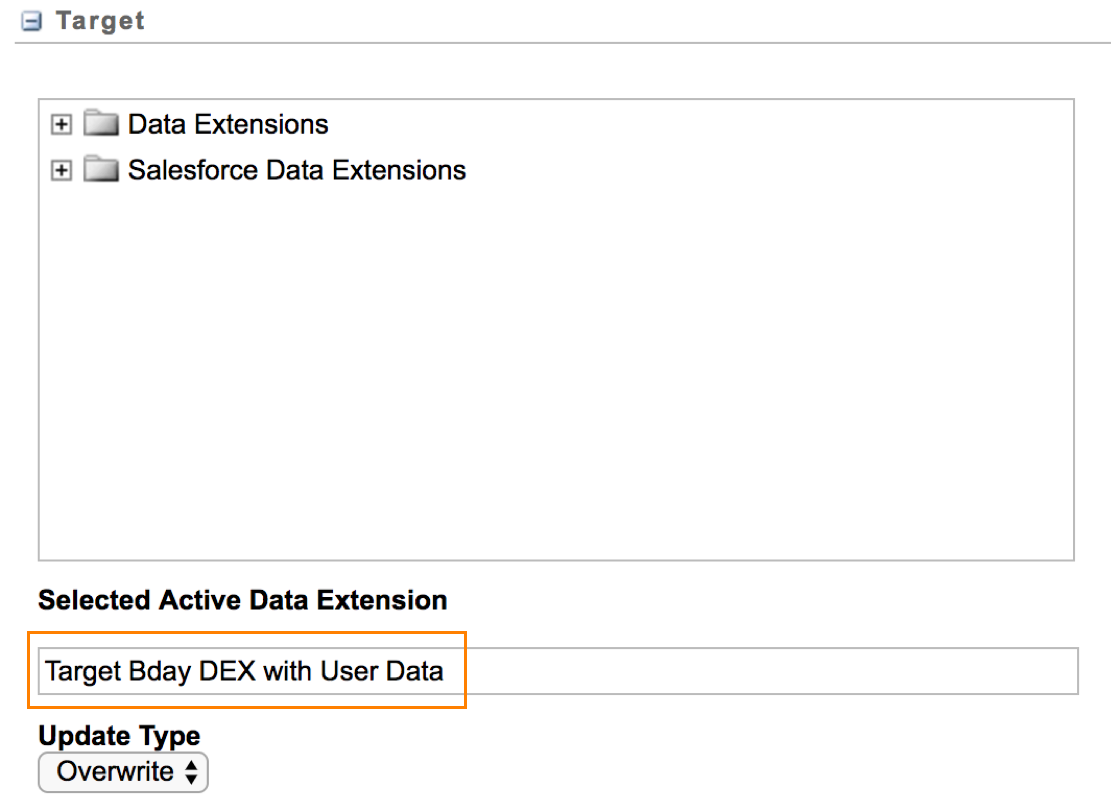
Now that we’ve run the query, we select a target data extension in the Target section. This should be the data extension we created at the beginning of step 5. Select Overwrite as the Update type (Figure 13).
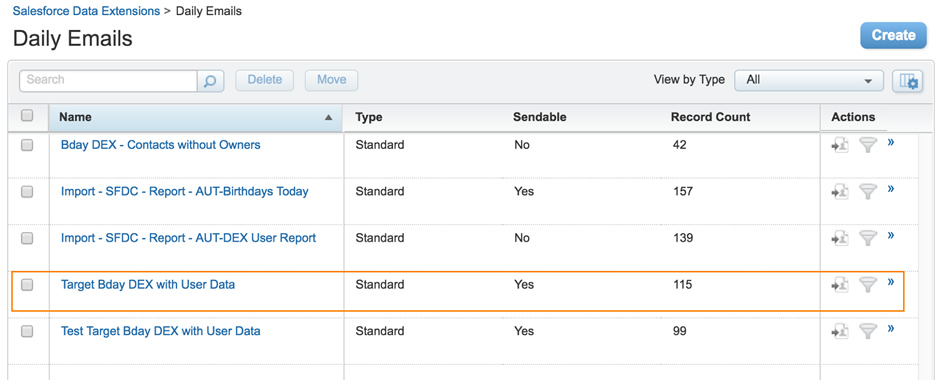
Click Save, and return to the list of query activities. Select the activity you just created, and click Start to run the query. Return to your data extensions to make sure it populated the target data extension (Figure 14).
Step 6: Filter Out Specific Senders and Their Contacts
In our stylized example, we need to ensure that Sales Cloud users who own contacts can opt-out from a given email send. For example, a user may send his or her own birthday email out with more personal details, such as a mention of a recent discussion.
For this purpose, I have created a Birthday Email Opt Out custom field on the User object. This was imported into the user data extension and into the target data extension in my previous post. We can use this to filter out or segment the audience further.
First, we need to create a data filter. (Find detailed steps on how to create one here.)
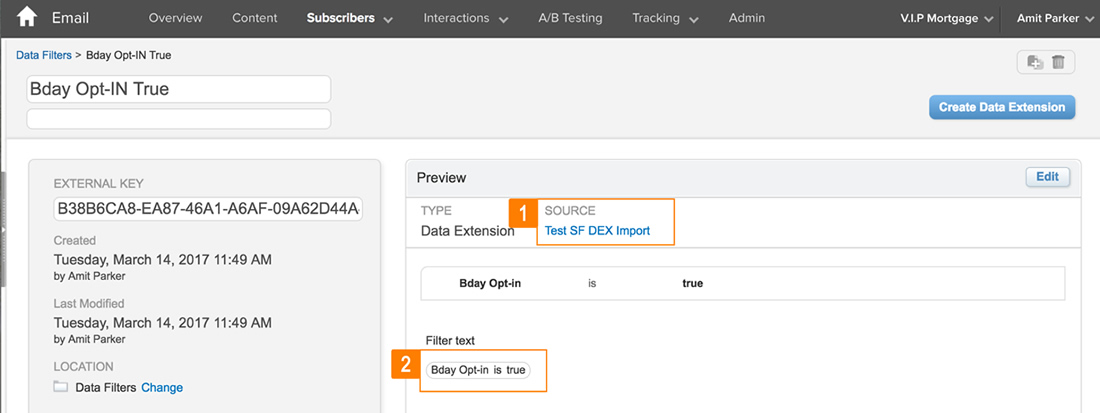
My example depicts the [1] source data extension, which is being filtered using a suitable [2] filter criterion (Figure 15).
Next, create a filter activity to use this filter. (See superb documentation on this here.)
My example is shown in Figure 16.
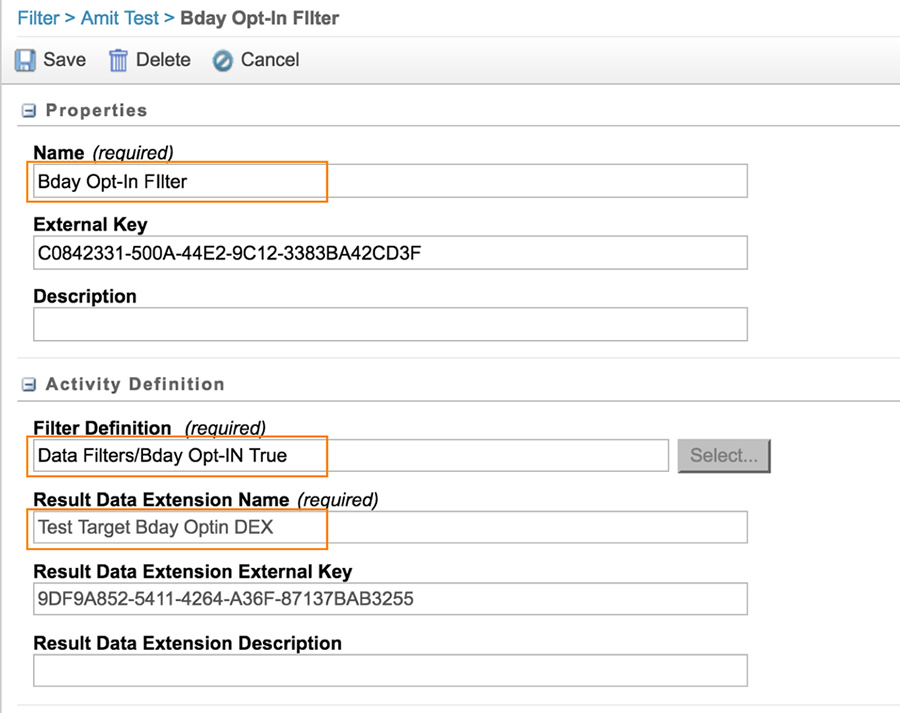
When run, this activity creates a data extension by the name specified in the Result Data Extension Name field and populates it with the filtered data. Once created, you should run this activity as the import and query activities above. Navigate to the said data extension to see your results.
Your Audience Segmentation is Ready!
Congratulations! You now have an audience segmented for a personalization detail – in my case, a birthday – and even have given your business development team the ability to opt-out. Moving forward, new contacts added to the database who fulfill the criteria you’ve outlined will filter into this list, saving your marketing team time and effort. Now you can focus on other aspects of email marketing, such as content development or subject line testing.
Download the Full White Paper
Our next post in this four-part series focuses on creating and packaging email content. Make sure to visit the Soliant blog next week to check it out.
You don’t have to wait until then, though! I’ve formatted the whole email personalization automation and audience segmentation series into a white paper, and you can download it today here:
If you have any questions, please feel free to ask in a comment below.