FileMaker Cloud is the new offering from FileMaker that allows you to provision a version of its database server for use with Amazon Web Services (AWS) and pay only for what you use. That means that if you only need FileMaker Server for a month, you only need to pay for a month, then take it down. It is a great introduction to AWS and IaaS (Infrastructure as a Service) as well as a great addition to the FileMaker platform.
A key advantage in using FileMaker Cloud is that it takes a lot of the complication in getting started with AWS hosting away, making it easy to set up and use. Everything you need to get going is included in the Cloud Formation template, so there is no need to configure anything other than FileMaker Cloud.
This offering complements other FileMaker licensing options, which you can also use on AWS instances if you desire. You might note that since FileMaker Cloud is billed through AWS, you will want to stick with traditional licensing if you are able to apply discounts for non-profits or education to get those price breaks.
FileMaker Cloud has the advantage of being lightweight and fully configured out of the box, including a domain name and simple point-and-click administration of the server. This simplified approach also suggests you can regard FileMaker Cloud as an appliance that “just works.” There is no requirement to get under the hood to customize. In fact, if you do customize anything, your changes will get overwritten when you update your FileMaker Cloud instance to a newer version.
There are still good arguments for having a local or traditional FileMaker Server either on premises or in the Cloud. FileMaker Cloud simply adds in a new product offering to round out the platform. It will be up to you to determine if it is a good fit for your project’s requirements.
Backup Behavior
One of the ways in which FileMaker Cloud differs from FileMaker Server is with its backup strategy. Instead of backing up your files and storing copies of them on the server, the entire server is backed up in an AWS snapshot. Backups are created, by default, every 20 minutes. A week’s worth of snapshots is stored at any given time, which will result in 504 snapshots (3 snapshots per hour * 24 hrs * 7 days) over time. Additionally, you can also select individual snapshots to preserve indefinitely.
FileMaker Cloud allows you to restore from the snapshots. Doing so will restore the entire EC2 instance back to that state. All files and OS are restored when you do this.
However, what if you only want to restore a single file from a snapshot? There is still a way to do this.
Manual Backup Restore
These are the steps to take to get to a copy of your FileMaker files, as created by the FileMaker Cloud snapshots.
Step 1 Create a Linux EC2 instance
You FileMaker Cloud Elastic Compute Cloud (EC2) instance runs on CentOS Linux. Our first step will be to create another EC2 instance. I chose to use the Amazon Machine Image (AMI) running Linux on a nano sized instance. It does not have to be large at all, since it will only be used by us while we access the data. When not needed, we can stop this instance to save on cost. You can use the same private key used for other instances or create a new one.


Since Amazon Linux already has the AWS CLI (Command Line Interface, used to easily integrate with AWS services) installed, we could copy files out to an S3 bucket, but we will show how to make them easy to access so you can copy them directly to your desktop. When spinning up your new Linux instance, make sure to configure the security group to allow for traffic on port 22, because we will use Secure Shell (SSH) to access it.
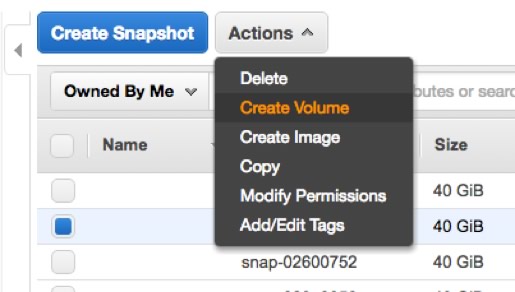
Step 2 – Create an EBS volume from FileMaker Cloud
In the EC2 section of the AWS console, select the snapshot you would like to restore from. This can be a preserved snapshot or one of the 504 rolling snapshots that FileMaker Cloud creates and keeps for a week. From the Actions drop down, select “Create Volume” and proceed with options for SSD.
Step 3 – Attach volume to Linux instance
Once you have created a volume from the snapshot, select it in the Volumes section of the AWS Console. From the Actions drop down, select “Attach Volume” from the list, and then specify your newly created Linux instance. Take note of where the volume gets attached. It will look something like this:
/dev/sdfStep 4 – Mount volume in Linux
From the Instances section of the AWS Console, right-click on the newly create Linux instance, select “Connect” and follow the prompts to connect via Terminal in OS X. You will need the private key specified when creating the instance.
Once you are in, you can see that by listing /dev (with “ls -al /dev”) that sdf, noted in step 3, is a symbolic link to a “device” located at /dev/xvdf (or similar). This is the volume we attached to the EC2 instance in step 3. We need to mount this device so that we can access its contents.
First make a folder at the root directory called “vol” with this command:
sudo mkdir /volThen mount the xvdf volume to that folder like so:
sudo mount /dev/xvdf /vol -t ext4The “-t” flag allows you specify the type of filesystem you are mounting, and in this case “ext4” is the type used by FileMaker Cloud and readable by Linux.
Now you can access the volume at /vol. Note that you will need to mount the volume again whenever you attach a new volume or reboot the machine, unless you configure it to mount by default.
Copy Your Files
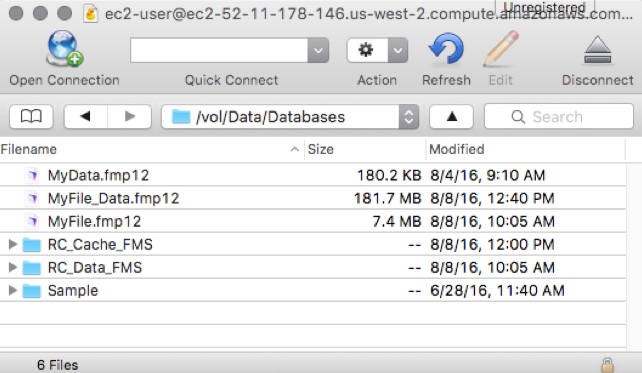
For an easy drag-and-drop way to copy files from the Amazon Linux instance to your desktop, you can use a program like Cyberduck. Connect to the instance, using your private key and with the same username that used in step 4. See Figure 4 for where to specify your key.
Once you have the files you need, you can re-upload them to your FileMaker Cloud server as needed. (See Figure 5.) Now you have complete access to individual files from within any of the snapshots that FileMaker Cloud provides.

Again, special thanks to Mislav Kos for reviewing and contributing to this post.
Pingback: FileMaker Cloud: What You Need to Know - Cimbura.com, Inc. Tech
Pingback: FileMaker Cloud, iPhone 7 Headphone Jack, fun stuff - FileMakerProGurus
File maker automatic take the backup, if you are connected with Internet. A week’s worth of snapshots is stored at any given time, which will result in 504 snapshots (3 snapshots per hour * 24 hrs * 7 days) over time.
Correct, with AWS Snapshots storing only the diff from the previous snapshot, so the actual size needed is only what changed on the volume.
Hi Mike, I know that we can create a new volume based on snapshot (as you shown).
But:
Could we create a new FMC instance on AWS (using FileMaker template as we did to create the first instance), stop it, dettach the dev/sdf volume (that is fresh with no data), attach the volume created using a snapshot from my old instance (that has all config and data) and start the new instance?
Do you know if in this case my FMC application (deployed in my new instance) will be up and running without problems?
I’m trying to design a Disaster Recovery Plan to restore our FMC application in new EC2 instance using AWS ressources. So, if the FMC server goes down (I dont know, if we patched and after reboot the server stopped), I’m wondering if we could create a new EC2 instance but use the old volume with all configuration and databases.
Thanks!
I would not count on this working, especially through automated maintenance on FMC. My fear would be that the instance logs the volume ID of the data volume it was built with, and changing that would result in the wrong volume getting attached later, when it builds a new instance as part of maintenance that it can do sometimes.