FileMaker 2026 introduced two new script steps, Insert Image Caption and Insert Image Captions in Found Set. These script steps can be used to send an image stored in a FileMaker Container field to the Claris AI Model Server, where a supported “image-to-text” model generates a description of the image. That description can then be stored in a field or variable.
The new Claris AI Model Server – which, for brevity, I’ll refer to as Claris AI Server – can be installed by itself, independently of FileMaker Server, and it features a few changes with respect to the previous version of it.
In this blog post, we’ll a) explain how to install and configure the Claris AI Server, and b) explore how these 2 new script steps work.
Claris AI Model Server
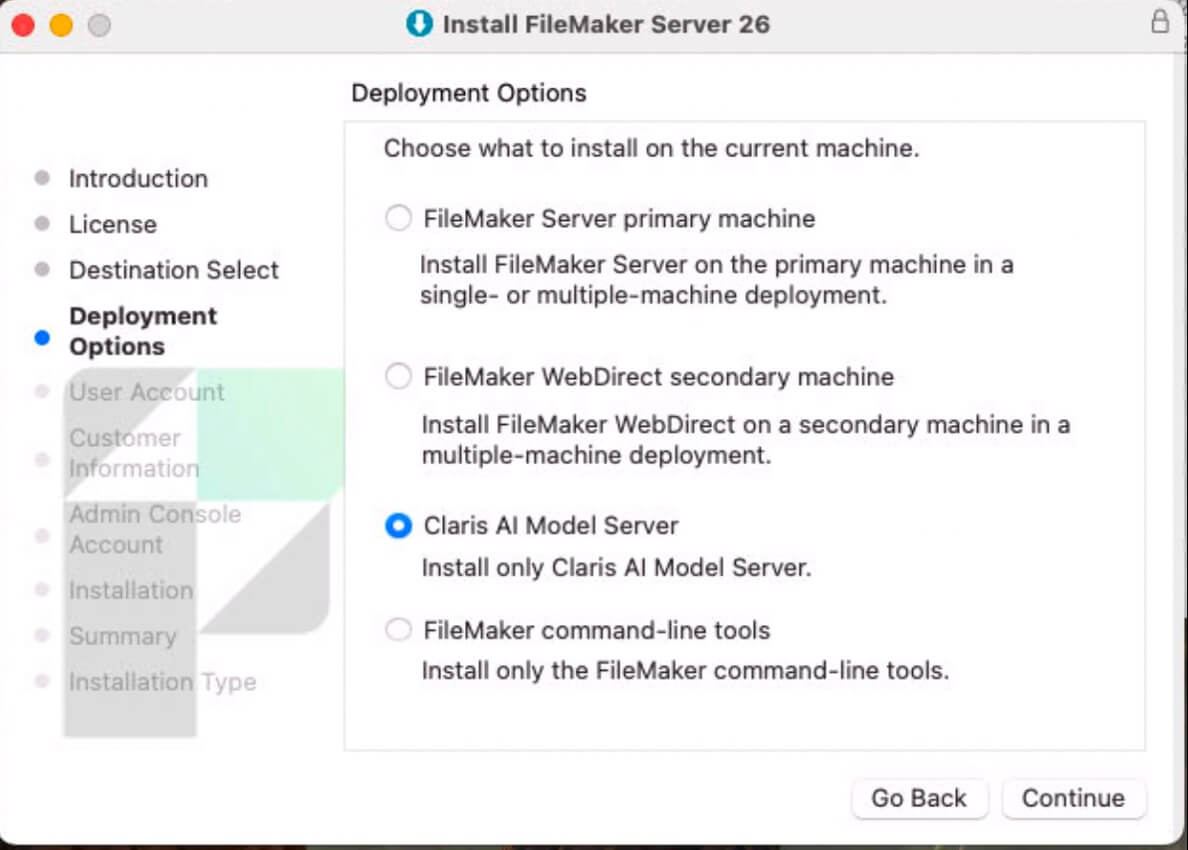
Starting with FileMaker Server 26, the Claris AI Server can be installed separately from FileMaker Server (see screenshot of FileMaker Server installer wizard). The AI Server consumes significant host resources, and those resources are different than what a standard FileMaker Server machine may have, i.e., AI model servers are thirsty for GPUs and VRAM. Furthermore, the models stored in the AI Server can be quite large (tens or hundreds of gigabytes in size). For those reasons, we recommend installing the Claris AI Server on its own machine, and not on the same machine as your FileMaker Server.
SSL Certificate
The installer prompts you to install an SSL certificate. In any production environment, you will want to install a custom SSL certificate from a Certificate Authority (CA). For testing purposes, you may use the Claris-issued certificate. Whereas the browser that you use to log into the admin console will alert you that it does not trust the certificate – because it cannot trace it to a trusted CA – the data sent to and from the Claris AI Server will be encrypted by the Claris-issued certificate.
Claris AI Server Dependencies
Installing the Claris AI Server requires installing Miniforge on the host machine. Miniforge is a minimal, community-driven package and environment management system. Installing Miniforge is quick and straightforward, as shown in the next screenshot.
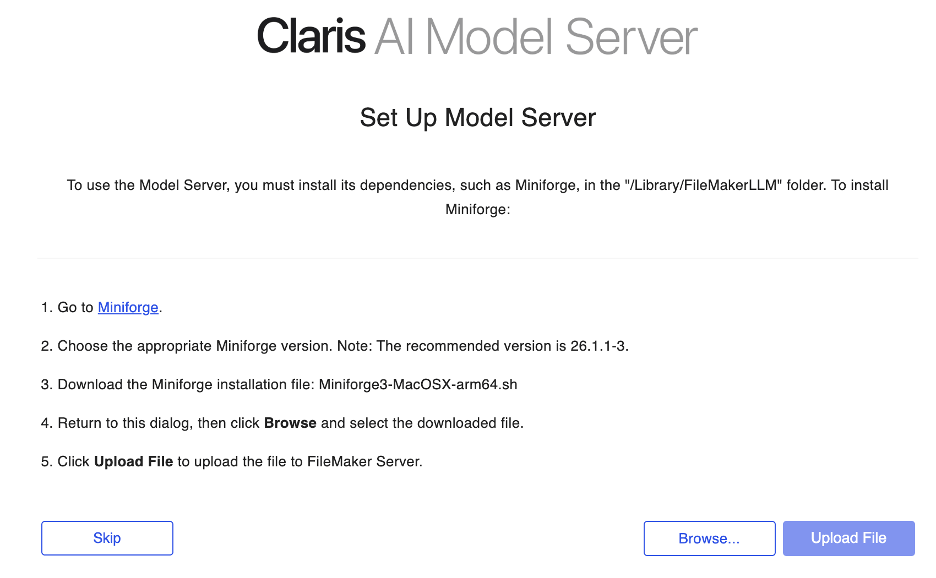
After uploading the Miniforge installer, you should see a message like this:

Create an API Key
Once Miniforge is installed and the Claris AI Server starts, we are prompted to create an API key, which we will use in the Insert Image Caption script steps to authenticate against the Claris AI Server.
Creating API keys is not strictly necessary to interact with the models loaded in the Claris AI Server. However, it’s best practice to use them, especially in any production environment or when working with sensitive data. In the Claris AI Server admin console, if you turn off the setting “Require API Key for Access,” which is enabled by default, the Claris AI Server admin console will constantly display various warnings to that effect. For those reasons, I recommend you get in the habit of using API keys to access all models in the AI Server.
As you can see in the next screenshot, a given API key can be used to access multiple models. For testing purposes, using a single key to access multiple models can be convenient. In a production environment, however, you may want to use a dedicated key for each model type that you utilize, to follow the principle of least privilege.
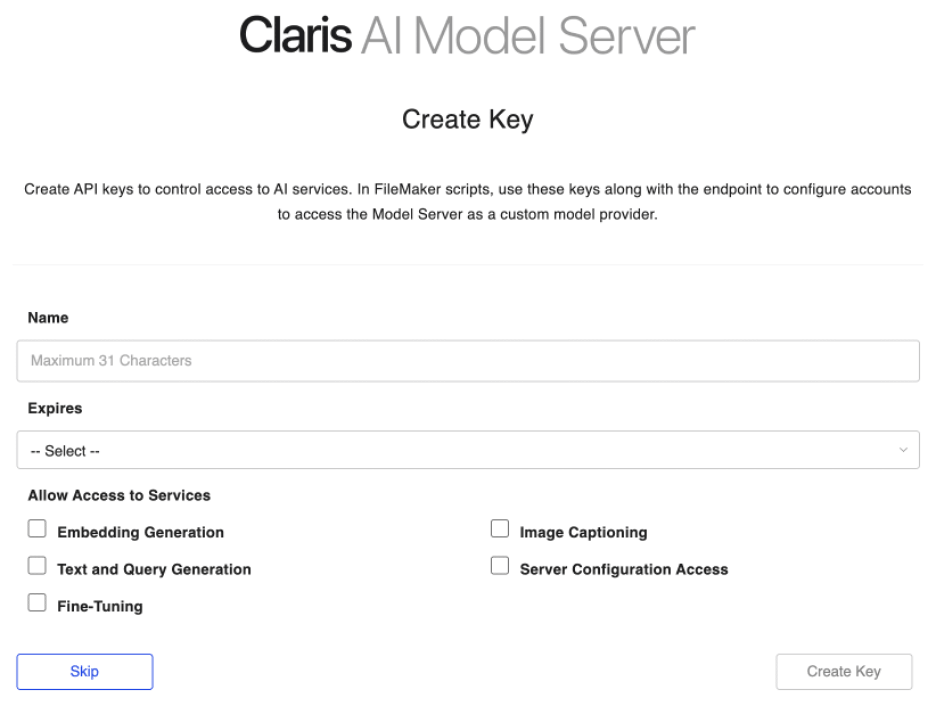
For the purposes of the use case covered in this blog post, you can just allow access to the “Image Captioning” models (aka services in the Claris AI Server admin console).
Once you create an API key, you’ll want to store it in a secure place, as you will NOT be able to retrieve its value again from the admin console.
Grab the API Endpoint
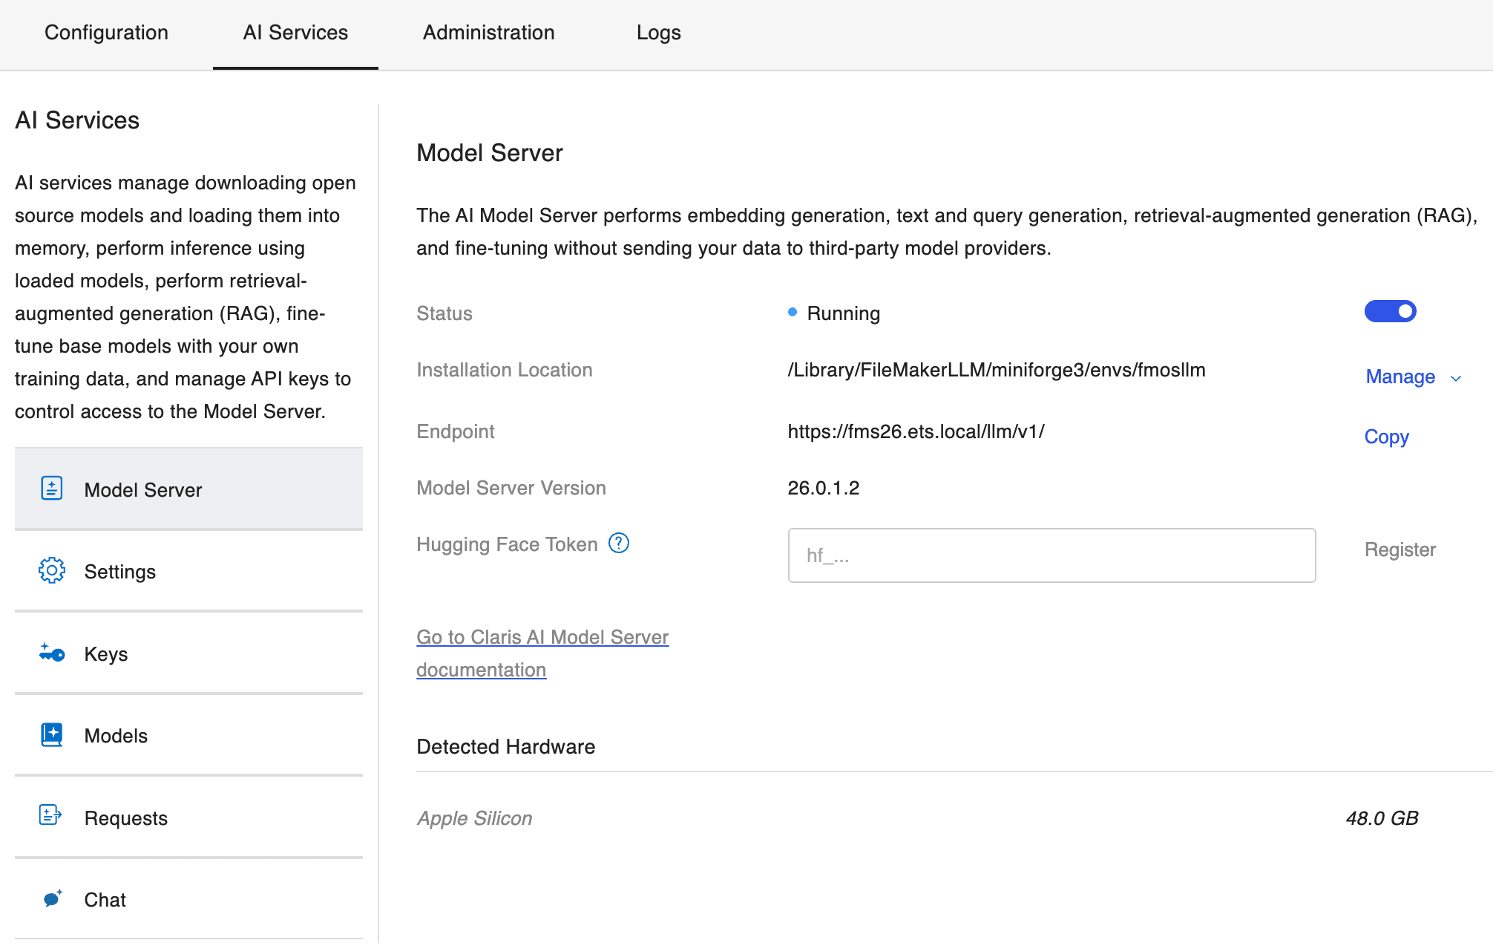
Once you create an API key, you will be taken to the Model Server section in the admin console. Here you will want to copy the “Endpoint” for the Claris AI Server, which is common to all models. In the case of the screenshot below, the endpoint is https://fms26.ets.local/llm/v1/. We will use this endpoint in the Insert Image Caption script steps.
In my experience working with APIs, what Claris calls an Endpoint here, is usually referred to as the “base URL”, and is one part of the endpoint. Having said that, I’ll stick to the terminology utilized in the admin console for the sake of this blog post
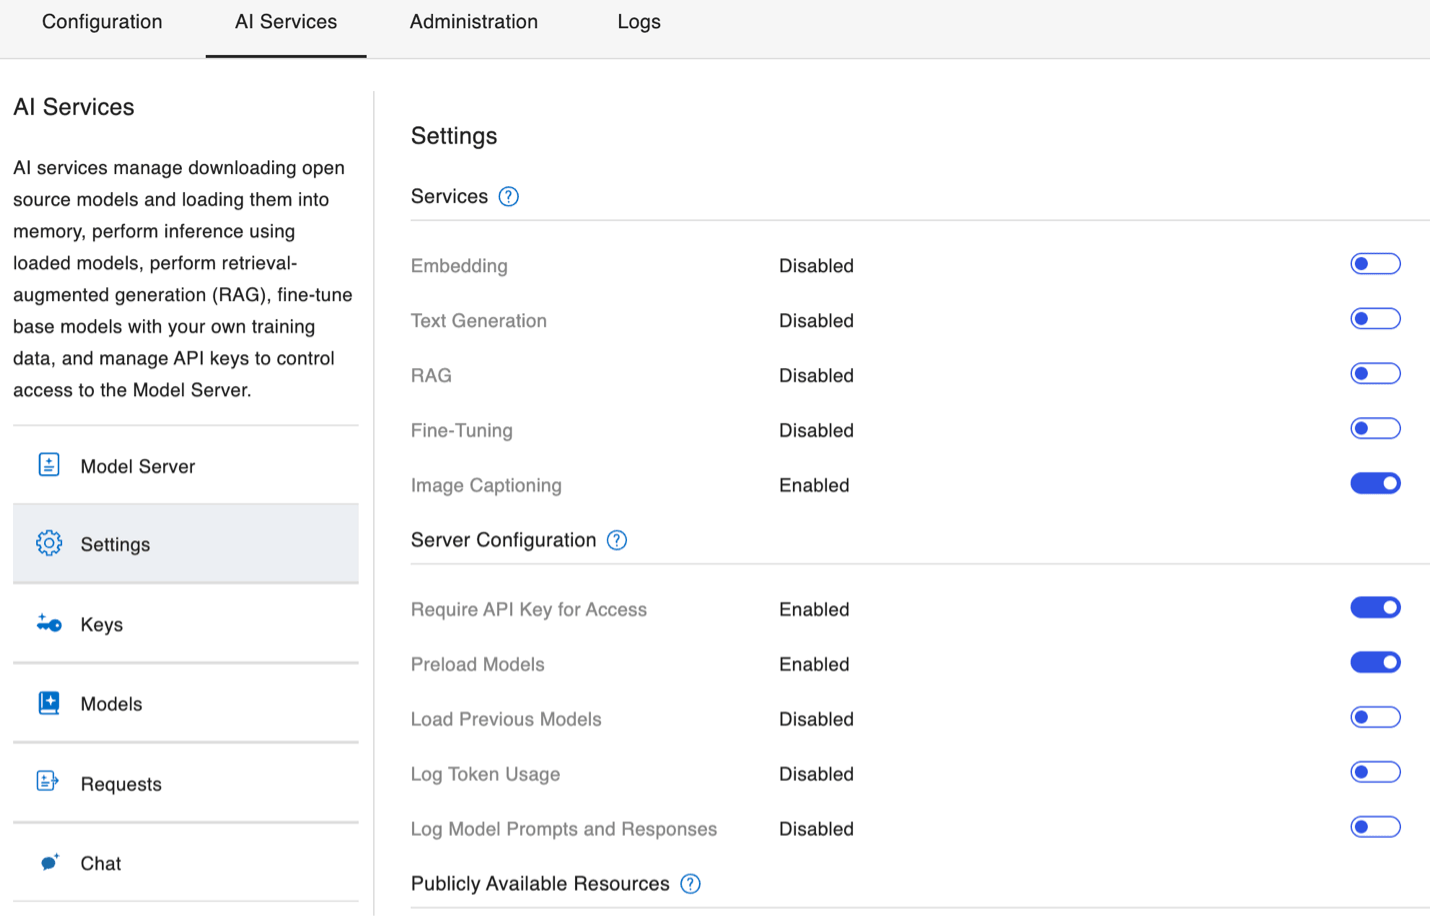
Enable the Image Captioning Service
The Claris AI Server supports different types of models or services (see next screenshot), which can be enabled or disabled independently of each other. For the Insert Image Caption script steps to work, you’ll need to enable the Image Captioning service. If you don’t enable this service and run the Insert Image Caption script steps, you’ll get error code 885 (endpoint is invalid or server is unreachable).
For performance, security, and other reasons, I like to disable any services that I am not using, as shown in the screenshot.
Load an Image Captioning Model
The last thing we have to do in the AI Server is load the specific model that the Insert Image Caption script steps will utilize to generate a caption.
As seen in the next screenshot, the Claris AI Server comes preconfigured with a few different models.
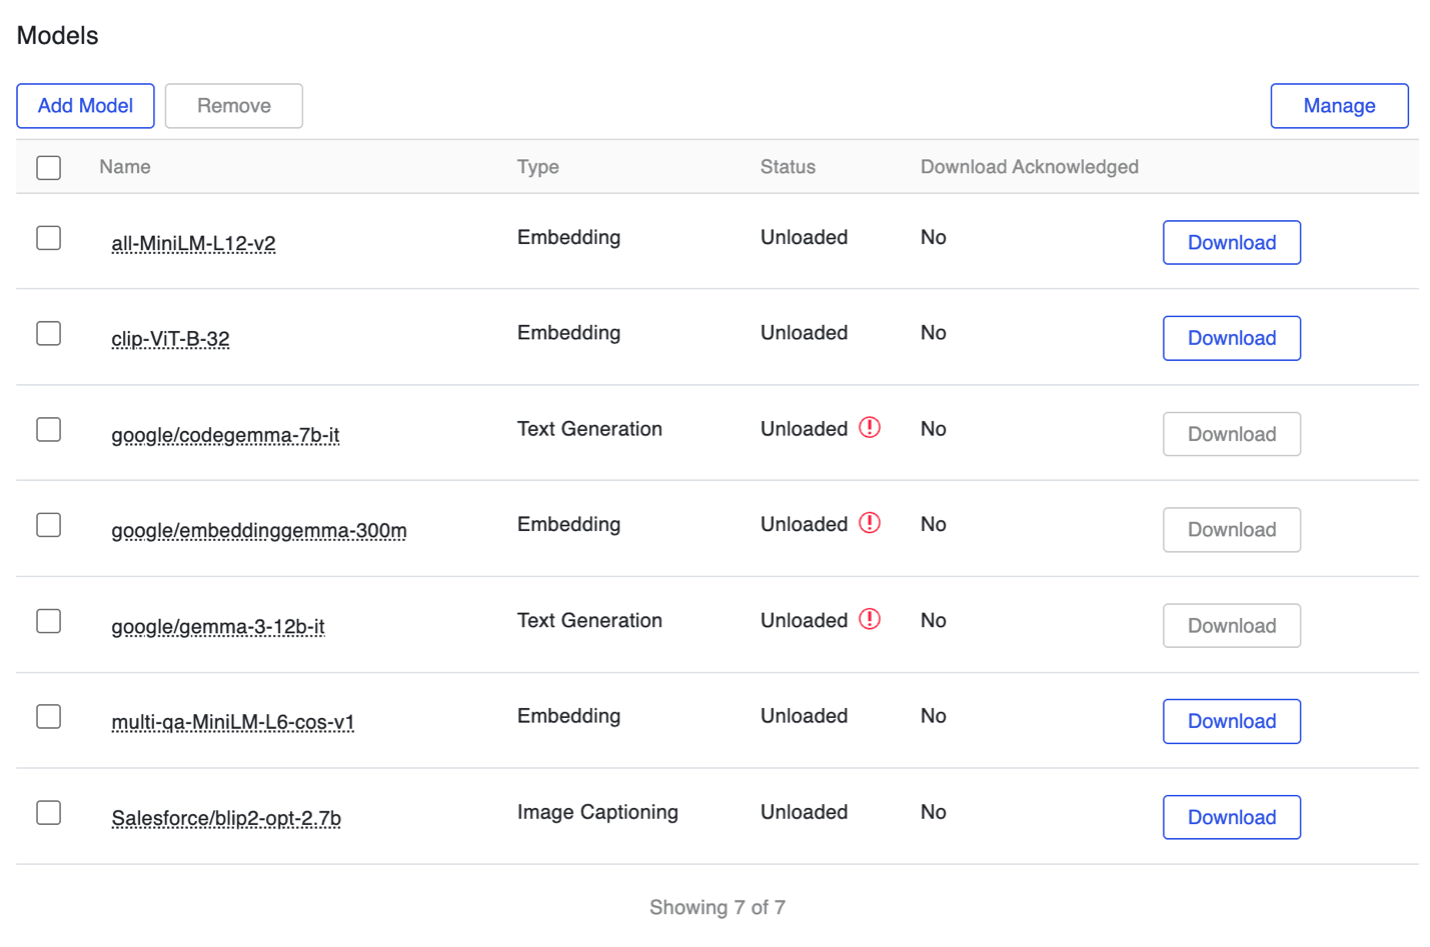
The name of the one pre-configured image captioning model, with which Claris has tested image caption generation, is Salesforce/blip2-opt-2.7b. Since this model has already been added for us, all we have to do is download it using the “Download” button.
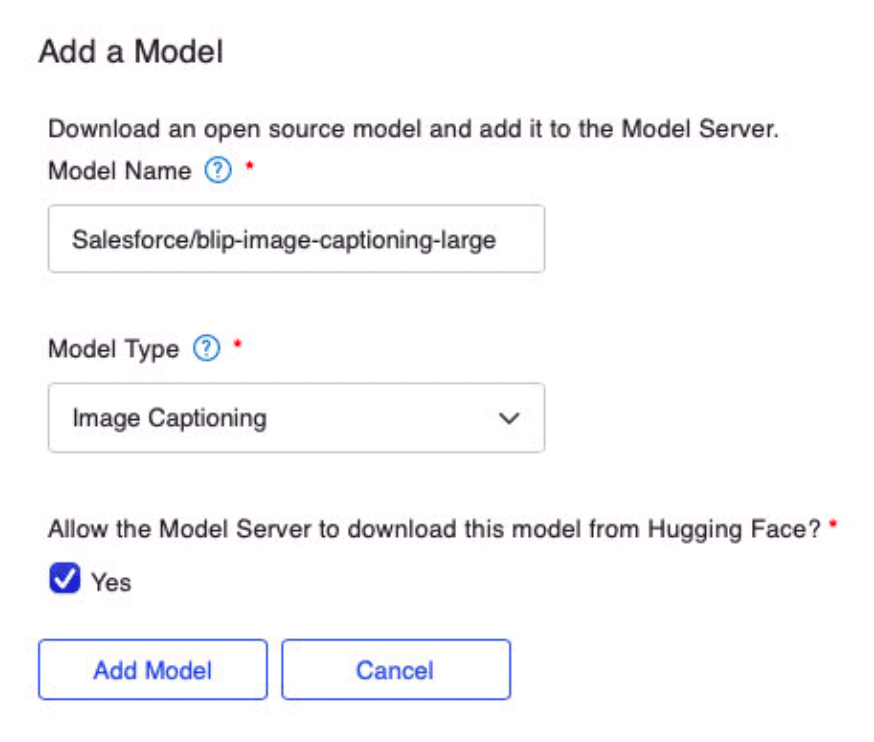
You can add any other open-source models that can be downloaded from Hugging Face. For instance, we could add this other image captioning model:
For the sake of this blog post, we’ll stick with the pre-configured image captioning model that comes with Claris AI Server.
Model Considerations
AI models can have flaws and biases. When deciding to use a given model, you can learn more about that model on the Hugging Face website. Here is the link to the image-to-text model that we are using here: https://huggingface.co/Salesforce/blip2-opt-2.7b
I encourage you to read the sections on “Bias, Risks, Limitations, and Ethical Considerations”, for a reminder of the nature of these models, and the implications of us using them.
Learning More About The Claris AI Model Server
In this blog post, we have covered the necessary information to get you started using the Claris AI Server and the configuration needed to load and use AI models in the Claris AI Server.
If you would like to learn more about the Claris AI Server, you can reference this Claris Engineering blog post on the subject; in particular, review the white paper on the Claris AI Model Server linked to in that blog post. You may also find the Claris Configuring AI services guide useful.
Using The New Insert Image Caption Script Steps
These steps are distinctly different from the existing Perform Semantic Find step introduced in FileMaker 21.0. Perform Semantic Find allows us to perform semantic searches against images. That step requires vector embeddings to be generated for both the images to be searched and for the text or image that is used as the “search criteria”, if you will. On the other hand, the new script steps in question do not require you to generate vector embeddings. They simply return a caption or description of the supplied image(s).
The Insert Image Caption and Insert Image Captions in Found Set script steps are configured very similarly to how Insert Embedding and Insert Embedding in Found Set are configured.
First, we need to configure the AI account that we’ll use to talk to the Claris AI Server. To do so, we use the Configure AI Account script step (see screenshot). The Account Name is whatever name you want to give to this AI account. The Model provider in this case is “Custom”, i.e. we won’t use any of the big AI providers like OpenAI, Google, etc., rather, our AI Provider will be our local Claris AI Model Server.
The Endpoint is the URL that we grabbed previously from the “Model Server” section in the Claris AI Server admin console. The API key is the key we stored securely. Finally, you can choose to verify SSL Certificates in this script step. By default, this option is turned off. If you did not install a custom SSL certificate in the Claris AI Server, and you are using the Claris-issued certificate for testing purposes, this should work fine.
In a production environment, where you have installed a custom SSL certificate, you would want to enable the Verify SSL Certificates option for added security.
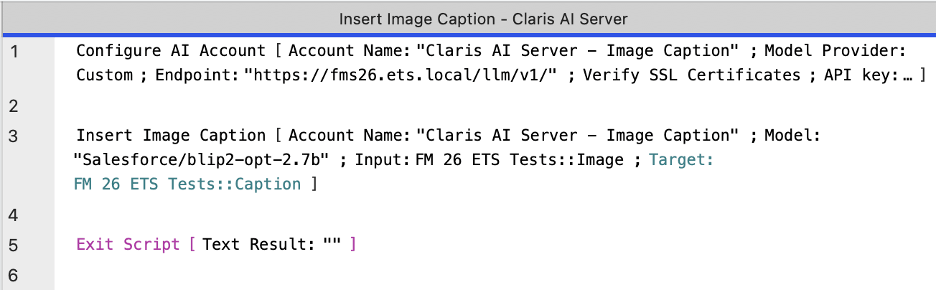
Note: to keep this blog post straightforward, I am directly inputting and storing the API key in the Configure AI Account script step. We do NOT recommend doing this in a production environment. Rather, we recommend storing keys securely and loading them into memory, i.e., into a script variable, when the script runs. Also, for the sake of simplicity, I am not including any error trapping and handling in the script in the screenshot, which I typically include in production scripts.
Once we have an AI account configured, we are ready to use the Insert Image Caption script step (refer to the previous screenshot again). The Account Name option in this script needs to match the Account Name specified in the Configure AI Account script step. The Model is the exact name of the model that you chose to use to generate the image caption, as displayed in the Models section in the Claris AI Server admin console. Input is a reference to a FileMaker container field, or an expression that returns an image as container data. Target is a reference to either a FileMaker field or a variable where you want to store the image caption returned by the AI Model.
When I execute the script in the screenshot on a record in which the Image field contains this image:

The Insert Image Caption script step – when calling model Salesforce/blip2-opt-2.7b – returns the following: “a man standing in a field of red flowers”, which is accurate and concise.
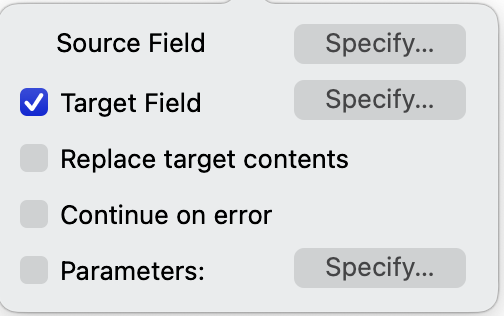
If you want to use the Insert Image Captions in Found Set script step, the configuration described above is the same for this script step, with the exception that the target must be a field; it cannot be a variable. Additionally, we can specify the following options (see screenshot):
- Whether the existing contents of the target should be replaced
- Whether the script step should continue if an error occurs
- Parameters – for the details on the parameters option, I’ll refer you to the Claris documentation for this script step.
Next Steps
In a follow-up blog post, we’ll explore other ways of obtaining captions or descriptions for images in FileMaker fields, including using AI agents and making API calls to AI providers like Anthropic. We will also dive deeper into how FileMaker script steps like Insert Image Caption interact with the AI models, and we’ll discuss the pros and cons of using the Claris AI Model Server vs other options. If you have questions now or need help adding AI functionality to your FileMaker application, contact our team to talk with both FileMaker consultants and AI experts.