Moves management is a method of cultivating a nonprofit’s relationships with donors, prospects, and other constituents by determining where every individual is in their donor lifecycle and determining what actions to take to move them along in their journey of supporting your nonprofit.
With appropriate planning and just a little bit of customization, you can leverage features in Salesforce’s Nonprofit Success Package (NPSP) to implement moves management in your organization!
Planning
Determine Your Target Audiences
The donor management lifecycle is the cornerstone of moves management. Typically, this lifecycle includes steps such as cultivation, solicitation, and stewardship. However, when you look at your organization’s constituents, you may find that they fall into different audiences, and you’ll want to use different strategies to engage with each audience; some of those audiences may even follow different lifecycles from one another.
For example, you might organize your constituents into three audiences: (1) small, one-time donors, for whom your goal is to get them to become recurring donors; (2) major donors from whom you want to solicit large donations; and (3) volunteers that you would like to see become donors.
You’ll want to spend time thinking about who these audiences are and what data attributes you can use to identify them. For example, do you want to segment your audiences based on gift size? If so, how will you represent smaller gifts vs larger gifts? Should total giving play a role? Largest gift amount? Number of gifts? Discrepancies between donor lifetime value vs actual giving? If so, NPSP’s rollup fields, such as Total Gifts, First Gift Date, and Largest Gift, can be great for segmenting your target audience based on their giving. Does it make sense to segment your audiences based on the programs that they support and are passionate about? Are there other attributes you would want to use to segment your audience, such as geographic location or age group?
Depending on how you define your audiences, don’t worry if you find that there are some individuals who fall into multiple audiences! That just means that there are different ways that they can be engaged.Determine Your Target Audiences
For example, let’s say our organization identifies three types of audiences:
- Major Donors, defined as individuals who have given >$5,000 in the last two years
- Small Donors who have given only one gift worth ≤$5,000 in the last two years
- Volunteers who have their Volunteer checkbox checked and have given $0 in the last two years.
Define Your Goal for Each Audience and Their Donor Lifecycle
Once you have defined who your audiences are, you’ll want to determine what you want each audience to do and what stages they should go through on their donor lifecycle. These goals should be SMART—specific, measurable, achievable, relevant, and time-bound.
It’s important to note that your goal should be different for each audience, and if you find you have the same goal for multiple audiences, it may make sense to consolidate those audiences together.
Also, different audiences may or may not have the same donor lifecycle. For example, it might be important to have specific identification and qualification stages for major donors that are coming from donor acquisition platforms, whereas donors giving small gifts can move into the cultivation stage without needing to be qualified. In our example, let’s say that our organization identifies the following goals and lifecycle stages for each audience:
- Major Donors
- Goal: ask for a major gift of $10,000 in the next year
- Donor Lifecycle Stages: Identification, Qualification, Cultivation, Solicitation, Stewardship
- Small Donors
- Goal: ask for a $100 gift or a 10% increase on last year’s total giving in the next year
- Donor Lifecycle Stages: Cultivation, Solicitation, Stewardship
- Volunteers
- Goal: ask for a gift of $100 in the next 6 months
- Donor Lifecycle Stages: Cultivation, Solicitation, Stewardship
Decide Your Activities for Each Stage of Each Audience’s Donor Lifecycle
Once you have defined your audiences, your goals, and each audience’s donor lifecycle stages, you should think about what activities should take place during each stage to help move the donor to the next step in their donor lifecycle. Some key considerations are:
- What kind of action is being taken? Email? Phone call? In-person meeting? Mailing?
- Who is performing each task?
- What does the cadence of the activity look like?
- How important is each activity to moving to the next stage?
For example:
| Stage | Small Donor | Major Donor | Volunteer |
|---|---|---|---|
| Identification | N/A |
|
N/A |
| Qualification | N/A |
|
N/A |
| Cultivation |
|
|
|
| Solicitation |
|
|
|
| Stewardship |
|
|
|
As you start to implement moves management, you are likely to find that some of the activities you have defined are more effective than others. That is to be expected; you will want to fine-tune each stage’s activities as you learn what works and what doesn’t, your organization refines its engagement strategy, and technological changes alter the ways we communicate with constituents. Think of this activity as a draft of your communication strategy that will get updated as you refine your processes and learn more.
Build It in Salesforce
Now that you have identified what your organization’s needs are, you can build the functionality in Salesforce!
Tracking Your Donor Lifecycles with Engagement Profiles
We’ll need a custom object to capture instances of individuals being identified as part of an audience. You can call this object something like “Engagement Profile.” This object will have three custom fields:
- Contact, a Master-Detail relationship to the Contact object
- Profile, a picklist that contains all the audiences you identified as picklist values
- Stage, a picklist that contains all the audiences’ donor lifecycle stages you had identified in your planning as picklist values. Additionally, you’ll want to add whatever stages that are needed to track a Contact exiting the audience (eg, Dropped, Not Qualified).
If you identified that different audiences have different stages, you can make the Profile field the controlling field for Stage to govern what Stage picklist values are available for each Profile. Be sure to add the Engagement Profile related list to the Contact detail page.
This allows a highly flexible and scalable solution: As you identify new audiences and donor lifecycle stages, you can add these as picklist values and update the controlling picklist accordingly. Another advantage of this implementation is that you can assign a single Contact to different Engagement Profiles, so if you identify one audience as major donors and another audience as supporters of a specific program, when you have a Contract who is both a major donor and interested in that program, you can track both and make sure she or he is getting appropriate engagement both as a major donor and supporter of the program.
In our example, the Profile picklist will have the following values: Small Donor, Major Donor, Volunteer; the Stage picklist will have the following values: Identification, Qualification, Cultivation, Solicitation, Stewardship, Dropped, and Unqualified. We’ll then make Profile a controlling picklist of Stage, Small Donor, and Volunteer, who will have Cultivation, Solicitation, and Stewardship as stages. Major donor will have Identification, Qualification, Cultivation, Solicitation, and Stewardship as stages.
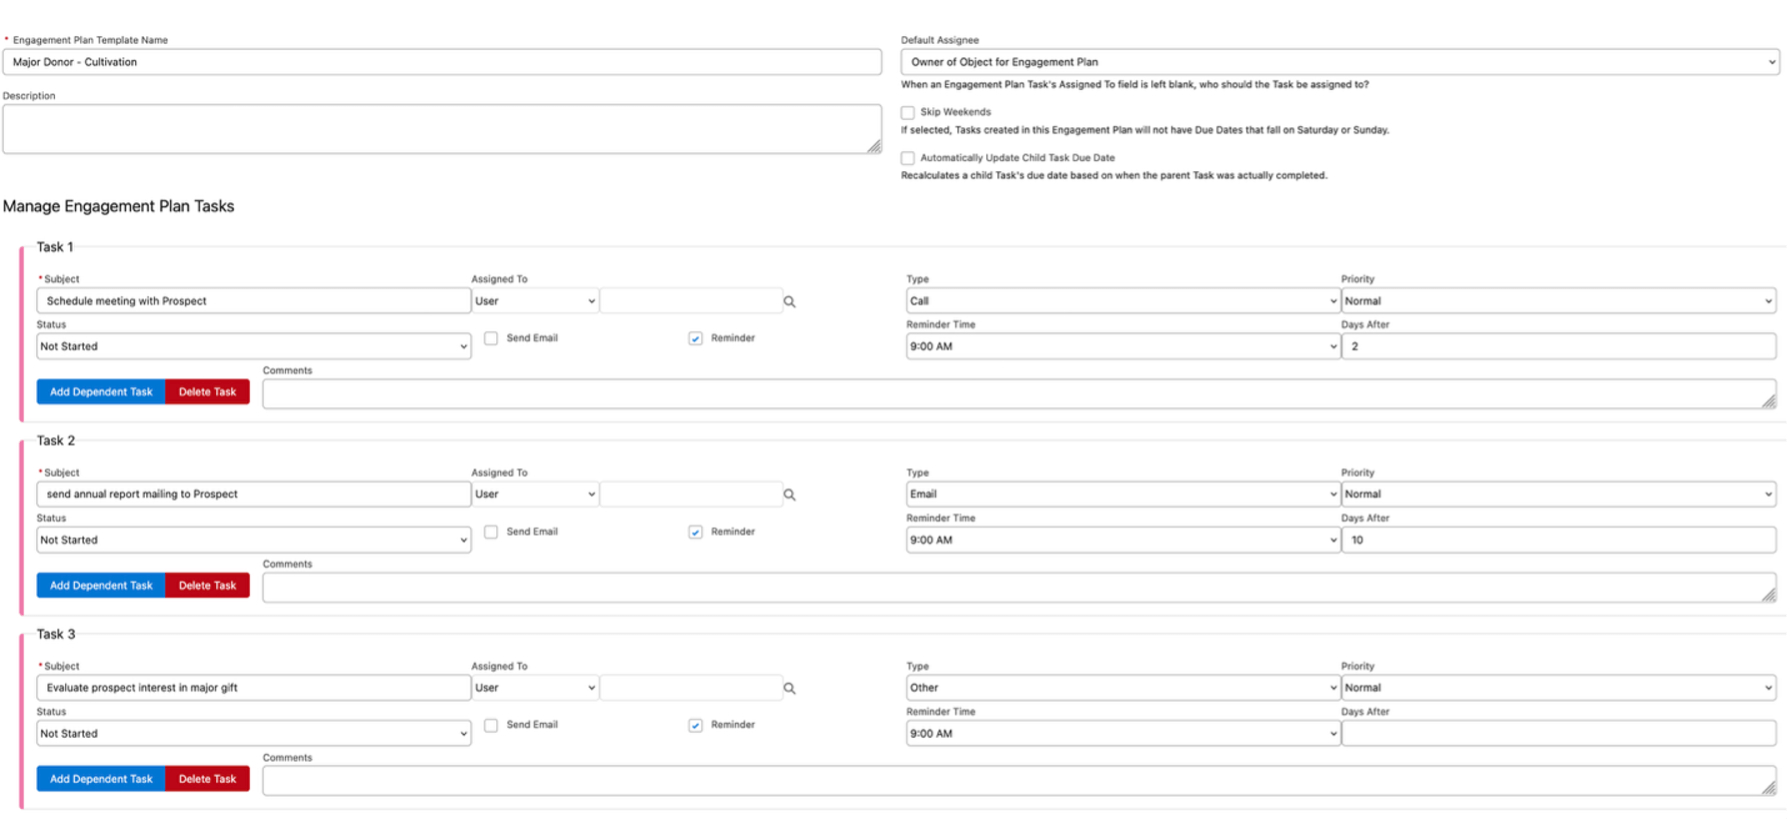
Build Engagement Plan Templates
Now that you have created your Engagement Profiles, we can leverage the NPSP’s Engagement Plan feature to track the activities we have defined. Engagement Plans are a powerful and underused NPSP feature that allows you to standardize touchpoints with your constituents. This feature consists of two key components: Engagement Plan Templates, which allow you to define the activities associated with an Engagement Plan, and the Engagement Plan, which can be assigned to a Contact or Account. When an Engagement Plan record is created, Salesforce creates a task for each activity in the Engagement Plan Template and associates them with the record to which the Engagement Plan has been assigned.
In the Engagement Plan Template, you can specify activity data such as the type of activity, how many days after the Contact is added to the engagement plan the activity should be completed, if the activity is dependent on the completion of other activities, and who the activity should be assigned to: a specific user, the user assigning the Engagement Plan to the Contact, or the Contact’s Owner. For more about Engagement Plans, you can reference Trailhead or the NPSP How-To Series videos.
We will want to create an Engagement Plan Template for each Profile/Stage combination in a standardized format, for example, “<Profile> – <Stage>.” Then, for each, you’ll want to create the activities we had identified in planning.
In our example, one engagement plan would look like this:
As you fine-tune your processes, you can update your Engagement Plan Templates to add new activities, remove activities that are found to be less effective, or update activity data on the templates if you need to revise your cadence. These changes are applied to Engagement Plans associated with the Engagement Plan Template going forward.
Automate Assignment of Engagement Plan Based on Engagement Profile
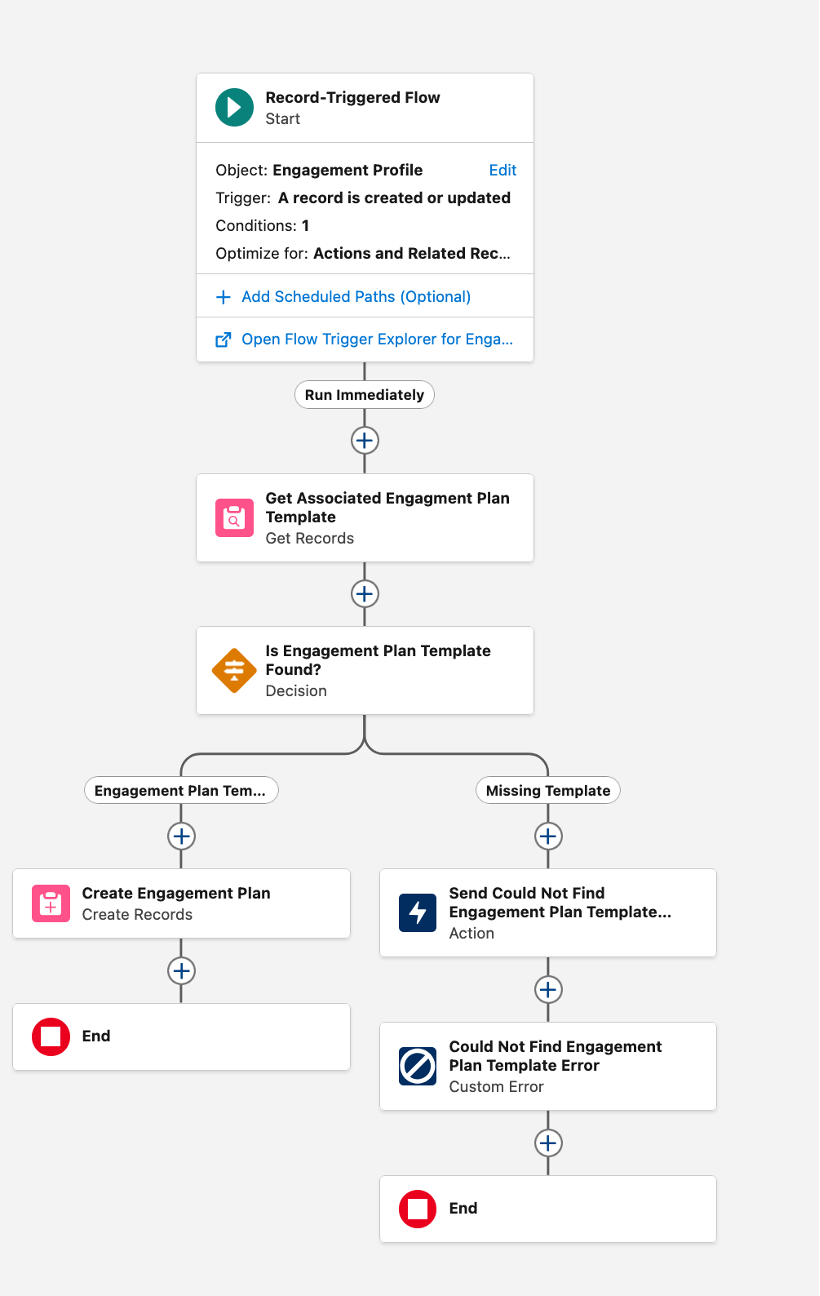
Once we’ve created our Engagement Profile object and defined our Engagement Plan Templates, we’ll want to create a Record-Triggered Flow so that when a Contact is assigned an Engagement Profile or the Stage of an Engagement Profile changes, Salesforce automatically assigns a corresponding Engagement Plan to the Contact.
To do this, we’ll want to create a Record-Triggered Flow for the Engagement Profile object that is triggered when a record is created or updated. Because we need it to fire whenever an Engagement Profile is created, we can use a formula for the entry conditions:
AND(
	OR(
		ISNEW(),
		ISCHANGED({!$Record.Profile__c}),
		ISCHANGED({!$Record.Stage__c})
	),
	NOT(ISPICKVAL({!$Record.Stage__c}, 'Dropped')),
	NOT(ISPICKVAL({!$Record.Stage__c}, 'Not Qualified'))
)
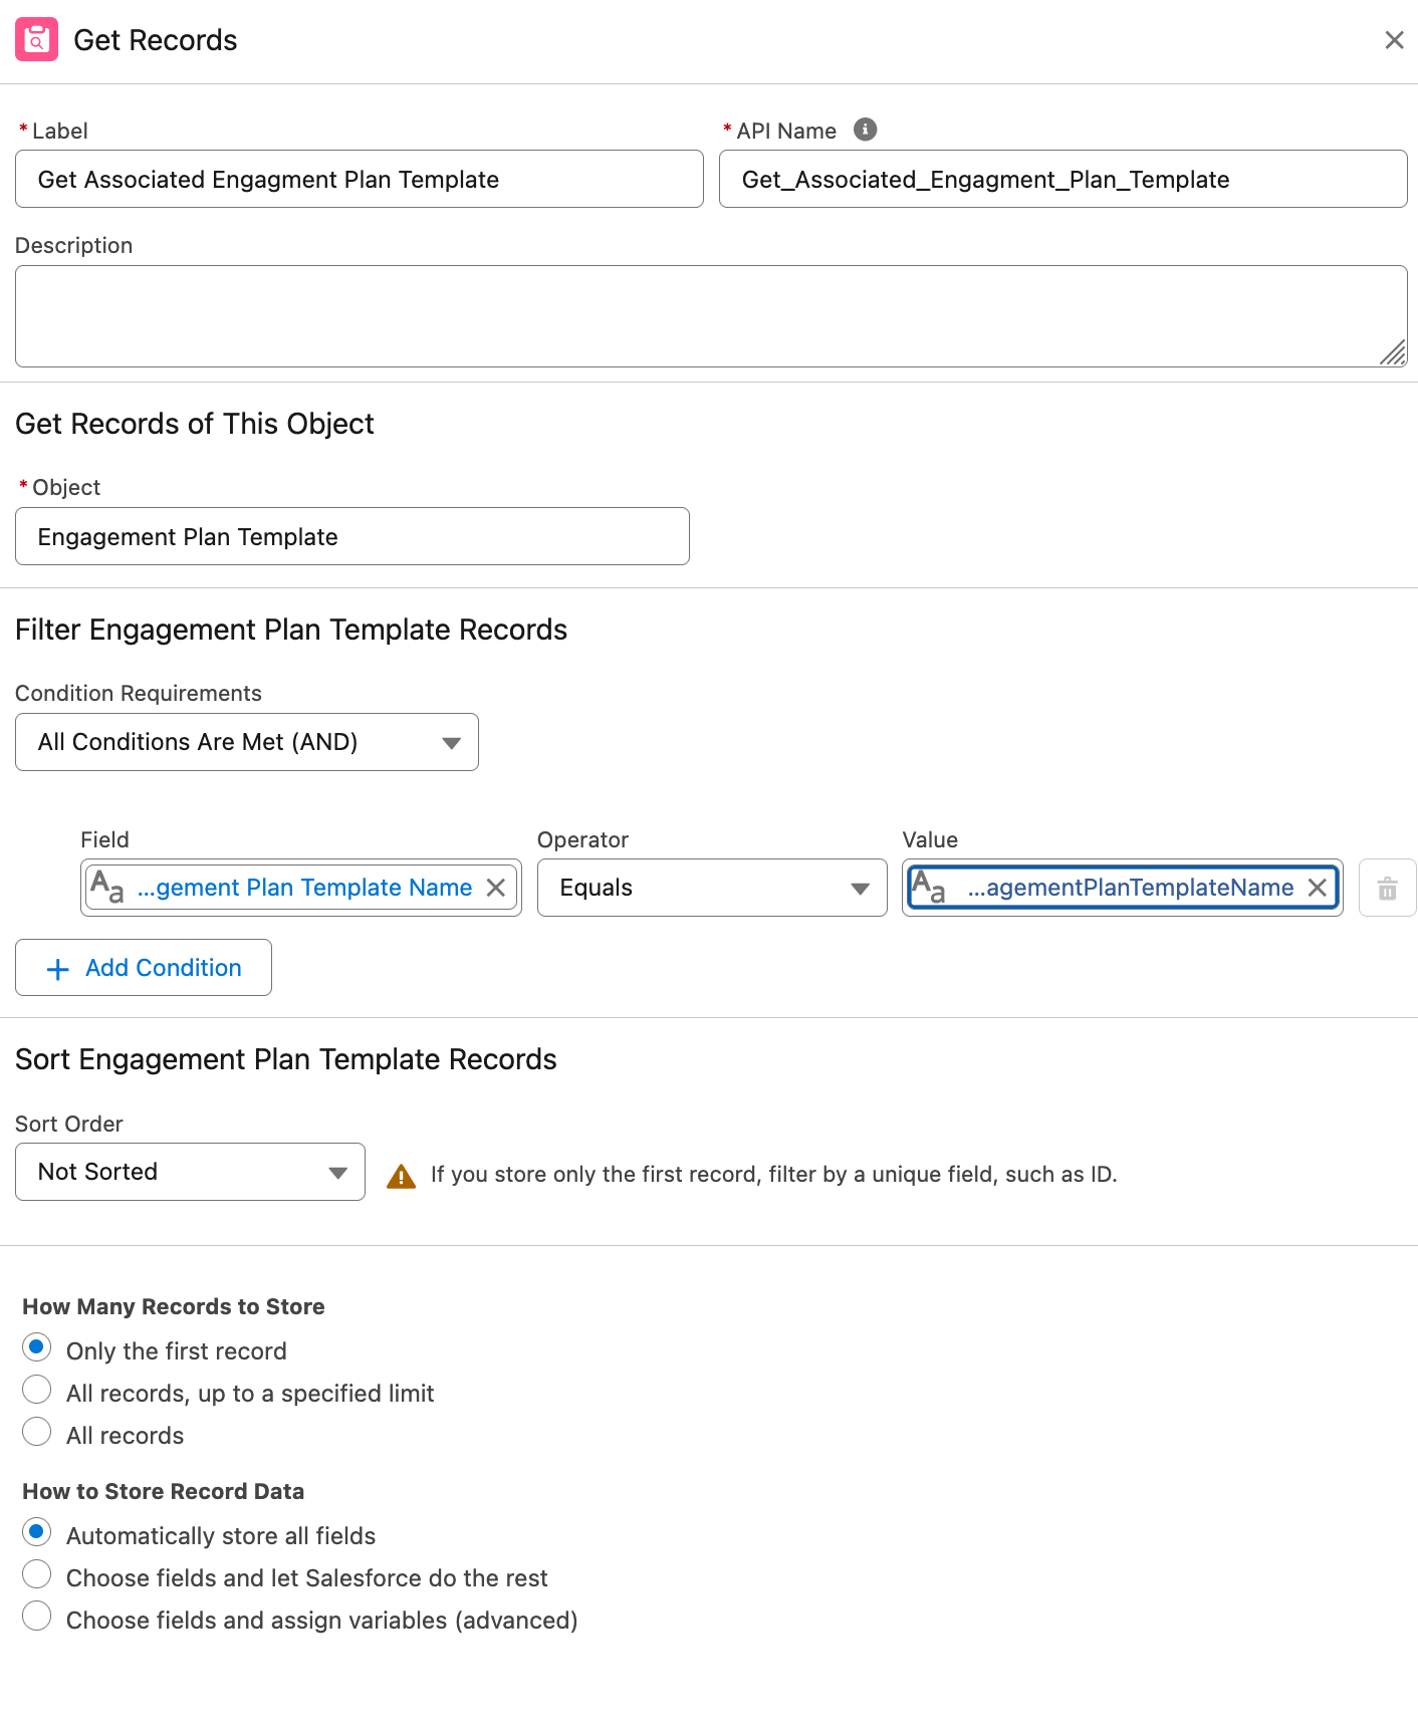
In the flow, create a Text Formula Resource called “EngagementPlanTemplateName.” This formula will pull data from the Engagement Profile into the naming format you used for the Engagement Plan Templates:
TEXT({!$Record.Profile__c}) & ' - ' &
TEXT({!$Record.Stage__c})
Now, create a Get element and query for the first Engagement Template Plan whose Name = EngagementPlanTemplateName
Next, add a Decision element to see if the Get element returned an Engagement Plan:

If no Engagement Plan Template is found, implement appropriate error handling: Send an email to the System Admin, display an on-screen error, or both.
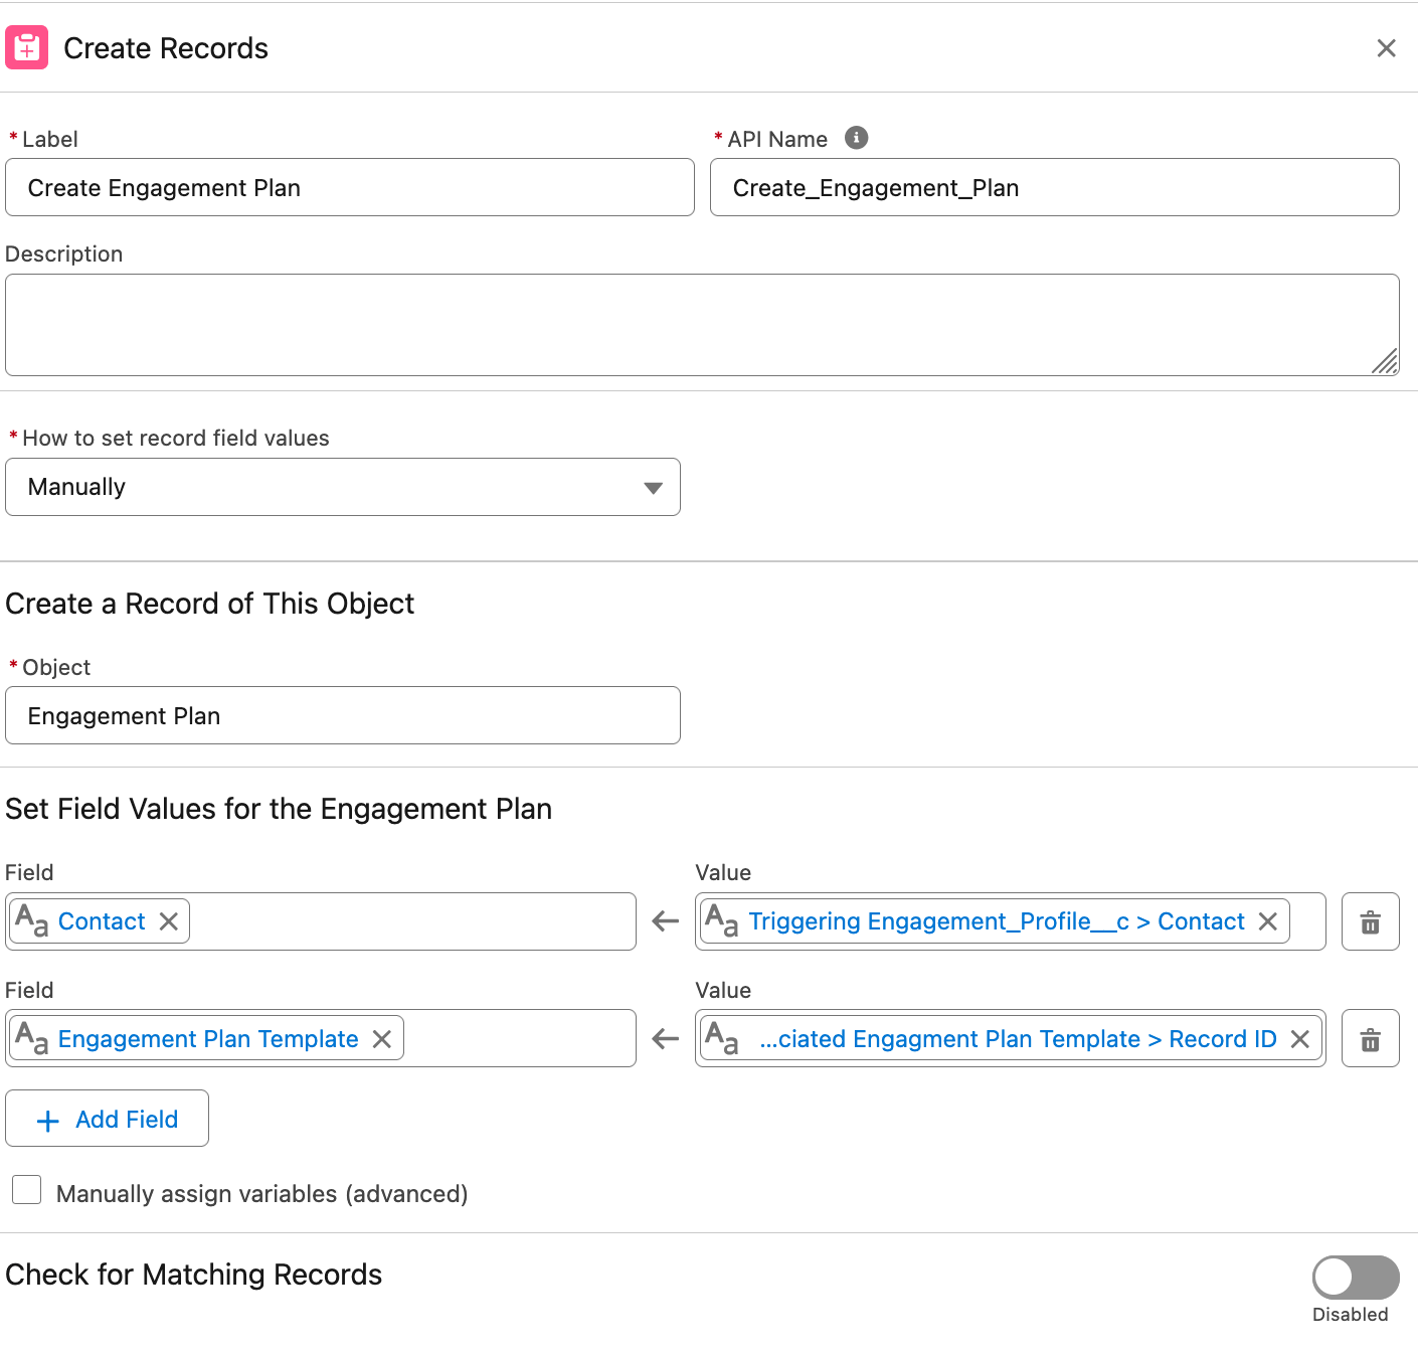
If an Engagement Plan Template is returned, add a Create element to make a new Engagement Plan Record.
Your flow should look like this:
Other Considerations
Now that you’ve set up that automation, your organization has a framework for moves management! It’s flexible, scalable, and allows Contacts to be assigned to multiple audiences!
However, there are a few additional considerations that you might want to address in Salesforce:
Major Gift Stages
Out of the box, the NPSP Major Gift Sales Process includes some Moves Management-like Stage values, such as Identification, Qualification, Cultivation, and Solicitation. Now that you are tracking this in your Engagement Profile, you will likely want to revise the Stages of the Major Gift Sales Process and define a standard operating procedure for what should be tracked as an Engagement Profile versus what should be tracked in the Major Gift Opportunity and when it is appropriate to create a Major Gift Opportunity.
Retain Engagement with Contacts in Stewardship
The Stewardship stage of the Donor Lifecycle is a little tricky from an engagement plan perspective. Engagement Plans eventually run out of tasks, but you’ll want to make sure you’re maintaining engagement once your Contacts are in the Stewardship stage on an ongoing basis. One way you can maintain this is by creating an Engagement Profile Tab and adding it to your app, and creating list views for each Profile with Stage = Stewardship. Then you can create an Add to Campaign list button that links to a screen flow that prompts users to select a campaign and adds the Contacts from selected Engagement Profiles to Campaigns as Campaign Members. This allows for easy segmentation of your Contacts based on audience and allows you to easily ensure that they are included in the campaigns.
Another way you can ensure you stay engaged with Contacts in Stewardship is by creating ongoing Stewardship Engagement Plan Templates and implementing a Scheduled Flow to periodically create new Engagement Plans for Contacts with Stewardship Engagement Profiles.
Additional Automation Opportunities
Now that you’ve set up a framework for moves management, there are a few opportunities for further automation to allow your Development team to spend less time logging repetitive data in their CRM and more time doing impactful work. As currently implemented, the Development team will need to manually create Engagement Profiles for each Contact. Remember how you had defined the attributes for each audience? You can build Record-Triggered Flows on the Contact object to automate the creation of Engagement Profiles when a Contact has those attributes! This can have the added benefit of encouraging users to be diligent about inputting Contact data and keeping it up to date, as doing this will save them time by taking the task of manual Engagement Profile creation off their plate, instilling a virtuous cycle of data stewardship.
Note that if this automation is not included in the initial implementation, you’ll need to account for Contacts that have already been assigned an Engagement Profile so that they are not assigned a duplicative profile by the automation.
Additionally, if the emails that should go out as part of Engagement Plans can be templatized and don’t need personalization beyond merge fields, you can create a Record-Triggered Flow on the Tasks object with a scheduled path based the Task’s Due Date that will query for an Email Template based on Task data, and if an Email Template is found, Salesforce can automatically send out that email and mark the Task as complete!
Partner with Our Nonprofit Experts to Maximize Your Donor Relationships
Implementing effective moves management in Salesforce’s Nonprofit Success Pack can seem overwhelming, but with appropriate planning, it can be implemented with comparatively little effort and bring your organization tremendous value by ensuring your constituents are engaged in ways that are relevant and meaningful to them, which can result in increased volume and size of major gifts, better donor retention, and improved resource allocation as you refine your processes and determine what cadences that are most effective for your organization. By leveraging Salesforce’s powerful automation tools, you can take repetitive tasks off your Development team’s plate, allowing them to spend more time on the more meaningful and impactful work of building and maintaining relationships.
As a Salesforce Consulting Partner with 15 years of experience serving nonprofits, we’ve helped hundreds of organizations implement sophisticated donor management solutions that drive increased giving and stronger donor relationships. We leverage our deep understanding of both NPSP’s capabilities and nonprofit operations to create SMART solutions that align with your mission while maximizing the return on your Salesforce investment.
If you’d like to optimize your existing Salesforce NPSP implementation or build a donor tracking strategy from the ground up, our team can help you leverage these powerful tools effectively. Contact us today to discuss how we can help your organization better understand and grow your donor relationships.