A Little Background…
Working with FileMaker layouts, you are able to insert an image on a layout, which is very handy for using sets of icons. The problem you run into is that for each image you place on a layout, that is another copy of the file that is stored in your FileMaker file. For example, lets say you have three container fields with icons under them to insert or clear the contents of each field. If you have a “trash” icon that sits on a button below each field, that is three of the same image stored on that one layout.
It may not seem like a big deal, but in addition to the overhead it adds to the file, it can be harder to maintain the solution if you ever want to update the icons. You would need to go to every icon, delete it and insert a new one, placed exactly as it was before.
A common solution to this problem is to create a table with a single record to store these graphics, with global fields that get set to the images. Then, as part of a script that runs when the file is open, set all these global fields so they will display. This has the advantage of keeping one copy of the image file in order to reduce overall file size, as well as improved network performance since FileMaker only has to send one copy of the image file to display in all places where it appears.
OK Then, Get on With It!
With the introduction of Styles and Themes in FileMaker 13, there is now another option to consider. You are now able to set the background of an object to an image. By saving those changes as Styles, and saving the Style back to the Theme, you are able to have much of the same advantages to the method outlined above, with the following advantages:
- No need to store interface elements in your schema.
- One image referenced everywhere it is used.
- No script steps needed (i.e. to set global fields used to display images.)
- Ability to change a set of icons all at once by switching themes.
Here’s how you can build your own icons and images and make them part of your own Theme. Open an existing FileMaker file, or create a new file.
- Enter Layout Mode
- Select the Rectangle Tool

- Draw a rectangle and in the Inspector, click on the Appearance tab.
- For Fill, select Image
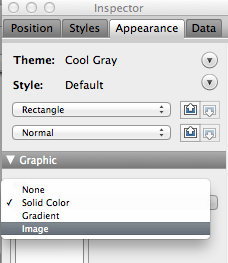
- Select the image of your choice
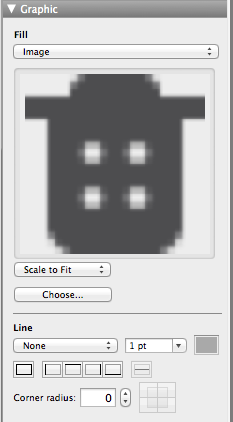
- Select “Scale to Fit” in the appearance pane.
- If you don’t want a line around your image, select “None” from the Line options.
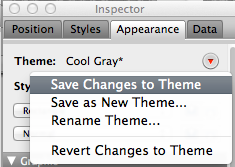
- Now there will be a red triangle next to the current Style. Click the red triangle and select “Save as new style” and give it a name. (Keep in mind that all style names must be unique throughout the Theme, so make it something likely to be unique as well as short and obvious…like “Img Trash”)

- Now save your changes to the Theme…there should be a red triangle next to the Theme, click it and select “Save Changes to Theme” and save when prompted.
Now any time you want a trash icon, following our example, you can draw a rectangle the size you need it to display and select the Style “Img Trash” from the Styles tab of the inspector.
The image is actually saved in the FileMaker file and referenced as part of the underlying CSS. In that way, it stores only one copy of the image and references it everywhere that style is used in your Theme, as well as on every layout that uses that same Theme. I have also found it best to use PNG images, as the transparency of the image is preserved.
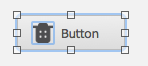
This make it easy to place image where needed, in this example, I have a button object that I added 24 pixels of padding the left side to make room for the icon, and placed the image on the button.
I mentioned switching between Themes, this works if you have the same named Styles saved in each of the Themes you switch between. Sticking to a naming convention, like starting each Style name with a prefix, e.g. Img Trash, Img Add and Img Link. That way they will all sort to the same place in the Style tab of the inspector, making it easier to find and select the correct image you want to place. Keep the name short so you can find it in the inspector as well.
This is only one of the ways in which FileMaker 13 makes developing more efficient and frankly, more pleasant. I hope that you find it useful as well!